This post may contain affiliate links.
Now that our National Parks Tour is wrapping up, we’ll soon be back to rolling in our “regular” Class B, Lance. We’ve had Lance sidelined most of this time – though we have taken him out for day trips on occasion.

Lance’s forecast calls for open roads and clear skies!
I can’t tell you how much this excites me, for a number of reasons. First, there are the things that had already been done to Lance that you just can’t get in a “regular” Travato, no matter how cool it is. I’m talking about things like:
- Automatic hydraulic Leveling System
- Air Suspension System
- 7.3 cubic foot refrigerator freezer
- And THE ABILITY TO STORE BIKES INSIDE
And those are all cool. But there’s one more thing Lance has that I’ve really been missing… THE ABILITY TO MOD! You see, while we did negotiate a few, reversible mods with Winnebago before taking Parky on loan, we really weren’t supposed to be modding it out. As a result, my mod gene hasn’t been expressing itself lately. That’s about to change.
Here’s a sneak preview of some of the mods that I’ll be doing to Lance in the next couple months. While it’s true that none of these are of the magnitude of the refrigerator replacement project, these are nonetheless things that have been on my mind. I’m glad now to have the free reign to tackle them. Here we go:
Insulate the “Pizza Oven”
This is by far the biggest and most involved mod I’ll be doing, and it corrects one of the biggest problems with the ProMaster as a Class B chassis. If you’re not familiar with the “Pizza Oven”, it’s the nickname not-so-fondly given by ProMaster owners to this area above the cab
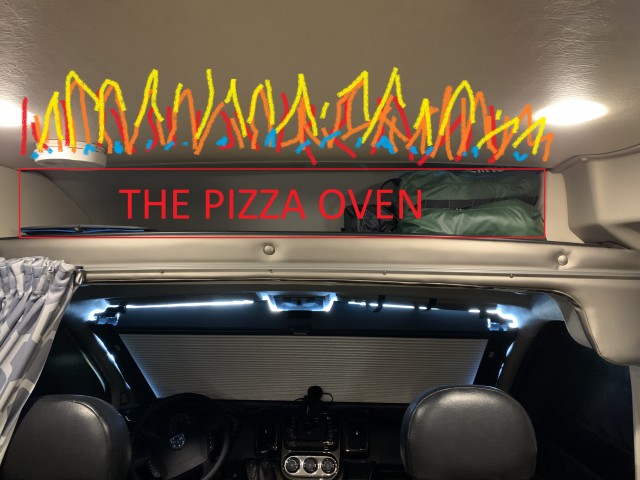
Check out my mad MS Paint skillz!!
“Pizza Oven” is an appropriate nickname not only because of the shape of the area, but also because of the temperature. In the summer, it can get BLAZING HOT up there. Well, I aim to change that by adding some sound deadening and insulation. I’ve already got the insulation
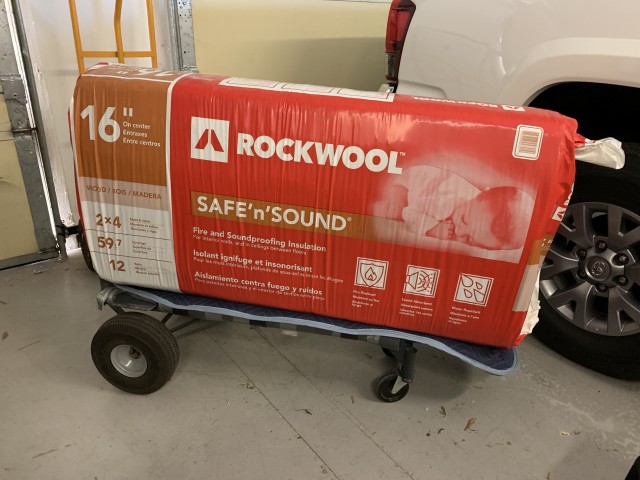
OK. So maybe I overbought.
I’ll be installing some RockWool (formerly Roxul) insulation, which has proven to be a popular and durable choice for Class B owners and DIY van builds. I’ll also be installing some FatMat sound deadener where it makes sense. This is such a big job; I’ve arranged for a second Travato to do at the same time. I haven’t yet told the owner that I’ll be learning the process on their rig, and then doing it for reals on mine.
In the end, this will make it quieter and cooler in Lance, but until we get there, there’s a weekend of swearing and cutting myself on sheet metal somewhere in my future.
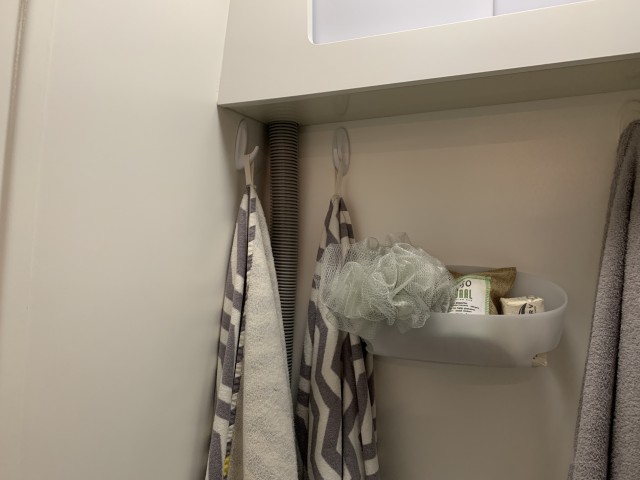
Re-work Rear Storage Area
Years ago, I made a video of adding some rear storage to the back wall of Lance.
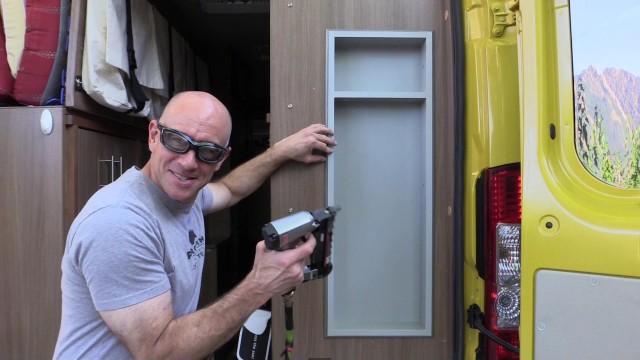
That storage has been nice, but it hasn’t been something we’ve put to very good use. I aim to change that. The main reason we haven’t used it much is because the shelves inside it are very narrow. Just a couple inches wide each.
Well, recently, when I was modifying the rear storage area on someone else’s Travato, I realized I could extend those shelves out past the rear wall. There are still a few inches there before you run into the rear door. With the shelves thus extended, it opens up possibilities to store some larger bulky items there. So that’s what I intend to do.
(I may change the color as well… The grey doesn’t really go.)
Pump Switch in Bathroom
We never use the pump switch at the rear of the van. At all. Ever. Like… I don’t even really know if it works. We don’t use it because we don’t use the exterior hose ever. It’s in the box of “Lance Parts that Didn’t Make the Cut”. What can I say. I guess we’re just not big fans of squirting our fresh water onto the ground.
Well, since I’ll have the back of the wall opened up, I’d like to move the switch from here
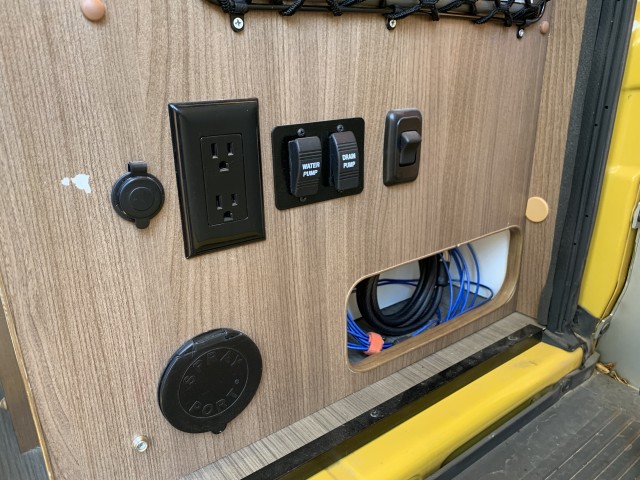
I’m totally serious. I can’t remember if I’ve ever touched that switch.
To here
Exact location TBD.
I haven’t decided yet if I’m going to add a second switch, or just move the original one. That probably depends on what parts I can find. But whichever way I go, it should be super simple, and it will cut down on those awkward “Honey, can you turn on the pump” calls through the bathroom door.
Install Refrigerator and Freezer Temperature Monitors
This is such a little thing, I almost didn’t even mention it. But I’ve had this sitting in my shop for about 6 months now.
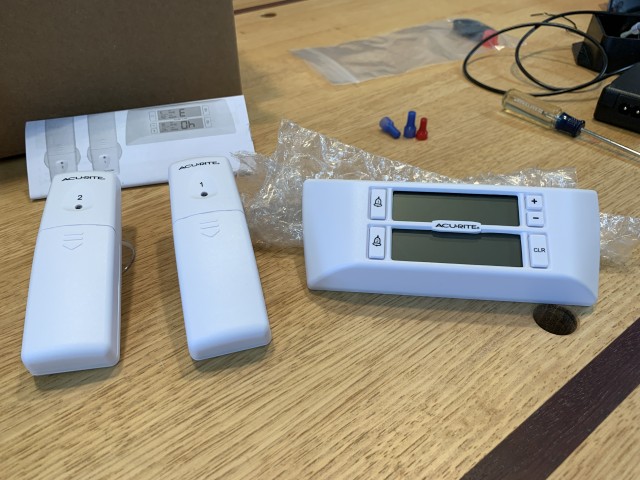
It’s an AcuRite 00986 Refrigerator Thermometer. The idea is that it can monitor the temperatures in your RV’s refrigerator and freezer. Other people have reported problems with their compressor-driven RV refrigerators not being able to keep up. I don’t think we’ve ever had the problem (because I paid attention to venting when I installed it). But it’s possible that we DO have the problem and I just don’t know about it because we’re not monitoring it very well. Hence, now we’ll have a monitor (with alarms!).
I intend to get this hooked up and working – though that mainly consists of just installing batteries…
Fix Cab Curtain
Years ago, I made a curtain for the cab of Lance that could be used even when the seats are turned around. It makes kind of a big “tent” area out of the cab.

Just looking at this picture makes me want to go get in the RV…
But here’s the thing. Ever since I installed the Remis Cab shades… it doesn’t work like that anymore. I can still pull it straight across, yes. But the Remis shades required changing out the sun visor mounts, and they no longer work with the magnets on the curtain. I’m going to fix that. This fix will probably involve mounting some magnets on the visors themselves. So the visors may come out looking a bit weird. But it will give us back our cab curtain, which we had really grown fond of.
While I’m Looking at Window Coverings
I’m also going to do something about the curtain on the slider door. Yes, the curtain we have on there works just fine, but…
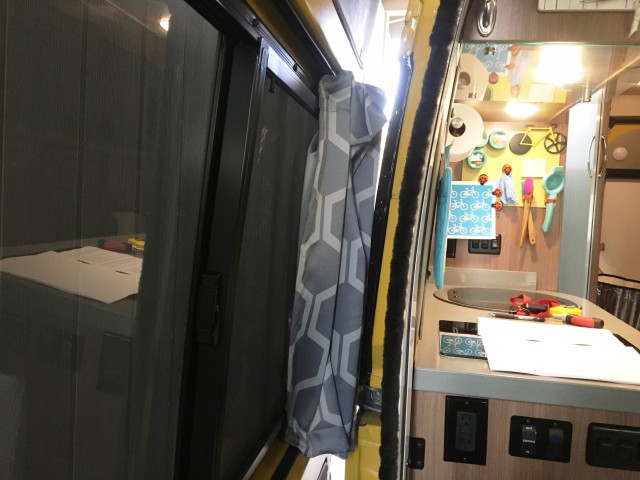
Dirty Van = Dirty Curtains. Less than ideal.
With the curtain open, it bunches up and drags down the side of the van when you open and close the slider door. Not good! So I’m going to be doing something about that.
I’m also going to take a good hard look at the rest of the window coverings in Lance. Some of our windows are just covered up with a MCD shade. I want something with better light-blocking and insulating capabilities. I’m going to look to Vanmade Shades. We’ve used them on Parky for these past few months and have really liked them. Look for more of their shades in Lance soon.
Back Door Woes
Over the years, the rear doors on Lance have become misaligned. As a result, there’s now (depending on how I close the doors) a gap between the seals that I can see light through.
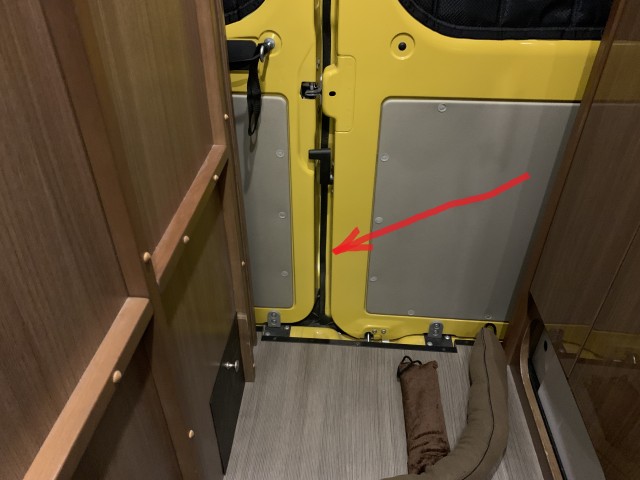
OK. Maybe it doesn’t look like such a big deal in this picture…
But look at it when I turn the lights off!

Yes. This is a photo of Lance’s crack.
Obviously, this ain’t good. Besides letting in light, a gap like this will also let in heat, cold, dust, dirt, and SAND! OH LORD, PLEASE, ANYTHING BUT SAND!!! (Not only that, but the rear doors SQUEAK! Gah!)
I’ve dealt with that for long enough. I’m going to fix it, and it will be a two-step process.
First, I need to adjust the doors themselves. For that, I’ll need some large Torx drivers. Once I’ve got them adjusted as well as I can, then I’ll go back after it with some weatherstripping to seal up any remaining gaps. It’s a good afternoon project.
There are other things I intend to do as well. Sanitize the fresh water system. Replace the cabin air filter. Re-Grout the shower area. Replace some peeling decorative stickers. Etc. etc. etc… But the ones I’ve outlined above are the only major (or semi-major) projects I have on tap for the coming weeks.
You’ll see ‘em when I do ‘em! Cheers!


What are your thoughts on an Espar heater?
I think they’re a great idea.
Am I considering one for Lance now? Not really.
For me to really consider it, it would have to heat the water as well. And even Safari Condo – who uses the Espar in their coaches – have an Aqua-Go for water heating (so they still need propane).
James,
I watched the video and am wondering if the minor lift is noticeable? Do the air bags provide any leveling capability?
I ask, because I’m planning a trip two Alaska and don’t want to bypass places; because of skimpy ground clearance.
BTW, please give my apologies the Stefany. I’ve been consistently misspelling her name.
Thanks in advance,
Bill
We don’t really notice any lift… but we had Sumo Springs prior to that.
The airbags do provide a small amount of leveling capability, but you have to do that manually. It’s not an auto-level.
(If you were the first to consistently misspell her name, I’m sure Stef would have noticed. But you’re FAR from the first!)
FYI – Someone on the FB Travato page just posted about the same issue with the rear doors and wondering how to adjust better. While you fix yours, you might consider a video “how-to” while you’re at it. I have read others having the same problem.
That’s the plan!
Hi James,
I first want to say how much you have been an inspiration in some of the mods I have made to my 2019 70B ERA. Thanks! I also have the pizza oven and look forward to correcting that problem. For the weatherstrip problem, or as you call it; Lance’s crack!! I know that my son repaired his door weatherstrip by a method of filling the void that 90% of all weatherstrips have and will rejuvenate and seal much better with low cost. My son used a rubbery surgical tube of some sort. Here is a youtube video that I just happened run onto that could spark your version of a better seal. Hope this helps! https://www.youtube.com/watch?v=rv9Tr6USqsU
Well, like most folks, my first thought was to just go down to the hardware store and pick up some weatherstripping.
Thanks for the suggestions. It’s definitely food for thought!
I suppose I’ll wait and see how far I get by readjusting the doors first, and then we’ll see what kind of gaps I have left.
But non-standard materials are on my list now.
Thanks for commenting!
Lance’s crack I’m rolling on the floor!!!
This past summer I added and extra water pump switch to my Trend. Winnebago uses a pump controller, so all I had to you do was use a DC wiring tap (like what you used on your Maxxair fan light shade) to attach the indicator light wires and the momentary pump-state change wires. Very simple and does not require removing the old switch. Since it is a momentary switch there’s no real current concern, and the indicator light is just a 12 volt circuit that will draw whatever your indicator light in your new switch wants to draw. I used an LED equipped switch so that current is very low. Waterproof momentary ono-when-pressed 5 amp switches in stainless steel are very inexpensive on Amazon, like $8. Existing switch has 4 wires, two of them when connected change the pump State and the other to provide 12 volts when the pump is on.
I’d replaced the main pump switch before (when I ditched our OnePlace panel) with a momentary rocker switch.
But if you’ve got a link for a favorite, I’m always up for something new.
I was just going to move the switch because I’m feeling lazy. But thinking about it, the wires probably aren’t long enough to get them where I need to go. So I’ll be rewiring in any case.
It’s quite easy to tap into the wires to the rear switch to add a lighted momentary switch. There is a posted procedure with parts and wiring diagram in the FB Travato group files and I have my own version I can send. you. You could also put a switch on the galley wall to have it convenient to both the bathroom and sink the way Daniel S. did.
If you’ve got your own procedure, I’d be interested to see it.
I’m also still looking to source the switch itself – have any recommendations?
James,
Do you know if the pizza oven area received some of the added insulation they started using in the 2020.5 models?
I’ve been told… yes!
James – I may be a bit ahead of you on the cab roof insulation process. There are a couple of tricks to getting the headliner loose, which Marlon Knox has discovered, but it is a painful process involving dropping the forward part of the ceiling to expose the headliner fasteners. I’d advise that the space up there is extremely thin – about 1″, and that Roxul is NOT the insulation you want to use over most of it. You can install Roxul in the corners once you pop off the covers and work out the hard foam inserts at the sides of the tray. I’m using Thinsulate SM400 over some CLD for the majority of the panels. Have you seen the pictures of that area on the web?
Hi Shaun –
Haven’t seen any pictures yet. I’m still in the planning stages. If you know of somewhere where this has been posted, do tell!
I actually figured on the space being pretty narrow – that’s why I got the more dense Rockwool. I just planned to cut it to an appropriate thickness before installation (giant bandsaw? could be fun!).
I have two coaches to do, and I have some other insulation projects in mind, so the big bale made sense. Thinsulate is good stuff, but considerably more expensive.
I did some pretty deep searches on the various DIY sites and came across a good thread with pictures. I’ll see if I can dig it up again and send you the link.
You’re using SafeNSound, which is a denser Rockwool and so will stay together better than Comfortbatt if you slice it. Thinsulate is just easier to tuck down behind the headliner.
Great to hear that WGO insulated the cab roof area. If it’s not done before the ceiling goes in, it’s bad hot place hard to do it afterwards.
Now, if you could get your hands on the precut WGO squeezyfoam for that area, that would be optimally awesome.
Here’s the big one…there are others
https://www.promasterforum.com/threads/insulating-above-the-cab.53906/
Hi James –
I love your website, and enjoy your mods! I see you have a nice looking set of monitors for your fridge. I had similar concerns, and went with a monitor called SensorPush. It is slightly pricier, but alerts you on your phone via bluetooth. It is really accurate, and allows you to download the data to show your fridge manufacturer exactly how well or poorly it is doing. This led me to add 3 small fans to my fridges cooling fins, which has worked pretty well so far. If you aren’t totally set on the ones you have, check it out!
Thanks again for Steph and your hard work on the site!
Well, I’m outside the return window for those fridge monitors.
If I find there actually is an issue and I want to dig further, I think I’ll pick up the one you mention.