This post may contain affiliate links.
Have you ever had a “bike fit?” Bike fits are when an expert spends an afternoon with you adjusting your bike, measuring you in weird ways, and doing a bunch of math problems all to ensure you can ride your bike most efficiently and with the least risk for postural injuries. Serious cyclists will fork over hundreds of dollars for a bike fit without batting an eye.
It dawned on me, as much driving as we do in the RV, someone should offer “RV fits” in the same way. We RVers can pull some looong driving days, am I right?! Without proper posture and seat adjustments, we’re just as vulnerable to aches, pains, and injuries from being behind the wheel as bicyclists are.
‘RV fits’ aren’t a thing yet, unfortunately. But! The good news is: we RVers are used to DIYing! In that spirit, I’ve included everything you need to DIY your own ‘RV fit’ right here. The best part is, it won’t cost you hundreds of dollars!
DIYing Your Driving Posture:
Driving posture is all about 3 things:
- Protecting your joints
- Protecting your circulation
- Protecting yourself in the event of an accident
Those are your 3 goals when adjusting your seat and steering wheel. When it comes to your joints and circulation, your goal is to keep your joint angles more open and closer to neutral. When you’re too flexed in your joints, your circulation isn’t able to flow as efficiently. The steps below take this into consideration, ensuring your joint angles are open and supported enough to avoid excessive strain without compromising your driving safety. Now you that understand what we’re going for, let’s get to setting up your seat!
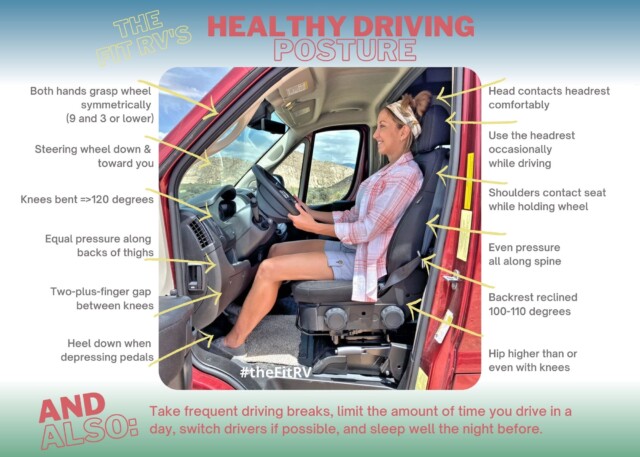
STEP #1: Adjusting Your Seat’s Distance
Move your seat forward enough so that you can keep your heel down when depressing the pedals. Don’t be too near the steering wheel though, because both your seatbelt and your airbags need space to react in the event of an accident. Also, make sure your knees are bent around 120 degrees. Anything less than that decreases the circulation in your legs.
STEP #2: Adjusting Your Bottom Seat Cushion
Your knees should not be higher than your hips, and should either be in line with your hips or lower. This helps open your hips more and decreases any strain. If your seat doesn’t have adjustments to raise your hips, consider adding a wedge cushion. Also, make sure you’re feeling equal pressure all along the back of your thighs, and especially pay attention to the amount of pressure you feel behind your knees, as that’s a vulnerable spot for cutting off circulation. A good rule to remember to avoid this is to allow at least a two-finger gap. Take two fingers and put them in the back of your knee to make sure you have open space between your knee joint and the seat. If you are petite and cannot get the two-finger gap, consider trying a back rest cushion.
STEP #3: Adjusting Your Back Rest
Recline your back rest to around a 100 – 110 degrees angle. This decreases any pressure on your spine and opens your hips for better circulation. While you might be tempted to recline it even more than that, doing so places undue strain on your neck. Hopefully your vehicle has an adjustment for lumbar support as well. If it does, adjust it until you feel even pressure all along your spine. If you don’t have a lumbar support adjustment, you could try a lumbar cushion.
STEP #4: Adjusting Your Steering Wheel
Adjust the wheel down and towards you to lessen the strain on your shoulders, neck, and upper back. Ideally, you want your shoulders to be in contact with the seat back as you’re holding the wheel. If you’re like me, you were probably taught 10 and 2 is best hand placement, but really, to lessen any strain on your upper body, it’s better to hold on at 9 and 3 or even lower if you can do so safely. It’s also good practice to keep your hands symmetrical and avoid driving with one hand on top. Driving with one hand on top may feel harmless, but it slightly takes your spine out of neutral alignment. A long drive even just mildly misaligned like that could make you vulnerable for aches, pains, and even injuries.
STEP #5: Adjusting Your Head Rest
This one is easily neglected but it’s especially important for safety. Adjust your head rest so the top of it comes between the top of your head and your ears. Ensure the back of your head comes in contact with it comfortably. Also, do try to use it occasionally when driving along if you can, as it takes some of the strain off of your neck.
There is, however, a caveat to all this: SEAT DESIGN.
Drivers’ seats are ergonomically designed for an average sized driver, so anyone on either extreme of average height will have more of a challenge. When you can’t get your seat adjusted comfortably, it’s even more important to stop frequently during your long drives, and make sure you’re limiting your overall driving hours in a day. We all should be doing that anyways, but it especially holds true for extremely tall and petite people.
So there you go. I hope you’ll give these adjustment a try. After all, ending our drive on a high note is what we all hope for. We want to step out of the vehicle feeling energized, healthy, and ready to enjoy the adventure!
Happy RVing, all!
Author Note: A version of this was featured in RV Magazine in the August 2021 issue. I write regularly for RV Mag, to subscribe, CLICK HERE!


Hmmm. So ef’fing around until it feels right is not acceptable any more. What is the world coming to!
Actually, on long trips (think boredom) I am changing around the electric seat (all ten points) all the time. Just to see the difference. AND, the difference? I stay more awake, for one…
And two? Hmmm.