This post may contain affiliate links.
Ask any veteran RVer, and they’ll tell you: Things can and will go wrong with your RV.
It’s unfortunate, but not really surprising, especially once you consider you’re basically bouncing a house down the road. Luckily, the problems are usually minor. The key to enjoying your RV for years to come is to catch these problems, and deal with them, while they’re small. Because really, it’s a lot easier to deal with a 15 minute maintenance task in your driveway than it is to deal with a heavy-duty problem in a remote campsite.
In that spirit, here are three easy inspection and maintenance tasks, based on some of the most common issues coming into the Good Sam tech hotline. The good news is, none of them are difficult. I recommend tackling this set of inspections a couple days before you’re scheduled to depart on your RV trip, so that you’ve got the time to fix any issues you uncover.
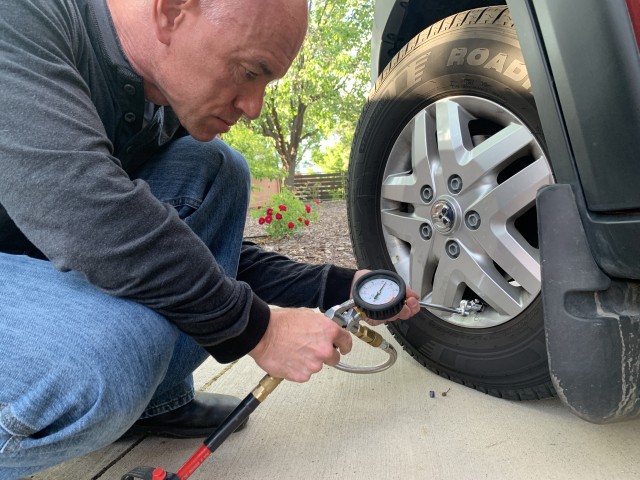
Inspection Item #1: Your Tires
Motorized or towable, the one thing all RVs have in common is tires. Nothing ends a vacation quicker than an RV that won’t roll where you want to go, so checking your tires should be at the top of your list. Rolling on poorly maintained tires is unsafe, and can lead to blowouts and tread separation, which are far too common on RVs. So, what do we want to check?
a) Tires should be properly inflated. You’ll need a tire pressure gauge to do this, and an understanding of how to use one. Your RV’s manufacturer should have put a label with the recommended tire pressures in your RV. Make sure your tires are inflated to those specifications, unless you want to do a weight-based tire inflation like I describe here. This is key – inflate them while they’re COLD! That means they haven’t been driven for several hours. Why is that? The pressure in your tires increases with heat. You don’t want to inflate your tires while they’re hot because they will cool down and the pressure will drop, leaving them underinflated.
b) Do a visual inspection. Obvious problems like side wall bubbles or tread separation are easy enough to spot and need to be fixed before travel. But be alert to more subtle problems as well. Do your tires seem to be wearing evenly across the tread? Are the sidewalls checked or cracking? These could be signs of a looming problem and should be evaluated and dealt with.
c) Check the date codes. Here’s the funny thing about RV tires. Most of them don’t wear out – they AGE out. Many RVs travel only sporadically and spend most of their time outside. Age and prolonged exposure to the sun’s UV rays causes the rubber compounds in tires to deteriorate over time, regardless of the miles driven. Fortunately, it’s easy to check the age of your tires. There’s a DOT code stamped into each one. It should be four digits: the first two represent the week the tire was made, and the last two represent the year. So, a tire with a DOT code of 0716 would have been made during the 7th week of 2016. How old is too old to be safe? The general consensus is that after seven years, your tires should be replaced, regardless of the tread left or the mileage on them. It might be hard to part with a tire that still looks good on account of its age, but it’s the safe thing to do. Just like a rubber band that’s gotten too old, you don’t want your tires failing when you try to use them.
Inspection Item #2: Your AC Power Cord
Your rig’s AC (Alternating Current) power cord is its electrical lifeline. This cord is responsible for bringing AC power – normal household current – into your rig. But unlike your house, which is permanently connected to the electrical grid, your RV is designed to be connected and disconnected to the grid via the power pedestal. That makes your power cord a moving, working part. And one that sees its fair share of abuse and exposure to the elements.
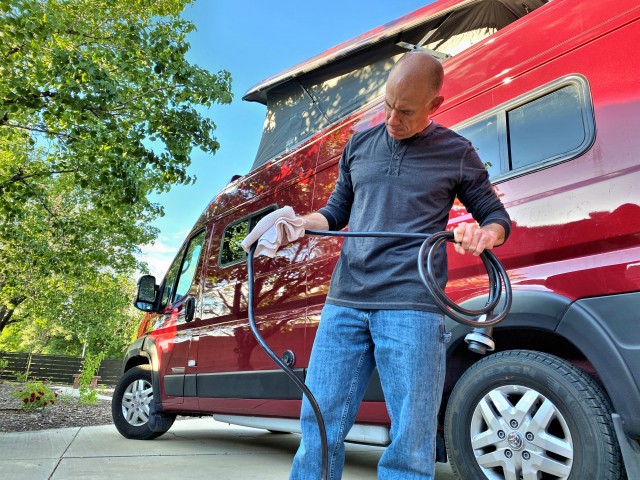
It might seem like a simple thing, but routinely checking your rig’s AC power cord can keep you from encountering a number of issues, ranging from the simply annoying to the downright dangerous.
a) Do a visual inspection: With your power cord unplugged at both ends, carefully check the entire length of the cord for cuts or scrapes that penetrate through the outer layer of insulation. Even if you’re certain you’ve never damaged the cord, can you say the same for the mowers and weed whackers of the RV park landscaping crews? Minor cuts and scrapes are OK, but anything that exposes the wires inside likely calls for a new power cord.
b) Check it can make and maintain a proper connection at both ends. Loose connections, particularly at the ends of the power cord, are dangerous because a poor electrical connection will heat up, and can lead to melted wiring, or in the worst case, a fire. You’ll want to pay close attention to the prongs and the sockets of your electrical cord. The prongs on the male end of your cord should be straight, and able to maintain a tight connection. A prong that’s slightly bent can often be straightened with a pair of pliers. But a prong that’s bent to the point of separating isn’t worth trying to save, and it’s time to just get a new cord. If the prongs on your cord look OK, but are covered with corrosion, use some fine grit sandpaper to gently clean them off to ensure a good connection. Take it easy with this – you’re not trying to remove material from the prong, just to clean off the surface gunk. The female ends of your power cord are more difficult to inspect, but the main thing you’re looking for is evidence of a bad connection or short. Burn marks, scorching, or melted plastic should be giant red flags. If you find any of these, it’s time to discard that cord, and have the other end of that connection (your RV’s electrical input) evaluated by a qualified technician.
Inspection Item #3: Your Sealants
Water intrusion in your RV can cause a lot of damage in a short amount of time. When you get a leak, you need to address it right away. I’ve had it happen while we were on the road, and trust me, a window leaking on to your bed, at midnight, in a Texas-sized rainstorm is NOT something you want to deal with on the road.
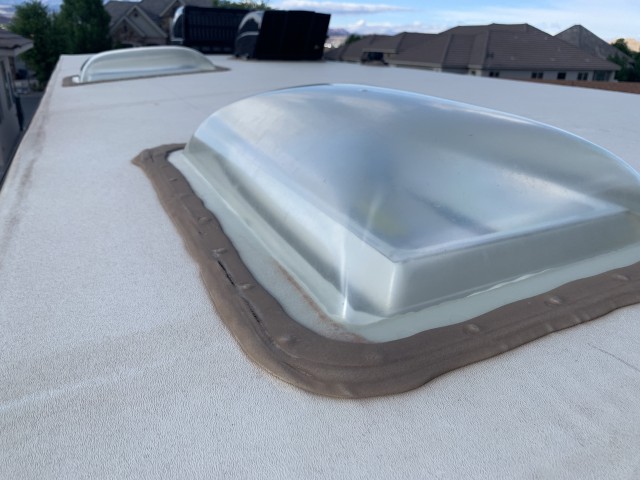
Taking a few minutes to inspect the sealants on your RV before hitting the road is a very smart move.
a) Inspect Your Roof: First– be sure you can get onto your roof SAFELY. If not, take your RV to an appropriate repair facility. Your RV may have a metal roof, a rubber roof, or even a fiberglass roof. But the one thing they all have in common is that they have things mounted to the roof that are sealed up with lap sealant. You’ll want to inspect all the seals on your RV’s roof: Around the edges, around the vent covers, TV antennae, every place you see sealant, have a look. If water can find a way to get into your RV, it will. So, what you’re looking for are cracks and separation in the old sealant. These are places where water can get in. Fortunately, in many cases, you can apply new sealant directly over the old. You’ll need to select a product that is compatible with both your roof surface and the existing sealant. Simply clean up the old sealant (soap and water works here) so that you can get a good seal. Once it’s thoroughly dry, use a caulking gun to apply a bead of new sealant over the old, sealing any gaps or cracks you’ve found.
b) Inspect Your Windows and any Side-Wall Penetrations: If you have sealant around the windows of your rig, you’ll want to check those as well. (That’s what got me in Texas!) Also take a few minutes to look at any penetrations on the side walls of your RV (hose ends, power outlets, etc.), as those can have sealant as well. A few minutes with a caulking gun before you leave might just save your vacation!
SO, THERE YOU HAVE IT. Those are three simple inspection tasks you can tackle before your next trip that will keep you from encountering some of the most common issues RVers face. Taking the extra time to check these things out will help you make sure minor problems stay just that: minor.


