This post may contain affiliate links.
We’ve been “Zinglered”!!
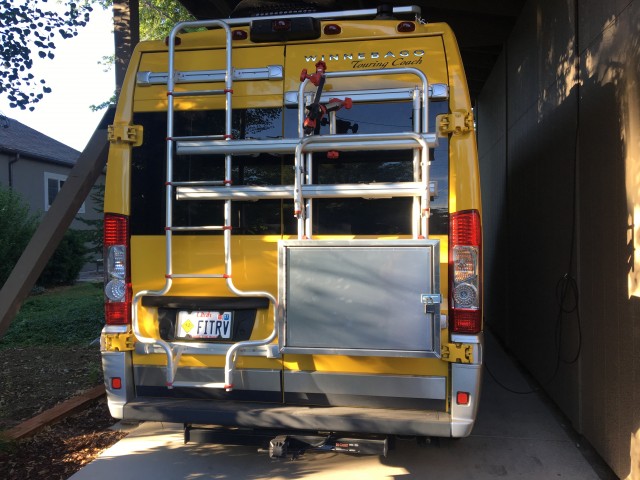
I wish I could take credit for the idea for this mod, but I can’t. The original idea comes from another Travato owner and all around nice guy named Dennis. I don’t remember where I saw it first, but it may have been the Travato Owner’s Group on Facebook (which, for those of you who own Travatos, is a great place to get ideas, inspiration, and help).
Dennis’ original box was a custom aluminum fabrication that mounted to the Fiamma bike rack when the bike trays are in the upper position.
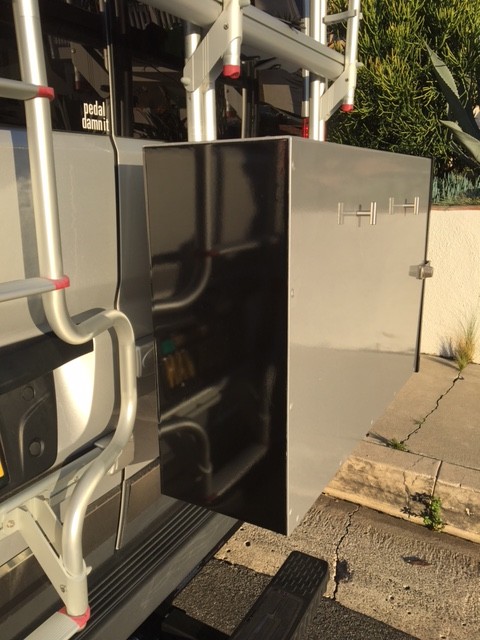
After seeing pictures of this box, and then inspecting it in person (at the Sea Otter Classic), I set out to have one of our own for Lance.
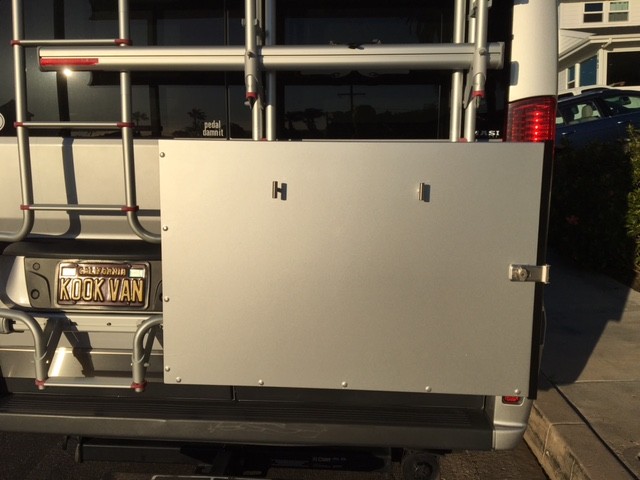
I don’t weld (yet), and I don’t have large brakes and presses (yet), so I had to outsource the box construction. I eventually wound up at Image West Metals in Salt Lake City. I took Lance there, gave them all the measurements, and then had to wait. Waiting is difficult for me.
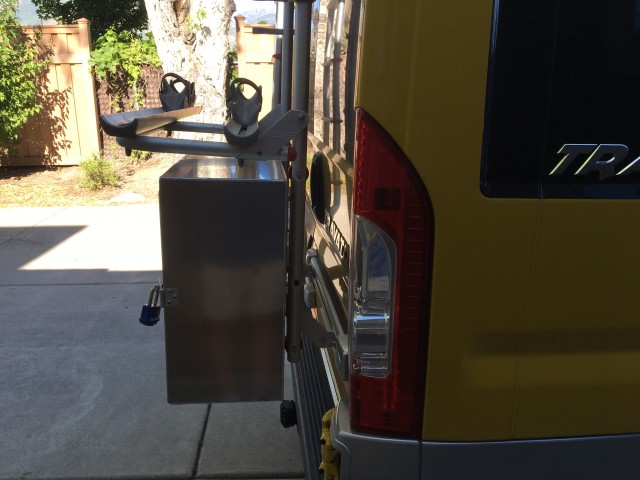
But eventually it was ready, and here it is:
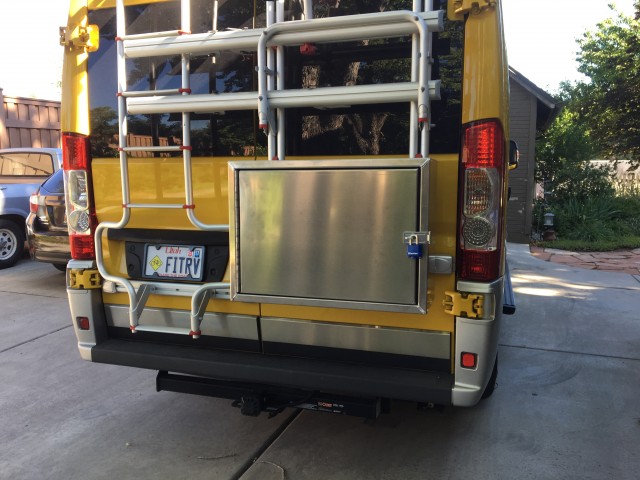
The box is made out of .10” aluminum sheet (just less than 1/8 of an inch). It weighs maybe 10 pounds empty. The exterior dimensions of the box are 27 ½ x 19 5/8 x 9 7/8 inches. Those weird dimensions are actually nice round numbers when you convert them back to metric. (Remember, the box was made to fit an Italian rack.)
To attach the box to the rack, I used two ¼” stainless steel bolts on each of the two rack uprights. Four bolts total. You need to use a spacer between the rack and the box so that it clears the plastic bits on the rack. Drilling through the rack was a lot less difficult than I thought it might be.
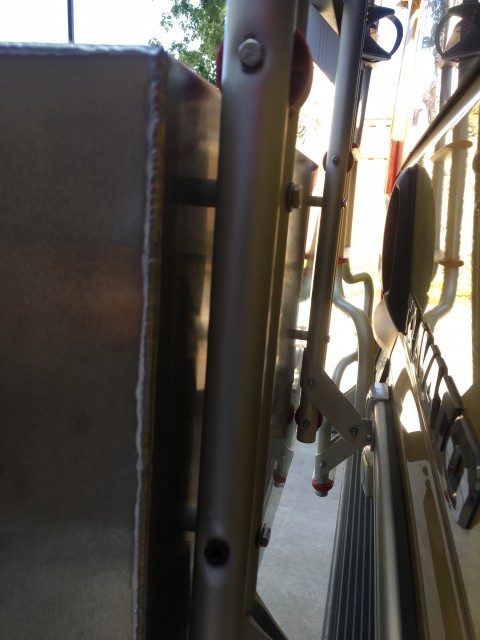
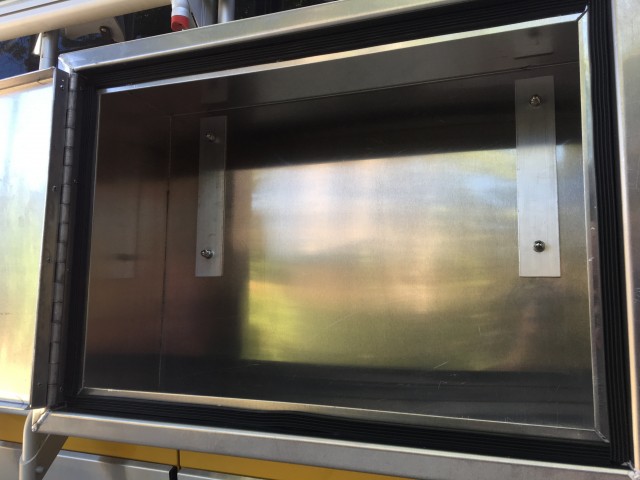
Inside the box, besides washers, lock washers, and cap nuts, I backed up the holes with 1/8” aluminum bar stock, which should keep the bolts from trying to pull their way through the metal. Apart from the drilling and torquing bolts, there wasn’t much else to do to install it.
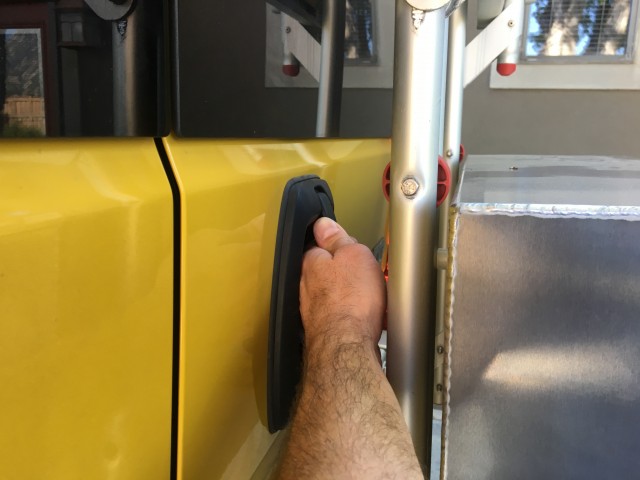
My design for the box does present one issue with the back door though. It covers up the handle, so you have to reach in from the side in order to get the rear door open. Like this:
In Dennis’ original box, he had the box open from the end so that he could rig up a cable extension to open the door.
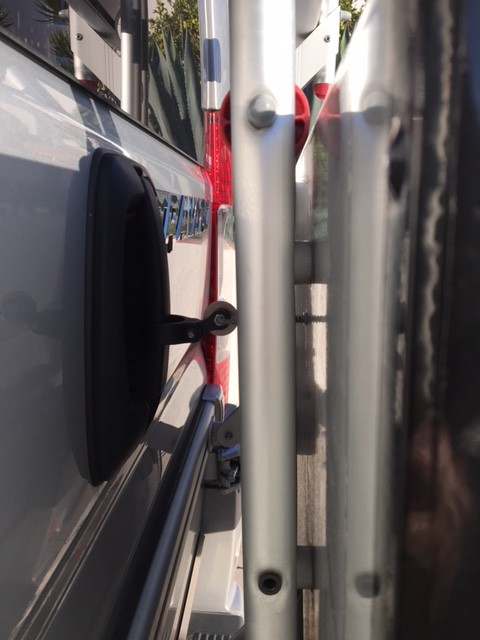
I thought about duplicating that, but decided I really wanted the wide opening door, so I’m just dealing with it for now. But I admit, it is a pain.
So that’s the box. What are we storing in it?
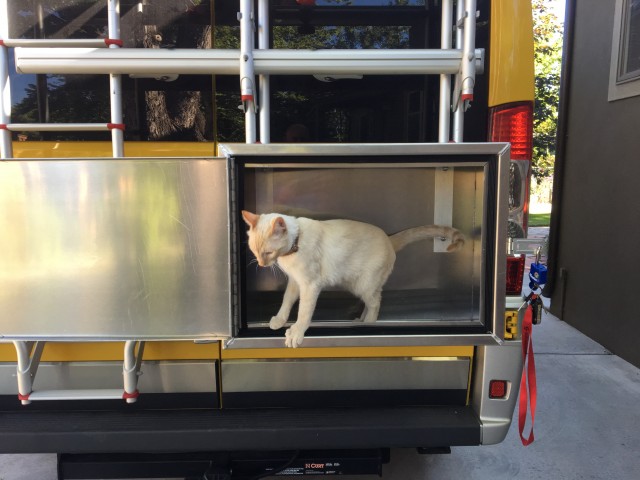
Well, Stef has been saying that she wants to bring Mel along on our trips.
But more seriously, I’ve been keeping all the “outside” stuff in it. Power cords and adapters. Leveling blocks. Water hoses. That kind of thing. Oh, and our mountain bike shoes because those are usually muddy.
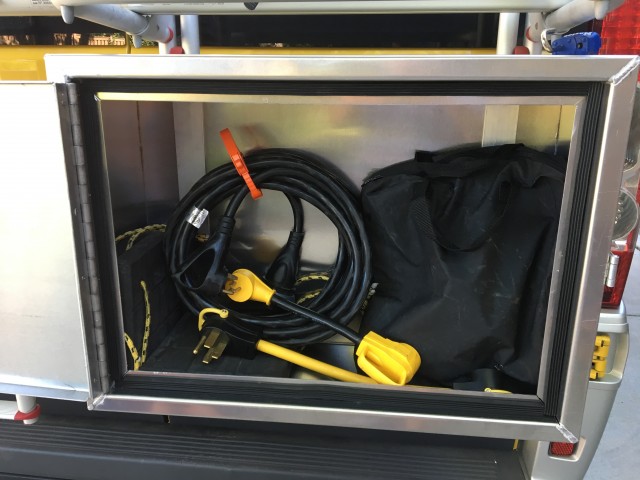
And that’s about it! We’ve been rolling with it for a few weeks now, and it shows no worse for wear.
Since the initial install, I did add some gasketing around the door. And then after I took it to a car wash, I realized the gasketing didn’t work all that well, so I drilled drain holes in the bottom. But other than that, it’s been a peach.
This wouldn’t be too difficult for any sheet metal fabrication shop to crank out, if you were interested in having one made yourself. But as a one-off, it was kinda pricey…
Anyway, that’s it! Until next time…
James




I was looking for something like this all over the internet! What do you think about the weight rating, do the Fiamma 60kg weight limits apply to including the box, too? I am thinking about putting a propane bottle in the box, this would cut it awfully close to the weight rating.
Yes, you absolutely need to consider the weight of the box and its contents as part of the weight limit on the whole rack assembly.
I have watched and enjoyed many of your videos. I have yet to see what you do with your waste hose on the Travato 59G. Are you using the stock lousy 10″ hose, ore something else and where do you store it?
Remember, in Lance, we have a composting toilet, so all we’re dumping is grey water. It’s not that bad, and we’ve never needed more than the supplied hose.
Really nice! I was thinking of something similar with some changes. I have the 2019k, and I thought it would be great to have it close around the ladder on the left to keep the ladder secure, so people aren’t just climbing up your rig when you are away. The other side could then be free for spare. No bikes here. 🙂 Not really sure how to make it happen.
I think the box is close enough to the ground that the “ladder cage” aspect wouldn’t really be practical. And if someone really wanted on top of your rig, they would just bring a ladder.
You might be able to work out some kind of “swing away” design in front of the ladder though. That might be more practical than the ladder-throuh-the-middle-of-your-box that I’m envisioning.
(Of course, it’s entirely possible I’m not grasping your vision properly…)
Greeting James and Stef,
Proud new owners of the new 70B Era (named Wall-E the Winnebago) and are loving it. We bought it with the bike rake and we use it for our two E-bikes. It is a great rack. On Saturday we saw a Travato drive by with two bikes on the back (no it was not Lance) with a cover over the both bikes. Since the bike bag completely obscured at least one of the turn signals, they had a temporary LED turn signal/brake-light bar that looked between two and three feet long and probably 4″-5″ wide that they hung on the rack. I’ve been looking for that turn signal ever since with no luck. Wondering if you knew of such a accessory? On the Era the bike rack sits a little lower and I was already concerned about bikes obstructing the signals without a bag.
Also, just wanted to thank you two for giving me the confidence to do some small mods to Wall-E. I installed a cargo box on the top but had to move the solar panel to make room. Since the new home for the solar panel was at the very front of the roof rack, I was worried about wind coming off the windshield and hitting the underside of the solar panel. So I did my best James impersonation and quickly added Plexiglas to the bottom of the frame. Worked like a charm and next I will attempt to fabricate a fairing like you did on Lance.
Thanks Again!
Mike
You’re one step ahead of us. I’ve never been able to even find a bike cover that I could tolerate for bikes on the rack! Finding the tail light bar would be phase two. Sorry, don’t have any recommendations for you on that one.
And CONGRATULATIONS on your rig! If I had to pick a mod for a “first timer”, the fairing wouldn’t be the one I would have guessed, so good for you! You’ll find it helps with wind noise quite a bit – compared to other folks’ Travatos that I’ve ridden in.
I have a feeling that this mod won’t be your last. 😉
Cool box!
You said that you don’t weld (Yet) Check out this guy’s Youtube Channel if you ever want to take the plunge. Combining your mad woodworking skills with metal fabrication and welding would make you a triple threat!
Cameron
Forgot the link: https://www.youtube.com/channel/UCqq70AnPkj4-UApS_m_6mPw
Thanks for the reference. I’ve thought about community college welding classes from time to time. I’m just pretty busy these days!
http://nicova.ca/en/product/
Have you seen this Great storage box, bigger, holds 2 bikes on top, swivels out of the way. Made & sold only in Canada tho?? Expensive about 2,800.00 Bucks
But NICE
Interesting and nice looking box.
We’ve never considered hitch-mount boxes before because we don’t want to make our rig any longer.
(Plus, I’m sure I’d smack it into something backing up…)
I’m late to this discussion, but another RV vlogger with a B van said that they had to remove their Hollywood bike rack and 2 Rad Mini ebikes in order to go up the Going to the Sun road in Glacier with its hairpin turns and tight walls. The limit is 21 feet – just the length of their van minus bikes – and it IS enforced! So it’s good to know where are you think you might want to go. That box is nice, but it’s 100 pounds. No way my husband and I could get it and 2 folding ebikes inside our Travato G.
We don’t have this RV anymore, but the box is nowhere near 100 pounds. It’s closer to 20.
James! Love the box! But you are still not making full use of your valuable space! Would you be interested in having OrganizedObie.com do a follow up with your new additions? We can help with the new shelf you put in the back too. (Contacting you on behalf of Jason) Keep em’ on the road!
Well, I’m always interested in ideas, Steven.
I’ll send you an email and see what you had in mind.
Nice James! I want one, but might look for a prefabricated substitue first.
Interstate, That’s depressing. We have never had to give more than a momentary thought about theft where we are. Naive or lucky maybe. I would think that some of those “outdoorsy people” enjoy firearms as well.
It’s a beautiful job, and hopefully nobody will attempt to obtain a five-finger discount on it at your expense, because that aluminum looks like money waiting to transmute itself into someone else’s pocket. Last year, my husband designed and fabricated a custom hitch carrier for our rig (he does the welding, and I do a lot of the sourcing, cutting, deburring and finishing… eventually I will learn to weld also). About 50% of our design and execution effort went into theft countermeasures. The more remote (and therefore desirable) a travel area, the more lawless it tends to become, at least in our part of the country. Maybe things are different in other geographic areas.
I’d have to think they’d try to swipe the (much more expensive) bicycles mounted just above first!
I haven’t been that concerned about scrap aluminum theft. Maybe I should?
Any attempt at a swipe will likely be when you are out on your bikes – that’s the visual cue that it’s safe to move in for the kill.
Given that I live in a state of 30 million people where only 2% of the land is federally-owned (and probably about the same tiny amount is state-owned), I have to be very creative and persistent if I want to attain any measure of outdoor privacy. There have been times when I’ve gone to local representatives and asked, “Respectfully, why won’t you allow me to boondock down there?” (referencing some restricted area). The response is typically, “Because we can’t get law enforcement back there on any reasonable time frame, and we’ve had too many incidents. It’s just too dangerous.”
Thieves target outdoorsy people (hunters, fishermen, campers, trekkers) because they are such easy, unprotected targets. My husband and I wanted to build a hitch carrier for our camper van that would accept our Yeti cooler. Well, Yeti theft is so rampant in our area that the theft rings have begun to rival organized crime in their degree of sophistication. Unless we came up with a device that far exceeded the prevailing market options, we had no chance. But it’s been over a year now and nobody has found a way to thwart our measures, so we accomplished that much, at least.
Like I said, I don’t know how the pressures are in other areas of the country. Most theft is drug-driven these days, so there’s perhaps a statistical correlation with how large the drug problem is in any given area.
James,
Thanks for the credit. Coming from the king of modifications I am humbled. I like the welded box, very clean. My next project shall be the Dometic Penguin A/C upgrade. BTW can I borrow your pulley system?
Dennis