This post may contain affiliate links.
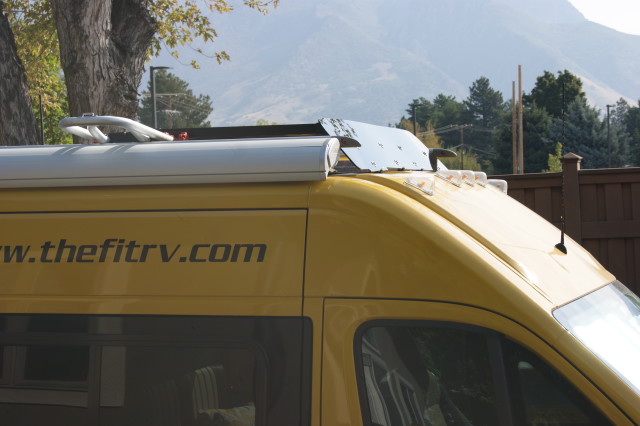
Lance, our Travato, has an extra solar panel mounted to his roof rack. This extra panel is right at the front edge of the roof. It always looked a little “unfinished” to me, and judging from the number of insect carcasses it collected, it was a pretty significant source of drag. Eventually, the Aerospace Engineer in me was bothered enough that I needed to do something about it. I tried ordering off-the-shelf fairings, wind screens, and deflectors, but none of them fit properly, or would mount properly to the Fiamma rack. I finally resolved the issue this past weekend by building a custom roof-rack-mounted fairing.
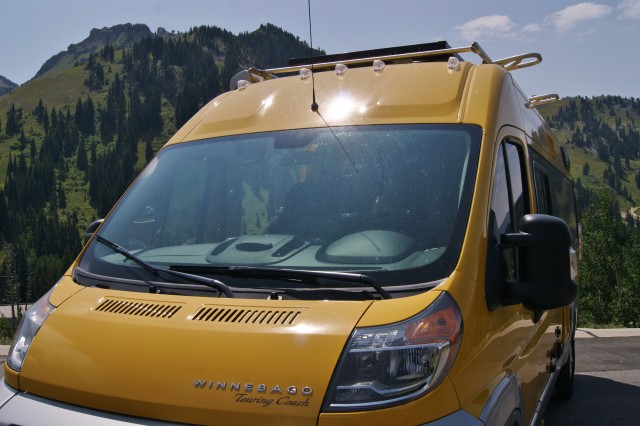
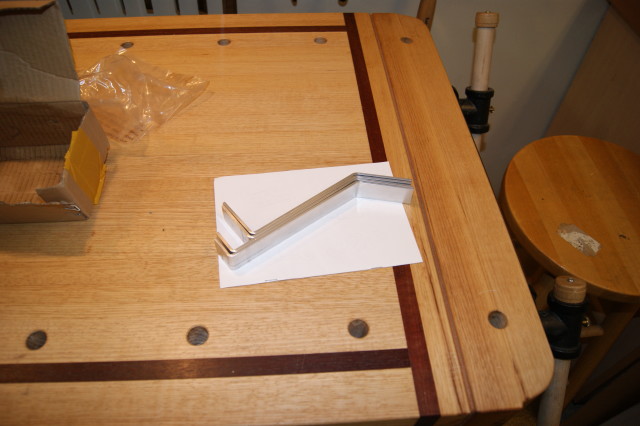
The “before” picture
But before I could get started, I had to source some materials. If you want to follow along at home, here’s what I used to make the fairing:
- 12” x 60” sheet of black Acrylic. ¼ inch thick. (You’ll use slightly less than that)
- 4 M6 Stainless Steel Carriage Bolts and M6 Nyloc nuts.
- Aluminum bar stock. 1/8” thick. Approximately 48 inches.
- 12” x 60” plywood, MDF, or other pattern making maerial. ¼ inch thick.
- 8 ¼” stainless steel machine screws, fender washers, and nyloc nuts.
- Industrial Strength Velcro – Extreme (no, really, it’s called Extreme)
The first step was to work the plywood into a pattern. The pattern winds up approximately 54 inches wide, and I thought it looked better sloping inward toward the top. Here’s the first square-ish attempt.
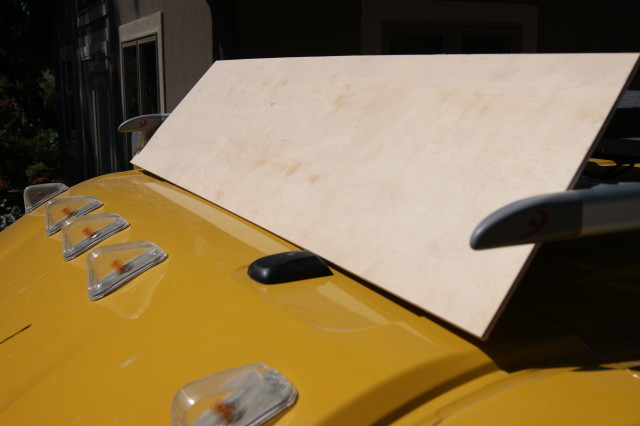
I noticed a couple things right away. First, I couldn’t give this thing as gradual a slope as I had wanted without covering up the GPS/Sirius antenna on the roof. So this fairing wound up a bit more “upright” than I would have wanted. The second thing I noticed is that the ProMaster roof is not flat. There’s a gradual curve to the whole thing, and a couple cutout sections on either side. To make the fairing fit consistently close to the roof, I needed to scribe the pattern to fit.
After much scribing, trial, and error, I was able to get the pattern to within a quarter inch or less of the roof the whole way across. After that, I rounded off the corners, and called the pattern good.
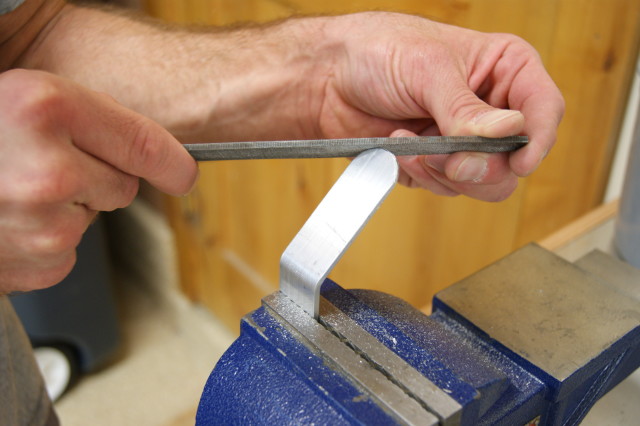
With the pattern laying on the roof more or less where I wanted it, I used a bevel gauge to figure out the angles for brackets to hold the fairing. With those angles, I made one sample bracket out of some old galvanized steel bar stock I had laying around. That came out like this.
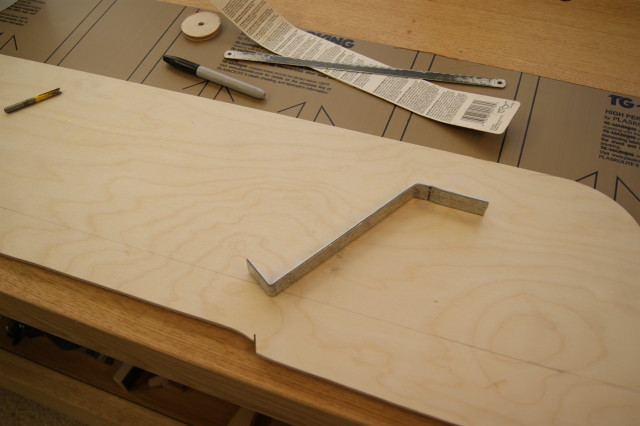
But that was just one bracket I bent up freehand with a hammer and anvil. I don’t have many metal working tools, and the prospect of making four identical brackets seemed daunting. It was so daunting, that I was able to convince Stef I needed a benchtop metal bender from Harbor Freight tools! Here it is:

And here are the 4 brackets I made up with it. Yes, they’re different lengths on purpose. The brackets in the center are not as tall as those on the outsides.
Still not quite done with the brackets though – I wanted the ends rounded and filed down to prevent damage to the roof. So first I ground the ends into a half-round shape, and then filed them down to remove any sharp edges.
Then I drilled a few holes in them and mounted them to the template to make sure everything lined up.
When I was satisfied with that, I took the template, and used it to template-rout the acrylic on my router table. I actually got some really great pictures of that, but they were on my phone. My phone – a Motorola Droid Mini – decided to FACTORY RESET ITSELF this past Sunday, destroying my pictures and all other data on the phone. Yes, I had backed it up on Friday, but that did me no good with Saturday’s pictures.
I’ll be destroying the Motorola Droid Mini in spectacular fashion in a future blog post.
Anyway – Acrylic works easily with standard woodworking tools. I used a ¾” diameter flush trim bit with the plywood pattern. This had the effect of producing a nice 3/8” radius on the inside corners. The other thing to note is do NOT try to drill acrylic with standard twist bits. It will crack. Use Forstner or spade bits, or a plunge router, to cut holes.
But like I said, sorry, no pictures of all that.
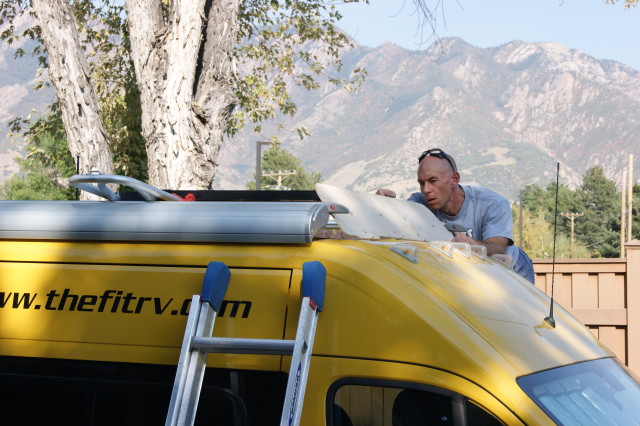
When I had the acrylic complete (it came out GREAT!), I turned back to the brackets. To keep them from scratching the roof, and to keep them from potentially lifting in the wind, I applied some Industrial Strength Velcro to the brackets and the roof. Apply the soft side to the underside of the brackets where they meet the roof, and apply the scratchy side to the roof. You’ll only need about 4 linear inches of the stuff. You can see it in this photo where I’m attaching the brackets to the roof rack.
You can also see that our front solar panel is attached to the roof rack as well. This actually made it more difficult to attach the fairing. I had to un-mount and re-mount the front of the solar panel so I could slide the fairing bolts into place. Most of you with Travatos won’t have to worry about that. And in order to access the track in the roof rack, you’ll have to remove three screws from the Fiamma rack (it’s obvious once you’re up there). Anyway, due to the tight clearance with the solar panels, I had to mount the brackets first, and then add the acrylic.
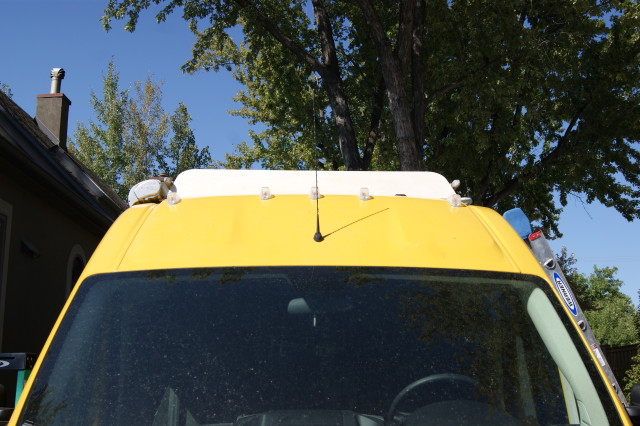
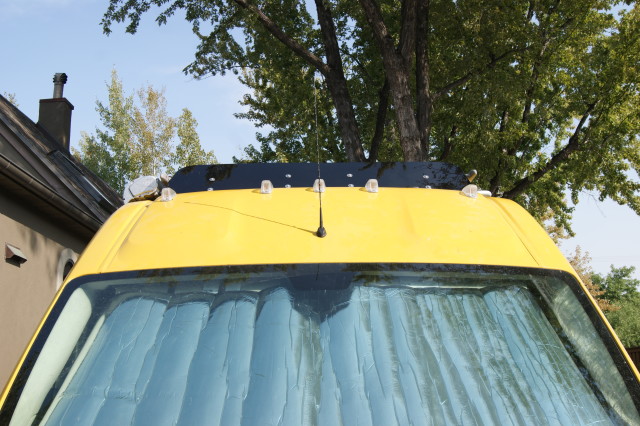
When I was done, it turned out not too shabby, if I do say so.
And here it is from another angle

Road Test
It’s too early to say precisely what sort of impact this will have on gas mileage. In a completely non-scientific road test, it seemed to be about 1mpg greater than I’ve come to expect (at least, every time I looked down at the computer-reported mileage). I’ll have to wait to run through a couple full tanks of gas before I can give you a final verdict. But I’m pretty sure it won’t hurt the mileage.
But the bugs seemed better. On our road test, we took Lance out on the highway along the southern shore of the Great Salt Lake. Normally, this would coat the front of the vehicle in bug guts. But we noticed very few dead bugs on the fairing. Again, just anecdotal, but noteworthy.
And I’m very happy to report that I didn’t produce any kind of additional crazy wind noise. We listened closely, at every speed from “highway” to “parking lot”, and not one time did we get any howl, whine, rattle, bump, or buzz from the fairing. Visual inspection of the fairing after a day out revealed no damage.
So there you have it. Even if it has no effect whatsoever on mileage, I’m going to leave it on just because I like the way it looks. What do you think? Is this something you would want on your Travato? Let me know!


I like the fairing idea for noise reduction. Promasters are noisy! In retrospect do you feel the noise reduction was worth the effort? Now on gas mileage – I think I see kayak saddles on Lance. Care to share how you get the kayaks up there? I built a fairly complex block and tackle system for our kayaks. Turned into a winter project, but it gets them up and down safely. Costs about 2 mpg to carry them.
Rich
It was a while ago that I did that fairing, and eventually it just became part of Lance. I honestly don’t remember the “before” noise anymore.
Having said that, everyone who drove him or rode in him said Lance was probably the quietest ProMaster they had ever been in. So, was it worth it? Probably.
As far as the kayak saddles – we eventually dismounted them and went with inflatables for our watercraft.
HI James,
Really like your site and especially the tests.
I have to express some skepticism on this project. It seems like the fairing you added will increase frontal area and won’t improve drag coefficient – seems like the net effect will be negative on MPG.
Two tests I did in this area that you might find interesting…
Testing drag reducing fairings for PV panels and racks…
https://www.promasterforum.com/threads/test-of-fairings-on-solar-panels-to-reduce-drag.95390/page-2#post-763454
Testing rack drag…
https://www.promasterforum.com/threads/mpg-penalty-for-roof-racks-and-roof-mounted-pv.95119/#post-753004
Thanks – Gary
Cool Stuff! Now if you could just construct a wind tunnel large enough for the whole van! Lol.
We’ve sold that van some time back now.
Even if it did not help reduce drag (which I never proved or disproved to my satisfaction), it helped with wind noise off the front of the vehicle, and it kept a lot of bugs off the roof accessories. So it was still worth in in my opinion.
But I salute your ambition!
I got the ProMaster 2500 and installed solar over 2 Vantech extruded aluminum bars(using light Home Depot aluminum bars for holding the panels at the same distance from roof as the Vantech bars) but the resulting howling noisy was horrible. I got and installed today the Yakima 52″ fairing, and although not sufficient wide or tall as the Vanteck bars, but it killed the howling to the point I do not know if there is any left. At $85 on Amazon it was a fast and easy fix to a huge problem.
If I could I would add some pictures of it.
You probably used “cast” acrylic. It usually comes with a brown paper skin. It costs more but machines much better than “extruded” acrylic. Though it’s hard to drill as well. Whichever you used, I hope others pay extra for the good stuff.
I know your van is out of commission at the moment, but did you notice much in terms of gas mileage now that this is about 4 years old now?
Not much. Maybe a half a mpg. But maybe that was just me and wishful thinking.
More than that, I noticed the noise changed for the better!
Thanks for the step by step instructions James! Just finished installing mine yesterday and it really does make it quieter in the front cab. Would never thought of doing it without your article…btw Harbor Freight no longer sells the bench top metal benders which was my only obstacle
Woo Hoo!
(And I don’t know how necessary the metal bender actually was… Probably could have done it with hand tools… 😉 )
Very nice mod. Anything that sticks out on a vehicle costs gas, side mirrors on a midsize car for instance cost you 2 mpg, as tested by an engineering friend of mine. Curious to see if your deflection has an effect.
Regarding Floyd, is one of your tanks having trouble venting by any chance, just hunch.
I haven’t been able to determine if there is much of a difference in mpg. I haven’t much tried though, because it seems no matter what I do, Lance gets 15mpg, period. I could drop him out of an airplane, and he’d get 15mpg on his way down. It’s weird.
Regarding Floyd – we’ve noticed he has something to do with the dash air being on vent vs. recirculate. On the one hand, we could figure it out, but we kind of like the mystery, so we don’t think about it too hard. 🙂
It’s a bit odd that you posted this, because I was just wondering about a Wind Fairing (of sorts) at the opposite end of an RV — the Undercarriage. I was looking at photos of a Prius which showed a complete cover that hides / shields all the crooks and crannies — and supposedly increases the gas mileage, one assumes. Or maybe it was a bottom photo of a Tesla.
Anyway, my thought was — is that practical on a Class B RV?
It’s an idea that’s proven to work in race cars and such.
The trouble with a class B is that there’s SO MUCH stuff under there. I don’t think it would be practical as a DIY project. And as far as servicing goes, it would be one more thing in the way. I don’t see it coming as an option any time soon, but maybe one day…
I was waiting for you to tell us that this killed off Floyd.
LOL! Floyd is alive and well. We’re still hearing him randomly every time we drive…sometimes two or three times every 30 minutes, sometimes he’s silent for hours. It’s the weirdest thing!!! Wish we could catch it to record it…
Looks great! Terrific job. Maybe you could go into a new sideline manufacturing business and get a return on investment on that new metal working equipment. 🙂
Are you saying you want one?…
Just kidding. I’m really not set up for that. I’d have to charge hundreds of dollars for each one!
I could use a copy of your template.
Did you save it?
Templates of the brackets would help too.
Seems for mounting solar panels we have two choices…directly to the roof or on the rack.
I chose to put our (one) panel on the roof as close as Renolgy recommended. Then build a custom half roof rack from the middle back out of 80/20. This way the windshield is forcing the majority of wind over the panel.
There is so much junk on our roof I don’t think a fairing will matter but I, like you, still consider one because they look great.
If you had written this comment one month ago, I would have still had it!
I actually *just* got rid of it, thinking… I’ll never need this again.
I never made templates for the brackets – just freehanded them.
Looks great! I might have used 1/4″ ABS plastic, but that’s because I’m used to working with it. The acrylic will probably do better regarding scratches.
I’ll be doing a similar fairing on the front of my panel mounts, though it should be shorter, being a lower rack mount than the Fiamma.
I kinda like the taller fairing now that it’s up. It may be all in my head, but I have this idea it helps cut down on turbulence from vents/antennae/etc.