This post may contain affiliate links.
I have to admit – I was skeptical about this one. It took a good old-fashioned experiment to convince me…
Here’s the deal: Every year about this time, I start seeing posts on various internet groups about people “winterizing” their RV using the blow-out method and nothing more than a cheap tire inflator for an air compressor. I had always assumed these people were just lucky in having not damaged their rigs.
The typical advice for blowing out your RV’s plumbing system is to use an air source with low pressure and high volume. The low pressure is required to prevent damaging your RV’s plumbing, and the high volume is needed to carry all the water out of your plumbing system. It’s like driving your car after a car wash: the wind rushing by isn’t at 100 psi, but there’s enough of it that it blows all the water off your car. Same thing inside your RV’s water system. But getting the high volumes of air required for several minutes typically means using a big air compressor – one sized at several gallons or more.
At the complete other end of the spectrum is the lowly 12 volt tire inflator. It moves very little air: It has a cylinder the size of a dime. But it can (eventually) build up to decently high pressures. In a winterization situation though, I just didn’t see how an inflator could maintain airflow for long enough to clear out your RV’s plumbing. So I devised an experiment.
SCIENCE!!!
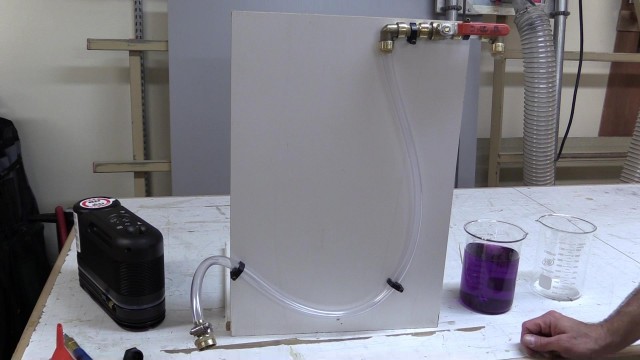
I built this test rig with parts from the local home center. It’s a representation of something you might see in your RV; a faucet, a city inlet, and a low point that could trap some water which could ultimately freeze and burst. Without giving too much of the video away, I’ll say I was able to successfully clear the plumbing of water (to the point it wouldn’t be damaged by freezing) with nothing more than a bicycle pump.
Yep, a bicycle pump. So a tire inflator would do just as well.
I’m not calling this “winterization”. And I’m not recommending this as a permanent solution. It doesn’t meet manufacturer guidelines. And there was still water left in the pipes. The success of this in your particular RV will depend on your rig’s plumbing system and its configuration. But in a pinch, if you’re stuck and worried, this could be enough to prevent damage to your rig. It’s certainly better than doing nothing at all.
It would be tedious. You’d have to pressurize and open one faucet. Pressurize, open another faucet. Over and over again until you had done all the plumbing fixtures in your rig. Including the toilet. But if it saves your bacon… that’s time well spent.
Beyond that you’ll have to watch the video to see what I mean. Enjoy!


Just did this using Ryobi Tire Inflator and although I had to keep turning it off and on (it stops at whatever pressure you set as limit) I was able to do my T@B Trailer until just air came out the different faucets.
has anyone tried the DeWALT DCC020IB portable air inflator to winterize there travel trailer?
I’m going to use my small 12v tire inflator to do my 24F Jayco. I use the 12v inflator to blowout the water line from house to my garage ever winter and no issues for 9 years. This is over 100 feet of 1/2 copper line (the previous owner did not put in a low point drain and to do so I would have to break though the concrete and then hope it was at the lowest point). It takes a about a minute to buildup the pressure 10-12 lbs which forces out the first slug of water for about 30 seconds. After that it spits and coughs out the remaining water for the next few minutes. When its done I can easily blow through the line so I know there’s no water slugs remaining. Then I leave all the lines open in the winter. I see no problem with doing this with my RV.
I suppose the success of this method depends on the nature of the plumbing you’re attempting to blow out.
Something with a weird loop or trap-type bend in it would likely be more problematic.
Interestingly, there’s a system marketed now for RVs that seems to use a 12v inflator. It’s called the Floe, and it’s made by Lippert.
This would seem to support the 12v inflator approach!
I thought I saw a video of you winterizing I believe it was a Travato blowing out only but I can’t find it.
I did a winterizing video a long time ago with Das Bus.
You can click here to find that video.
Hey James I thought you might be interested to know that I followed the method you demonstrated using a small compressor made for use with an airbrush. This 120V unit is not much larger than a 12V inflator, but it has several advantages: a pressure regulator, a pressure switch and a filter. With those features it functions like it’s big brothers, cycling off and on automatically to maintain pressure at the selected level. Because it is low volume (.5 cfm), you need to follow the one-faucet-at-a-time procedure you outlined in the video. It worked perfectly! It would take about 30 seconds to get up to pressure (30 psi) and then shut off. I would then blow out a faucet or outlet, close the faucet, wait for it to repressurize, and repeat. I circulated among all the water outlets twice and got nothing more out of them, and then did them all a third time for good measure. Took about 15 minutes.
With this type of compressor there was no need to go out and turn it off and on like you would with an unregulated inflator. In fact, I just set it on the dinette table and fed the air hose out the window to the nearby water inlet. A final bonus is that the unit is extremely quiet. I bought it at a local discount tool outlet for $70, and there are similar units online. This unit solved my concerns about hooking up a pressure regulator and filter to a 12V inflator. Oh, and I hooked it up to a standard RV blow out hose with a 1/4″ fitting, using an adapter that came with the compressor. Thank you for pointing me in this direction with the method you demonstrated, and now with this fairly small compressor I can blow out lines if necessary while on the road. It uses about 2 amps at 120V so if you are not hooked up to shore power, you can use a generator or a small inverter (although it would require more than the 12V / 15 amps that a cigarette lighter plug inverter can supply).
The one I bought is very similar to this one: Master Airbrush High Performance Airbrush Air Compressor with Filter, Black Air Hose & Dual-brush Holder
Interesting stuff. Glad you’ve found something you’re happy with.
I still recommend blowing the lines out with a high-volume air compressor for complete winterization. But in a pinch, it sounds like you’ve got a plan.
Cheers!
James, would it make more sense to start with the faucets farthest from the water inlet or the ones nearest to the inlet? I can kind of see it both ways. Maybe it doesn’t even make a difference? What do you think? Thanks.
I’ve wondered this, but then decided that – in my own case – it just doesn’t matter. I simply leave the compressed air running for several minutes as the manufacturers directions indicate. All the water is out either way.
Remember, you will have opened the low point drains before this, so most of the water is already out. It should be only bits of water you’re chasing with the compressed air. Not whole pipes full.
Thanks for this interesting and very useful video (as are all of the things you and Stef post!). My question is about filtration. When using a standard air compressor (even the “oilless” type) it seems it is still recommended to use a filter. What about with these 12V inflators and bike pumps? They don’t really have tanks, so maybe a filter isn’t necessary? I tried to find an inline air compressor filter that might work, but could not find a combination of fittings that would go from Schraeder to 1/4″ air compressor (the air filters I saw at HD were all 1/4″ threaded). Do you think it would be ok to just forego the filtering? Thanks.
Personally, I would always use a filter. If the hose fittings didn’t work out, I would simply cut the hose on whatever inflator you are considering, and attach my own hose with my own fittings.
Rubber hose and hose clamps will hold just fine for the kinds of pressures we’re talking about. And there’s no shortage of barbed fittings for you to make your connections.
I’ve actually thought about permanently attaching my filter to my blow-out plug – but I never do because sometimes I use the filter elsewhere.
Thanks for your swift reply! Sorry to bother you again, but I had another thought about filtration that might be even easier than rigging up my own fittings so that I can filter the air coming out of the air inflator that was supplied with my Travato. What about using a standard hose threaded RV water filter? It filters water… would it filter the air adequately I wonder? Would it even work? I could attach the 12V pump’s Schrader fitting to a blowout plug w/ a Schrader fitting, attach the blowout plug to the inlet of the water filter, and then go from the outlet of the water filter to the RV water inlet. Don’t know why I’m bothering you with all this speculation, I can just go experiment and see if it works… Anyway, there it is.
P.S. the whole reason I’m pestering you with these questions is that I want to be equipped to blow out the lines on the road if conditions dictate (and don’t want to travel with my big air compressor). I’m hoping that if I’m using the RV and keeping the inside temperature nice and warm, and with the benefit of the insulation I’m adding (doors and under the galley) I will be ok to moderately low temps, maybe 20F depending on duration. But if it sounds like it’s going to get colder than I’m comfortable with and I’m on the road, I can use this “portable” setup. I know thhere are other things I can do (thanks to your videos and tips) like add a vent to the step-up area and heat tape to the infloor lines between the tank and pump, but I’m running out of time because the insulation is taking me so long (I’m slow…). Thanks again for any guidance!
Well, I’m sure you could get it hooked up OK.
But I don’t know what kind of pressure those water filters are rated for, but that could be one problem. And I’m not completely sure that air and water would be filtered the same way. Maybe? I don’t know.
Great information and so well presented. I need to buy an air compressor. What size gallon capacity would you recommend?
Well, for general homeowner use, I have and can recommend one of these: http://amzn.to/2laj2HK
I wonder how well one of those Trek air pumps with the inflation chamber – used to seat fat-bike tubeless tires- would work?
I am thinking of using a high volume low pressure inflator, like my air bed inflator. Seems like i only need a couple pounds of pressure to push all the water out. The highest point is 6 feet at the shower so that is only about 3 pounds of pressure. I am thinking the airbed inflator can produce about 5 psi or better.
I didn’t test that scenario, and personally, I wouldn’t extrapolate to the conclusion that it would work.
If the pump can only go to 5psi, you won’t be able to pressurize the lines to 40, which is what I tested.
Interesting idea, but would it require you to bring something extra? We always have a bike pump and/or a tire inflator with us. But we’ve never traveled with a waterbed pump.
I have this 18 v Ryobie compressor/inflater that I carry along (great for grandkids float toys) and all I need to do is push the button to inflate tires.
I am thinking that I may need to noodle out the flow paths to avoid just moving the water around … or just use the antifreeze goop.
BTW, thanks for all the info you put out … great stuff … especially the black water tank stuff!
IFL your videos, especially your science ones like this and the poop/black tank video. Thanks for what you do and for sharing your knowledge with us in such an entertaining fashion to boot.
Thanks Tony! They’re great fun for me to do, too, so you can expect more of them in the future!
How about a battery operated leaf blower on low and you let air leak out on the way to the connection – maybe hold by hand lightly against the hose intake?
Uhhh….
Let me know how that goes! lol.
Hi James what brand of 12v tire inflator are you using in the video?
I don’t actually know. It’s just the one that came with our Winnebago Travato!
The RV antifreeze (pink stuff) doesn’t appear to be harmful and I consider it insurance. Repairing a water line is such a bother, eh?
Thank you for your work. you’re good people!
Great videos, all of them!
Have you tried Rid-X to see if it digests solids in black tanks?
No. We have not tried that.
The black tank is a *holding* tank. You’re not actually trying to do any waste processing in there as you would be in a septic tank.
Drive your rig a little south then ride your bikes home. Takes less time then everything spent on this project- but it was entertaining in any case, thanks James
What about using a co2 canister type bicycle pump
I wouldn’t recommend that.
I’ve never seen a CO2 pump that I could regulate pressure with. You shouldn’t pressurize the RV’s plumbing much over 40 psi, and there would be no way to prevent that with CO2 canisters.
Also – “impact” pressure would be bad for your system and could damage your water pump. There would be no way to prevent that with a CO2 canister.
Could you link the connector you used to connect the tube to your air compressor?
No problem. It’s the:
Camco Black RV Plastic Blow Out Plug with Schrader Valve
Using the garden hose to contain a quantity of compressed air isn’t much different than using an air tank to contain a similar quantity.
Seems to me the important variables are the speed and duration of the air flow through the pipes. The air speed is fixed by the 40 psi (pounds per square inch) maximum pressure and the duration is determined by the size of the air tank (or amount contained in the system).
So, what you’re demonstrated is that using the existing plumbing as an air tank is just as good as using the air tank built onto a conventional compressor. Good information! And nice to know that, in a pinch, the system doesn’t care if the air tank is a real compressed air tank, plumbing pipes (or a hose) being used as an air tank, or maybe even a large inner tube being used as an air tank.
It’s the volume of compressed air that’s important, not what’s containing that volume. For someone who doesn’t have a compressor, the easiest solution might be to pick up an inexpensive air tank at a discount hardware store and fill it with air at the local gas station.
40 pounds of pressure sounds reasonable. Home plumbing systems can handle about 75 pounds of pressure, but RV systems seem to be built to handle a 45 psi.
Thanks so much for doing these tests!
In regards to winterizing (we live in Southern California and only have to worry about freezing on short trips) I would love to see a similar test showing exactly what it takes to burst a plastic RV plumbing pipe. Would six inches of water in an otherwise empty pipe really do it? How quickly do pipes actually freeze?
My gut tells me that I could probably get away with going on a five day ski trip and so long as I was heating the coach up from evening to morning, there probably wouldn’t be any problem with frozen pipes. But I sure would like to see some examples of test plumbing mounted to boards and left out in 0º weather, just to see what would actually happen to it.
Thanks again. Love you guys and your great videos and demonstrations.
I had thought of doing a “freeze test”, but decided against it because everyone’s rig is so different. Different pipe locations. Different levels of insulation. Heck, even different exterior paint colors would have an effect.
In the end, I decided I couldn’t make the results relevant enough to everyone.
Good thoughts on the air volume bit though. A portable tank might be a solution. But then when it was empty, you’d be trotting back to the gas station to fill it again. Could be tedious if the tank wasn’t large enough.
I found a freeze test video on YouTube https://youtu.be/7louMO0q5wI and it confirmed what I suspected, that Pex is unlikely to burst due to crosswise expansion pressure and the it’s really the end bits (fixtures, joints, and devices) that need to be protected.
For my situation, living in a warm climate and only occasionally camping in sub-freezing temperatures and never for more than a few days at a time, and never storing our RV in freezing temperatures, I think I’m willing to take the risk and completely ignore any sort of winterization procedure.
If I were in the unexpected situation of having the unused, unheated RV being stuck in sub-freezing temperatures for more than a few days, I’d probably feel secure with simply passively draining the lines, the water heater, and the water pump. And also making sure all the valves were left open. If the holding tanks were more than half full, I might be inclined to add some anti-freeze.
With all the attention and questions surrounding winterization, it’s surprising that our campers aren’t plumbed with sloped lines and drain plugs at the low points.
One question; are there lots of of damage reports regarding frozen plumbing? If so, what part(s) of the system were damaged, and how? It’s easy to for me to say, living in a warm area, but I wonder if the fear isn’t overblown.
I can’t begin to to tell you how much time and energy your series on waste tanks saved me. I have a feeling this report on winterizing will have much the same benefits.
I thought about putting a fixture at the low point, but it would have obscured the liquid. I think people get the idea though. If there was a fixture there, and it froze, you’d have a real problem with the fixture.
People don’t report freeze damage to me directly, and I’ve certainly never had any. But we had it in my house when I was a kid, so I know it happens!
Maybe someone who has had freeze damage to their rig will chime in?
Use your bike air pump to refill an air canister.
Hello
I love your you tube channel
I have a question on the Rv winterization process , since we live in a much more northern climate than you
Where we live I blow out the water lines with a high volume air compressor ,making sure as much of the water is out of the system
We also fill our water lines with Rv antifreeze as a precaution , is the process you did of just blowing the lines out all or part of your winterization
We flush the Rv anti freeze out each spring and clean the whole water system
Thanks chris
Compressed air is all that I do. (Well, I do put the pink stuff down the drains…)
We winterize and un-winterize several times over the course of a winter. Removing all that pink stuff from the lines each time would be a real chore.
If there’s nothing in the pipes to freeze, I figure we’re good!
Living in south Texas I usually ignore winterization videos but when it is you doing an experiment, I can’t resist. I also enjoy an expirement that surprises the scientist. Therefore this was a delight. You also covered my first objection to the premise, but I also have a second. I’m a belt and suspenders kind of guy with my RV. I would have done it twice.
Thinking about practice use for this new knowledge, I have used 6 gallon pancake or hot dog compressors with good results. So possibly they are the safe minimum for most rvers.
Doing the procedure twice would yield better results. (But it would also take twice as long!)
A small pancake compressor would probably be sufficient for “normal” winterization. You might have to let the tank recharge between faucets.
James, just as you demonstrated with the high volume airflow from your shop compressor allowing the air to continue to flow with the ball valve left open, you didn’t demonstrate what would happen if you connected the 12VDC tire inflator and and left it running with the ball valve open.
Would it push enough air volume to get the job done more completely than the 40 psi bursts using the manual bicycle pump?
Not likely. See my response to Alastair. Those compressors move a rather small volume of air. After the initial blast, any remaining water would have sat there and watched a gentle breeze blow by.
Hi James,
To clarify, I am absolutely not an engineer so this is mostly a request for an explanation/demonstration of why I’m wrong.
Seems to me that you weren’t comparing like with like here. You hooked up your shop air compressor and left it running and, presumably, generating the 40 psi. With the bicycle pump, you pressurised the line, then closed off the air supply (fair enough – you’d have had to be pumping like mad) before opening the outlet tap.
What would have happened if you’d pressurised the test rig to 40psi with the large compressor, then disconnected it before opening the outlet?
What would have happened if you had hooked up the little compressor and left it running during the test, as you did with the large one?
Maybe it wouldn’t have made any difference and maybe it’d involve more physics than is appropriate in an RV video, but I’m just curious.
Thanks, as always though, for a great video.
I’ll take the questions one at a time.
Q1: “What would have happened if you’d pressurised the test rig to 40psi with the large compressor, then disconnected it before opening the outlet?”
A1: The exact same thing would have happened that happened with the bicycle pump (in either case). 40psi of pressurized air in a given volume will behave the same – no matter where the air came from initially.
Q2: “What would have happened if you had hooked up the little compressor and left it running during the test, as you did with the large one?”
A2: This is something that I didn’t address in the video. Reports from people who actually use this process in their RV indicate that it takes such a small compressor a while to pressurize their RV’s plumbing. From that, even if you don’t take my word for it, we can conclude that the volume of air produced by such a compressor is small. So the initial “blast” of air would have been the same, followed by the pump running and blowing very gently through the tube. In other words, any water that was left would have either just bubbled or simply sat there and watched small amounts of air go by.
So, in short, I don’t think those would have made much of a difference.
Unless you did it for so long that evaporation came into play!
(I had actually thought of that when I was typing my answer!)
I just love watching the thorough, well thought out, (engineering) DETAIL-ORIENTED attention you give to your projects. It’s enjoyable to ride along on the coattails of your thought process!
I just love to see pimped-out garages also!!! Quite the cycle collection!
Thanks (to BOTH of you) for all the great videos and write-ups. Always worth my time and very inspiring.
Lauri
One of these days, I eventually should do a shop tour. People seem interested. Thanks!
So, you need to create a volumn of air that gets injected into the plumbing! The bigger that reserve, the better; ie use a large diameter and longer hose, or an air tank.