This post may contain affiliate links.
If you remember back to last summer, I embarked on a two part RV Soundproofing project where I installed three different kinds of materials in our RV trying to tame the noises we hear while we drive. The results from the first two parts were underwhelming, and we concluded we needed to do something about our RV’s cab-over area. That happens in this video… PART THREE!
The materials we used in the first videos were from Second Skin Audio. And even though the results from those first efforts weren’t as effective as I had hoped, the folks at Second Skin liked the videos, and offered to provide the materials to complete this third part. The good news though is that since we’re dealing with data and measurements, and things anyone else could duplicate, we don’t have to worry that their sponsorship altered the experiment.
So How Did It Go?
Knowing that a lot of time (and RV mods) had happened between the first videos and this one, I decided it didn’t make sense to compare things to those previous measurements. So we headed out to our test mile of interstate, and took a “before” reading with the sound level app on my phone. That result was 73.0 decibels – which was actually louder than where we had left things in the previous videos. I knew I hadn’t tried any sound amplification projects in the RV, so I think we can chalk that up to a slightly different RV, measured with a different phone, on a day with very different weather.
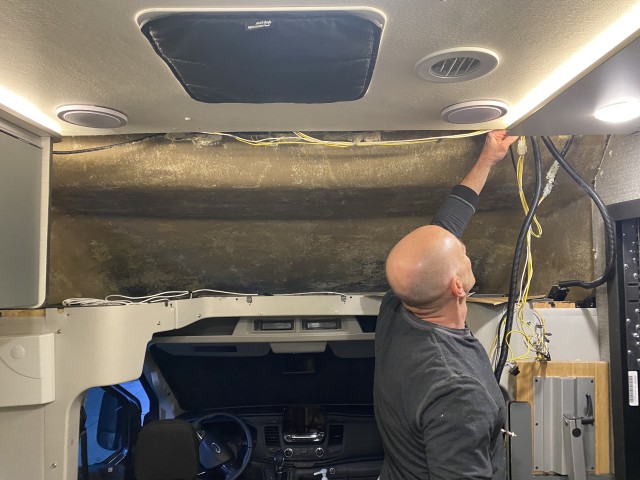
Then, it was time to tear things out so I could install the sound deadening materials. But when I got everything torn out, I realized what a truly large space it was that I was dealing with.

This space now available for something cool.
And once I realized I had this much space available, I thought I could make better use of it than by simply putting it back as it was. But building something different would have spelled trouble for the experiment. So I decided to steer the testing in a different direction, and try to measure the noise levels of JUST the cab and the sound deadening materials. We went for a ride with the forehead bare – just raw fiberglass on the inside. And then we went for a ride with just the sound insulation installed, no cabinetry. For both of these tests, we moved the microphone up a bit to try to capture as much of the forehead sound as possible.
For our pre-test, measuring just the empty forehead area, we got a reading of 73.3 decibels. This was louder than the first measurement, but only by 0.3 decibels. I think this points to the limitations of on-the-road testing with consumer equipmet. It was a different day, different weather, different wind, etc. Qualitatively, though, the blank forehead really did sound like an open window.
Then we installed our two sound deadening materials.
- First, we installed a layer of Second Skin Damplifier, directly against the fiberglass.
- Then we installed a one-inch layer of Second Skin’s Mega Zorbe Pro, on top of the Damplifier.
When we went back out on the road to test the forehead again, we got a reading of 69.5 decibels. I do feel like this is valid with respect to the 73.3, as we took both of those measurements on the same day in basically the same weather, just 7 hours and 30 minutes apart. Even if you discount this somewhat to account for variables which may have changed, a difference of 3.8 decibels is very significant in my book.
Extra Bonus
One nice thing about these materials, and the Mega Zorbe Pro in particular, is that they enhanced the thermal insulation in the cab-over area as well. The Mega Zorbe material has an R value of 4.16 per inch. That forehead area can get quite hot in the summer and cold in the winter, so that’s a nice bonus to all of this.
Overall, I’m happy with the results on the acoustic and thermal fronts. I’m even more happy with the large amount of space I was able to gain as a result of this mod. I’ll post up how I did that conversion in my next video.
Any questions, ask away in the comments below!


Love your videos! They provide inspiration! Did you have to take apart any of the cabinets to get the shell over the cab out? You pointed to a couple of screws at the edges that looked like they were not really accessible. I’m trying to talk my husband into doing something similar in our Ekko 🙂 Thanks.
Glad you like the videos!
Only one of the four possible problem screw holes had a screw in it. The rest were left blank.
That one screw I was able to get out by positioning my driver at an angle, as you can see in the video.
Go for it!
g’mornin youngins,
as a guy who built van conversions professionally in the 80’s we tried all sorts of materials to soundproof road noise and insulate out the weather. the best we tried was to frame the entire van with 1×2’s after windows and sunroofs and all other cuts in the metal were completed and then bring it to a experienced spray foam guy to fill between the frame and on all the doors. the spray foam adheres real well and take extra time planning the firewalls around the engine. remove any over spray that expands and you will have a flat surface to fasten the interior panels. the only places you cannot control is windshield, windows and gaskets. in later years I worked on diesel boats and sourced a neoprene type multi layer soft/hard soundproof product that was fastened around the engine room that helped but the customers that paid for my framed and sprayed vans were the most satisfied.
You know, I didn’t consider spray foam for that area, but that might have been a good idea. I know there can be issues using it inside vans, but up against the fiberglass, it might have worked just fine.
Nice job especially on the shelf! I have noticed on our Ekko most noise coming from the RV door not sealing tightly (not sure how to move the post back but need to take it to a dealer to fix under warranty i think) AND the wheel wells are just plastic with not acoustic mats. My silverado has acoustic liners in the wheel wells, and I saw Second Skin has a spray on acoustic liner. It would be nice to use more of a thick mat liner on the wheels wells but i worse about long term adhesion.
I also have a floor squeak to sort out! Overall love the Ekko but has some quality control issues.
PS – another fun project would be to delete the manual e-brake and use a retrofit kit or the Ford transit SRW kit! Makes spinning your foot around between the seats possible.
I haven’t tried the spray on acoustic liners, but am interested in them.
If you try one, please report back and let me know how it goes!
-3db is a fantastic result. Congratulations, plus the bonus of around r8 insulation, and you have extra found storage space as well. Truly a well found project. Quick question, do you happen to have a link for that clock?
We’re pretty happy with how it turned out.
And I’ve LOVED having that clock. Stef thought it was too much when we got it, but I think it’s just right.
Here’s the link: https://amzn.to/3Zy8Hnv
I’ve used a lot of contact cement in my life–I think that’s what you had in the spray can. If it is, the problem isn’t that it dried–cc should work when dry, in fact that’s when you’re supposed to put the pieces together–the problem is that it soaked in to the melamine foam, and you didn’t have enough on the surface of the foam to make a good adhesion layer.
Just my 2 centimes.
I had thought of that, and it could very well be what happened. But the can said it only had a 15-30 second tack time (which I thought was odd).
It’s just as well though – the fumes would have driven me out if I had kept spraying inside the van!
As the owners of a cab-over Mitsubishi Fuso based camper with a diesel engine between the seats I had to chuckle at your attempts to deaden sound in your rig, because if you rode with me you’d be thankful for your “noisy” rig.
Anyway, IMO insulating our vehicles against the cold/heat should be our first priority. That’s the most efficient use of our insulating money. Luckily sound deadening can be a byproduct of thermal insulation.
It would be an interesting experiment for you to use an infrared add-on device for your phone (FLIR makes several) and test for thermal insulating qualities. Where there are thermal leaks there are typically sound leaks. I have discovered some thermal leaks in my camper using a similar device that were quite surprising. As a bonus, the gizmos come in handy discovering thermal leaks in your home, too.
I’ve actually done that before! Assessing the Insulation in our RV with an IR Camera
But then I got a new phone, and it made me really mad at myself for getting something that was phone-model-specific. (As though I would keep the iPhone 4S forever!)
I haven’t revisited it since then, but if I do, I’m just getting a dedicated IR camera.
Great series on sound. like the front mod. Will you be doing a video on the build? Looks like you may have used cloth or carpeting on top of the sound material and a few more cuts on the original plastic etc… Really enjoy your videos. Thanks for sharing the projects…
Yeah, I plan to release a video all about that front shelf mod. It was kind of fun because I went at it without a clear idea of how I was going to finish it.
Good information! Eventually I will have to re-insulate my van which has a fiberglass raised roof. I will definitely consider their products since it looks like you can get good insulation with reasonable thickness.
Glad you found it helpful!
James, I love your methodology, detail, dedication, and honesty. This three part series is extremely informing, and a joy to watch. Great to hear (pun intended) your efforts had positive results, and clearly the end results look better and is more functional. Looking forward to the shelf design and install video. Don’t forget to duck!
Steph, as a party to this, you have way too much patience!
We’re both.. uh… adjusting… to having that shelf there. lol!
Another very helpful idea! After you last sound deadening video, I removed the shelf above the driver and passenger head and put in 1″ of sound absorbing material and really noticed the difference in our Era. This summer I plan to take on the doors and floor this summer.
Glad you were able to take away something that made a difference for you!