This post may contain affiliate links.
If you’ve seen some of my other posts (like this one, and this one) you know that I’ve put a fair amount of time (and money) into improving the ride and handling of our Sprinter-based RV. But the one thing I haven’t addressed yet is probably one of the easiest and cheapest to deal with, and that’s tire pressure. And the good news is that even if you don’t have a motorhome based on the Sprinter, setting your tire pressure properly can help you too.
Now, a lot has been written – online, in magazines, in forums, and who knows where else – about tire pressure. And there’s probably some accuracy in all of it. So let me just say this up front – I’m not a “tire engineer”, or even a mechanic. What I am is an RV guy who’s come up with a way to set the tire pressure in my RV that – in my opinion anyway – leads to improved ride and handling, and still addresses the safety concerns about proper inflation. Now, other opinions may differ, but I’m going to share what I do.
But first, there are two common things that people do, and I want to explain why I don’t do them.
What I Don’t Do #1 – inflating tires to the maximum pressure on the sidewall
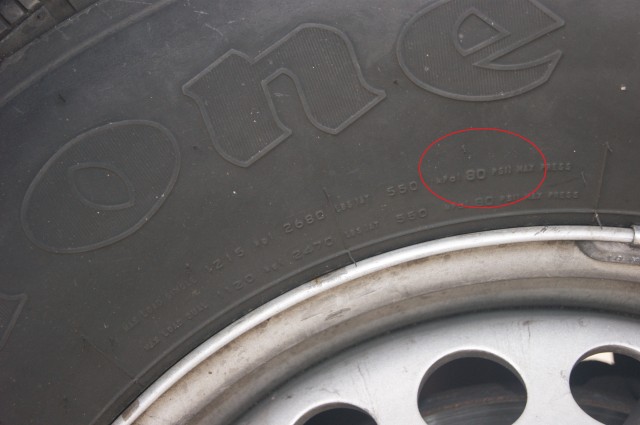
The first is simply inflating all the tires to the maximum pressure listed on the sidewall. All tires will have their maximum pressure stamped on the sidewall.
This is what mine look like, and on these tires (Firestone Transforce) it’s 80 psi. Now, inflating the tires to 80 psi will certainly provide all the load carrying capacity that the tires are capable of. But there’s a decent chance you don’t actually need all that, and riding with the tires at max will lead to a pretty harsh ride.
What I Don’t Do #2 – inflating tires to the pressure on the chassis plate
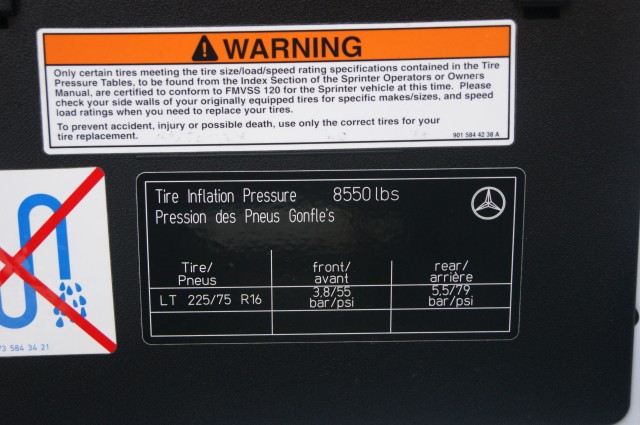
I’ll confess this is what I used to do, but the second thing I don’t do anymore is to inflate the tires to the numbers listed on the plate attached to the vehicle. Now, on my Sprinter, that info is on the driver’s seat pedestal.
This is certainly a better idea than just inflating things to the max on the tire, but this was put on by the manufacturer. They certainly knew their vehicle, but they didn’t know what particular tires you were going to use. They also didn’t know how loaded your rig was going to be – so they had to assume the maximum (in this case, 8550 pounds). So basically, these numbers aren’t optimized for you. Nevertheless, you can’t go wrong by using them, and that’s actually what I did for a while before I figured out what I’m about to show you now.
Step 1 – Find your RV vehicle and axle weight ratings
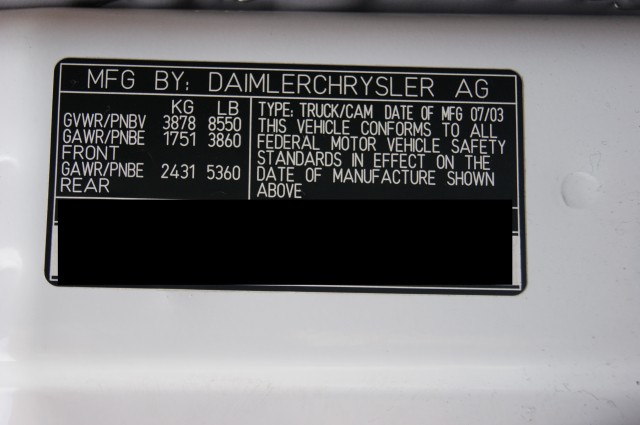
On my Sprinter, you’ll find them at another point on the driver’s seat pedestal, and they’re usually around the driver’s door somewhere.
My RV has two axles, so there are three numbers I’m interested in. The first is the Gross Vehicle Weight Rating, which in my case is 8550 lbs. The others are the Gross Axle Weight Ratings for both axles. For me, that’s 3860 lbs in the front and 5360 lbs in the rear.
We want these numbers because we’re going to head out and weigh the vehicle, and we want to be sure that we’re not over any of these weights. And speaking of weighing the vehicle, that’s the next step. But there are a few things we need to do before we head to the scales, and they all begin with “Fill the RV with…”
Step 2 – Load up your motorhome
Now, when I was thinking about weighing the rig, I wanted to be sure that I was weighing the vehicle as fully loaded as I could ever expect it to be. I wanted it full of stuff – so I had to wait until we were headed out on our next RV adventure to make sure that I had it full of food, bedding, fitness equipment, bikes, and anything else we might take on a road trip. You should do the same.
Fuel has weight, you’ll also want to fill the RV with fuel (gas, diesel, propane, whatever you use). The weigh station I use is a Flying J that also sells diesel and propane, so that’s easy enough.
You’ll also want to fill the RV with water. Head to the scales with a full fresh water tank and a full water heater.
And finally, you want to make sure that the grey and black tanks are full. Now, when I did this, I didn’t wait to fill these naturally… because, you know… eew… So I just filled them with water. I don’t ever anticipate traveling this way intentionally because that would be bad form – but we’re looking for a theoretical maximum, so that’s what I decided to do. Also, I want to point out that the RV is very heavy while doing this. So drive very conservatively, and if this is the first time you’ve done this, then make sure the tires are at least inflated to the pressures listed on the vehicle plate for now.
I also want to point out that it’s best if you can locate a scale that can weigh all of your wheels independently. The scale I use can’t do that, so I have to assume that the axles are more or less evenly weighted side to side. I happen to know my grey and black tanks are on the mid-line of the vehicle, and the batteries and fresh water more or less balance out, so for me, that’s not a bad assumption. But if your tanks are not located along the mid-line, weighing all the wheels becomes more important.
Step 3 – Weigh your rig
First, let me warn you – if you’re going to use a scale that’s normally used by truckers, when heading to the weigh station, you’re going to want to bring a long stick. Just trust me on this one. At the Flying J I use, here’s how it works:
I head inside first to tell them to expect me on the scale. Though this probably isn’t strictly necessary, I feel better about it. That way, if something unexpected happens, they know they’re dealing with a total amateur.
Then, it’s back into the motorhome and drive onto the scale, stopping where indicated. This is where you need the stick – the button that says “weigh me now” is set up for truckers, and it’s like 14 feet in the air. I can’t hit it without a stick. When you hit the button, they will ask you for a number – but you can just say “Private”.
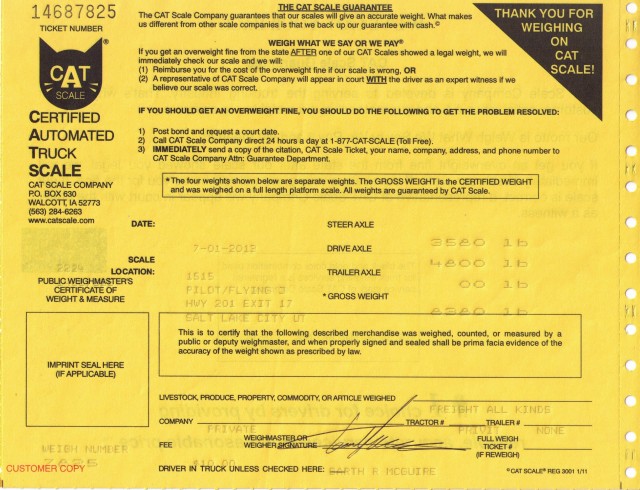
Once you’re weighed, drive off the scale and head back inside to get your weight. They should give you something that looks more or less like this:
Now, if your waste tanks are totally full, dump them (again, easy at the Flying J) and head home to sort things out.
Step 4 – Validate your weights vs. the maximums
So the next thing we want to do is to check and make sure that we’re not over the max weights for either the vehicle as a whole, or any of the axles. Since I rebuilt our RV myself (details here), I can’t rely on the old manufacturer ratings, so I was sweating this one the first time I did it.
Good news! I’m under. Barely, but under. I came in at 8380 pounds of an 8550 max, so I’m good as long as Stef and I don’t gain much weight. But remember, this was as overloaded as I can make the vehicle, so we’ve got a safety margin here.
Also, I’m under on each of the axles. On the front, I’m at 3580 pounds of an allowable 3860, and on the rear, I’m at 4800 of an allowable 5360 pounds. Hopefully, you get good news like this too.
Step 5 – Obtain the proper load and inflation tables for your tires
For this you’ll need to hit the internet, or contact your tire dealer. What you are looking for is the load and inflation tables for your particular tire. I mentioned before that I run on Firestone Transforce HTs – but I also have a set of Blizzaks that I use in the winter. So I need two sets of tables. Here are some links to a few of the load and inflation tables I found online. You’ll need to find the right ones for your tires.
The interesting thing was, when I checked them, for the same size tire, they all seemed to indicate the exact same weight and inflation numbers… So either I’m in the Twilight Zone, or these things are more or less standard for E load rated tires. Either way, I recommend checking the ones made for your tires.
Step 6 – Determine your tire pressures from the tables
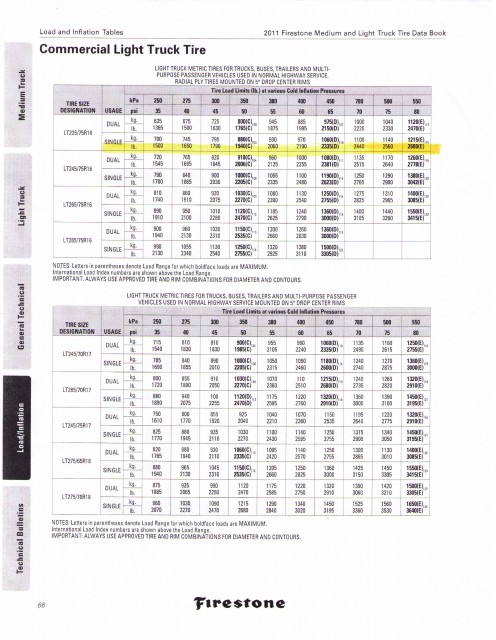
So I’ll just use the Firestones as an example here. (But the Blizzaks have the exact same numbers.) I need to mention that our Sprinter is a 2500, with the single rear wheels at each side. I’ll be using that when I read the tables. Here’s my page from the Firestone book.
So for the front axle, my weight was 3580 pounds. Since I wasn’t able to weigh each side individually, I’m just going to divide by two. 3580/2 gives me 1790 pounds per tire.
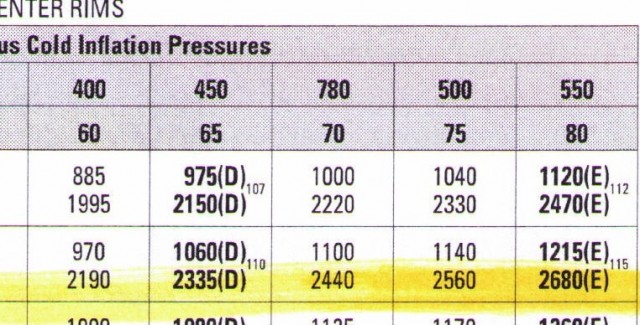
Now, with my size tire, in a single wheel configuration, it shows that I can get away with inflating my tires to just 45 psi (!) and they will still carry the 1790 pounds. But 45 psi seems awfully low to me. And remember that I wasn’t able to weigh both ends of the axle. So unless my load is exactly evenly distributed – 45 psi isn’t going to cut it.
Therefore, I’m going to select 50 psi for the front tires. That’s a cold inflation pressure. This will allow me a 300 pound difference – side to side – and the tires will still safely carry the load. And remember too, that the rig is never likely to get this heavy again.
Now, for the back tires, just dividing by half (4800/2) yields 2400 pounds per tire.
And from the tables, it shows that I should run 70 psi to handle this load. I could elect to run them as high as 75 psi and still be in the ballpark. But I am going to run with 70 psi.
This allows an 80 pound swing, side to side. That might not seem like a lot. But I know that my grey and black tanks are behind the rear axle. And since I don’t normally drive with them both insanely full – my typical running weight is about 60 gallons of fluid less than how I weighed. Water weighs about 8.3 pounds per (US) gallon. So normally, I’m about 8.3 x 60 = 498 pounds lighter behind the rear axle. That makes me pretty comfortable with 70 psi.
Step 7 – Inflate tires and go for a drive!
In my case, 50 psi front and 70 psi rear is a few pounds less than what the Mercedes Benz specified (by 5 and 9 pounds). But when I set the tires this way a drove a bit, I liked it. I found it to be less harsh – like when hitting seams in concrete highways – and it also provided good control when cornering. I am very confident that I am inflating the tires enough to carry the load. And since the Blizzaks have the same ratings, I have just one set of numbers to remember.
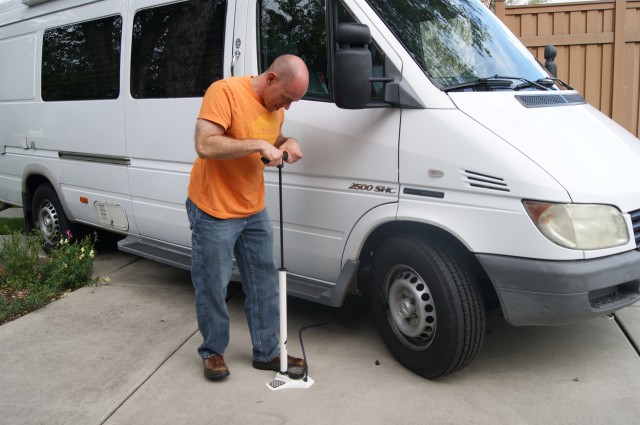 (OK. I don’t usually inflate my motorhome tires with a bicycle pump. But since I almost always travel with bikes and a pump, I thought I’d try it just to see. The good news is, it does work. The bad news is, it takes about half an hour per tire!)
Anyway, for my rig, my equipment, and my weights, 50 psi front and 70 psi rear were the answer.
How do these numbers shake out for your rig? There’s only one way to find out – so load up and head out to get your weight!
We’ll see you on the road.








Recently listened to a Neil deGrasse Tyson podcast and he explained how to determine the weight of your vehicle without a scale. You need to measure the ground contact area in inches of your tire and multiple them by the PSI of your tire. Add them together to get your vehicle weight.
Other than parking on glass with a crawl space underneath, did he offer a reasonable way to measure the contact patches?
Old post but the correct info is still correct and the “not quite correct” is still not quite correct.
The inflation on the tire sidewall is actually the minimum needed to support the stated load.
The tables provide info on the minimum inflation needed to support the stated load. Tires can tolerate higher pressure so the statement or implication that the inflation is the max the tire can tolerate is misleading.
The inflation we are talking about is ALWAYS the “cold” inflation which means when the tires have not been driven on for the last 2 to 3 hours and have not been in direct sunlight for the last 2 to 3 hours. Some people incorrectly look at the hot pressure, assume the pressure on the tire or mentioned in some post is the MAX pressure and they incorrectly bleed air out of their tires which is absolutely the wrong thing to do. By the way I am a tire design engineer with 40+ years experience. check you my blog http://www.rvtiresafety.net to learn more.
On my first set of tires, at 10K, I noticed that the rear tires, inflated to some 75 psi, were wearing in the middle of the tread. Well, of course, it was early days in my van build and I only had 1/3 of the rated weight.
I guessed, and lowered them to 45 psi, and of course now there is more weight on the back, and, wow, based on your table, I was pretty close.
So I like your way of figuring out the correct inflation.
Awesome! Glad this is working for you. It’s worked for us for years now.
Our new RV has dual rear wheels. We’ll be looking at the other column on the chart now!
James,
How about a session on this at GNR and Winnie B rallies?
Great info.
Thanks good info for a novice. Just bought my first RV 2005 Dynamax isata Grand tour. It’s a dually rear end. Do I assume that I do the math by 4 instead of 2? Thanks
Yes. If you’ve got 4 rear wheels, take the rear axle weight and divide by 4.
(Also be sure to use the dual wheel columns in any tables you reference – the load limits are different for a tire used in a dual configuration.
C–
What are the discussions on the consequences of getting a flat on one tire of a dually pair? I know we hardly get flats anymore, but, as least for me, I do get flats once/10 years.
1. The non-flat tire now has twice the weight. So that might be no different having a soft inflated tire, so maybe no big deal? At least for a short distance?
2. Flat tires on semi duellys often catch on fire; that happens on travel trailers as well, (not good; they are made of wood!!.) (That happened to a friend of mine family’s trailer in the 70s; the trailer was a complete loss). So I guess you pay double attn to the tire pressure sensors, and do so religiously?
In the old days, and maybe even now, truck drivers, before taking off, would walk around their rigs with a hammer to bang on each one of their 18 tires to make sure they were all under pressure.
–d
I plan to be installing additional tire pressure monitors. Look for details about that in an upcoming post and maybe a video.
James
james – Thnks 4 thoughtful, exacting, complicated tire pressure guide. whew! as 4 me, a quick service call 2 Mercedes Benz is about all I can do. I’ve installed extended valve stems on rear 2 make it easy on them. in my humble. world, I’ve learned the kiss rule. it
works. sometimes. luv ur stuff. Wrm rgds, Scott Nelson.
Great article. Found this article as I google trying to find tire pressure info for 2019 Coachman Galleria 24t. 61 psi for all tires was recommended to us. Just bought vehicle after 2000 miles from original owner, and drove 1000 miles and now go to check tires (my wife said drive was rough in back) and now find the two inner rear tires were not filled! How could manufacturer send a vehicle off the lot this way? Anyone else experience this? Any possible reason other than an incompetent dealer? Help!!
Yikes. First off… glad you’re OK.
I don’t want to speculate how the inner tires got to be “un-filled”. I’m pretty sure they would have left the chassis factory properly aired up. But a lot could have happened between the Mercedes factory, the coach manufacturer, the first owner, and you.
I’d recommend getting some kind of tire pressure monitoring system so that you can be sure this never happens again. This is the one we use: Tire Minder A1A
Inner rear tires can be a pain to reach to fill properly, so a lot of lazy and busy RV dealers simply don’t bother to check them, even though by law they have to before letting the rig roll off their lot. This is a apparently a very common occurrence when buying a used RV, as the rear inner tires have probably not been properly inflated since the manufacturer originally filled them. Glad you and your family are ok.
Great article. Help me out on reading the Tire chart when I have a Funseeker RV with dually tires on the rear axle? Is the weight specified per tire, therefore actually multiplied by 2?
The weight specified is indeed per tire. Though you will have to de-rate a bit for duallys. (That bit should be on the chart.)
We’re new to RVs so your posts are really helping us. You use a tire pressure monitoring system. Do you have any recommendations as to which are the best or what to look for?
Currently, we’re using a TireMinder A1A. It works well for us (and in a van, I didn’t install the booster).
Most of the systems available are pretty similar. In fact, you can usually take the sensors from one system and pair them with another.
The biggest thing to look out for is that the sensors can accommodate the higher pressures that we typically run in RV tires.
Another feature we like is that – since we sometimes tow – we can easily disconnect the sensors on our trailer so that we don’t get false warnings when we’re not towing it.
James,
Just saw your recent video on Cat Scale app and it led me to this post. I have a 2015 Navion and I run 61 psi cold as recommended. On EezTire TPMS, it will get up to 72 psi when hot. So if you are setting at 70 when cold, are you worried that it will get past the 80psi max mark?
Good Question!
Our tires actually do get over 80 psi, depending on time of year, temperatures, etc.
Generally speaking, when you see a tire pressure listed anywhere (sidewall, door jamb, inflation table), the pressure refers to a “cold” pressure. They take into account that the tire will heat up and the pressure will increase.
For example, the Winnebago-supplied sticker on our Travato lists 80 psi cold for the rear tires. If we had to worry about them heating up, we pretty much couldn’t drive!
Thanks for asking. That was a good one!
I have 1n older 1995 36′ Holliday Rambler Endeavor, which calls for LT235/5R16 120E tires. Such tires are rated for a maximum tire pressure of 80 lbs when cold.
The tire tag on the Endeavor says to inflate these tires too;
Front tires: 80lbs
Dually Tires: 60 lbs
Tag tires: 65lbs
I have a lot of concerns about these tire specs,
First; why would you have the front tires maxed out at 80lbs when cold, when these tires are bound to get over 90lbs in really hot weather?
Second; why are the dually tires only 60lbs and the tag 5 lbs higher?
Well, I didn’t help with the design of your particular rig, and I’ve never owned one, so I can’t really say why they would have chosen those particular PSI recommendations.
I can give you a few thoughts though (that may give you some comfort).
First – tire pressures are ALWAYS given as “cold” numbers. So there’s no question in my mind that they knew this when they specified the pressures. So, tire heating is taken into account when the “MAX” stamped on the tire is rated.
Second – the burst pressure of tires is crazy high. You’re extremely unlikely to hit it while driving. I’d never say “never”… but it’s practically never.
Third – I think the dual tires are set considerably lower because… you know… there’s two of them. The load is spread out over twice as many tires.
And finally:
We did a video a while ago where I addressed some of the concerns about overinflation. You can see that video here: Are our tires overinflated?
Awesome article, I am new to the RV life. And it’s funny to see this.
As a merchant mariner and chief engineer. I thought I was the only one doing this kind of thing 🙂
I will most definitely look up the rest of your post.
Thanks for being complete in this post.
Happy trails
Glad you liked it.
I’m learning there are more of “us” out there than you might think. 🙂
See you on the road!
U even made it easy for me to understand. Thanks
Glad it helped!
If you want to learn more about tires in RV use you might check out my Blog. http://www.rvtiresafety.net. I am a tire engineer and RV OWNER.
I’m late to the party; very new to RV’ing; and this type of info is invaluable. Of course, I have a different tire on my Forest River SunSeeker 2400R MBS – Continental’s. Here’s their load info – https://blobs.continental-tires.com/www8/servlet/blob/85806/e0854f2c7866c64da551474b998ef8b3/download-technical-databook-data.pdf
Thanks for a great article!!!
Thanks for the link!
Now, if I could just find the same one for their bicycle tires…
You write some of the best, most well-thought-out articles! Question: What to do if your weight says you are over GVWR? Is there a fudge-factor built-in? I have a 6 month old Leisure Unity Murphy Bed. I cannot figure out where the load capacity disappeared. I have a diesel generator (after watching your excellent sound-off test). I added custom leaf springs, a leveling system, a beefier Hellwig sway bar, and new rear Fox Shocks tuned for the RV. I’m just not sure what I can throw out, or how dangerous exceeding the GVWR really is. Also, I was hopibg the leaf springs would improve the load capacity, although I’m told they are not allowed to claim that it does.
Glad you like our posts!
As far as overloading a vehicle – I’d have to advise you to do whatever you can to get your weight below the GVWR. Think of this: In addition to how much weight you can *carry*, the GVWR is also a rating of how much weight you can *safely stop*! Easy things to do in your situation are to not travel with full tanks, either waste or fresh. Dump the holding tanks before you leave and fill up with fresh water once you get there. The liquid weight can really add up! Other than that, think like a camper van RVer, and really examine what you actually use on a trip.
Good Luck!
Load carrying capacity is based on the weakest link in the chain (which is frequently the tires). Increasing the load carrying capacity of the leaf springs simply means that THAT ONE component can carry more weight, not that the tires/axles/frame can carry more weight. How dangerous is it to go over the GVWR? Very. While there is most likely a certain amount of “fudge factor” there, do you really want to guess how much? Ever see “The Long Long Trailer” where the wife hides her prized rock collection in the trailer? You really don’t want to be that person.
James,
Are there any currently available systems to monitor tire temperatures, say with permanently mounted infra red sensors when the tires are rolling? This would seem to be another way to determine if you under inflated a tire. One would have to establish a baseline as I am guessing tire companies don’t publish temp vs. load curves. Izze racing has an advanced IR tire surface temp monitoring system. but me with my dually F350 and 4 tires on my fiver would take me into data overload. How about one integrated temperature average per tire, with a system to alarm you if any one tire went over the average of all tire temperatures by some value. Maybe we need to get together and build such a system if none is out there!
The one I use is called the TireTraker. (Yeah, they spelled it funny.) You can buy it on Amazon, here.
Besides tire pressures, it also monitors temperatures through the valve stem end caps. It’s probably not as accurate as infrared monitoring, but while I’m driving, I’m only really concerned about emergency situations. I think it would handle those just fine. It also has alarms for over/under temp, over/under pressure. You can buy additional valve caps to extend to quite a few tires. Check it out!
Check out Tire Minder. Does all you ask and more. I am very happy with mine.
We’ve got one. 😉
This one, in fact.
have a 08 national tropical motor home, only had it 6 mos. put new tires on sure track new tires 255/70r/22.5. dealer put in 115 lbs each. have driven 300 Miles. very harsh drive feel every dent. put on new shocks plus safe t plus stabilizer better but still feeling all the bumps. dropped the tire pressure to 95 psi, much better. I’m about 8k below max load. I agree with your plan to come up with a desired psi.
Lots of RV forums discuss tire pressures, and they are all over the map. Mostly they recommend max pressure. Your method is the correct one. And well written. You should post it on the forums. I’ve also read the Bicycle Quarterly articles, same principle: inflate according to load on the tire. Re: your road bike/buffalo blog: just ride a touring bike with 35mm tires and you have no problem on dirt, and also get a slightly better workout. Not that much more, actually.
Curious if you’ve run the numbers for the Travato, and how they came out vs. the chassis plate.
I haven’t run them yet.
I really want to, but since Dodge went with Nexen tires for the ProMaster, I can’t find load and inflation tables for them!
I even called Nexen, and it seems they just don’t have them. They have maximum loads, but nothing else.
When I switch to Blizzaks in the late fall, this will come to mind again, and I’ll run them then.
James, I know this is years removed from your response above, but after searching off and on for a few months I just found Nexen pressure vs. load charts on “tirepressure.com.” My Travato, fully loaded for a two-month trip last spring, weighed in at 4100 lbs on the front axle and 4580 pounds on the rear axle. Following your methodology, including adding margin, I came up with 60 psi for the front tires and 70 psi for the rear, instead of the door sticker pressures of 65 and 80.
Your weights and pressures may vary, but this chart may be useful. I’d be more comfortable using it if you get a chance to “weigh in” on it (pun intended!).
Pete
Same concept as your road bike tires. Here is the article that started all the discussion about bike tire inflation. This has helped me with my road bike and riding grand fondos.
http://www.bikequarterly.com/images/TireDrop.pdf
Indy Bruce
I read that same article about bike tire pressure!! Excellent!!
That’s why my bike tires (Conti GP 4000s) are 100 in the front and 110 in the rear. Unless it’s raining.
OK, I’m late to this, I know. But I wanted to add something about side-to-side weighing. I found a CAT scale with a wide apron on each side (and no steep dropoff!), and, after a normal weighing, carefully drove my class A onto the scale a second time with one side in the middle of the scale and the other side on the apron. After getting out and double-checking my position, I signaled for a weight. I then knew what one side weighed, and subtraction gave me the other side. It worked well, and they didn’t even charge me full price for the second weighing.
Genius! Thanks for the tip.
Great post james!
Nice information in this blog about tire pressure and useful information which you have shred with us. keep sharing…
Great post, James!
If you’re trailering, it’s also important to set the tire pressure correctly. You can find some good information here: Trailer Tires Article
Read with interest your cold inflation scheme and we are doing much the same, except for the weighing bit – yes, that needs (must) be done.
Presently we are fixing to travel back to Advanced RV – last year they installed a screen door for us, this year we are getting upper cabinets for the cab. For the trip we thought we would get some new tires, do you have any recommendations?
Das Bus originally came with Michelin LTX tires, which we liked. When it came time to replace them, the Michelins seemed a bit spendy. The staff at our local tire shop recommended Firestone Transforce HTs. They put them on local ski shuttle vans, and were having good luck with them. We have been VERY happy with them on our Sprinter. They’re less expensive than the Michelins, and the ride is just as nice.
And very cool that Advanced RV is making some additional storage for you! Tell them we said “Hi!”
Great piece on tire inflation! We’ve towed 3 different travel trailers with our Ford E350 van and each unit was a different weight and we used three different hitches. Weighing your rig, adjusting the tire pressure to the load/inflation tables and then checking how your weight distribution hitch changes things when it’s adjusted properly is all part of the thinking person’s approach to Rv’ing. I’ve never been able to weigh each wheel independently but that would be an eye opener for sure!
Thanks for your posts!
Thanks, Tom! I’ve never been able to do the four-corner weighing either. I hear sometimes they offer this at the big national rallies, so it’s on my list to check out. I’ve spent enough time under my rig so that I think my assumptions about weight distribution are good, but I would love to confirm. Thanks for the kind words. See you on the road!
Great idea–Now Stef can have an article on bike tire pump exercise!! Deflate-Inflate