This post may contain affiliate links.
I dropped a teaser about this a few weeks ago, so now it’s time I finally came clean with all the details. Since that time, a number of folks at Winnebago’s Grand National Rally, and on the Lake Superior Adventure have seen Lance in action, so some of this has already leaked out. That’s OK, it’s all pretty cool stuff.
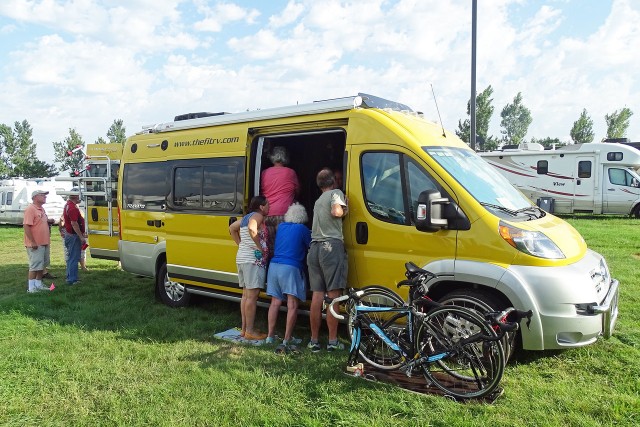
But most people seemed to be more interested in the curtains I made than in the state of the art power system. I found that strange…
I had been thinking about a system like this for a long time. My interest with it probably began when we visited Advanced RV in Ohio. These days, there are lots of people adding lithium batteries to RVs. Advanced-RV has been doing it for a while now, and their installs work very well, from all reports. They approach RV power as an integrated system (rather than just installing a bunch of parts and hoping for the best). They put a lot of work into that integration, and I think their success is due to that. I wanted to emulate this systems approach when upgrading our RVs power.
System Goals
I had two major goals here. The first one was the same as many people: I wanted to do away with the generator. In our case though, it wasn’t because the generator was loud. (OK. I mean, yes, it was loud, but we could deal with that.) It had more to do with the fact that after almost a year, we had only 13 hours on the generator – and 10 of them were just to exercise it. Exercising the generator was pretty much the whole reason I added an auto-generator-start module. So from a usage perspective, the generator was a big “meh”.
The other strike the generator had against it was its unwillingness to start at higher altitudes. I’m thinking of our trip to the Fishlake National Forest in central Utah. At 9000 feet, the generator just refused to start. We didn’t actually need the generator, we just wanted to see if it would start (and we could hear a Honda 2000 not too far away). I know there are carburetor kits for high altitude that would have helped. But a couple months later, we were camping on the beach in California at sea level. Considering where the generator was mounted, messing with the carburetor as we changed altitude seemed like a real pain for something we barely used.

Our Winterproof Travato at 9000 feet. All systems go – EXCEPT THE GENERATOR…
The other major goal I had was that I really don’t want to think about it too much. We all know I like to tinker with the RV, but after reading about lithium batteries and inverters for the better part of two years, I’m over it. I want things to work without my having to constantly monitor and tweak them.
Now, that doesn’t mean I don’t have a healthy curiosity in the data and the results. But you may be disappointed in this post if you’re expecting to read things like:
“By decreasing the float voltage from 13.6 to 13.4 volts, I was able to increase the remaining capacity at one year by 3.2%. This translates to an increased lifespan of 4398 full discharge/charge cycles – up from 4261. Those extra 137 discharge/charge cycles will likely be an even greater number since I never let my batteries get below 84.9% full or experience temperatures above 90 degrees Fahrenheit. ”
So, fair warning to battery purists: don’t gasp in horror as you read about me deliberately draining the expensive battery until the coach went dark. (Yes. I did. And it was awesome.)
System Design
Given my aforementioned apathy toward battery capacity and charging system discussion, it won’t come as a surprise that I let someone else design the system for me. (I’m an aerospace engineer – not electrical!) In this case, it was the good folks at Xantrex (a division of Schneider Electric) who did the heavy lifting on the design side. I can’t say enough good things about the system they’ve put together.
They took the lead in contacting suppliers of components that were already on the market and working with them to gather information, size components, adjust parameters, work out communication protocols, and basically make sure everything would work together as a system when it was all said and done. Though the components were all sourced from different vendors, they’ve so far worked together flawlessly. All they’re missing is a catchy name. So just pick one word from the first column and one word from the second, add them together, and let’s pretend that’s the name. (I’m going with “Amp-Camp”!)

If this sounds like your marketing department… I’m really sorry.
But the folks at Xantrex didn’t stop at just designing the system and sending me a parts list. They actually showed up at FitRV HQ and helped me install and remove stuff. This was a good thing. Since the amounts of stored electricity we’re talking about can be potentially harmful, I was glad to have the assistance and extra eyes for safety.
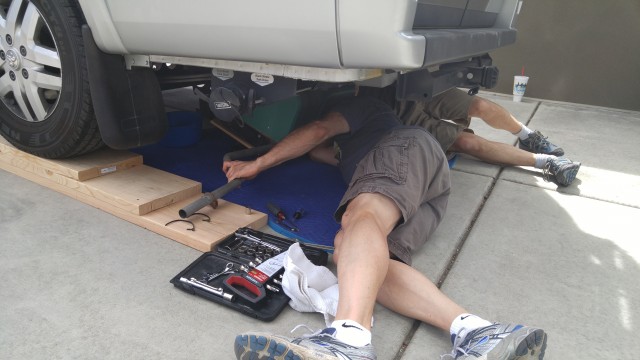
They even helped me drop the generator when it was all over!
The system they put together consisted of the following components.
Second Alternator for the ProMaster
This proved to be the most difficult and cautionary piece of the whole puzzle, mainly because this involves messing with the engine of your ProMaster. I’m good with wood, and OK with electrical and plumbing, but I’m no mechanic. So I had to find help to install this – hopefully without blowing up my warranty. Fortunately, the team at Larry H. Miller Dodge in Sandy, UT agreed to take on the task.
The alternator kit is already used in other ProMaster based RVs. It comes with everything you need to complete the installation. Here is the kit as I unpacked it on my bench and immediately decided there was no way I was going to mess with it.
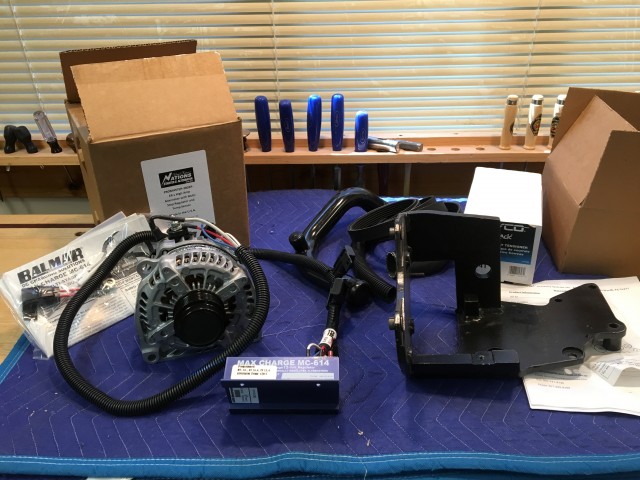
When I got to step 1, I knew I was in over my head.
The installation is pretty involved. You have to drop the air conditioner compressor, install a pulley; install a bracket; add the second alternator and belt and tensioner; cut and re-route coolant hoses, and somehow get it all back together. Here’s what it looked like halfway through, with the bracket installed and the compressor hanging loose.
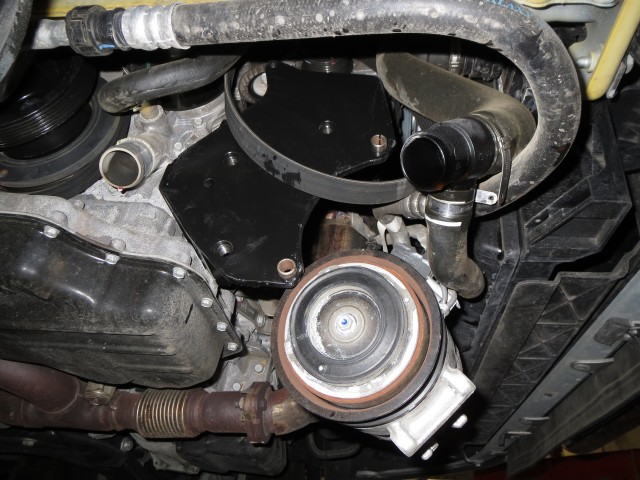
And when it’s all done, it looks like this.
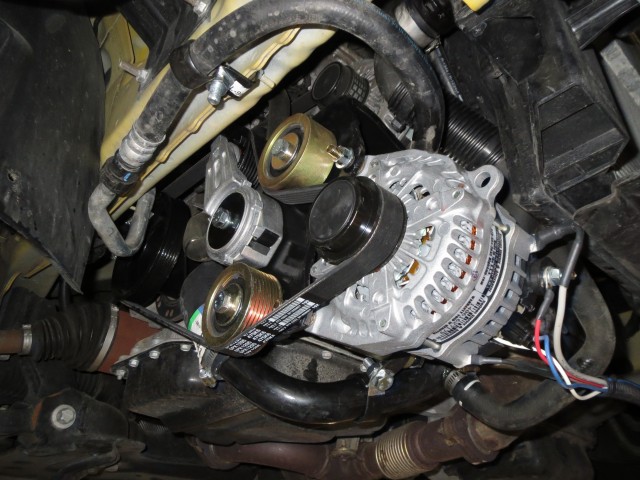
It took a whole day to get it installed, and I was pretty happy with the results for about 50 miles. Then this happened.
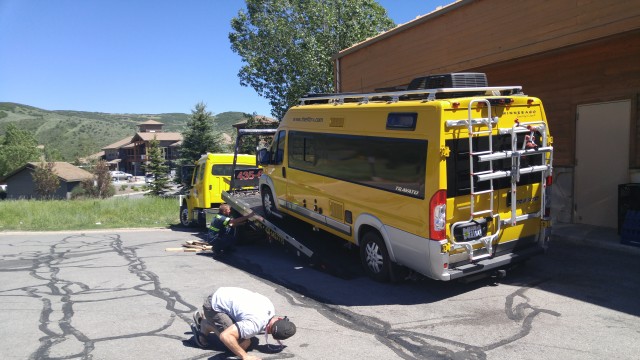
While heading up Parley’s Canyon toward Park City, Lance’s dash lit up like a Christmas tree, and things severely overheated pretty much all at once. We made it up (barely) and coasted down the other side to wait at a gas station until we could get a tow.
What had happened was that the new hose and belt routings were just a bit too close to each other. The belt, after 50 miles or so, cut through the radiator hose, and spewed all the coolant onto the freeway. Boom! Instant overheating.
Fortunately, the crew at Larry H. Miller Dodge are real stand-up folks. They owned the problem and fixed it at no additional charge. They also took ownership of the next two problems which had Lance leaking coolant: a warped thermostat housing, and a damaged water pump. They fixed these as follow-on issues to the original mistake. So, other than having to go back and forth to the dealership a few more times than I had planned, it all worked out well in the end. Since then, we’ve put about 2000 miles on Lance, and everything has held up, so we’re pretty confident that all those problems are behind us.
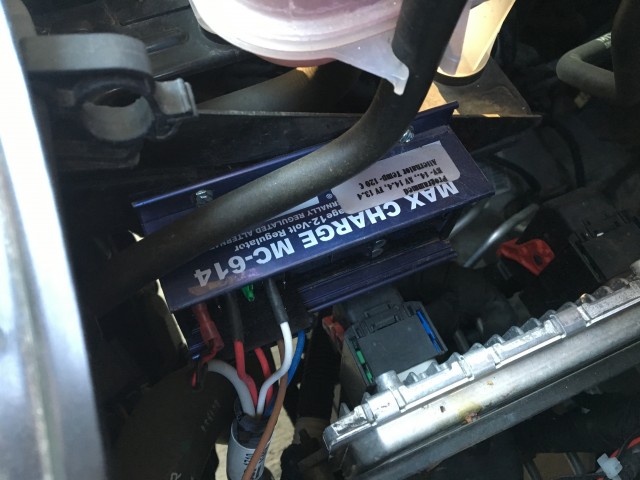
This alternator also came with a voltage regulator attached. This is a key part of the system, and it does two things. First, it ensures that the alternator’s output is properly matched to the lithium batteries. This is a problem for single-alternator systems. The chassis alternator is designed to charge the starting battery, but that charge profile likely isn’t optimal for the house batteries – especially if they’re lithium. So by having a second alternator with a properly regulated output, the lithium batteries can have it their way, and the rest of your chassis electronics can have it theirs. Everyone is happy.
The second important feature of the voltage regulator is that it has a control circuit on it which will allow the NeverDie Battery Management System (BMS) on the Lithionics battery to “turn off” the alternator when it decides it’s full. This did require running a control wire from the battery to the voltage regulator, but it works – I’ve seen it in action. Working out that bit of communication is why I was glad to have Xantrex designing the system for me. It’s not likely that, as an individual, I could have worked that out between the three suppliers involved.
Zamp Solar Charge Controller
Our Travato was already sporting 300 watts of solar panels connected to a Zamp solar charge controller. But that controller was programmed for AGM batteries, which require a different charge profile than our new lithium battery.
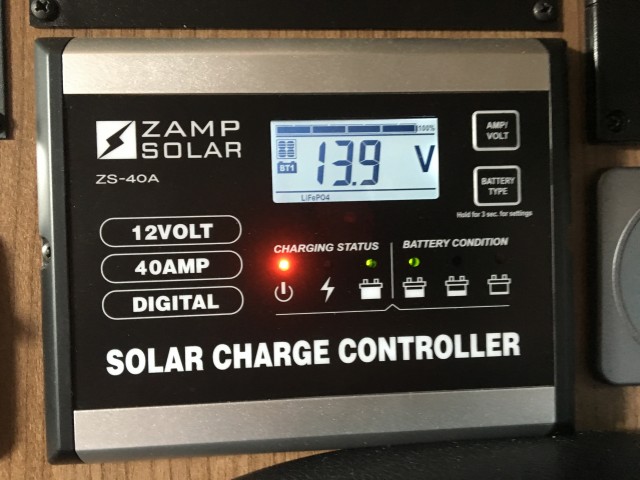
Fortunately, Xantrex had been working with the people at Zamp as well. In the year since we purchased our Travato, Zamp had already come out with a lithium-ready controller. But Xantrex had worked with them further to tweak the charge profile to match the other components in the system. When receiving power and set for lithium, the Zamp system delivers bulk and float charges as specified by Xantrex (14.6 and 13.4 volts, respectively). As a bonus, this new charge controller will handle 40 amps as opposed to the previous 30.
Lithionics Battery
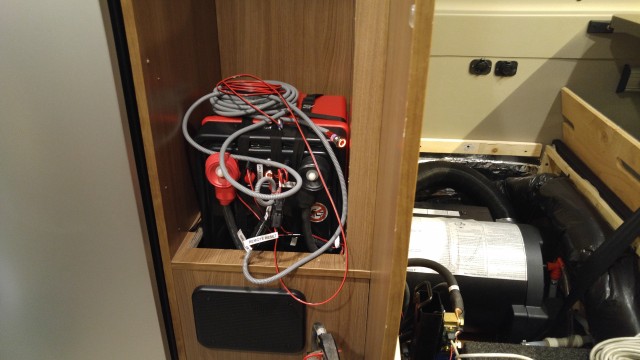
This battery is what really makes all this possible. It’s a 420 Amp Hour battery from Lithionics, with an on-board battery management system. It’s a lithium battery, which brings some special considerations.
I had always been worried, when thinking about lithium batteries, about the potential for damage from the cold. You see, lithium batteries can be damaged by charging them at temperatures below freezing. Since we like to take our RV out in cold weather, and since the stock battery and generator locations in our Travato are underneath the body of the van, this was a problem. I had assumed that we’d be using the generator mounting location for this battery, and was thinking of heating blankets, insulation, and whatnot.
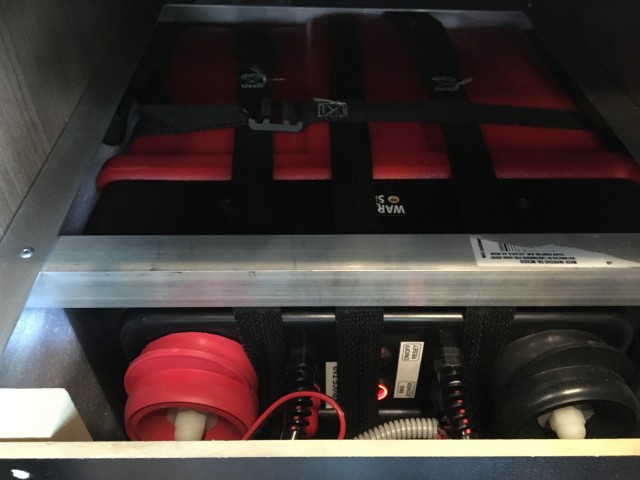
The Xantrex guys actually thought up this mounting location, and we’re glad they did. We lost one drawer of storage in the pantry, but what that bought us was automatic climate control for the battery for zero effort or expense. It’s genius, and similar to how I passively heat the water lines in the winter.
This did require a bit of cabinet modification, and some angle aluminum that I riveted together to keep things from moving when underway. Also, this battery has two user-operated button controls, which I mounted on the cover I had to build.
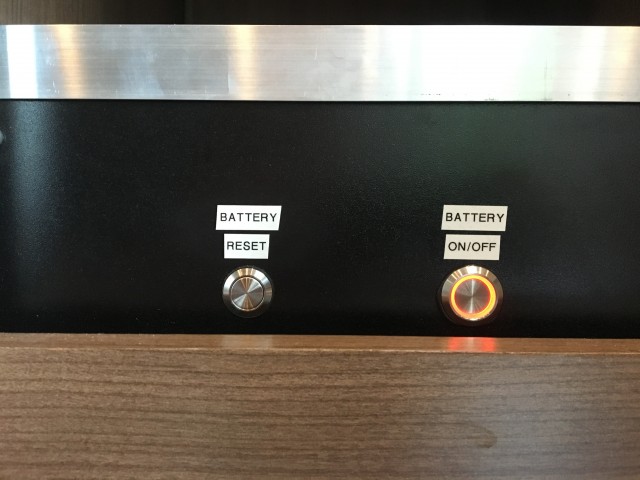
The control with the lit circle is the master battery on/off switch. It comes in very handy when you’re working on the RV and get nervous about the rather large energy store on your 12 volt system. This is different from the Winnebago-installed coach master switch because this one just controls this one battery. With this switch off and the coach switch on, for example, you would still have power from solar (assuming the sun is out). It’s kind of interesting, and I promise you’ll only forget the difference between the two once…
The second button is the “reset” switch. I only need it when I drain the battery to the point where the BMS shuts things down. This button is how you get your battery and electrical system “booted up” again. Yes, I’ve done this already. We’re getting to that.
And, since I’ve mentioned it a few times, let’s discuss the on board NeverDie BMS. It protects against overcharging, over discharging, and a host of other things. But it’s mainly those first two I’m concerned with. I’d mentioned before that it has a circuit that is tied to the voltage regulator on the second alternator. It does, and it’s the BMS that decides “I’ve had enough charging, thank you,” and kills the alternator. That keeps the battery from facing massive overcharging on a long road trip, for example.
On the discharge side, the BMS prevents running the battery all the way into the ground. It shuts down the battery when it’s about 90% discharged. Yet it retains enough reserve charge in the battery that it can be re-booted, as I mentioned above.
Xantrex Freedom SW Inverter
Naturally, Xantrex designed the 120 volt side of things around their own inverter, the Freedom SW 3012 with their System Control Panel. This is a true sine wave inverter with a 3000 Watt continuous output and a surge current rated at 80 amps. It’s a beast of an inverter/charger, but fortunately, it fits in the space where the previous Magnum inverter lived.
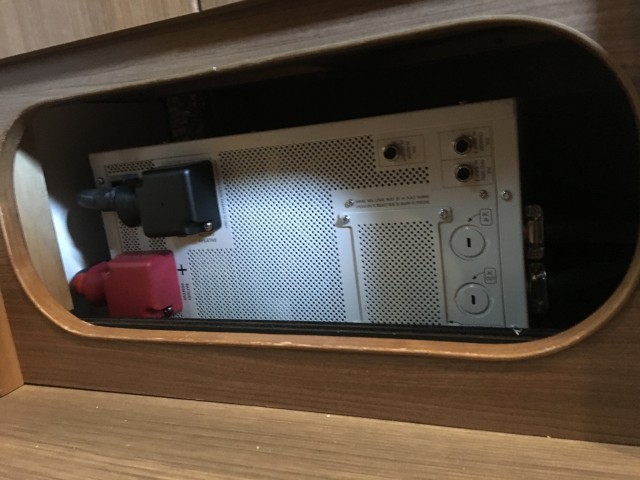
The 80 amp peak rating is the key driver here, as it will reliably start the air conditioner in our Travato. That air conditioner has a “Locked Rotor Amps” rating of 63, which represents the peak cold-start load. With a rating well above that, the Xantrex inverter has started our air conditioner many times now without complaint.
Beyond that, the Freedom SW is also a charger, which eliminates the need for the converter, and so we removed it, along with the transfer switch. The other thing to note is that Xantrex has updated the software in their inverter to work properly with lithium batteries. They updated the inverter on the fly using the ports on it, so we have the very latest revision.
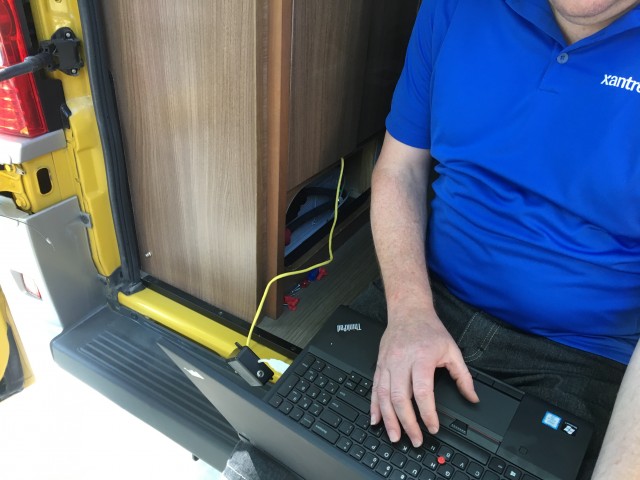
Coleman Mach 10 Air Conditioner
Let’s talk about the elephant in the room. This is what it’s all about! When everyone talks about using large lithium batteries and large inverters in their RV, all they really care about is powering the air conditioner. Anything else you typically run in an RV can get by with much less battery or inverter capacity. The success of any RV power system is going to be measured by how long it can run an air conditioner.
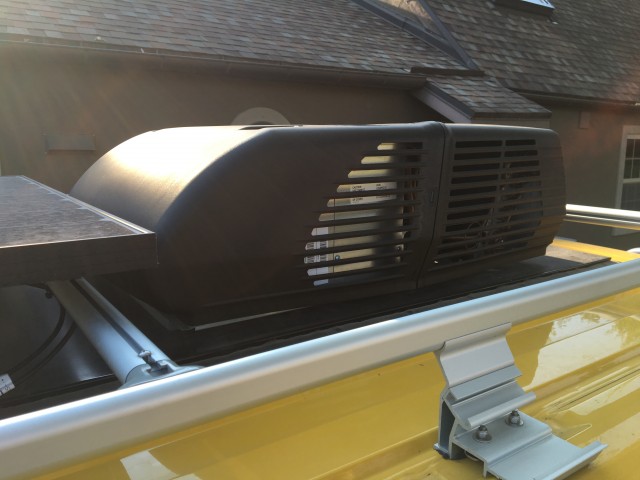
With this in mind, some time ago, we had swapped our Coleman Mach 8 air conditioner for a Mach 10. Besides being just a hair taller, the Mach 10 runs at only 12-13 amps (@120v) versus the 15-16 amps the Mach 8 is rated for. When you’re trying to squeeze all the performance you can out of your batteries, those 2-4 amps matter, because they translate to 20-40 amps at 12 volts. That’s a 60 to 120 Amp-Hour savings over 3 hours, which is huge.
Our goal with the battery and inverter setup is to run the air conditioner for three hours without having to run the vehicle. Three hours represents the longest race I typically compete in (during which Stef might be stuck hanging back in the RV). It’s also about an hour longer than we ever ran the generator at once during our first year in the Travato. After three hours, we’d be fine to run the engine for a while to recharge.
One additional benefit of the Mach 10 vs the Mach 8 is that it’s approximately 50 billion times quieter*. The reduced volume is very noticeable on the outside, but not so much when you’re trying to sleep 18 inches from the air distribution box inside.
* Claim is pure hyperbole, and not verified.
Wiring and Monitoring
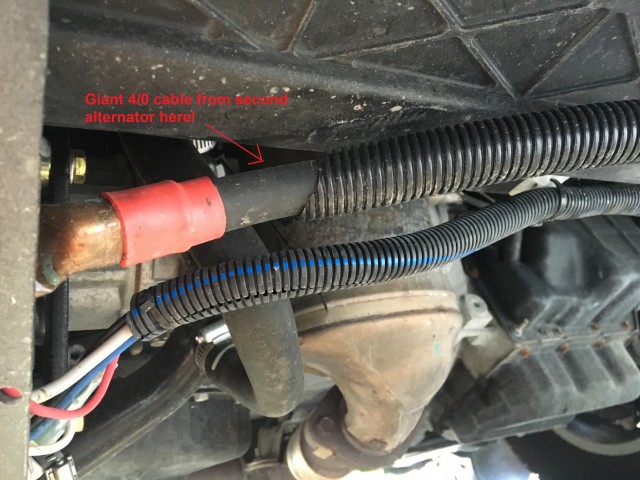
We wired all of the high-amp runs in the van with 4/0 welding cable, and used 300 amp fuses where appropriate. This is thick copper, and with the battery at mid-ship, none of the runs are super long, so I’m not worried about any voltage drops. Also, the welding cable is extremely flexible, so we had no difficulties in fishing it where it needed to go.
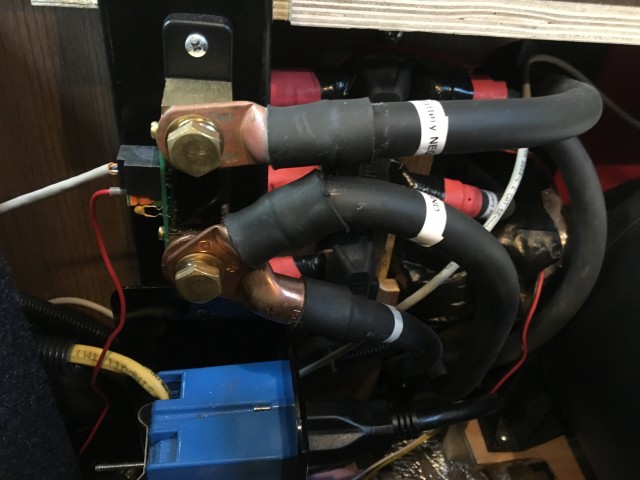
And have a look at that! To me, it looks something like what I imagine the first electric chair looked like. But what I do want you to notice is the presence of the shunt, which is part of what provides extremely accurate battery monitoring via this:
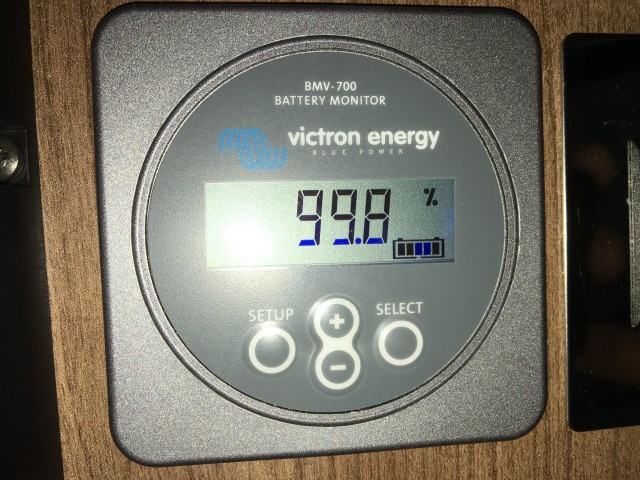
Our monitoring needs are met by this Victron battery monitor. I’m a big fan of hyper-accurate battery monitoring. If you’re going to monitor the battery, you might as well do it right. I installed a Trimetric in Das Bus. Our Magnum setup also had a shunt-based battery monitor, and now we have this Victron.
In addition to the basic amps in/amps out monitoring, it also gives state-of-charge (SOC), and estimated runtime based on the current load. I’ve also set it to alarm at 10% of usable capacity remaining.
The other item we have is this switch.
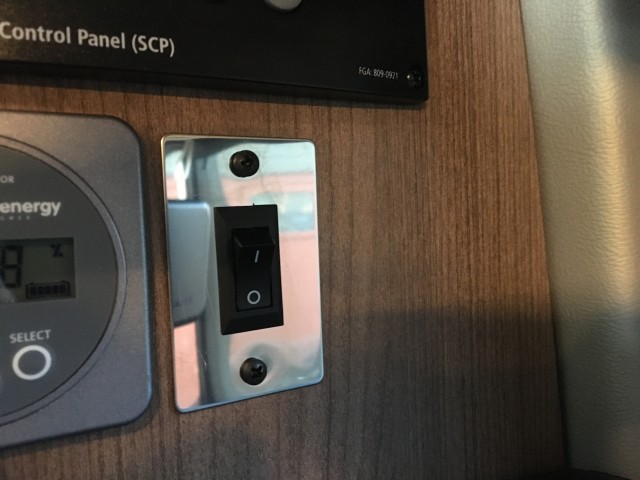
This switch performs a very important function: it keeps the two 12 volt electrical systems (chassis and house) separate. You see, from Winnebago, the house and chassis batteries are connected when either of two conditions occurs:
- The engine is running.
- The “Battery Boost” switch is pressed.
With a highly regulated lithium battery setup, I pretty much NEVER want the first condition to connect the batteries. But I may one day briefly want the second. This switch interrupts the circuit that activates the solenoid at the rear of the coach that connects the batteries. As long as the switch is off, the batteries will never be connected. If the switch were “on”, the two electrical systems could be connected and I could then use the boost switch.
There is also the potential that if one or the other of my alternators fails, I could turn on the switch and run both the vehicle and house with the other alternator. It’s kind of like a weird backup alternator. I don’t know if I’d ever do that unless it was a huge emergency, but it’s interesting to think about. Realistically, what I’ll probably do is put some sort of covered missile-launcher-style switch there instead so we never accidentally turn it on.
The Electric Travato in Daily Use
So when you hook all this stuff up, how does it run, day to day? In a word, fantastic! In normal use, you really never need to pay much attention to things, so if you’ve been overwhelmed reading this far, never fear. About the only thing you really need to know is which button to push to turn the inverter on and off. I’ve taught Stef which one it is, so life is good.
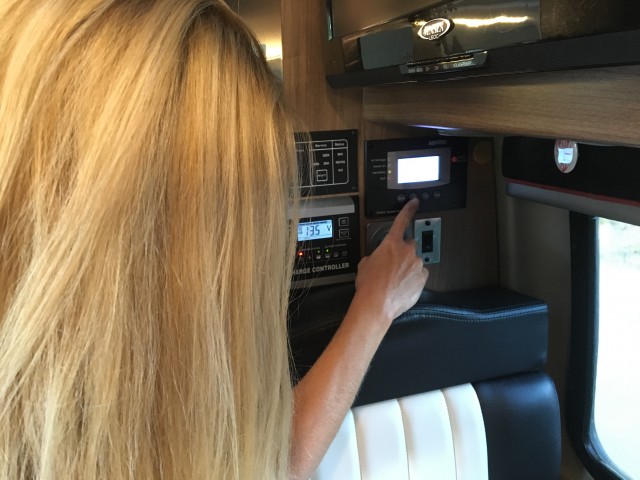
The new inverter has the Stef Seal of Approval
We’ve tried things like running the rear air conditioner while driving. That works just fine, and we’re still charging the battery when we do. The one problem we did encounter was traveling across Montana in 100+ degree heat. After running the rear AC from the inverter for a few hours, it got pretty hot cooped up in its little cabinet. Eventually, it shut itself down. But five minutes later, it turned back on again and everything was humming along. It was a pretty graceful recovery in my opinion. I’m considering some sort of venting for that cabinet – but it’s not a high priority since it only happened one time under extreme conditions.
I’ve run the inverter all day while I worked and Stef drove. No problems encountered, and I have no concerns about running the inverter hard for extended periods.
We’ve run the microwave and the air conditioner at the same time from the inverter, and that worked just fine, too. In the event we ever really did start using lots of juice, the EMS built into the coach by Winnebago would shut something down before we got into trouble, if the inverter itself didn’t stop the foolishness first.
I did weigh the RV before and after. There was not much change. Here we are “before”. But remember, I already had a smaller inverter installed.
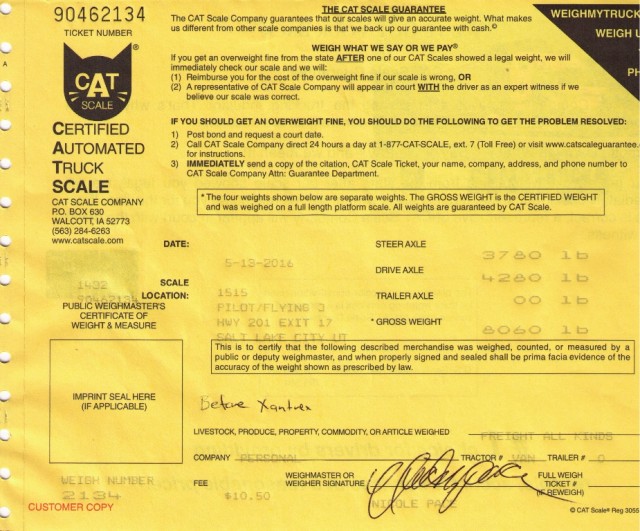
And here’s the weight after. 20 pounds lighter overall, and some of that weight shifted forward a bit.
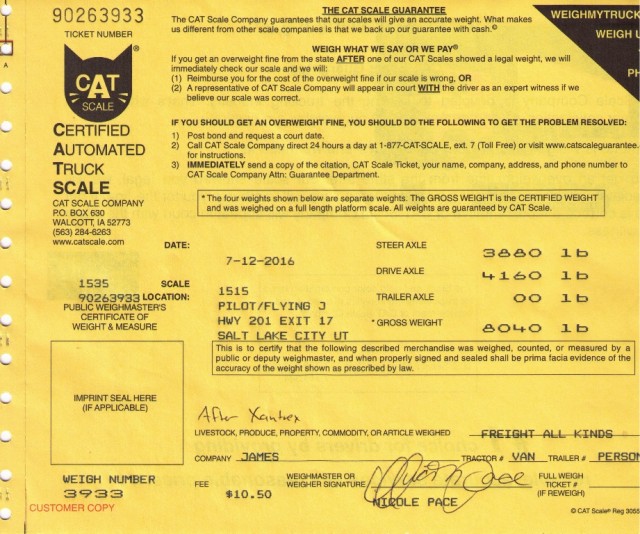
In the big scheme of things – that’s not much of a change, weight wise. We lost the generator, converter, transfer switch, and two AGM batteries. We added a big battery, a larger inverter, and quite a bit of 4/0 cabling. I would have thought the weight would have changed more.
As far as charging, without paying much attention to it, the batteries stay pretty close to full the entire time we use the rig. The combination of solar and driving keeps us pretty topped off. So I’m well on my way to meeting that “don’t pay much attention to it” goal. And I think Stef’s already there.
Some Actual Testing Results
All right, all right. What fun would it be if I didn’t share some real numbers and results? The litmus test of this whole thing is “how long can it run the air conditioner?” So let me get this out of the way.
3 hours and 19 minutes.
Here are the particulars of the test:
- Outside Temperature: 88-82 degrees
- AC Run Time: 3 hours 19 minutes (Some cycling of AC in second hour and after. But never less than 80% duty cycle even in those hours.)
- During this time, 2.6 Amp-Hours were contributed by the Zamp solar system. (I had parked in the shade to keep that to a minimum.)
- Ending event: Lithionics BMS shutdown. The coach went completely dark.
- Voltage was 11.87 Volts according to the Victron monitor approximately 10 minutes before shutdown. I didn’t catch it right at shutdown.
- Amp-Hours extracted: Greater than the 377 AH drawn from battery according to Victron monitor approximately 10 minutes before shutdown.
So basically, the BMS called the show over with just less than 10% of charge remaining, as expected. I’d like to be able to say I was surprised about something here, but everything worked exactly as advertised.
Restarting the coach from that dark state was very simple. I plugged in the coach. Everything is still dark at that point, because with the battery off, the inverter/charger didn’t recognize that there was anything to charge. Then a quick press of the reset button, and everything lit up and the battery started charging. It’s a good thing that the BMS leaves itself a little room to restart on shutdown. I suppose I could have attempted the startup with the engine and second alternator running instead, if shore power was not available.
During this test, the Victron battery monitor was very accurate as it counted down, both in time remaining and in percentage. Both of those hit zero just before the shutdown event. And it alarmed at 10% of usable capacity remaining just as programmed. If I hadn’t been determined to see how far I could go, I would have applied some charging when that alarm went off.
But besides that one test, here are some other data points for those who want to know.
The Coleman Mach 10, running through the Xantrex inverter, burns 11amps AC, which translates to 101 amps DC, according to the Xantrex Control Panel. I would have said 102 ((118 x 11)/12.7), but whatever.
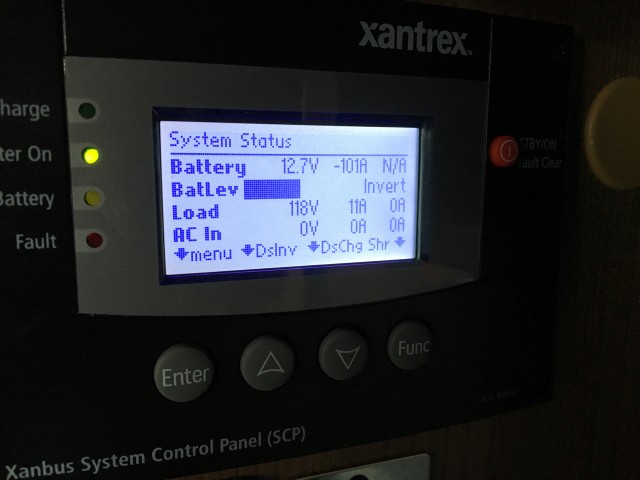
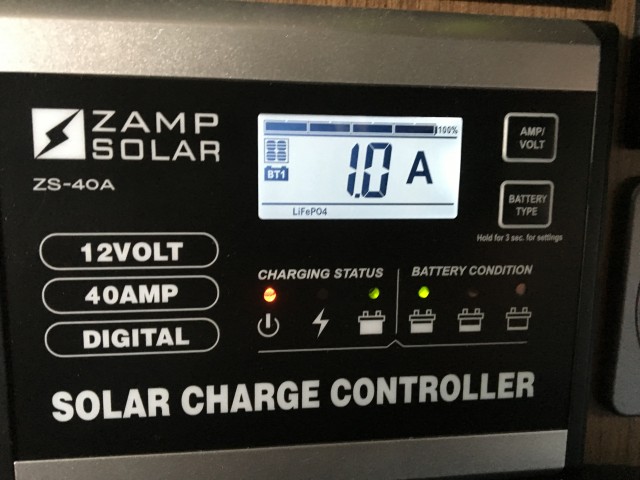
When I took this picture, the Zamp solar charge system was contributing about 1.0 amps. (Again, parked in the shade.)
The battery monitor at this moment was showing 112.5 amps going out of the battery

So with a little math, we can calculate: Amps out of the battery + Amps Contributed by Solar – Inverter Output – 2.5 amps for lights, etc = losses. 112.5 + 1 – 101 – 2.5. I come up with 10 amps of losses when running the AC. With just the inverter on and no AC running, it uses about 3.8 amps. So all that means, it would seem, is that the system is over 90% efficient. Xantrex only claims 90%, so it seems they’re actually better than they claim.
I’ve mentioned that we’ve run the microwave and AC with no problems. But just to see how far I could push it, while the air was on, I plugged in an 1800 watt induction cooktop and turned it up to 10. Besides boiling water in 90 seconds, I got a peak of 280.1 amps being drawn down from the batteries!
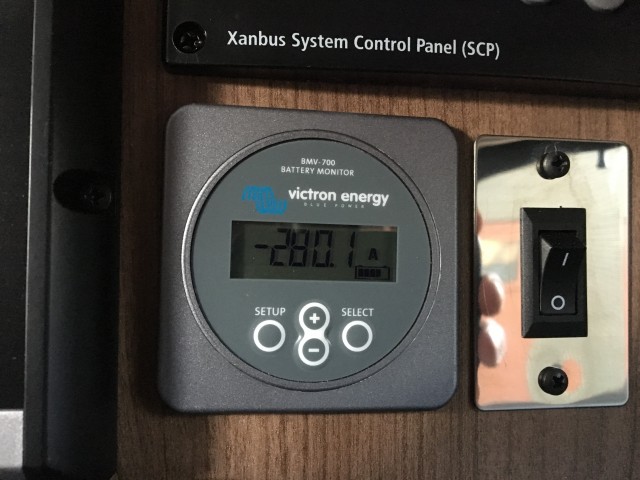
That’s a crap-ton of juice. All the other loads are minor compared to the air conditioner and that cooktop, and I’ve already written a post where I explore the other 12 volt loads in the coach, so that’s as far as I’m going on the load side for now.
On the charging side, when the Xantrex is plugged in, it delivers its programmed 100 amps to charge the battery.
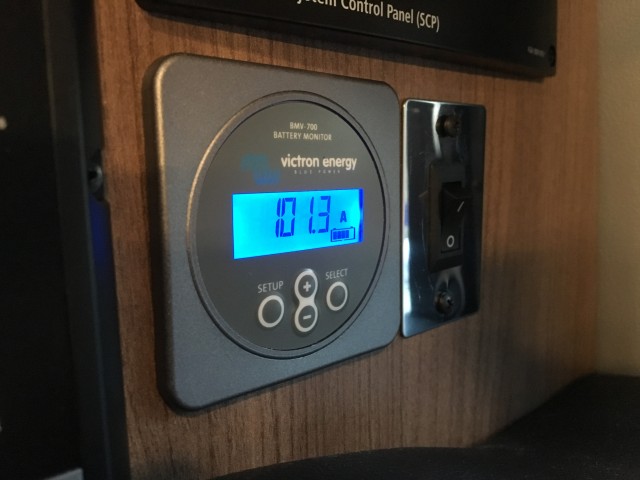
OK. OR, 101.3 amps. Slightly weird, but whatever.
With the Xantrex unplugged, and the alternator running at idle, I get 172.6 amps in.
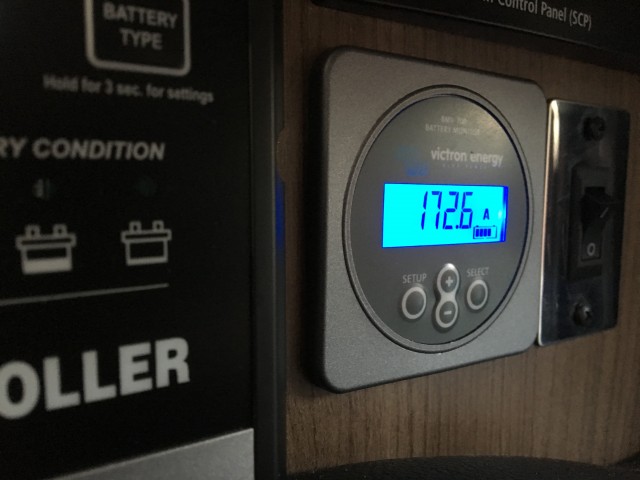
That’s not quite the 280 amps at idle in the brochure, but it’s pretty darn good.
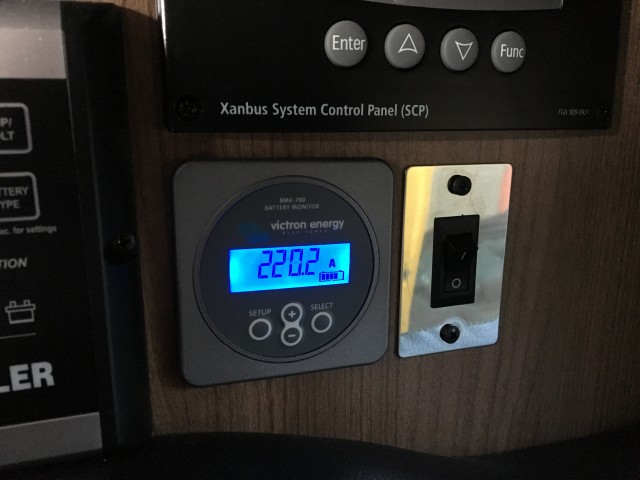
And if I rev up to 2000 rpm, we get this for a charge from the second alternator:
And finally, if I need to charge the batteries in a big hurry, I can always power the Xantrex charger and run the engine. When stacking this way, at idle, I get a pretty substantial charge of 234 amps from the two combined. If I rev the engine, the charge seems to peak at about 250 amps, and it won’t easily go higher. I suspect there’s a limit somewhere of a 250 amp charge rate, though I don’t know exactly where that’s coming from. Perhaps the BMS. I don’t know that I’d ever really NEED to charge things that quickly, but it’s cool that I can. This would charge the batteries in about an hour and a half-ish I guess.
Next Steps
Well, it’s an RV, so it’s never really “done”. So what do I plan to do now? Well, the first thing I intend to do is something with this:
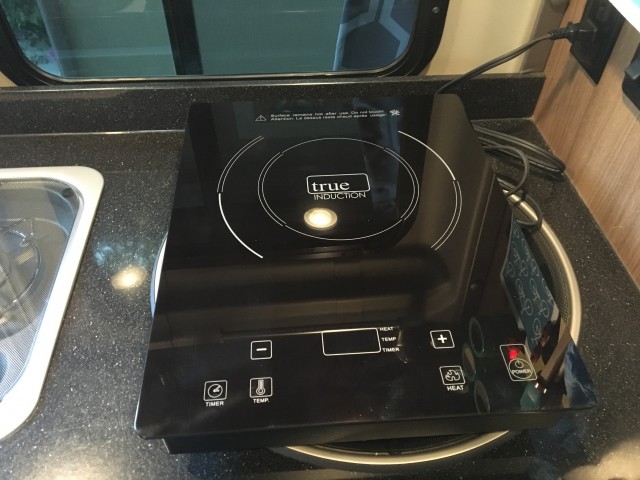
This is a True Induction cooktop. It’s the same kind Winnebago uses in some of their coaches. We’re going to have a “boil-off” of sorts, and assuming the induction cooktop wins as we expect, I’ll be mounting it up in place of the propane cooktop. Stef and I rarely use more than one burner at a time, so I doubt we’ll miss the second burner.
This cooktop is rated at 1800 Watts. That’s actually a larger load than the air conditioner if we crank it all the way up, as I did in this testing. It’s still well within the capabilities of the Xantrex inverter, so I’m not worried there. That will leave just the Truma (which is staying, for sure) and refrigerator (hmmmm… maybe…) as consumers of propane on board. Propane capacity is the limiting factor on our winter camping now, so every little bit should help.
The other thing I really want to do is to rig up something to protect the second alternator. As you can see, it sits sort of low up front:
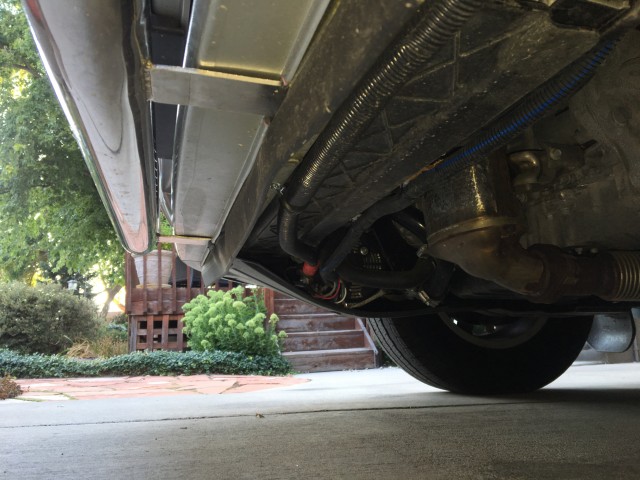
I’m a bit worried that I may pull into a parking space with one of those cement curbs in front of it and whack it. Either that, or run over a tire snake on the freeway or any number of careless scenarios that would have me damaging the very precious second alternator. As cool as Lance’s nose ring is, I think I may have to swap it out for something more substantial that hangs a bit lower.
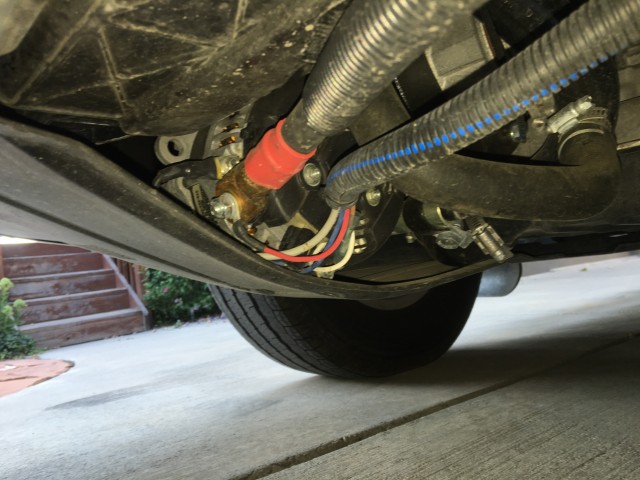
I’m also not too crazy about the plastic splash guard under there. I do want something there to protect from spray and particularly salt in the winter, but I’m not sure that piece of plastic is it. I also wonder what the plastic is doing to airflow around that alternator. More research needed here.
Anyway – now you know what I know. The generator’s out, and we don’t miss it, so we met objective one. And now that I’ve written this post, I’m even further down the road on the “don’t think about it” objective. Thanks for reading!




Sorry for commenting on an almost decade old thread on a rig you’ve rehomed – but a question: where did you route the 4 gauge power cable from the 2nd alternator to the coach? The Promaster is famous for having no engine compartment space.
All I can gather from your pictures is that the output cable went in front of the engine and I would guess from there back along the driver’s side…?
No worries!
And you’ve got it right. The 4/0 cable took a hard turn off the alternator, and then ran across to the driver’s side (inside the skid guard we eventually installed). Then headed back along the rail on the driver’s side.
Or at least, that’s my memory of where it ran. The battery was about mid-ship, and the inverter was in the back corner on the driver’s side on the floor, so all the heavy cable runs were along that side.
That makes sense. The frame rail is much more accessible and open on that side of the engine compartment! The passenger side is SOOOO crowded with hot pipes and accessory drives…
Grazie!
Our 2019 Travato only has certain outlets that can be used with the inverter. You mention using the AC, microwave and induction cooktop on the inverter. How did you wire these so that they can operate on shore power, generator and inverter? Is there another video that describes the wiring?
If your inverter isn’t big enough to run everything, it’s not a good idea to feed the whole circuit panel from it. You’ll just frustrate yourself by shutting down the inverter all of the time with overloads.
But for the record, it’s Shore Power —>>> inverter —>>> Main circuit panel. That’s all there is to it.
Have a Promaster based RV (2020 Pleasure-way Lexor FL). It’s lithium based with a 2kw Xantrex inverter. Looking to replace the two, 100 ah batteries with something from Lithonics. Favorite atm is their 12V 555ah F27 GTX module since it requires the external BMS which seems to be more functional / flexible. My question is specific to the wiring up through the existing MasterVolt MAC plus 12/12 50 or possibly replace it. Some talk from Lithonics sales of using the Sterling DC-DC charger instead. It would be nice to keep the generator auto-start feature after this upgrade is complete but I admit mostly from the standpoint of resale. For now, just plan to keep the air conditioner wired up for shore or generator power only but I could see that changing sometime in the future with this amount of reserved power. Anyway, any words of wisdom before kicking off that upgrade would be appreciated. Any of you recent Pleasure-way upgraders feel free to contact me on your success stories. – Retired Software Engineer.
Hi James.
We recently completed a custom van on a Promaster with a builder in New Jersey. We went with the Xantrax Freedom system and the Nations alternator. We had the alternator in our Roadtrek Zion and it would be hard to go back to something else. Due to your leak issue that others have had as well, I check the coolant constantly. We just drove it across the country and this morning I checked and it was very low. It appears the belt has cut into the hose causing a leak. It seems like these installs have very tight tolerances. Luckily I found it before driving. I have a shop appointment to hopefully fix this in a few days. I was wondering what may or may not have been done on yours to have more tolerance between the belt and hose and give some future peace of mind? Sorry for the long comment for a short question. Thanks for all your advice and tips.
Dave from CareyonVagabond
It’s been a while since I looked under there, but if I remember right, we wound up rigging up a bracket of sorts underneath there to hole the hose (the metal part that comes in the Nations kit) away from the belts.
I know others have put on “hose protectors”. I had an Amazon link at one time, but I seem to have lost it. These are like firm plastic covers that you can put over the hose in strategic places.
Every time someone goes under there to work, I get very nervous that they may bump something out of place. Just a fact of life with the ProMasters and the second alternator.
One more question – the Xantrex documentation for the Freedom SW (and all of their chargers, actually) states that they only support Flooded/Gel/AGM battery types.
It reiterates this caveat in the FAQ, as well.
Just wondering how they modified it to work with Lithium?
The folks from Xantrex helped with the programming for the Freedom SW.
What I think it means is that “out of the box”, the Freedom SW comes programmed with selectable charging profiles for lead acid, etc.
However, you can program a new charge profile with appropriate limits and voltages for lithium. That’s what the Xantrex folks did on Lance.
I believe you could do this yourself. But you’ll want to call Xantrex support and verify before purchasing.
Hi James,
One of the first things we did when we got our 2019 59G was to rip out our generator and sell it. We are looking at battery system upgrades and saw your post. Great stuff!
We are dismayed, though, that no one but the marine people are trying the LTO batteries as of yet – no thermal runaway, wide temperature range, super fast charging, up to 20,000 cycle life, etc. So, we are considering LiFEP04 now.
In any case, we were puzzled at something in your post:
“Beyond that, the Freedom SW is also a charger, which eliminates the need for the converter, and so we removed it, along with the transfer switch. ”
I am just a newbie learning about this stuff, but I thought the converter provides power to the 12v outlets and/or devices directly when on shore power and that it charges the house batteries as a secondary function.
So even if your replacement inverter charges the house battery, what about the other function the PD converter does?
Thanks,
Gaius G
The better way to think of a converter – rather than thinking of it as a charger or load support – is to think that the converter just takes 120 volt AC and converts it to 12v DC. What you do with that 12 volts is up to you.
You can charge a battery with it. You can run 12 volt loads with it. The way these things are all wired up, the 12 volts is just put “on the grid” so to speak. If you aren’t running any 12v loads, it will charge the battery. If you are running a few 12v appliances, then whatever is “left over” will charge the battery.
I may be oversimplifying for the sake of clarity, and I may have called it a charger in the write up, but that’s more or less how it works.
Just reread your post on the ‘Freedom from Generator” build. Just finished ours and it has to be the 1 if yours is a 10. Got a 2500 watt pure sine wave inverter and 12’ of 00 cable. We have the 2016 Travato 59K so there is lots of room for the inverter over the house batteries. We wanted to be able to use the microwave when we stopped for tea or coffee 9 (and heat up that pastry! ). Just have an extension cord at this point. Wanted to see what our use was. Haven’t got the induction cooktop yet but found the little electric kettle was way faster than the gas stove. In the first trip we were surprised to see how slow the van’s alternator was at recharging the house batteries. I have since read that it is really not set up for that. Your posts are so helpful with the planning of the mods I have in mind. The chart you posted showing the relationship between voltage and battery ‘fill’ is most useful. Thanks
Glad you find our content useful. And congratulations on taking the first steps toward being free from a generator!
Wonderful read. I’ve been thinking about doing this for years. But… after reading your post I’ve decided against it. The main reason is we only need this to run our microwave from 1 – 10 minutes. And after reading your post I suspect we’d have to run if for about 150 years to get some of our costs back. I am hoping that by the time our coach batteries fail (probably 2021 or so) there might be a simple cheap drop in pack which will let us draw the required 100 or so amps for that amount of time without all the other changes. Anyway, good luck on your work and may it last you for years.
Hi
I want a ALTERNATOR type of DOMETIC 3867100-01 230v 5kw 11.203.454 and Belt tensioner where I can find it ?
thank you
Let me Google that for you.
You beat me to it lol
James, I’m using your blog to help me convert a cargo trailer into a camper (strange, I know). Quick question, at some point did you do a battery upgrade? In the comments I see some references to a 7000 watt-hour battery but your write-up mentions a 420 amp-hour battery. 7000/12=583 unless I’m not understand something (or can’t do math).
Very perceptive!
(But for a lithium battery, you should be using 13.3 for a resting voltage.)
In any case, yes, we did upgrade our battery. We sent it back to Lithionics and they were able to add extra capacity to our battery. I think this happened a couple years ago now. Don’t remember the date.
But yes, we now have a 525 amp-hour battery.
Happy New Year!
I want to keep my passenger van conversion a simple plug and play. I only need to be able to run my portable air conditioner for no more than two hours in between charging the lithium battery system.
I am in the first stage of adding electricity to my van conversion. Could I use a 30 amp portable distribution power spider to charge my lithium batteries via a Xantrex 3012 converter charger?
How long would it take you to use shore power to charge your 420 amp battery? I do not want to add a second alternator and I plan to be within reach of shore power for most of my camping.
I don’t remember what the inputs to the Xantrex looked like, but I don’t think there was a “plug” on it. I believe you would have to direct wire it – and I don’t know what sort of spider you’re talking about.
I assume it could be done, but I don’t know for sure.
Regarding charge times – that depends.
You can program the maximum rate of charge for the Xantrex inverter/charger. If you had it set to 100 amps – as we do – a 420 AH battery would charge from a fully depleted state in 4.2 hours if it had full use of the charger. But that will depend on what else you’re running on the 12 volt side. AND what else you’re running on the 120v side. AND what you have shore power limited to in the Xantrex SCP. (In other words, if there aren’t 100 amps available, you won’t charge at a 100 Amp rate.)
Hi James:
I looked through the questions you were asked and didn’t see the question I have. I apologize if it has been asked. I have a 2015 Winnebago View Mdl G. I added in 500 watts of solar with a Victron 100/50 controller and a Xantrex Freedom 3012 inverter charger. About a year later in 2017, I took out the deep cell lead acids and replaced them with two 100ah Stark LiPo4 Lithium batteries. I love the way the new system works for me. I would like to know how I can go about getting the software revision you mentioned for the Freedom 3012. I used the custom menu on mine and plugged in the bulk and float parameters Stark recommended. I would love to get the software update for my Xantrex if you could point me in the right direction. Thank You
Well, I just took a quick look and was unable to find the latest firmware download.
I’d recommend you start with the phone numbers on this page and give them a call: http://www.xantrex.com/power-products-support/overview.aspx
We’ve met the support people at Xantrex, and they should be able to get you going.
If I were to replace my lead acid golf carts with the Lithium Ion Phosphate, a second alternator will be required?
I like the new type batteries, but it is a lot cheaper than doing a Volta system. And contacting them has been tough, but finally heard from them. Their system is a lot more expensive, with the 48V.
I have a Thor Aria and with the Residential Refer, does not take long to kill the leaded batteries.
Thanks.
A second alternator isn’t strictly *required*, but you won’t get everything possible out of your lithium batteries if you charge them with an alternator that is set up for lead-acid.
It’s a longer topic, but that’s basically the deal.
What about a second or third Lithium Battery??? Would it increase your ability Cool, Cook and Heat to a more usable time… Better insulation….
We actually have a 7000 Watt-hour lithium battery. How much bigger do you think we should go??!! lol.
(The current battery is a couple thousand dollars…)
Did I miss total cost data? How much was total cost of the mod?
When added as an option, a Lithium package like this runs in the $10 to $15 thousand dollar range.
First, you and Stefany have been amazing sources of information. I can’t express how much your site and posts online have helped in our research.
After a couple of years now, how do you feel that your system is holding up? I was really considering the Volta package, yet the $20K price tag, initial bugs, wait times, and such have me a little concerned. I live in the South with 2 dogs. My biggest concern is have use of the A/C while driving and for stops along the journey. After seeing the Volta option and weighing the pros and cons, picking up a rig and doing your type of build seems a bit more appealing. We drive a lot and don’t stay put for more than a night or two. What might I be missing here? I am trying to find the value proposition with the Volta, and it just isn’t jumping out yet. Thanks in advance for any guidance!
Well, to answer your first question, our system is holding up just fine, thank you. I would never consider going back.
As far as your other questions… I was just giving a “lawn chair chat” about lithium systems this past week. Here’s the main thing I told the attendees:
When you think of a lithium battery system, everyone goes mentally leaping for the air conditioner. And that’s a big part of it, but if that’s all you think about, the justification is difficult.
The REAL value of a lithium power system like ours is all the *other* things you didn’t even realize you weren’t doing because running a generator was such a pain. As in – I made a sandwich this afternoon, and I TOASTED my bread. I would NEVER have run the generator for the 120 seconds needed to toast bread. I’m in a quiet parking lot now and I’m using my laptop and it’s *charging* because the inverter is on. I would NEVER run the generator this late at night.
There are things I do every day now that I never would do if I needed to run a generator. THATS the value of a lithium system.
Thanks for the feedback and quick reply. As you point out, the ease of living with either your setup or the Volta setup is very appealing. I remain torn on the $5-!0K difference for our needs. I will keep an eye on the FB page and see if I lean more towards Volta or not as they start rolling out. At some point, I need to make a decision and move from a wannabe and to an owner!
Thank you to both of you for all that you do! It is extremely helpful 🙂
I have read through the article and most of the comments. We have a 2006 Sportsmobile prototype C on Sprinter 3500. Our 4 Deka AGM batteries are on their last legs. We also have 4 100 watt solar panels with Trimetric controller and monitor. We usually boondock but have modest electrical needs except for running furnace fan and we try not to be where we need that much heat. We are thinking of replacing AGMs with 200 to 250 amps lithium. But I am concerned with your remark that your stock van alternator would have damaged them. We don’t want to add an alternator so can we do a lithium replacement?
You *can* add the lithium batteries. Several companies market “drop-in” replacements.
You just won’t be charging them with the charging profile that they would like best.
Will it result in reduced capacity because you don’t hit high enough voltages? Perhaps.
Will it result in an overheated battery when you drive for 10 hours and the alternator is shoving 14 volts at it the whole time? Maybe.
Will it result in a reduced life cycle of say 6000 charge/discharge cycles instead of 8000? It might.
As far as I know, nobody has ever done a test on this kind of non-optimal-treatment of a lithium battery.
Bottom line is, it will work. It will probably get you improved capacity vs. what you have today. But you won’t get everything you could out of the new lithium batteries.
What an awesome in depth article! One for the archives! (Love y’all’s youtube vids too) Can you please help me have an idea; I’m relatively new at this, gonna buy a class B this year and seems like when I look at factory lithium option packages like the Freedom option from Midwest Automotive, or other factory’s add-ons, they want around 20k added to the RV price. I’m thinking/guessing a retrofit after the fact, something like lithionics/zantrex like you did would be a substantial cost, but quite a bit less than the factory option packages? Am I wrong? Can you give me a “rough idea” or rough range in your opinion what I might anticipate doing what you did? I know there are many variables, but a rough range for me looking forward? Thanks James!
If I had to hazard a rough guess, I’d say you could probably “self-build” something like this for about $13-$15k.
That’s a total un-researched, seat-of-the-pants guess.
More question than comment. I’m buying a Winnebago Era. It comes with AGM 31 batts. They are located under the coach at the very tail completely exposed to the outside weather.
What would be the advantage/disadvantage of switching to Lithium? Are they the same size? Do they shut off from charging if too hot or too cold? I just like the idea of Lithium. I would only change the batteries to have the latest tech. I have a 1000 w inverter and two 100 w solar panels with controller for the AGMs. I would just like to run the TV or compressor refer with constant worry. Is this a way to go for an old man and his toys. Any special benefit of making the change or will I lose my investment during January when we have several days of freezing weather and easy 110 deg in the summer. Lancaster, CA. Please answer by email so I have contact in the future.
Lithium batteries do not like to be charged (and even discharged to some degree) in very cold weather. If you store your rig over the winter, you may not have an issue with that, but if you use your rig, then you will be compromising the lithium batteries by storing them outside.
There are lithium batteries that are marketed as “drop in replacements” for standard sized batteries like the group 31. I have not used them, but others have with generally positive results I think.
We aren’t able to answer individual RV queries by email. But if you find a relevant post on our site, as you did here, then we can answer there and everyone can benefit from the exchange!
Dear James,
Thanks gratefully for your guidance. One major issue I have not successfully resolved is a 110F upper temperature limit on the Lithionics Battery in the South USA during the Summer.
The freezing is easy to fix with heat strips on the battery enclosure. However, cooling takes more than just a fan blowing on it from my novice understanding of thermodynamics.
As always, any guidance is greatly appreciated. High temps are a Li-ion battery-life killer. Lithionics is the most advanced, but they also have perhaps the lowest Max temperature spec as well. Rather than move to the North, I would rather switch Li-ion brands with a significantly higher Max temperature limit: unless someone could help explain why the battery specs (that no one talks about) are a non-issue.
Kind Regards.
I’ll ask, and let you know if/what I hear back.
Dear James,
What space should be allowed between the driver behind a bulkhead partition and a steel locker with:
– a 600ah li-ion battery (maybe encased in AL shell-??),
– inverter, and
– li-charger in it (with your system as a road-map)?
I notice you have a few feet with your dining table in between, and thought it may be strategic: since inverters and chargers would seemingly need a few feet space between them and Humans, going through their powerful cycles for safety sake. (Your cabin is well engineered and luxurious.)
Thank You Sir!
I am not aware of any space requirements for components. I simply put the components in the spaces I had available. I’m not really worried.
What I *would* recommend putting some thought into is SECURING the components in the event of an accident. A 200 pound lithium battery is not something you want flying around your coach!
Just found this excellent read, thanks. As you do cold weather camping, how do you prevent charging, solar, alternator, and inverter/charger from charging your lithium batteries?
Two things.
First, our battery is stored inside the heated space of the coach. So if we are using the rig, the battery is as warm as we are, which is fine for charging.
Next, the BMS on our battery will disallow charging when the temperature is too low. We don’t have to do anything for that fail-safe. It just happens.
Hey, did you ever consider an evaporative cooler?
This is, for sure, one hell of a modification. To be stored and re-read all over and over again. I wonder if you’re also an electric (electronics) engineer… One thing I noticed though, and thinking about the super duper modifications you made: on the second alternator, there are some cables (white, blue, red (?)) on sight, and pron to be scratched by the gravel or whatever. Why aren’t they covered with that rinoflex tube (is the name right?) until the alternator? This is, for sure, one so small detail, but caught my eye the minute I saw it.
God bless you people and thank you so much for your enlightenment and super awesome videos
Aerospace engineer… used to be.
I too was concerned about the whole second alternator and its wiring hanging underneath.
My solution was to work with someone to develop a skid plate for the underside of the ProMaster.
You can read about the final version here: https://www.thefitrv.com/rv-tips/promaster-alternator-coverskid-plate-the-final-version/
Got a new 2018 Dynamax Rev 24RB a few weeks ago that has many cool factory options as I know you are aware of.
I have used Sumo Springs before on my other RV as they helped but picked the heavier duty yellow ones and I should of picked the smaller ones instead for lesser weight. I like them and the did help.
So my question is that I know you used them on the back of your promaster. Which ones did you use and what is your overall opinion compared to the stock ones.
For example diesel truck passing, wind, corning, Sway etc. My wife and I love ya both. Thanks James
Mike
Meant to say the yellow sumo springs I used on my class c chevrolet were too hard on the driving up front and raised it around 2 inches. It was just too firm and not enough oscillation from the front springs since I was basically always riding on the bump stop. I should of went with the lower duty ones with lesser weight specs for load.
So the question is what was your experience with them on the promaster since my new unit is a promaster too. The promaster does come with hellwig spring dampners that work rather well over bumps as it drives like a car.
But the Sumo could and possible help with the Diesel trucks and winds. As long as it doesn’t ruin my soft ride I have now. Thanks
Think I just answered this, but we liked the yellow Sumo Springs in the back. At the time I did those, they weren’t offering a solution for the front wheels.
Since then, we’ve gone to VB Air Suspension, and there’s just no turning back.
We used the yellow Sumo Springs, and we liked them. Since nobody actually rides in the back of our van, the extra stiffness and handling was a good thing. There was no loss of comfort up front.
We’ve since moved on to VB Air Suspension – which we love!
I know this is an old post, but…have you considered taking a portable lithium battery like the Goal Zero Yeti 3000 and doing some rigging so it can quick plug-in to the RV so the RV solar panels will charge it and the Yeti can run certain items (like everything but the AC) on the circuit panel in the RV? This could power up the RV for most things and the portable battery could be pulled out and used for other things (like back-up power for the home).
That’s something we never considered.
Honestly, our Lithionics battery has all the capacity we would need.
(Our battery currently has over 7000Wh of capacity. More than twice the Yeti.)
I suppose if I were doing a self-build, I might look at something like that though.
I drive a Tesla Model S with the 100 batter. It’s truly amazing what the battery pack in this car accomplishes. Pushing the car 300 miles and heating/cooling it so effortlessly. Tesla will be releasing a semi-truck soon…hopefully that chassis can be used for motorhomes. It would be a serious game-changer not to mention less harmful to the environment.
I am currently doing a Promaster self build and have the 220 amp alternator. Could it be possible to eliminate the starter battery altogether. Charging the house lithionics battery from 330 watt Panasonic panel and the existing alternator. Then using the house Battery as a starter battery, considering how much power potential it has. This would majorly simplify things and cut down the weight.
I don’t think I’d eliminate the starter battery. You’d be interfering with the “van” part of the build, and you might compromise a warranty in the process.
Besides, usually, when you put the RV away for a while, you’ll want to disconnect the “house” battery. If there’s no “van” battery, you’d be resetting clocks and radio stations every time you hit the disconnect switch.
Hi James, we are in the process of upgrading our B class Pleasure Way Plateau XL and trying to choose the best converter/inverter to use. Our goal is to install a 3000 watt Xantrex same as yours but our installer is suggesting that it would be too loud to have inside the coach? Can you tell us how loud your inverter is?
Chris
Ours is running right now, and I can’t hear it over the refrigerator. So I’d say “not loud at all”.
Even if it was loud under load (which it isn’t), you’d be using it to power the air conditioner. We can’t hear a freight train over the sound from our air conditioner, so it could never be a problem.
Chris, could you get a hold of me? Looking to upgrade the battery on my 2020 Lexor FL and you might be able to answer a question or two. Contact James or Stephany on Facebook and they will pass along my contact information. Thanks.
Absolutely pricless amazing info….so grateful….
Thanks, Jeff! This kind of thing continues to be more and more common. This system is available on the Coachmen Galleria now (which we just reviewed).
Hi James,
My son just bought a 2018 59G and your site & videos have been extremely helpful. I’m actually thinking of buying a “K” for myself, so I have a question regarding batteries. I’m a long time sailor and on my 36′ sailboat I installed 2 extra 105 amp/hr batteries for a total of 4. If I didn’t want to get things to complicated, could I put on the 300 watts of solar panels and two extra batteries in the under bed storage box on the K and wire them all together ? This would give me 420 amp/hrs with no need to recalibrate everything for lithium. Would that work until I’m ready to undertake the lithium conversion ? Thanks!
I think the most people have generally been able to fit on top of a Travato K are 260 watts worth of panels.
Short answer: yes, what you propose would work, potentially. There are caveats though.
You’ll need to run large cable between the inside where you want to add the new batteries and the outside where the existing batteries are.
You’ll need to match the capacity of the batteries closely to what’s already there… It’s that old advice about not mixing batteries of different sizes or old and new batteries.
And the biggest caveat: if you don’t have a rig yet, you don’t know that you have a problem yet. Most people do just fine with the existing battery setup.
I’d buy the rig first, and then see if you need to do anything at all!
Hi James and Stef;
Found this post in the “favorites” column. We are converting a brand new Sprinter with the 7′ inside ceiling. Also had the same goals – no generator and no propane. I found Adam Nations and he plugged us into the Lithionics, Xantrex, Nations loop. We took delivery of all the components in 2016 and had the van finished enough to “camp” in it for family reunions last summer. But we had this system up and running! And the A/C was wonderful.
Regarding the BMS shutting off the alternator. Per Adam’s instructions, we ran a 12 VDC line, pwered by the chassis battery, to the BMS and then to the field control on the Balmar VR. If the BMS says the battery is full it opens that curcuit and the VR shuts off the field for the alternator. Incidentally, the VR also needs to see at least 12 VDC from the batteries or it won’t charge.
We also anticipated that the inverter would be a heat generator; and, since we’re starting from scratch, we added a vent pipe for that area. So the most forward of the three vents on the roof is for that. I hoped that the venturi effect while driving would suck out the heat, but put in a remote wx station to check. When it was above 90″ regularly while running the A/C, we thought that might be counterproductive; so we added a small but powerful house fan and it seems to work well.
Our conversion is taking way more time that we thought, but I’m still working more than full time and adding living quarters to a vehicle with substantial curve to the walls is time consuming.
Sure was fun to see your photos, see the similarities, and think that maybe we figured some of this out correctly.
Thanks for all your observations and articles.
Louis and Judy
Glad to hear that the system is working out for you!
It sounds like your Field Control is working the same as ours.
We’ve never done anything about the heat from the inverter as you have. Venting seems a sensible solution, and if one were building from scratch, it’s certainly worth considering. On the other hand, we’ve seen a lot of rigs from the major manufacturers with inverters, and they never seem to vent them to the outside. I’d say if you’re happy with how yours is working out, then I’d just run with it.
Hope to see you on the road!
Great work! Very helpful. One thing I didn’t see or overlooked is how you get the solar controller to switch to float when there is not enough solar current to get the battery voltage up to 14.6V. My 30A of solar (on a really good day) won’t drive my 300 AH LFP up to 14.6V so never switches to float. With typical solar I see about 20A and don’t get near 14.0V when the battery SOC hits 100% (or after it hits 100%). The result is the solar charger never switches to float and continues charging for hours beyond 100% SOC. Setting the solar controller to switch to float at a lower voltage helps, but it’s not very effective because the voltage at 100% SOC depends on the solar current which varies widely.
The LFP battery (a LifeBlue) has overcharge protection in the BMS but it’s probably the typical 16V or some such and only prevents catastrophic failure and not loss of life. And unfortunately my LifeBlue only outputs SOC via bluetooth.
Does your solar controller switch to float via a signal from the battery as do your other charge sources?
Thanks,
Harrison
I did swap my solar charge controller for a lithium-capable one from the same manufacturer. Beyond that, I did no special programming.
I do agree that a FCC circuit, similar to what is present on the alternator, would be a useful addition.
Given that we drive most every day, we’ve never had a problem with getting the voltage up. We’re 100% SOC at at least some point on pretty much every day.
Hi James. My wife and I are picking up our 2018 59G this coming week. We are carefully considering doing similar, if not the same, electrical modifications to ours.
Are the listed companies (Lithionics, Xantrex, etc) that you worked with equipped/set up to replicate your system design in another Travato? In other words, do they offer installation services or was yours a one-off install for them?
Thanks for all that you do for the RV community!
Jeff in Denver
No, at present, I am not aware that Xantrex and Lithionics offer installation services.
You’d have to check with an RV or Marine electrical specialist.
In the RV world, I’d recommend AM Solar.
James, I’m about to expose my ignorance for all the world to see but here are two basic questions I hope you will answer: First, I understand the regulator controls the volts delivered to the battery, but if your second alternator is producing more amps than the battery is rated to accept, does the battery’s BMS control that or is there a stand alone controller for the current from the alternator, or…? Second, I assume the inverter is wired “downstream” from the batteries so to speak, so how do you get those extra amps “around” the battery to an inverter so you can (for example) make coffee via the inverter while the batteries are charging?
Our battery can accept everything the alternator can put out, so no issues on that front.
Our battery and alternator also “talk”. Basically, our battery can shut down the second alternator when it’s had enough. And yes, that’s under the control of the BMS.
From your second question, it seems like you’re thinking of things connected in series – one after the other in a line. It’s not set up that way.
Things are actually connected more in parallel. So all the + and – connections come together at central points (under the dinette seat). In that scenario, there’s no controlling which current goes to where. All current flows in and out as needed, and there’s no switching.
Thanks, James. I’m working with an upfitter to build a camper van on a Promaster chasis with a system similar to yours. This helps.
Did you consider switching Lance over to 48V? It seems you had to replace many of the components anyway, and it perhaps would have allowed you to use much of the existing wiring instead of having to rewire much of the coach. Also, the wiring from the new alternator could have been smaller, saving much weight, right? With everything I’m reading about 48V systems, it seems like a no-brainer, but perhaps I’m missing something.
Thanks for all your info – all good stuff!
It’s true that 48V does save some weight on the wiring.
We didn’t consider it at the time.
We still would have needed to run wiring between the second alternator and the coach battery. And between the coach battery and the inverter. And between the battery and whatever was converting the 48v to 12v. And we would have needed to change the programming on the solar charge controller to charge a 48v battery – which probably would have required a different controller altogether, since the panels don’t even natively put out 48v. And we would have lost the capability I have to temporarily connect the coach and chassis electrical systems. (This can come in handy when you want to charge the batteries in a big hurry – I’ve got two alternators!)
Anyway, if I was doing it again now, I might consider it. But as a retrofit, it’s quite a bit of work.
Thanks for detailed write-up James. It seems that an efficient 12V DC A/C would make it a lot easier to size a system like this reducing the battery and inverter load. Every RV A/C on the market here is designed for shore power. I’ve seen a Chinese brand of bus/van 12V A/C units that looks promising at providing off-grid A/C… but I haven’t seen anyone actually test or review it.
The problem with the 12v AC units is (just my opinion here) the size of the cable you would need to run to them in order to both provide enough power to get to 13,500 BTU and to overcome the voltage drop. You’d be running 4/0 cable.
Certainly not impossible, but kinda big and heavy cable. I’ve seen that Chinese unit, but never seen one in person. If they want to send me one to test, I’d be happy to!
Yeah, I guess there’s never a free lunch! Would have found you and said hello at the Hershey RV show, but I was there early and left early, so I missed you guys. Man – those shows are exhausting. Don’t know how you do it. 🙂
The other problem with 12v AC is equipment cost. I just finished researching this and self contained all electric roof mounted systems from reliable manufacturers start at around $3800.
That’s more than three times greater than a typical RV air conditioner!
That was great. Thanks, James. We’re picking up a travel trailer this week and I’m looking at long term options for ditching a generator as we rarely, if ever, dry camp/boondock. Lithium Ion is only going to get better over time and your information is very helpful.
Enjoying your videos too. Thanks for all your great work.
Agreed, and if you rarely boondock, you’re a good candidate for ditching the generator.
(You’re NOT a good candidate for solar though…) 🙂
Enjoyed reading through writeup and comments.
We have 1400 W of solar and 9 kW-hrs of LFP on 5th wheel. We can run standard Dometic a/c for 4.5 hours with full sun and down to 50% SOC.
We have 415 W of solar and 4.5 kW-hrs of LFP on Roadtrek. We can run smaller Dometic a/c for about 2.5 hours with full sun and be down to 50% SOC. We can run down to 20% but choose not to.
Reed and Elaine
Impressive.
What brand of air conditioners are you running?
Dometic power hogs (2200 W for 5th wheel and 1200 W or so for the Roadtrek)
Would go to mini-split but we are Goldi-lockers, and go to where it is neither to hot, nor to cold, just right. So Mexico for winter and Canada/high mountain (7000′ and higher) mountain west. Air conditioning is something we seldom need even in Yucatan; however there can be hot spells. It was 103 going north near Merida a year ago. We were to Puebla (8000′) two days later. Just running for half an hour can really reduce cabin temperature. The 12 V fans (plug into the numerous cigarette type outlets) only use 10 W (about 1 amp at 12 V) and make a great difference in comfort level.
We do have a 1 kW Honda generator in a box at back of 5th wheel which we need to take out and run for an hour or so. The Roadtrek has an integral 2.5 kW Onan (runs off vehicle gasoline) that we used once in Newfoundland and once in Mexico. 90% of usage has been monthly half hour runs as suggested in manual.
We are currently mootchdocking at older son’s place at 7600′ in mountains NE of Las Vegas, New Mexico. Night time temperatures are in low 50s and daytime are in mid 70s. It rains every afternoon: second or third wettest summer since 1941 for New Mexico.
Reed and Elaine
Does the additional alternator under the hood rob the engine of a lot of power and does it greatly change the gas mileage?
Nope and nope.
1 horsepower is about 750 watts. SO even if the alternator produced 3750 watts of charging (which it never has), it would only be 5 HP.
It’s a 300 horsepower engine in Lance! It’s less than 2%.
We haven’t noticed anything. Plus, it charges so quickly that it shuts itself off after a while on long drives and there’s really not much load after that.
Hi again James. Having been unable to find a better place to leave this comment, hopefully it’s okay to be sort of on topic, but not really. Anyway… I just watched your Aug 14 video with Mike Neudorfer of Advanced RV (excellent work as usual!) and was blown away when he said they had been running the A/C on the van with their new 48v electrical system for 7 hours at “full 100% duty cycle” and the batteries still had 94% capacity remaining. Unlike some people I could mention I’m no rocket scientist (I do well to remember basic algebra) but after taking a stab at the math I think that means the battery bank would need to be about 3200aH. Did I calculate that right? And if so, can that really be what Advance RV is putting in their vans? Or did Mike fail to mention the alternator was running part of the time, or whatever?
3200 AH would be a massive battery bank. And I didn’t ask how large the one we were looking at was. (I know, I know… I should have)
But I think we would need to add a zero… even to that number.
Assume the AC is 12 amps at 120 volts. That’s 120 amps at 12 volts. (*10)
120 amps for 7 hours is 840 amp hours. And if that’s only 6% of the battery capacity. That means the whole capacity would have to be somewhere around 14,000 AH.
Which would be huge! So, realistically, I think they drove home, or ran the engine at some point.
What I think this reflects – more than anything – is that by having a battery system with sufficient capacity and capability, they just don’t really think about it very much. They just let it do its thing and don’t worry about it. “Did we drive? Uh… Maybe. Yeah, I think we may have driven? Marcia – did we drive after we turned the air conditioner off?”
That’s kind of how I imagine that playing out in an Advanced RV owner’s head. They just don’t keep track of that kind of thing because it’s become unimportant.
My two cents, anyway. Next time I talk to Mike, I’ll try to get some more specifics.
I was thinking 3200aH or so since it’s a 48 amp system, right? But either way a lithium bank big enough to run the A/C for 7 hours without charging would be crazy expensive…like $50k or more I would imagine. I know that’s not out of the question at the prices Advanced RV charges for a new build, but still… Wow.
It would be interesting to know what capacity that van really has. Please do let us know if you find out.
You make a good point about a system being so well designed that it’s not on the user’s radar. If the system does what it’s designed to do, even a tech savvy guy like Mike could lose track of the metrics. Which would be pretty wonderful.
derp… 48 volts…
You got me. Yes, it would be a 3200-3500ish, 48 Amp Hour battery. It would still be massive, I think. Bigger than what I saw underneath the van.
But I really do think the tech eventually becomes a non-thing for them.
Kind of how like I have no idea what pressures exist in my vehicle’s exhaust system.
I mean, yes, technically, they could affect my mileage. But meh…
Hi again, 125 comments later I’m late to the party commenting today as I re-read just now (honestly scanning and absorbing best as possible the scientific details) today…Thanks for the deep dive into your lithium upgrade. Brenda and I do have an appointment upcoming at AdvancedRv to meet with them about upfitting our battery system and front seats. FitRV’s website content (your work) is a treasure and inspiration. Thank you, Dave
The crew at Advanced RV will steer you right. They’ve been at this a while!
And while you’re there, tell them we said “Hi!”
Hi again James,
We’re a little closer to finalizing our LiFePo4 setup on our yacht and your article has been a great asset as we move along in the process. We need a few more decisions to be made around how to manage our charging/load bus bars, but making progress.
I have another question / comment for you. You mentioned in the article that “On the charging side, when the Xantrex is plugged in, it delivers its programmed 100 amps to charge the battery.” The 3012 is capable of 150A @12VDC charging (I’ve seen it easily on our current AGM setup many times). Have you specifically limited the charging side of the unit to 100A for a specific reason, or are you possibly running a different model than the original?
Derek
The 100A limit was something suggested by the Xantrex guys when we did the install.
In my mind, 100A at 12v is about 10 of our 30 available AC amps. That still leaves us plenty of overhead for air conditioner, etc.
(Yes – it’s true that I could throttle the shore power down as well to make sure I never trip a breaker, but in case I forget.)
Also – I’m never worried about charging that quickly if I’m plugged in.
If I’ve bothered to hook up the shore power, we’re staying a while and the extra quick charge isn’t as big of a deal.
Thanks for the reply. That approach makes sense if you have those limits, and as you’ve said, if you can pump 100A continually into the lithium, that’s huge power anyway. We do the same sometimes when running the generator with all A/C running and such as we don’t need the charger pumping full power. It is interesting that with the Xantrex you can change this on the fly with the 2nd screen on the SCP varying from 5A-30A.
Again, thanks for the reply and insight.
Derek
Right on. Good luck on your yacht project!
Hi James,
Thanks for sharing such a detailed report of your undertaking. I’m coming across your post as we’re looking at a yacht based LiFePo4 setup with existing Xantrex charger/inverter, 1.1Kw of solar, and dual 80A alternators and 3 onboard AC units. Same but slightly different to yours, however overall system design will be pretty close.
Quick question — what firmware do you have installed on your Xantrex now?
Thanks! Hope your system is as trouble free as ours it.
Our SCP shows Firmware 3.06.00 BN3.
Thanks for the quick reply. It appears you’re one or two up on us — we’re 2.03.00 BN3 for the FSW30 and 1.03.00 BN2 for the SCP specifically.
Do you have the contact at Xantrex or process that might be able to help us with an update by chance?
No specific contact. I’d suggest just calling their customer service.
Those folks should be able to help you.
Hi James,
First thanks so much for your and Stef’s informative and entertaining reviews. It makes a very meticulous and tedious process of searching and purchasing an RV more fun. My wife and I are entertaining the thought of purchasing a 2017 Travato 59K. We are confident that we will need an Auto Gen start mechanism as from time to time we will be leaving our dog unattended in warm weather and we are not yet prepared for the full Lithium battery overhaul. Per the link provided it appears that you had installed at one point a MAGNUM MEAGSN. The other model I have been looking at is the EC-30W. One good selling point is that I am not great at complicated DIY projects and this seems easy to install. If you are familiar with the EC-30W is it possible to provide some pros/cons between the MAGNUM and ED-30W? If not, can you provide just the pros and cons of the MAGNUM?
Again, thanks so much for the entertaining reviews.
The only auto-gen-start I’m familiar with is the Magnum, so I can’t provide any kind of A/B comparison.
If the EC 30 is the model I’m thinking of from Onan, it should install with a minimum of fuss. You will have to crawl underneath to install it.
Wincrasher wrote something up on his blog about that install. Ron is a thoughtful guy. You can read about his install here: http://wincrasher.blogspot.com/2015/05/onan-generator-remote-control-ec-30w.html
I am planning on doing the same on my 59K but was wondering if Xantax / Zamp would help anyone (not famous folks)with a similar project . If so, do you know what are the fees / cost.
I don’t know if they do for-hire consulting. But your best bet would be to call up their customer service number. Those folks are super helpful and can get you started out.
James, I’m very grateful that you took the time to write this up. It’s fun to read, and after hearing about the many problems Roadtrek owners have had with their system, and seen the price tag on Advanced builds, you’ve given me renewed hope that my wife and I might be able to achieve our goal, which is to power a production class B van’s air conditioner with batteries all night while we sleep.
You wrote that your AC runs about 3.5 hours with a 100ah battery, so I’m thinking we should rig up something that would automatically start and stop the engine through the night as required to keep the battery charged (similar to Roadtrek’s “volt start”. Do you have any thoughts or suggestions on a way to make that happen? Also, assuming we can find the room, what do you think about a larger battery bank, say, 300ah? Would that take too long to charge back up?
Thanks!
Our AC ran for 3 hours and 19 minutes with a 420AH battery.
So to get through the night, you’d need at least twice that, and probably a little more. Maybe 1000AH.
If I had to guess what’s in a “voltstart” system, I’d say they took a standard auto generator start and spliced it into a remote car starter. :-p
I guess what I’m saying is, the electronics to make that work aren’t terribly complex, and the solution is out there: it’s just in two different products.
Thanks for that fast reply James. I was already wondering if the Xantrex generator automatic generator start device paired with a remote engine starter might do the trick. It’s encouraging to have someone with your level of knowledge confirm that as a likely solution to pursue. And again, thank you very much for taking time to post this information in such detail. This is a real gift to the RV community which will be greatly appreciated for years to come.
Thanks! If you do go that route, and get it to work, please post back!
Hi James,
I read the whole article and looked at every picture – that says a great deal about how well and how clearly you write. I could follow along and understand what you were talking about even though I am completely clueless about batteries, power, wiring, and well… vehicles in general. I’m not saying I totally grok it all. I couldn’t remember any of it once I was done, and would have to re-read it several times and read up on how batteries work, and what the difference is between the types of batteries you mentioned, but just had to give you props for writing it all so clearly! Food for thought when I am ready to start nomadding… though it’s a long way off from now. Thanks!
Wow. Thanks, Diane!
I usually ask Stef to read my posts for a “non-geek-check”. That probably helps a lot, so props to Stef. Good to know we’re keeping it sane!
Did you think about putting in a Lithium Battery for the chassis and then adjusting the stock alternator to be able to charge both the chassis and the coach?
I know that would cause some issues in the cold, but didn’t you think about how to keep them warm before they were mounted in the coach drawer area anyway?
Honestly, I never really thought about doing that. There’s no reason why it absolutely won’t work, but a couple problems you’d need to overcome.
First – I’m not sure how many amps of charging are left over with the stock alternator, but it’s probably not the 180 ish that I can get from the second alternator. You would have to anticipate longer charge times due to fewer amps available.
Second – I’m not sure how to change the charging profile for the stock alternator. But let’s assume there’s some sort of external voltage regulator you could get. Even if you did that, you’d be taking a gamble that all the other electronics in the vehicle would be OK with the different charging profile. Not sure how to verify that, but probably a call to Fiat would have been required.
Finally – the freezing thing, as you’ve alluded to. For our house battery, that’s just inside the heated space of the vehicle. I can warm that up before engaging the house battery at all, so that’s fine. But the chassis battery has to be available all the time or I can’t even start the vehicle. Also, it hangs down below the floor under the driver’s feet in the ProMaster. No real way to keep it warm, and I would have had to engineer a separate solution for warming the vehicle without starting it.
That’s not to say these problems aren’t solvable. Perhaps they are. But as the second alternator is available for purchase with a voltage regulator programmed for lithium, it just seems simpler to keep everything separate.
Hi James
While I am not a rocket scientist I am an electrical engineer and I am not looking forward to designing and sourcing all this stuff. I noticed you leaned on Xantrex for the system design. I don’t see anything on their website that suggest they perform this kind of service for non corporate entities. How did you get them to help?
Nice post!
I just got myself a Lithionics Battery as well (300Ah). I hooked it up to a MSH3012 (Magnum 3000W) inverter charger and turned on the AC: I saw an AC overload fault for like a split of a second (I think the BMK was reading something close to 280ADC and dropped down to settle at 110ADC).
Do you see a fault as well when turning on the AC?
280 * 12.7 = 3556W so well below the 3900W 5 sec surge power allowed by the inverter. So I am not sure if I get the fault as a “warning” or if there’s really something wrong.
I’d think it’s a warning because after that split of second the AC kept running and everything looked fine as if it never happened.
The Lithionics batteries rock. You won’t be disappointed.
We have not seen an error like that with our Xantrex. Though 280A DC would not be out of the question for us. (Microwave + induction cooktop…)
I guess in your shoes I’d give the guys at Magnum a call. I called them once (when we still had a generator and I wanted to hook up an auto gen start), and they were very helpful, sent me diagrams, etc. You just have to get past the front desk to the technical guys and they’ll be great.
Thanks, James! I’ll give them a call tomorrow 🙂
Thank you for the inspiration James!
I’ve just completed the first phase of converting our A/C to run off the 200AH Eco-Ion battery bank in our 2017 Pleasure-Way Lexor TS. The cost for parts was about $2000 dollars and the labor took about 3 hours. The folks from Xantrex were absolutely terrific to work with and their equipment with the Xanbus setup is very easy to install and configure.
The system is performing really well. It was 85 degrees here today and it ran for 110 minutes in the sunshine before the controller turned on the generator to recharge the batteries. I’ve also set up a cellular hotspot and an environmental monitor that communicates with my cellphone if something goes awry.
We often find ourselves in urban environments where we can benefit from A/C while we’re working or getting ready to go out. It should also give us some flexibility when we’re traveling with our Beagle and need to run in to a store or restaurant where she’s not welcome.
Thanks again!
Bob
An hour and a half on 200 AH is about on target. Congratulations!
(And yes, the Xantrex folks are super nice.)
Did you install a 2nd alternator or is this a different system? Also does this void your warranty?
I love the Lexor but need a way to turn the AC when I must leave my dog alone so I am considering a Roadtrek Zion which can be ordered with the volt start system. I’d prefer the Lexor if I can have this installed professionally.
Thanks!
I think your question is for Bob? Ours is not a Pleasure-Way. (And I’ve modified things so far out of warranty, it’s not even funny anymore…)
Hi Bob: I have a 2016 Lexor TS. Did you install this Xantres yourself?
Thanks,
Randy Lum
James,
I’m just designing the electrical for a planned class B build. It’s great seeing a complete set up and understanding the reasons for the decisions you made. Thanks for that.
I do have one question. I’ve just about got myself talked into mounting 2 160 watt panels in series and using an MPPT charge controller. Still, the simpler, less expensive Zamp set up you have is appealing.
May I ask…Did you consider a series set up with an MPPT? If so, what made you go with your current set up?
Oh, I should add one more thing. I will likely not have the second alternator. If you did not, would that have affected your decisions.
Thanks,
For a 320 watt system on a class B, the gains from the more expensive MPPT controller will be minimal. The wire runs aren’t going to be long enough to worry about a voltage drop. And even with some efficiency losses, when you multiply that by 320 watts, the total loss is small – maybe enough to run an LED light fixture while the sun is out. Not worth it, in my opinion. MPPT shines best in LARGE systems or systems with LONG wire runs. You’ve got neither.
Even without the second alternator, the leftover amperage would still be much greater than you could expect with a 320 watt setup. That would not affect my advice on solar.
James
Thanks for the response James.
It’s easy to get caught up in the small technical differences between systems and over-spend for minimal return. Thanks for helping me avoid that.
Thanks, James but I’m an old guy not seeking this sort of challenge. Any chance Winnebago will recognize the value of what you’ve done and offer a complete package with large lithium battery, etc?
Well, I think eventually the entire industry will move that direction. So I’d say yes, there’s a chance that Winnebago will eventually offer a similar option.
This may have been addressed in your post or in all the comments after the post but I could not find it. You identify the batteries you are using as Lithium but there are 2 types of Lithium batteries available now, Lithium Ion and Lithium Iron Phosphate. The LiFePo4 batteries are said to be safer and superior to the Lithium Ion, more expensive too. Can you specify which battery you are using. If it is LiFePo4 can you recommend any place in Salt Lake City that can help me design a battery system for my soon to arrive 4X4 Sprinter. I live in Park City and have found some places around the country that can help but it would be nice to have a local source.
Our battery is from Lithionics, and is Lithium Iron Phosphate (LiFePO4).
As far as any place in Salt Lake City, I can’t really recommend any place. AM Solar (Oregon) is probably the closest I can recommend based on experience.
Still kind of far away though.
Very nicely done RV power supply, blog, and comments. It’s interesting to see what can be done methodically and with resources. Unfortunately my resources do not allow for that level of investment and maintenance.
However, even if they did. I’m still not convinced I would do the extra alternator. All those belts and clearance issues?! To play Devils advocate here there are some advantages to separate systems. I like my Yamaha suitcase generator as back up to solar. But yes, The first thing I removed from my RV was the big and heavy generator.
Hi Jeremy –
In my mind, the biggest benefit from the second alternator is that its charging is regulated to match the lithium battery. If I had used the vehicle alternator, it would be charging the (expensive) lithium battery improperly. I’d be hitting it with 14 volts nonstop – every time the vehicle was running. That’s bad for the battery.
With an AGM-only setup, the second alternator is less of a benefit.
James, great post, excellent description, commentary and description. By chance, was a wiring diagram developed to show the components and wiring? It would be very helpful. Thanks, Cal
We never put together a wiring diagram. Sorry!
James, I love what you did – and am going to contact the Xantrex folks. Is there something (above mentioning this post) that I can do for you and FitRV as a referral?
I got a 170″ wheel base, EB Sprinter and am incrementally adding the really cool features that you’ve done on your van(s).
I love your site and work.
Well thanks, but no referral necessary! Best of luck in converting your Sprinter. It’s a big undertaking.
If you were feeling really motivated, the next time you buy something from Amazon, use the link that appears on our pages. It won’t cost you anything, and we get a small referral bonus.
Thanks!
Nicely done! James do you see any downside to leaving the agm house battery setup strictly for the 12v requirements while installing a seperate lithium battery system to replace the Gen for 110?
Downsides: Extra wire. Extra weight. Extra Batery to fuss over. You’d now have a three battery bank electrical system in the van to keep straight. Potential difficulties in figuring out which battery to charge when you’re plugged in? Would there be an A/B switch? Or maybe some sort of controller figuring out which battery got what charge based on state of charge, or a simple ratio? I can see all sorts of problems to solve with that kind of setup.
For me, I think the benefits are slim to justify that kind of complication. That’s why I had no interest in pursuing it.
But if your usage scenario was very different from ours, maybe it would make sense in that case.
Follow up ? – Would the space originally occupied by the Onan 2800 make a suitable landing site for one, or multiple lithium batteries? I know there are cold charging and excess heat sensitivities with lithium, yet I imagine an isolation box could be fabricated around them and perhaps a heat patch similar to the ones used on holding tanks might be employed? The Onan measures 22L x 16.3W x 12.8H, which seems ample space to allow installation of three of the following type of batteries:https://starkpower.com/shop/stark-deep-cycle-12-volt-125ah/. As you made use of a single, 420Ah battery, do you feel a large capacity unit is preferable to multiple, smaller ones? Or was the decision more based on available space? Not yet owning a Travato, I have not seen how the Onan is rigged. Does it sit on a hanging shelf that could be re-tasked to hold batteries? I have seen owners use the original battery platform but thought this site may allow additional space. Can’t wait to get one of these RVs! I wish I could order a G without the Onan. Have to figure within a couple years that will be common. Cannot thank you and your wife enough for the incredible asset you provide to current or would be owners!
Considering following your lead after I get a G early next year, Are you able to give more specs of the alternator kit costs and where you purchased it? I see a “DODGE PROMASTER DUAL ALTERNATOR KIT WITH 280XP HIGH AMP ALTERNATOR FOR 2014- UP 3.6L GAS ENGINES” for $1800! Is that the one? Thank you.
Yep. That’s the one. (Sadly, they’re not cheap…)
Hi James. Really love your thorough articles. Was wondering how much clearance you get now that the generator is removed? Is it 8-9″ now? I guess your second alternator is probably your lowest clearance point now.
Thank you
Hey Omair –
Actually, the lowest point didn’t change much. It’s still the bottom of the rear axle. Though we are working on some protection for that second alternator as well.
Thanks for reading!
Just curious if you purchased the Bluetooth Dongle for the Viltron Battery Monitor, or decided to monitor what you needed to directly from the monitor?
No Bluetooth. We’re talking a Class B here. It’s never more than 8 feet to the monitor, which is in plain sight.
I think the Bluetooth might be good if everything was mounted away in a storage compartment or something.
Hello, enjoy your videos and blog.
Based on your experience with the manufacturer, can you advise if the Travoto line will soon be available from the factory with modifications similar to those you have made to your van?
This would be something long the lines of Etrek by Roadtrek.
It seems there is a great deal of consumer interest in units that offer the maximum live-ability while “boondocking”.
Thanks,
John
I obviously don’t speak officially for Winnebago. But I can say that they are interested in and looking at this kind of technology. And they’re aware of the market interest.
Exactly when, and in what rig the technology might show up is something only they can say for sure.
Great info (and cautionary tale), James! We are in the early stages of planning a DIY Sprinter conversion. I am also thinking lithium and a second alternator. You mention your system “kills” the alternator when the battery is charged. Is that done via an alternator clutch?
I don’t actually know how it does it. There is a field control circuit on the battery, which communicates with the Balmar charge regulator. We didn’t install any mechanical parts like a clutch – though I suppose that could have been part of the alternator as shipped from the manufacturer.
https://www.bluesea.com/articles/58
Automatic battery isolation.
Yah, but we didn’t install a separate isolator or relay. If there’s anything like that working, it’s inside the battery case.
Hi James. Excellent writeup and it really covered the bulk of the questions I have, except for one. Now that you’ve experienced the lithium, and presumably feel more comfortable with it, would you do solar again if you were starting from scratch? We have a Sprinter 4×4 144WB on order and Sportsmobile is doing the conversion (with lithium). Generally speaking, it’ll be about the same setup as what you have. Our difference is that we don’t have the need to run the AC that long without idling the van. We have a ton of outdoor gear, and with space already being a premium inside the van (full shower, Espare D5, lithium bat, etc), our need for roof space is going to be pretty high. With how fast the van recharges the batteries, would you ever consider just purchasing more battery capacity and skipping solar all together? SMB indicated it might be wise to have solar purely for resale, but we really need that space. And, long-term I just don’t see the need for solar with the charge profiles lithium batteries can take when you have two alternators. Short of the long backpacking trips where we want the fridge going the whole time, I can’t really see the need to have solar with such good amps coming from the alternator. Wasn’t sure if you had some feedback or thoughts on that. The benefits of not having solar would be more roof space, less complexity, and that investment could be put towards more AH. Long-term, even an auto start that runs the van to could be used for situations like that.
Well, the solar really isn’t all that expensive, so it’s nice extra insurance. But I get your point.
A good rule of thumb for solar is that you can expect 30 Amp Hours of energy per 100 Watt panel per day in ideal conditions. So, from our three panels, we could expect 90 AH per day. But conditions are never really ideal, so it will always be less.
Running the engine at idle can generate up to 170 Amps of charging from the second alternator. So another way to look at it is that running the engine for a half an hour or so can produce more stored energy than all day of perfect solar generation. Kinda makes you wonder…
So, I’d suggest you look at your usage profile. If you want to sit for a few days and not run the engine at all, then solar (and conservation) is the way to go. If you envision yourself driving most days, then the solar may not be as important.
Us – we wanted all options available to us, so we have the solar.
Reid, since I have a Sprinter too, I was wondering how to install solar without going to the roof because of weight considerations. I am trying to figure out how to mount panels on the side (most are on ~1 7/8″ frames but some are thinner, some are up to 60 lbs but I found framed ones that are just 20lbs – or you could just use stick-ons). This would free up roof space and allow for angle adjustment to some degree.Since you are looking at a custom high end van, you might want see if they can engineer that for you (and let me see close-up pics).
Reid, if you would be open to it, I would like to link up with you in a conversation. I too and contemplating a Sportsmobile build that is similar for winter use, and I am considering a number of the same systems you note. Thanks
Thanks for this great article. It rolled around in my mind for a while, and I have a question.
Love the idea using the engine alternator as a replacement for the generator. Obviously the standard alternator charges the engine battery. Is it possible to also electrically route some of the output of the alternator to the solar controller and make use of it’s built in charging cycle for lithium batteries? Might that eliminate the need for a second alternator?
Interesting idea, but I don’t know of any solar charge controllers that are built to handle that. The alternator could hit it with a lot of amps, and at a particular voltage. I’m not saying it would never work, but you’d really want to do your homework with the manufacturer of the charge controller.
Very interesting write up. Thank-you
Question 1. You have installed a control wire back to the alternator to shut it off when the batteries are full. What happens with your solar panels? They will continue to charge?
Question 2. When you discharged your battery to 10% it shut off. When you plugged into shore power the coach was still dark until you pressed the reset. You removed the 120v / 12v converter? Did you leave the 120V system alone? Are you still able to use 30amp shore power?
Enjoy your web page.
Mike M.
As an auto technician I would look into modifying or adding an adjustable Potentiometer to raise the RPM at idle. Actually simple modification as you can use OE connectors in between the poteniometer too keep warranty in effect. Just remove before a major service or warranty repair. As without research on your diesel Travato I would say it is a fly by wire setup. As your an engineer so I know you could do it. Plus with your skills I am sure you would make it top notch.
If it is manual cable then even an old style of wire setup used for cruise control and vacuum would also work to adjust the throttle through the gas pedal linkage.
If all else fails get a piece of wood that keeps that RPM higher at the gas pedal. But I know thats not your style.
Just ideas as Seeing a 25% loss of Amps or more would drive me crazy as think of all that lost fuel. Maybe that will get your OCD cooking.
Great articles as my wife enjoys them too as been watching for over 2 years now. THanK YoU
Yeah, the “piece of wood on the accelerator”… not my style. lol!
To date though, we’ve actually NEVER run the engine just to charge the batteries, so the extra amps on the table hasn’t been much of an issue.
Our batteries have always stayed pretty close to full just from our normal driving and the solar panels.
We’re at the tail end of a 3+ week road trip, and we’ve had ZERO issues with the setup. We’re totally happy with it so far.
Great website you two have!
Any concerns about fire if there is a short in that powerful battery?
With your skills, why did you choose to not start with a bare van body and build the RV yourself?
Thanks for the education both of you provide!
Mike
I could have built my own, but finding the time to do so (and to do practically nothing else) would have been problematic.
Plus, the Travato offers a good value for the money. That made the decision easier.
As far as fire danger – I’m not too worried. The battery itself has safeguards built in, and I’ve double and triple-checked all the high-amp connections for tightness. I do pay extra attention now when I work in areas around the battery cables though…
as for fire protection.. what you need is a BlazeCut:
https://jogrusa.com/collections/blazecut
I have them under the hood of all my cars, and they are often used inside battery and electrical cabinets.
Interesting. I wonder how it would handle a lithium fire. Water generally makes them worse.
But a neat idea nonetheless!
James, this is the stuff inside:
https://www.chemours.com/FE/en_US/products/fe36.html
since a major application is in electrical cabinets and computer rooms, etc you’d think lithium / battery fires would be a primary target.
Stick a Tesla battery under the floor…that’ll power ya up!
I know they were going to start selling a wall-mount battery for solar installations. Do they sell their regular automotive batteries?
No, Tesla does not sell the automotive batteries but I’ve seen folks take them out of cars and break them up and sell them. Here’s a link: http://www.evwest.com/catalog/product_info.php?products_id=463
Hi James, great post as usual. I was wondering, come winter in freezing temperatures with this set-up you have now will you be able to recharge the lithium batteries? Many read I find indicates either you can’t recharge below 32F or only charge at 0.02 which could take days to get the batteries full. Do you plan to wrap the batteries with blanket heather ?
Recharging the lithium battery will be no problem. It’s inside! I don’t plan on keeping the inside of our RV below 32 degrees. At least not while we’re camping in it. 🙂
Question for you. Did you ever consider a soft-start for the AC unit so you could get by with a smaller inverter? We’ve got a Sprinter 4×4 on order with Sportsmobile doing the conversion, and your spec is essentially what we’re wanting to do. Dometic has a soft-start for their Penguin II AC unit (almost same specs as your Coleman) that brings down the locked-rotor amps to mid 30’s. I believe other manufacturers have something similar. May not have enough residual power for both the AC and induction cooker, though.
We’ll have a 2nd alternator, same lithionics battery, same victor monitor, etc – so it’s great to see some actual numbers, especially in regards to idle performance from the alternator. We ordered the sprinter with the adjustable high-idle option, so I’m happy to see you’re getting close to rated power from the alternator when above idle. We’re thinking of just having a single 100 watt panel for solar to keep the battery up a bit with the fridge in the summer while we’re backpacking. Otherwise, we’ll idle the van as needed. If you had to start from scratch with this lithium setup, would you still have gone with 300 watts of solar?
If I were to do it over again, I’d probably still put 300 watts of solar up there. Just because I have the room, and don’t need the roof space for anything else. It’s nice to always have full batteries.
We never considered a soft-start for the AC. The folks from Xantrex assured us that their inverter could slap the AC hard enough to start it, and they’ve been absolutely right. We used to have a Penguin II on our last RV and loved it. If you can get the soft-start built in from the factory, that would be a nice way to go.
Great write up as usual. Might be more than I need for the reasons you stated: don’t need to run A/c off battery. I would like to know whether you are happy with the 300 watts of solar for normal non-A/C use? I have a K model and I’m planning my upgrade project now but I need a real target wattage to support the fridg , tv, 12v devices etc. I’m thinking approx. 300 but you are the only one I know who has actually lived with 300 for while. Any advice? Thanks Bob
300 Watts is, realistically, more than enough for a standard-issue Travato. When we were actually out and using the RV, except for first thing in the morning, it seemed the batteries were never less than completely full. 200 watts would likely be enough – that’d be my guess.
Hi. I’m the girl (well I’m 45) planning on dry-camping NYC streets in a class B for a year to save rent and pay down grad school loans.
My major concern is not killing my small dog while I’m in the hospital during my 8-12 hour shifts. If it goes below zero maybe 10 days out of the winter, and goes above 100 the same ( about 10 days), The remaining days are more manageable with temperature, I’m think. I can also street park near the hospital to check on the dog as needed.
Am I nuts? Please share your thoughts.
I too am an outdoor enthusiast. I will be taking frequent trips biking and skiing. I also live in SLC (Sugarhouse), but currently I am reting while in NYC for school.
The winter would be fine. RV heaters can be relatively quiet. If you get a model with a Truma heater, better still.
Summer will be a problem. To run an air conditioner for 10 hours straight, you will need to either plug in, or run the generator. The generators are loud.
I don’t know how the police in NYC are, but that seems likely to draw attention.
I know this post is from last Fall, but just wanted to say it’s totally legal to sleep in a vehicle in NYC. The only potential problem with a noisy generator would be if someone complained – but the cops generally don’t come out to check non-emergency noise complaints. If parked in a lot, away from residential buildings, I think it’s probably no big deal. This is a very noisy city.
I wonder what Kim Garrett decided to do and how it’s working out for her!
Kim Garrett , we must both be crazy as I have the same idea. In my case I want to cut down on commuting every day(NJ to NY) and “work camp” 2-3 nights a week.
Hi, We’re planning our sprinter conversion now and have similar concerns leaving our cat in the van for a day or 2. Wondering if you’ve made any more progress planning this? I was thinking that a smaller 12V AC system like the ones from cruise n’ comfort (www.12voltac.com) may be a solution. They have a 5K BTU unit that draws 38amps and an 8K BTU unit that draws 46 amps. Wonder if those would be big enough to keep the inside of the sprinter safe for the cat purely off a lithium battery setup. I feel as long as it’s below 80˚ or so in the van it would be acceptable. Appreciate any comments or input.
I don’t have any direct experience with those units, but they are considerably smaller than what’s in our RV now. Some days, we think our AC doesn’t cut it.
But if you’re trying to keep a cat from… dying? How much AC does it take to not kill a cat? I don’t know. Depends on a great many variables. How insulated is your van? How hot is it outside? How heat tolerant is your cat? Is the AC ducted, or otherwise directed into a smaller space? Or is it trying to cool the whole van?
Purely from a battery capacity standpoint, if your batteries are big enough, sure, you could run it for a couple days.
And if it’s below 80˚, you honestly might be all right just running vent fans. Many people do that (like pretty much everyone in Europe), and they seem to have lots of pets over there.
This is Everything I wanted to know about Power …but was afraid to try!
Thanks for sharing your courageous overhaul of Lance’s power plant. No wonder rocket-scientists are always at the forefront of innovation!
And it works!
The second alternator/engine generator seems like the most valuable new element in the system. Some manufacturers will now be offering it in their standard configuration. It’s logical for “motorhomes” to take advantage of the quiet and powerful engine and fuel source they already have. Apart from finding a way to protect the alternator with a new housing (custom roto-molded ABS (http://www.customroto.com ?) with a steel protection bar?) it looks like a winning combination with the Xantrex Inverter/ Lithionics Battery/ Nations Alternator with the Balmar controller.
Congrats to the Fit RV team! You know how to present information in simple terms and make it accessible to technological neophytes.
Glad you liked the write-up, George!
I’m intrigued by the custom roto molding, but building a mold would probably be prohibitively expensive for a one-off.
Steel bar seems a more likely route, but I’m still figuring it out.
James,
I’m not so sure about the value of the underhood generator.
You upgraded to the lithium battery that returns more power than the original battery, right? The better battery would seem to reduce the need to rely on a generator when boondocking. You’ve got good solar. I bet (other conditions being the same, i.e., no trips to the hot, humid south) you can go all year without using the underhood generator.
An “underhood generator” is purely a marketing term. Around here, we call it what it is: a second alternator. 😉
While it might be possible to create a system that relied on the chassis alternator exclusively, the second alternator is a better approach for the following reasons:
1. The charging profile of lithium batteries is different from the starting battery. You do NOT want to throw 14.4 volts at a lithium battery during a 12 hour driving day. That’s no way to treat an expensive battery! The second alternator has the proper charging profile for lithium batteries.
2. The second alternator can charge the batteries MUCH FASTER than the chassis alternator could. It’s not sharing the load with anything else.
3. Even with our battery, we can only expect just over 3 hours of air conditioning run time. If we want to run the AC for more than three hours, we need an alternative.
Gee ! Everything you did comes from the factory on a Zion. Might have been easier to just have traded it in. At least in a Zion everything was designed from the ground up and should be mostly problem free.
Yeah, but:
1.) Mine works! 😉
2.) The Zion floor plan is completely unacceptable for us.
3.) The folks from Winnebago and Xantrex have been fantastic to deal with.
4.) Our rig has indoor plumbing, and is winter proof.
5.) My craftsmanship is better.
We are also in the market for our 1st class B RV. The second alternator and solar seem the way to go when I think about a noisy generator. But this is an advanced project over many of our heads. The Travato is near the top of our list, does anyone do a complete conversion like you described?
We were impressed with ‘Advanced RV’ with a very similar system, but an AAR used 2013 model, with 17k miles sells for $172k. That’s about double our budget! Any ideas how to get started generator free, maybe buying a used Travato and retrofitting? It sounds like the Zion is not the ticket? Thanks for any input.
A used Travato would actually be a pretty good bargain. As Winnebago has kept up a good pace of updates and improvements in the Travato, a used one would probably be a solid value.
As for the electrical system – finding the pieces of the system is the easy part. Finding someone who can install it safely and competently is the difficult part.
You might try asking shops that specialize in RV Solar installations? If you have a good Marine electrician, they would be a good choice as well.
What an animal you are James….running your induction cook top while the gen is on. I would have put on a face shield just in case. About the alternator- when your mishap occurred shortly after the install I was sure you were going to mention that you had run into rain or drove through puddles just before it happened. That thing looks perilously close to the ground- skid shield or not.
Welding mask!
I wonder about the splash aspect, but I mean… surely they’ve thought of that, right?
Excellent project for RV’s of all types. As we continue to enjoy our 2016 Era, I see this as a similar project in 2017…There will always be the pioneers who show others the way….Thank you for all you do!
Fascinating stuff. Hoping that someday you try out a compressor refrigerator.
A decidedly low-tech question: does removing the generator create enough room underneath for a spare tire?
We had a compressor refrigerator in Das Bus. We’re already sold. Loved it. Miss it. (The compressor, not the size… it was tiny!) I think ten years from now, absorption fridges in RVs will be museum pieces. Can’t wait.
As far as the spare tire, I haven’t tried it, but I think there’s almost enough room now. You might have to move or remove some other things to get it working. I see a few mounting holes, but I don’t see any remnants of a winch system or anything. And I think you’d have to move the solenoid and relays in the box toward the rear as well.
Full retail price and labor? Beta tester? I would of definitely done the install differently.
It’s not available as a “system”. At least not yet. But prices for the individual components are available online. I believe I’ve linked to them all.
It did run about $800 to have the alternator installed. It was a whole day of labor, so that may depend on what your local Ram service rates are. If they were to install a second one, it would take them a lot less time.
I plan on using an induction cooktop like you, but I think I will just find a way to attach it to the propane cooktop cover, so it wont move in transportations. The induction cooktop is not very thick and the usable space saving by imbedding it in the place of the propane cooktop will probably not be that great. Especially since you will be keeping the propane anyway for the Trauma. It’s good to have the backup. Also, by keeping the induction cooktop mobile, its easy to cook outside.
And if you’re really looking into optimizing your electrical autonomy, look into pressure cooker cooking. Small water quantity to heat + shorter cooking time + induction efficiency give a big win-win.
But I have yet to find a way to make good “camping toast” (burnt on the outside, uncooked in the middle) on the induction cooktop…LOL
Right now it’s just sitting on the propane one as you describe. It doesn’t move much.
Cooking outside is an interesting idea. I think we’ll take a trip with it like it is now and see if we’re motivated to cook outside with it. (But we’re pretty lazy, so I don’t know.)
Depth of the cooktop and the propane one are similar. By mounting it, we don’t have to store it, so there’s that…
I notice a small spark when I pull the plug on my induction cooktop even if it if off, which leads me to believe there is a constant small currant draw even when off. If you mount it you might still want to have access to pull the plug (or put a switch) if that currant is significant in the long run.
Interesting. There is a light that stays on, even if it’s not on. We hope to have our “boil off” this weekend. I can test the current draw then.
For us though, unless that draw is huge, it won’t be a big issue. We don’t leave the inverter on all the time – only when we’re actively using 120 volt appliances.
James,
Exceptional write-up and detail. Thank you for revealing all of the behind-the-scenes issues and solutions!
Have you considered some sort of “high idle switch,” that would allow you to hold that 2000 RPM engine speed without having to sit there with your foot getting numb? I think that would be a great feature, even for the mostly-stock RV.
Also, on the need for a “Skid Plate,” that does not have to be metal, and can be fabricated from high-impact thermoplastic (ABS, for example) and heat-bent easily to keep it snug to the chassis. It would not increase weight that much, depending upon the overall size you select.
GREAT WORK!!
If it were a factory option, I might install a high idle switch. But honestly, I don’t think we’ll need it. An extra 50 amps of charging on top of 170 already isn’t terribly motivating.
I’m not set on any particular material for a skid plate. I’d be open to plastic. Someone at WGO suggested UHMW. I can’t fabricate either myself, so it’s a hire-out job either way.
I’m sorry if I missed it but it in the post but is there a cost figure for this? And, what was the original cost of your generator? I’m trying to get an idea if I skipped a generator and just had this installed what the cost difference would be.
I didn’t include a cost figure for this, because it’s not currently available as a complete “system”. You’d need to source the components yourself – prices and suppliers are online and I’ve linked to them.
As far as the Travato generator, as of right now, it’s not “optional” or something you could delete. I don’t know if that will change in the future.
James; Thanks for your power work and write up and for mentioning the work done by ARV on Lithium powered Class B motor homes. I learned from your experperience and power blog. We are on our 4th major design improvement in lithuim battery/engine alternator systems installed in over 50 ARV custom Sprinter coaches. There is always more to learn and improvements to be made as technology improves. I look forward to further discussions with you about your power project so we can learn and push the technology forward together. We have installed Xantrex inverters and have also experienced excellent support for a well designed inverter.
Thanks, Mike! It’s always a treat to visit your facility and see what improvements you guys are up to. Here’s to the next chapter!
Why not add a circuit to the inverter that puts a 120v a/c charge to Lance’s skin as a bear defense?
If the inverter can be bridged you could put 220-240v.
I have done similar with a 1farad capacitor with 12v d/c. The results were a very effective anti-theft system.
Another great write up James! For an engineer ( I’m a Civil ) your write ups are better than a novel!
I would share your concerns about the exposure of the second alternator. It could be a critical point of failure should it be damaged.
Some sort of steel skid plate in place of the plastic splash guard comes to mind, but that might further reduce ground clearance.
I see that lift kits are available for the ProMaster. Would that be an option?
Or would the resultant rise in C.G cause handling issues?
I’m sure you’ll come up with some sort of imaginative solution. Can’t wait to read about it!
Thanks for a great read!
Well, as far as a lift kit – I can’t see how you could raise the rear axle with one – and that’s really the low point in back. Raising the front might help a little though.
I know you like the engineering challenges of it all. Why didn’t you buy a Roadtrek Zion and it would all have been done for you?
I would guess floor plan and price. I really want to like the Zion, but I really can’t get around the floor plan.
And, he probably wanted his to actually work!
LOL!
And, the floor plan in the Zion would so never work for us either.
Ok how realistic is this for a person that is just a regular person with no mechanical abilities? Is it expensive. If I were to buy for example a Travato or class C that comes with a generator what would it entail to convert or would they just leave off the generator and parts I do not need? What if I buy a used one? Or do I have to by certain motor homes? It does not sound like you can just buy a kit and drop it in and off you go. It sounds like a lot of things can be done wrong. Also do you know anything about the Tesla Powerwall battery pack you can just hang on the wall? Thanks for all the great research and information. Marian
Well, if you have no mechanical abilities, this is definitely a project you want nothing to do with. The installs are difficult, time consuming, and require some background to make sure you don’t create an unsafe situation.
HOWEVER – if you’re asking from the point of an end user – this is an extremely friendly system from that perspective. Stef is completely fine with it.
Don’t know much about the Tesla product. I’m sure it’s top-shelf though.
As far as RV manufacturers adding this for you – you’d be best to go with an Advanced-RV. They’ve been doing similar systems for quite a while now.
This is an awesome write up…almost too detailed and I’m an aerospace engineer as well.
But two things I dont understand is why all RVs don’t come optioned with integrated electrical systems instead of those antiquated generators. And second I don’t understand folks that never use their generators. You must either always be in a campsite with full hookups or camp in moderate climates or both. In my experience I run my generator all the time to feed the a/c unit as I’m driving or dry camping or both.
Over three hours of battery powered a/c is good but my goal would be to run it all night off batteries. It scares me but I have slept with the generator running. In hot climate you dont have much choice. With some help I think I could build an integrated system but its not cheap. Thanks.
In time, I think we’ll see RV generators play less and less of a role in smaller RVs. There will probably always be a place for them in the larger, stay-in-one-place rigs.
As far as our generator use: We like to travel more in the spring, fall, and winter. Summers are hot and crowded everywhere. I mean, yes, we do travel in the summer, But we’re more likely to head north at those times.
As far as getting more than three hours running the air, I think this system would certainly to it. All you need is additional battery capacity. 1200 amp-hours should get you 8 hours (roughly). Finding space for the batteries is the only remaining concern.
Amazing work!! This is a top notch setup you’ve got there.
1) Great writeup. I love these deep dives of James’ and recognize the work that goes into them. Thank you.
2) Great news in those results. When I asked the local BAD (big something dealer) shop about retrofitting a unit to run the air conditioner off of battery, they literally swore that it was impossible. I was so insulted by the way the salesman spoke to me that I reported him to national headquarters.
3) Love the shout out to Advanced RVs. Those guys seriously impress me on a regular basis. I only wish it didn’t take a year to get one made at AR; but then it is their personalized approach and small shop environment that contributes to their greatness.
4) Stef, how many times did you doze off while proof reading this for James?
Hearing “impossible” would bug me as well.
Maybe you should go back to the dealer and refer them to this post!
(and Stef didn’t doze off, but she did edit in shifts…)
I’ll bet, like me, “that’s impossible” is to you as “sick em” is to a dog. In fact, I did refer them to your review of the Advanced RV rig.
Hello James Great write up . You answered my first question which is can this setup handle an induction cook top. I was also curious as to whether or not it can run the Truma combi system ( I get the feeling you are going to to find out sometime in the near future!). One day when I get my Van I would like to go all electric( not a big fan of propane or the loud generators)I am interested in the 59K so the Fridge is already electric .
On a side note do you have any plans for the space gained by ditching the generator? I read that Roadtrek has an air conditioner that is mounted under the van, I believe it was on the CS, No roof top AC more room for solar panels oh yeah baby!
Don’t know if you caught it, but it can run the induction cooktop WHILE also running the air conditioner!
Running the Truma would be interesting, but not really very efficient compared to propane. I’ll try it, and I’m sure it will work, but I don’t see wanting to run the batteries for that regularly.
I have no idea what to do with the extra space. It’s not very accessible. I’ve thought of a below-decks storage hatch, which would be interesting. But other than that, haven’t thought much about it.
The generator was the low clearance point according to one of your blogs, if I remember correctly, so I would have thought you would like to leave that space free with all the back roads you do.