This post may contain affiliate links.
It’s been a while since I’ve written about development of our ProMaster Skid Plate, and since we’re what I’d call “done” now, I thought it’s time for a quick update. But first… BEHOLD!!
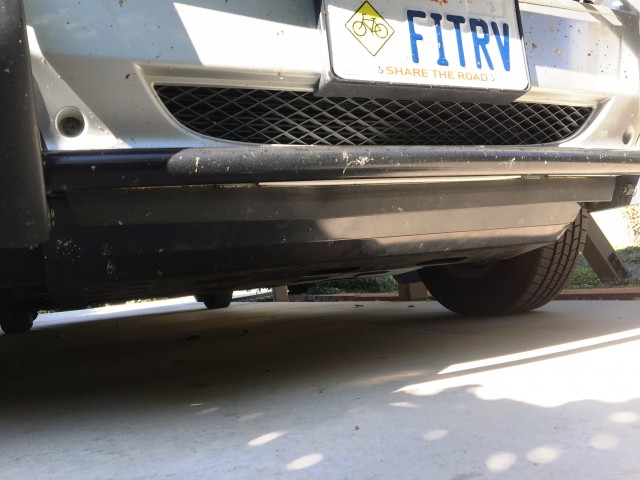
OK. Wow. I really need to wash my van. But just think of all those bugs that won’t be impacting my second alternator now!
There have actually been at least two versions since I wrote the last post on the subject. That was version 3. So I think we call this final version, “Mark V”.
But I’ll jump back a bit and catch you up.
Version 3 was a pretty stout affair, based on a European design for the Ducato, but heavily modified to fit the US-Based gasoline-engine ProMaster. It was made of heavy gauge steel and looked about like this.
Skid Plate V3. Landmines Beware!
I drove around with that one for several months, and all was well. But I started to notice something when the hot weather rolled around. In extreme heat, the output from my second alternator was reduced. I was still within temperature limits for the alternator (measured them), but the reduction in output was real and noticeable. Particularly when parked and idling in hot weather – I was finding my output reduced sometimes up to 60 amps from winter measurements!
So, based on this info, and some experience with another Winnebago Travato, copious venting was added to the skid plate, and we had version 4.
Our “Swiss” version. Version 4.
The vents in this version allowed the temperature of the engine bay to return to pre-skidplate levels. It also looked pretty cool, especially the holes alongside the alternator.
Version 4 with the graduated holes near the alternator.
But while it looked cool, it wasn’t exactly what you’d call “designed for manufacturing”. The curved section, though elegant, required cutting and forming by hand. And then it had to be welded back into place by hand. All that makes for a time-consuming, and more expensive, finished product.
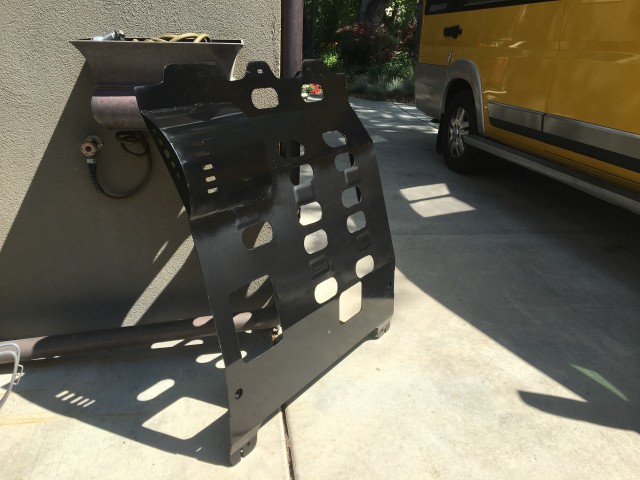
So we (OK, it was just Gordon) went about modifying the design to eliminate the handwork required, and to adapt the design for efficient manufacturing. The curved section was eliminated and replaced with a few bends. The “bulge” for the alternator was extended to cover the whole width of the plate. The venting all stayed. I think we’re calling it done at this point.
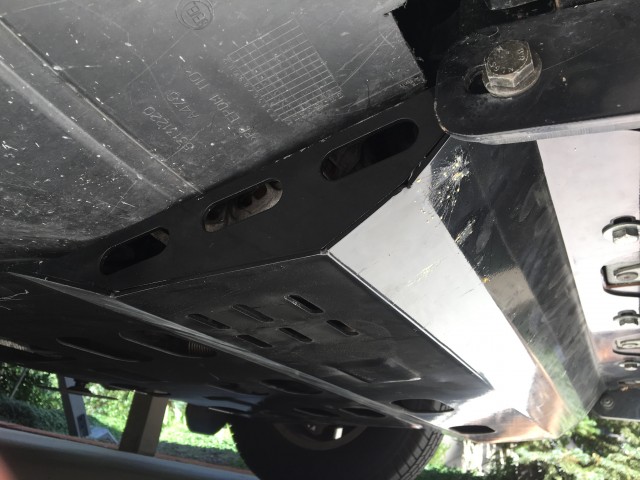
Skid Plate “Mark V”. Already killed quite a few bugs with this one!
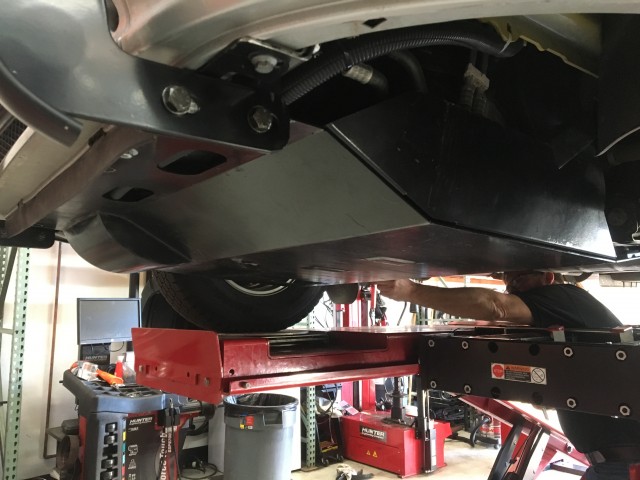
The new design does a couple of things. First, as intended, it makes the whole part easier to manufacture. But the other thing it does is allow more room all across the front to protect any cabling, mounting or other accessories that might be installed. You can see the space in this one I took while Lance was on the rack.

Plenty of room in side the Mark V ProMaster Skid Plate.
And, I guess the third thing the new design does is look more “automotive”, or more “finished”. In other words, it’s less obvious that there’s something unusual going on down there.

About the only thing you’d notice now is that I hit way too many bugs an don’t wash the van often enough… sigh.
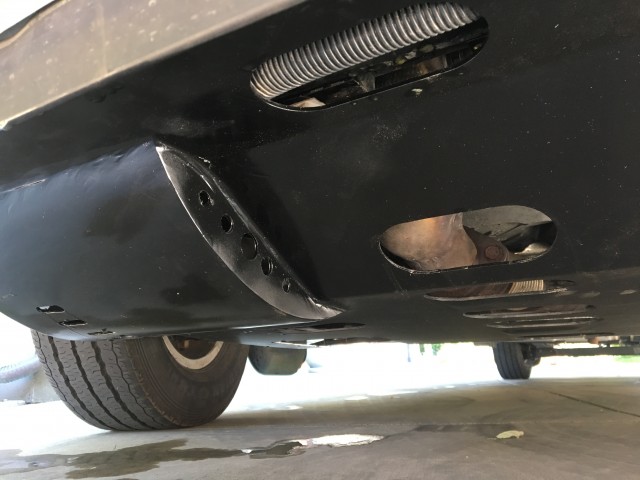
And finally, this should go without saying, but doesn’t… So I’ll reveal that there are strategically placed holes so that you can change the oil without having to remove the skid plate.
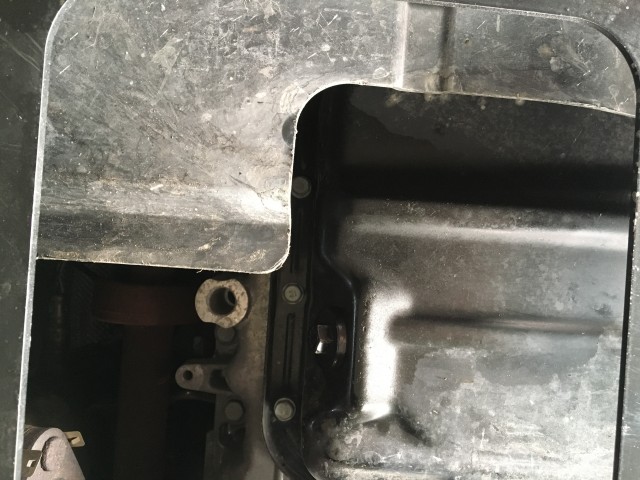
Just set the phone on the ground to take this picture. Oil drain plug is just below center. The piece that’s more “in the way” is actually factory plastic.
So there you have it, the ProMaster alternator cover/skid plate is complete. If you’re a ProMaster owner who is interested in protecting the underside of your rig, we’ve now got a solution for you. If you’re an RV owner who has installed a second alternator underneath your rig (and this includes Roadtrek and Hymer owners, who may have had this installed from the factory), you definitely want this.
Good News! They’re available!
Since originally posting this, we’ve heard from Gordon at Edge Motorworks, and you can now have a ProMaster Engine Guard of your very own. Here are the details from Gordon:
So there you have it. If you’ve got a ProMaster with a second alternator – of even if you’re just concerned about banging up the underside of your engine – now you have the chance to have the same guard Lance does. Cheers!


James and Steph: Love your website, methodical technical tests, mods, posts and videos. You’re my go-to for Ram Promaster info (I have a 2015 Roadtrek Zion built on a 2015 Promaster 3500). Question today is to request a followup of your Edge Vanworks E-Guard. How has the guard performed for you? Pros and Cons? The openings seem large enough for gravel to get wedged up in, like ouchy pebbles in a sandal. It’s not cheap so is something I need to carefully consider before buying. (As an aside, when reading something on your website, I can sometimes hear James’ voice in my head saying it as well! Haha.) Thanks so much! A loyal Fit-RV groupie. fmdg
The guard has been fine. It really seems like something could get caught up in there, but I’ve never noticed anything (besides really small particles that seem to blow out by the next drive).
Hi
I do have a Hymer Aktiv 2019, on a Promaster and like to install the UHG skid plate
I am in Quebec Canada
What is the price and delivery
Regards
Roger
Hi James,
I just had the skid plate/engine guard installed by my dealer, all went well with the install. I feel so much better knowing I have the back up protection!
Thank you tons for creating the product with Gordon at Edge Motor Works. Gordon was great to deal with. The guard was well packed in a heavy duty box and arrived without a scratch.
Cheers,
Dave
That’s fantastic news! I’m glad to hear that they’re shipping and installing with no issues.
Enjoy the security!
Hey James how does your travato drive in the snow? Have you put weight in certain areas or purchased snow tires?
Drives just fine in the snow! It’s front wheel drive, and we do have snow tires that we rotate on in the winter.
No issues.
I have promaster can’t find anyone to install second alternator any help is appreciated. Tom
I can’t speak for your location, but here in Salt Lake City, I just went to my regular Ram dealer (Larry H. Miller Dodge).
They were clear that this wasn’t going to be a warranty item for them in the future, but they did the install for me, and even helped fix problems that I encountered down the line.
I had a good experience with them and would recommend them if you’re in the area.
Hi James,
I corresponded with Gordon at Edge Motor Works, looks like I’ll be ordering the guard.
The ground clearance specification that Gordon supplied me with (from the lowest point of the guard to the ground) was 6″. James were able to increase the ground clearance after your VB suspension installation?
Thank you,
Dave
Glad to hear you’ll be getting a guard. You’ll like it.
As far as ground clearance: Yes, the VB install did increase our ground clearance in the front. When they installed the rear airbags, they installed new longer springs in the front. this raised the front of the van about an inch.
Rear axle still is, and always has been, the lowest point on our vehicle.
Hey James. I’ve sent them an email. Looking to add a second alternator to my DIY Promaster Van.
Right on!
I’m sure Gordon will get right back to you.
Hi James, I am the happy owner of a Simplicity SRT. But the under hood generator concerns me. I definitely want to order the “Mark 4” guard when available. What is the make of your frame mounted front bumper guard? Would like a bit more protection up front as well. I also want to add additional house battery capacity. Is there anyone that makes ready to install battery bases for the Promaster chassis? I really enjoy your website and the information you provide. Keep up the great work!
You’re in luck! I just heard from Gordon, and the guard is now available. I’ll update the post shortly!
James, all your mods have been brilliant. I think you’ve made all upgrades possible. Do you think Russ Garvin will incorporate any, like a compressor refridge in a 59G?
I think a number of the things I’ve done will find their way into future models.
The “indoor plumbing” is already there on all the Travato now!
Well done! I’ve been considering the Hymer Axion. Most include the optional UHG with a plastic cover as you previously noted. I crawled under show vehicles to check clearances and concluded like you that the UHG sticks down ~2 inches. I am amazed Hymer lets it out of the factory that way since the UHG will be regularly whacked by cement parking bumpers. [Note: One look under the hood reveals there is no room for mounting the UHG on top of the motor.]
Your final version also protects other low hanging mechanical things under the motor, such as the exhaust pipe and transmission pan. Without your new full-width plate much could be damaged by a rock in the road.
The “curb hit” is one of the things I feared most with the second alternator…
The venting holes are so important to equipment longevity. Good thing you noticed the heat lag. Thanks for a great heads-up from my van.
Happy to help, Stuart!