This post may contain affiliate links.
If you’ve been around here a while, you probably remember my last post on the skid plate to protect our ProMaster’s second alternator. But just in case you haven’t, let me bring you up to speed.
A number of ProMaster based RVs have a second alternator installed as part of their electrical system. Besides our own Travato – which is a bit special – the second alternator can be found in the Roadtrek Zion and the Hymer Aktiv. This second alternator rides pretty low to the ground, and when you see it, you’ll be a bit concerned about whacking it into a “retread snake” along the interstate. Leaving the alternator exposed, or using a flimsy plastic cover on it weren’t options for me. So we partnered with EDGE Motorworks, in California, to develop a way to protect this vulnerable alternator. After two iterations, the alternator skid plate looked like this:
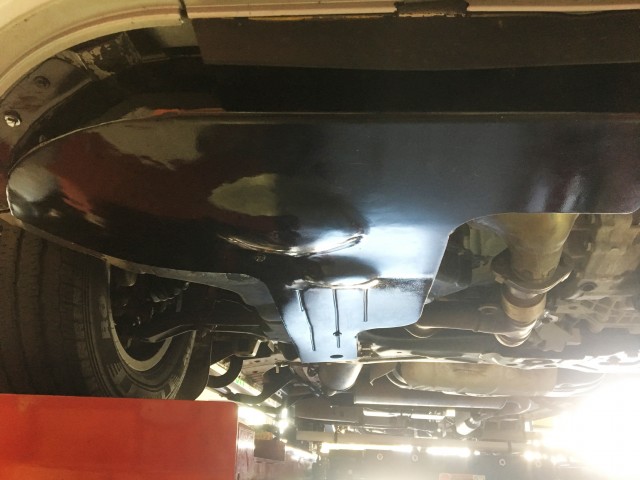
This was version 2. Version 1 was a steampunk looking affair.
Now, that last version was a solid attempt, and it stayed in place on Lance through a couple months of testing with no failures, and never so much as a rattle. But we knew we could do better. Right away, after installing this skid plate, we identified three areas where where could improve:
- Thicker Material. This skid plate was made out of 16 gauge steel. We wanted to do better, and work in 1/8″ thick steel.
- Better Mounting. Rather than tapping into sheet metal, we wanted a more solid mounting point. We wanted to bolt on to the frame rails.
- Angles. We wanted to angle and curve the front of the skid plate to present a glancing surface to obstacles.
So, after two or three months of testing, it was time to head back to EDGE Motorsports for the next iteration of the skid plate. Once again, Stef didn’t come along, and she’s probably really glad, because Lance spent most of the week inoperable and ugly in the parking lot.
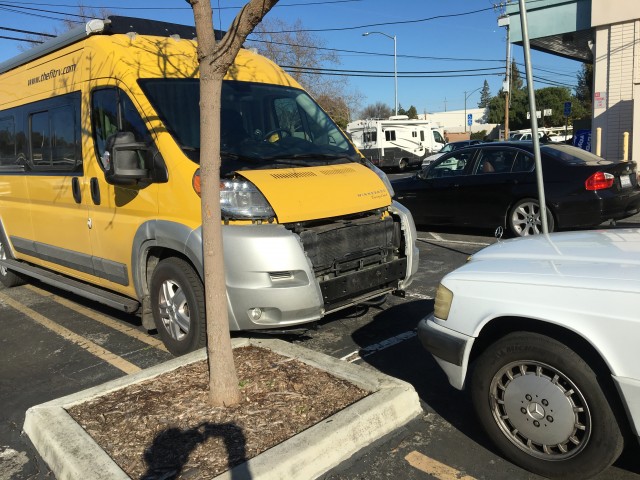
Stay classy, Lance.
But in the end, I’m happy to report the new fitment went well, and now I feel more like I’m driving a tank.
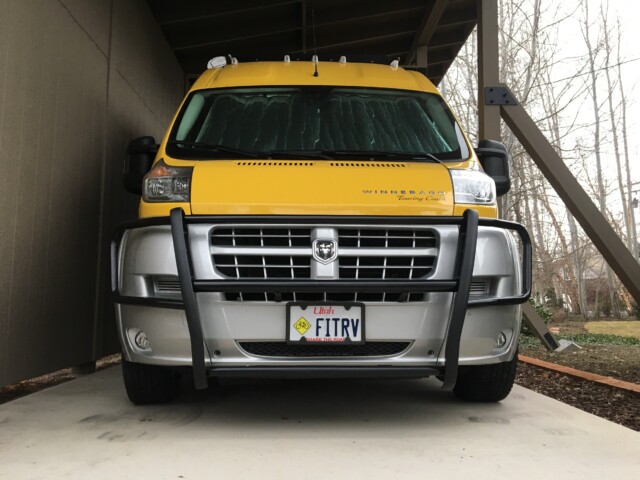
Mad Lance
You’ll notice there that we’ve swapped out Lance’s nose ring for more of a full face mask. I’m not sure if I dig the black color yet, and we may be changing that at some point. The reason we did this was simple. We wanted to have a look at something that securely attached to the frame, so we could base our skid plate mounting off that. This grill guard attached to the frame, so we got one to study. As a result, the new skid plate attaches to the frame, and will work either with or without this grill guard. When all was said and done, we had the grill guard sitting around, so why not mount it?!
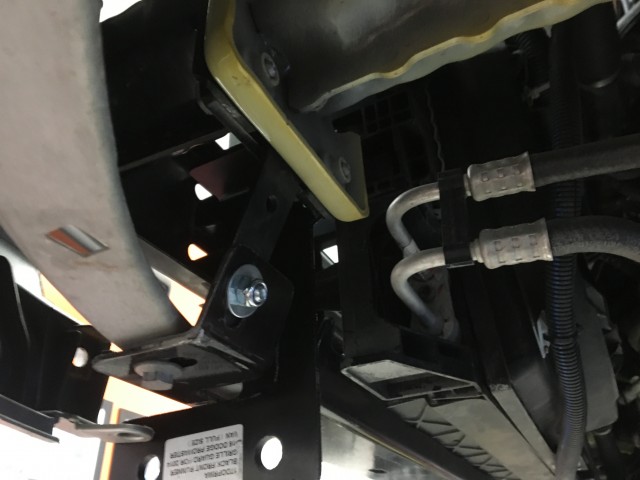
This skid plate is only falling off if the whole bumper falls off.
This mounting scheme addresses the second of our areas for improvement. Whereas the first version of the skid plate was installed with self-tapping screws into sheet metal. This thing is bolted onto the frame with bolts that I can’t torque the heads off of. (I have a really bad habit of torquing the heads right off of bolts. This probably has more to do with the fact that I buy lots of cheap Chinese bolts than it does with my strength…)
Apart from the “Mad Max” grill guard, the improvements to the skid plate are substantial. Addressing the first of our areas for improvement, this thing is over seventy pounds of thick (.125″) steel.
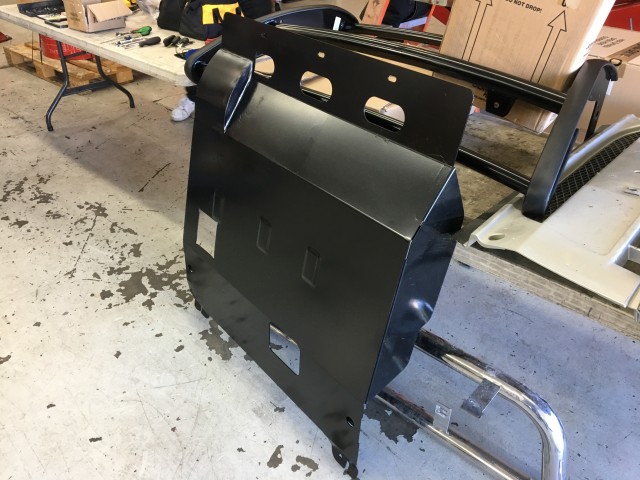
So beefy, it was a pain in the a** to move around!
You’ll notice that this one is considerably bigger than version 1. We reasoned, if we’re going to protect things underneath the rig, why not go all the way. This new skid plate protects the oil pan, the pan underneath the transmission, and pretty much anything else you can see in this picture.
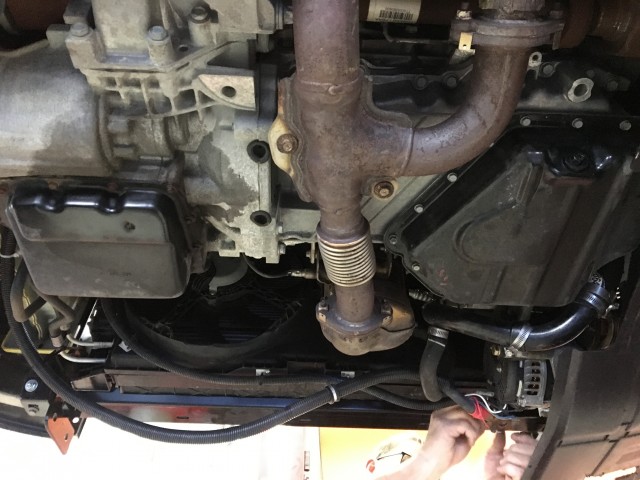
The seamy underbelly of a ProMaster…
This meant, of course, that we had to cut a hole in it to allow access for changing the oil without removing the whole affair (because removing it is pretty difficult).
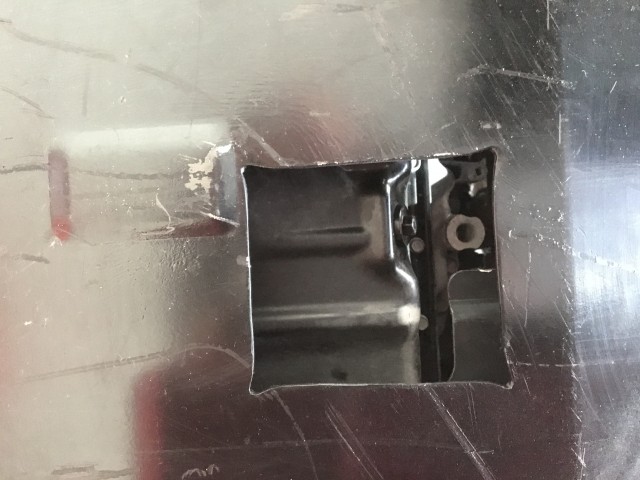
We could’ve cut the hole a hundred yards wide, and the guys who change my oil would still find a way to make a mess of things.
The size and weight of the skid plate meant it took two of us to install it properly.
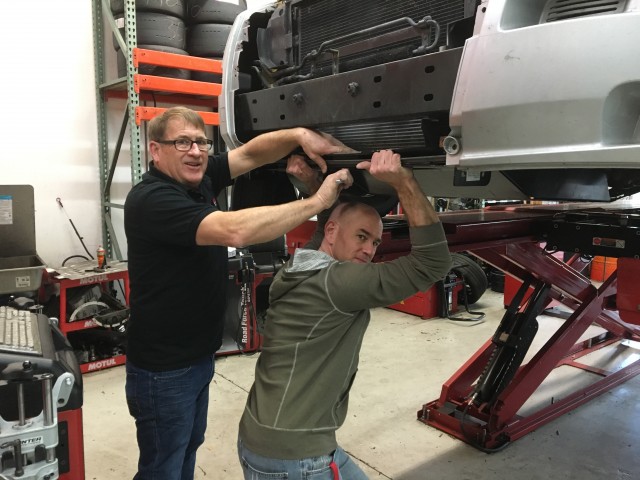
Don’t be fooled by the alignment rack. I’m actually holding up the entire rig here.
Once we got it up, we were able to get a good look at the clearance picture to the second alternator. We felt like this was adequate clearance to all belts, hoses, and electrical parts.
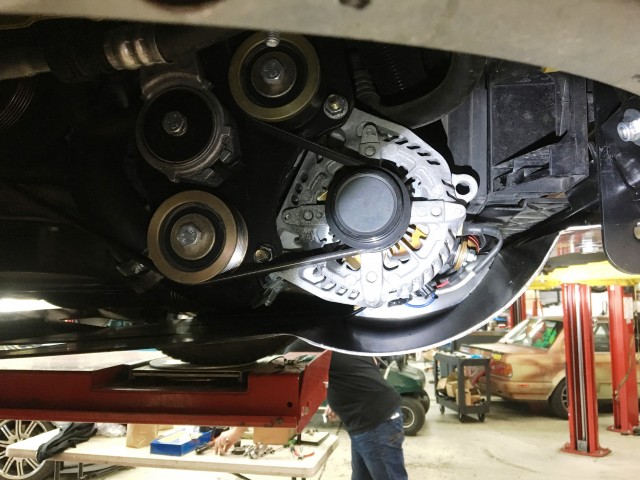
Plenty of space in there.
You’ll notice the slick curve under the second alternator. This, and the angled front of the rest of the skid plate addressed our third area for improvement. But fashioning this curve was a bit difficult, and required lots of gratuitous welding and sparks to get it just right (it only took us two attempts).
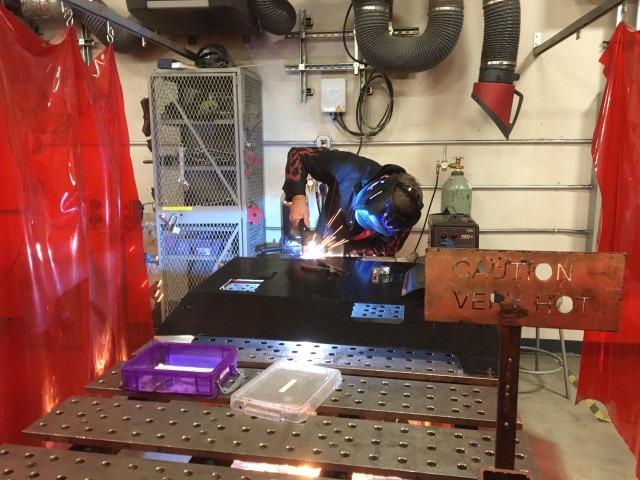
I checked it out. It’s actually an OSHA regulation that all welding gloves, jackets, and helmets have to have flames on them.
So now, with everything mounted, up, it sort of looks like this:
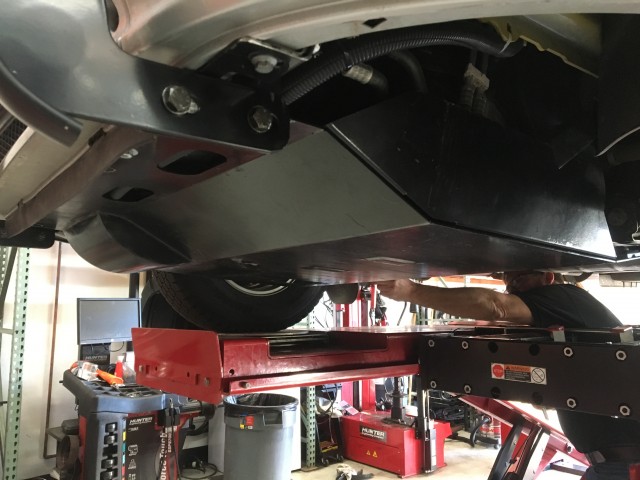
I WANT to run over things now…
And with that, it was time to leave EDGE and head for home. On the way back, I stopped at a Starbucks. When I got out, I happened to snap this picture of the underside of the rig as I had rolled up to the curb. If anyone wonders why I’m eager to have something protect the second alternator, this picture pretty much explains it. Without a skid plate, this curb would have hit it.
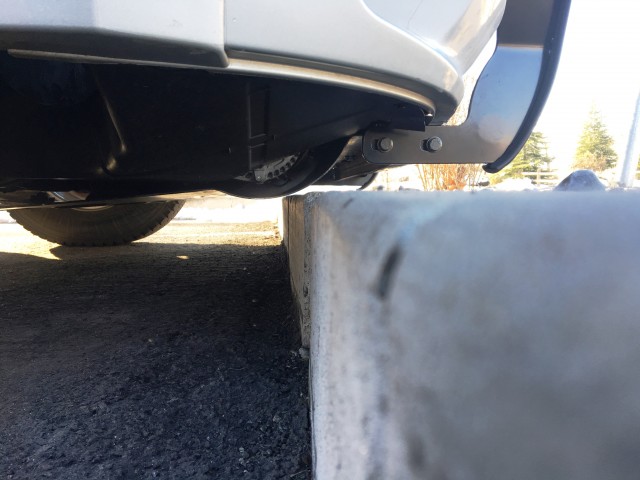
This makes me uncomfortable to look at.
So – Let’s Hear It!
And now we’re throwing this open to our readers. We feel like the design of this thing has progressed enough to where we could entertain a few early adopters. We can actually produce these things either with or without the bubble to protect the second alternator, so our audience is a bit wider than just those with the second alternator. Our ideal early adopter would:
- Reside close to the Mountain View, CA location of EDGE Motorworks
- Have a Roadtrek or Hymer ProMaster-based rig with the second alternator installed
- Or, have any ProMaster where protection of the undercarriage is desired
- Be patient and understanding as we work to progress this further
If this sounds like you, please sound off in the comments below. Do include your email (the emails are not published, only I will see them), and let us know if it’s OK to contact you about this.
And now, I’m off to go rock crawling in my Travato! (just kidding)




Hello James,
Is there any place around Montreal area who I can have it or ordering it?
Thanks
Ronny
Not that I am aware of.
You could try the contact info in the post and see if anyone still has one and is willing to ship it to you.
Sorry I don’t have any additional info for you.
I have a 2018 Roadtrek on a 2017 Promaster Chassis. It came with a plastic guard on my second alternator (Generator Underhood.)
Needless to say the plastic guard broke off and I’m interested in replacing with something stronger. My email is;
_removed for privacy_
Text message is best @
_revoved for privacy_
we talking about?
We don’t sell them directly.
I’ll pass your information on to Gordon, and he can get back to you.
Hello – I couldn’t decide whether to ask this question here or in the ground clearance entry. Anyway, I know the ProMaster is not intended for off-roading. But there’s bound to be a time or circumstance when you start on a path that turns out to be more than expected. My question: Do you stick to pavement only, maintained dirt roads, gravel, or what? I saw a Travato somewhere that has all-terrain tires mounted, presumably for increased traction on dirt roads. Where is your line? Thanks!
Fair question.
Maintained roads are all in-bounds for us. We will take almost any Forest Service road – dirt, gravel, what have you. But having said that, we always reserve the right to turn around if it gets too rough.
Hey there! I know this article is a little older but I hope the skid plate is still available! We have a 2021 Roadtrek Play with the second alternator and are in dire need of some protection!
You’d have to try to get a hold of Gordon. Good luck!
Hi James, we are interested in finding out the cost as well (for the under-hood skid plate and the zombie apocalypse front end protection … as well as installation). Would need to drive it to Gordon for install. THANK YOU, James and Gordon! Feel free to contact me (I am looking forward to it)!
You’ll have to call Gordon at Edge Motorworks to get the latest pricing and install timelines.
(925) 803-8080
I have a 2018 Zion on the Promaster 3500 chassis. I’m interested…how much do they cost?
Hello,
Now that it has been a couple years is it still working well? Do you know if EDGE Motorworks still does these? Is there a ballpark amount for this and the brush Guard? I have a 2018 Carado Banff with the underhood generator and it came with a plastic shield, but the rivets on the shield are too close to the rear wiring harness on the alternator and it rubs. For other owners this has eventually caused a short. I want to fix it before that happens. I don’t live in California but could make for a nice vacation trip.
Fair questions.
The skid plate has held up wonderfully over the time I’ve had the final version installed. No issues whatsoever, and there’s plenty of room for cabling, etc without impinging on any wires.
Gordon is still fitting and selling them, though I don’t have a good number to give you for a price.
You can give him a call at Edge Motorworks in Dublin, CA and he’ll be able to give you all the details.
Hi James, We hit a bag of seeds on highway 10 in Texas ripping off all but one of the bolts used to attach the plastic skid plate on our Hymer Aktiv. We live in Cupertino and will definitely be in the market for a new skid plate. Won’t be back in town until April though. How much would this cost?
I don’t know what Gordon is selling them for these days, but I’ll ask him to get in touch with you!
James, great stuff you and the Mrs have done here —
we just purchased a 2018 Hymer Aktiv today….super excited!
We are flying up from Long Beach to Oakland, to pick it up
in Fresno this THURS! 19OCT… We were going to stay
at a friends in Santa Cruz that nite, before making the drive
home to Oceanside… We would LOVE a skid plate…
is 5 biz days to short of notice for them to fab one up???
thanks,
I will forward your info to Gordon. If he can get one ready for you, he’ll be in touch.
Hi, Gordon White here from EDGE Motorworks. Thursday or Friday works for me! Please call the shop at (925) 785-4477 and we can set it up.
My Zion arrived without a guard for the GU (2nd generator for my 400w lithiums). My understanding the initial designed cover caused overheating issues. A newly designed cover was installed in Jan. But I believe it is still plastic.
I’ve not had any overheating issues with ours.
Of course, we’ve never sat on the blacktop in Arizona in the summer and idled to run the AC all day, either.
(But in that scenario, our air conditioner couldn’t keep up anyway, so that’s all moot.)
We left one side of the cover open. I’m hoping that would be sufficient. Though we always have the option to cut slots in it.
I have been following your second alternator experience and all of the follow-ups. I don’t recall seeing any information about the effect of the second alternator on your fuel mileage, or on the performance of the Travato while on the road. That second alternator is a substantial additional load on the engine. My wife and I will most likely be purchasing a Travato later this year, and your reviews and all of the modification articles have been most helpful.
Hi Rick!
The second alternator has resulted in no change whatsoever in fuel mileage or driving performance. In fact, we just had our best fuel-mileage-tank ever.
The load from the second alternator is actually small. 180 amps at 12 volts is 2160 watts. That’s like 3 horsepower. The 300HP engine barely notices.
The short answer is – don’t worry about it!
Hi James. Installing the second alternator in my 59G within a month. Not certain when I can make it Mountain View, but as I’m in Los Angeles, it’s not a big deal to get there. Definitely interested your protective plate solution. Also, I know you do not have a wiring diagram of your inverter/battery/alternator installation, but even an elementary napkin sketch would be helpful. just curious about how you connected your runs and in what order they went. Though I’ll be having knowledgable help with installing my system, I’d still love to see the wiring logic of your project. Thanks!
Hi Steve – I’ve passed your info on to Edge, and told them it was OK to contact you regarding a potential skid plate install. Let me know if you have trouble syncing up with them.
As far as a wiring diagram – I’m going to have to pass there for several reasons. First – I’m not an electrician or an electrical engineer and I don’t wanto to put something out there that could potentially get someone hurt. Second – I didn’t actually run the wiring. The crew from Xantrex did most of the heavy lifting, and I was just there for approvals. And finally, since Xantrex designed and installed this system, it’s really their intellectual property. I don’t want to be giving away secrets that aren’t mine to give, ya know?
The good news for you though, is that I don’t think there was anything all that unusual in the install. A competent installer who has installed RV inverters before should be able to figure things out.
Sorry I can’t be more help, but hopefully you understand. Thanks!
I am looking at electrifying a Paseo, do you have a contact at Xantrex?
I would just start with Customer Service. We’ve met members of that team and they should be able to help you. (They’re all super nice.)
Totally understand James. I was actually not looking for an actual “wiring diagram”, even though that is what I wrote. I should have worded it differently. I was hoping for an elementary sketch of the broad strokes involved in the flow of energy from alternator to battery, to inverter and how the stock transfer switch was involved. I will have a professional electrician that specializes in RV and boat inverter systems do the installation. I’m just trying to conceive of how to interface with the Travato’s AC system. I’m guessing you substituted the inverter feed in place of where the Onan used to connect. That would leave the transfer switch and everything beyond untouched, which would still allow the shore power override. I’ll send an email to Edge and say hello as well. Thanks for your reply, now get back to your fridge project!
Well, I can tell you this much:
There is no more transfer switch because it is not needed. I tried to sell it on eBay but nobody wanted it so I threw it away.
Incoming power goes through the surge protector and then to the inverter/charger. Inverter charger is wired directly to the inputs of the 120v circuit breaker panel.
Generally speaking, there’s no point using more parts than are necessary.
Hey James. Looks like a great solution to protect the 2nd alternator. Better than the stock plastic shield provided by Roadtrek on my Zion. I too have scraped my protective shield on my fair share of curbs and am very conscious about the way that I park and drive now. I love the 2nd alternator but it does need more protection.
I live in Santa Clara which is a few miles south of Mountain View down Highway 101. I’d love to be an early adopter. How much would it cost?
Right on, Vince!
I’ll send you an email and let’s see what we can work out.
Sounds great. Thanks for doing all the R and D!
I came across these gadgets today. Looking at your last photo, they might be useful. I have no idea if they work, or how well they work, but it’s something worth investigating. Brandmotion makes two Curb Alert models but I can’t figure out the difference. There’s also one from a different company with a similar name, Curb-Alert.
Curb Alert
http://www.brandmotion.com/curb-alert-parking-sensor-universal-5000-ca13.html
Curb Alert Pro
http://www.brandmotion.com/curb-alert-4.html
Curb-Alert
http://www.curb-alert.com
There are probably similar units available from other manufacturers.
I read your pieces re the underhood generator you installed. As usual they were interesting and informative and very complex. My question is probably much too elementary and simplistic: Why did you need to do it in the first place? Wasn’t your engine already charging your coach batteries? Especially when you’re driving to your destination? Was this more a major upgrade and enhancement, particularly with the lithium battery?
Hi Jim – you are correct, the engine was already charging the house battery. But the second (and very expensive) lithium battery really needs to be charged differently from your basic engine starting battery. Had we just used the engine alternator for that, we would have been charging the lithium battery improperly and would have shortened its life. Also, the second alternator can give us hundreds of amps of charging. Had we used the engine alternator, we would have been limited to what was left over from the vehicle’s needs.
Hope this helps your understanding!
While I understand a quest to fix something that bothers you, i.e. “Rattles”. There is a cost vs benefit ratio. How much was involved vs. potential savings.
Cost of materials + fabrication + time + lodging + added weight – cost of alternator= + or – ?
I totally understand wanting the extra protection and I think the second alternator sits much to low. But is the total cost justifiable?
Did you consider replacing your oil drain with a ball valve and hose? You could also relocate the filter to the same location and make oil changes a snap.
With a ball valve on the oil drain it would also be easy to take a little oil out every month, then put it all back in just before a race. Oh, wait, wrong Lance.
OK. That’s the best Lance joke we’ve had on here in a long time. Well done, sir!
As far as the expenses, yes, it hasn’t been an inexpensive affair. The hope is that we can get this down to something we can sell. I’m just considering all of this work as “product planning”. We may never make it up in the end, but at least we’re having fun!
An alternator is a very resilient component. Before belt tensioners you used a pry bar on the alternator to tighten the engine belts. The case housing on alternators can really take some abuse. If you look closely at the picture of the curb your skid plate is near impact but your alternator still has clearance. Between the thickness of material and the insulating space you have actually given up about an inch of clearance. My fear would be an impact that would cause the plate to bend and contact the vibrating engine components.
Well, I suppose it all depends on what kind of impact we’re talking about. The guard is 1/8 thick steel. Any whack that can push it into the alternator is – I’m guessing – going to cause enough additional damage that I’d call it catastrophic. I don’t know how tough we’d have to make it to protect against that, but it would probably approach ridiculous. I think the less-disastrous impacts are more likely, and I’m satisfied with where we’re set the toughness.
I had scraped the alternator on curbs prior to the first version of the guard. I actually scraped enough that it had started to file the casing of the alternator down. (Check out the first post for a pic.) Given that, I’m personally sold on the need for something like this.
If I find that I’m scraping the skid plate too often, I could always attach something on the new bull bar that hangs a bit lower than that. A plastic scrape bar?
I was actually going to suggest a deflector/ air dam ahead of the skid plate.
Are you going to look into the change in underbody aerodynamics due to the skid plate?
Interesting idea, but I didn’t do any good “before” tests as a baseline.
But if the mileage suddenly jumps an MPG or so, you can bet I’ll be crowing about it!
I was looking all around the site and in a big gear shift from this post. Can we get your opinion on some bicycles.
I am considering a new bicycle and was wondering your opinion on bicycle types. Especially “fat bikes”
Good luck on the new MPG.
Well, the idea is cool, for sure.
But I don’t have one, personally, so it’s tough for me to comment on them.
Very specialized. Even if I had one and loved it, I don’t know if we would travel with one except on a dedicated winter trip.
I also wonder how well they would fit on various bike racks?
But again, like I said, I don’t have one personally, so can’t give too much of an opinion.
Just a thought, we hit deer with our Travato in southern New Brunswick, and after towing the van back to Maine, we found out that the only thing that protected the radiator, air conditioning condenser, and various other cooling lines was a plastic rams head medallion and a plastic grill. These cooling components had no real protection and were mounted inches inside the plastic. Three tow truck adventures, one month and $7800 later, we were finally repaired.
The body shop mounted, I believe, the exact same grill guard that you have. With a grill guard. one may have more sheet damage as the impact is spread over a wider area of the front of the van, but the better protection offered to the cooling components, helps, I hope, in maintaining driveability
I think our grill guard is worth the investment and makes me feel better driving in our area that has lots of deer. At least it makes a good place to hang wet things to dry. Maybe helpful.
I hope neither I, nor any of our readers, ever hit a deer.
But having said that, I think the picture of Lance without the plastic face tells the same story as yours. There’s not much to protect those up-front components. The grill guard is likely to help in those kinds of impacts.
Glad you survived your deer incident OK!
Jim and Dave,
What is the brand and model of the grill guard?
Thx
John
I believe it’s the Black Horse.
70 pounds … any concern about the net effect on GVWR and CCC? Especially since you like to travel with outdoor equipment as well.
Good question, and that is something we considered up front. But I’ve weighed Lance, and we have about 1300 lbs of CCC to spare.
For a (heavier) class C built on the ProMaster, this might be more of a consideration.
Somewheres is your second alternator “musings” I remember you saying that Winnebago would not delete the standard generator on a factory order because of the electrical. I also asked them to delete the generator and they refused. So my question is…are you carrying around 130 pounds of dead weight or did you have it removed after market and if so what did that entail. Thanks for all the great information. Ordering a 59k next week.
Our RV came from Winnebago with a generator. It is now gone.
I removed it myself (well, I had help). It wasn’t terribly difficult… just awkward.
Eventually even got the fuel tap plugged at the tank end.
Nice! I’ve been contemplating adding a second alternator to our (soon to arrive) home brew promaster rv, but really didn’t like the clearance. I’m in Mountain View, so this could be pretty easy once my van arrives.
We are converting a new 2016 159″ Promaster at this time. The conversion includes the Nations second alternator – – that we, too, feel must be protected (we can, and have, hit a surprising number of concrete barriers and other ‘stuff’). We’re nowhere close to California (Illinois and Michigan) but do have a very competent local mechanic who can participate.
Have you done a review on the New Paseo from Winnebago and I missed it? From what I have seen and read it looks like the Ideal B Van. We really like the Pleasure-Way Plateau FL. But unfortunately its on a MB chassis (too many bad MB experiences). The Paseo on the Ford Transit chassis looks like a perfect combo.
Thanks for any input you may have
We haven’t done one of our formal reviews… yet. BUT!
We did do a Facebook Live event where we walked through one at its debut at the Pomona RV show. Russ Garfin is in it as well.
You can see it on the Winnebago Facebook Page.
What are your bad MB experiences? We also are attracted to the Plateau FL and are getting close to purchase as we continue our search..
Thanks
Nice. And I am always concerned about retread waste on the roads, as it can do a lot of damage, really quickly. The idea of adding protection, even without the need to protect the second alternator, is attractive. That said, I won’t be driving to Mountain View any time soon… kind of far.
Well, if we get it mass-market ready and shippable, you’ll be one of the first to know!