This post may contain affiliate links.
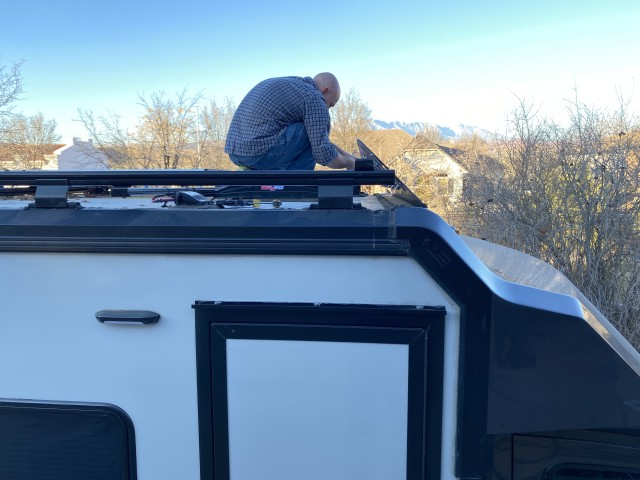
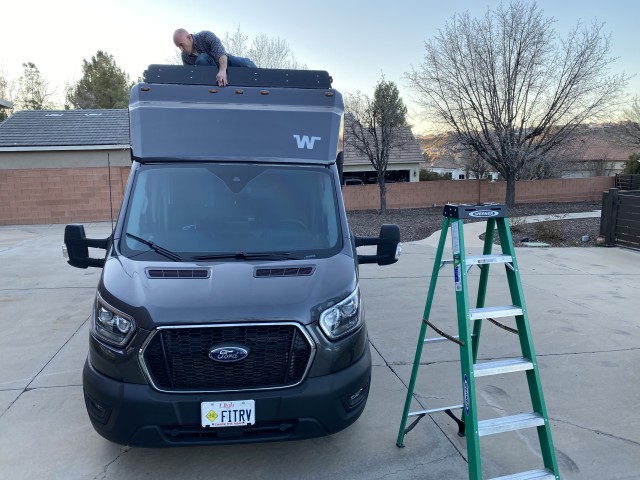
With all the solar panels and other appendages on the roof of our EKKO, I thought it might be a good idea to add a fairing to the roof line. I did this mainly to reduce wind noise from roof items, and *not* to reduce drag (we’ll get into that at the end). This was actually not too bad of a mod. Once I finally got cracking on it, the process was maybe four hours, start to finish. Lots of pictures here so let’s get started.
If you’ve been around here a while, you might remember that I also added a roof-rack-mounted fairing to our Travato, Lance. I’m going to do much the same thing here, except it turns out to be even a bit easier due to the construction of the roof. In the Travato, I was dealing with a contoured roof on a metal-bodied van. But in the EKKO, the roofline where I wanted to add the fairing was perfectly flat! This meant that I didn’t need to make and fit a template, and then trim the fairing material to it. That alone saved a couple hours.

The first step in adding the fairing was to add a front crossbar to the roof rack. As shipped from the factory, the EKKO does not come with a front crossbar. This is partly due to wind noise. Whatever you do, don’t try adding a front crossbar by itself without a fairing… you’ll go crazy from the noise. You can purchase an extra crossbar from Winnebago. Alternatively, you can purchase a front crossbar from Summit Products directly (they make the rack parts for Winnebago). If you order from Summit Products directly, the part number you’re after is 108037_A. Adding the front crossbar isn’t too difficult, it just bolts right in with 5/16 carriage bolts. I slid the front crossbar as far back as it would go – against the front towers on the side rails.
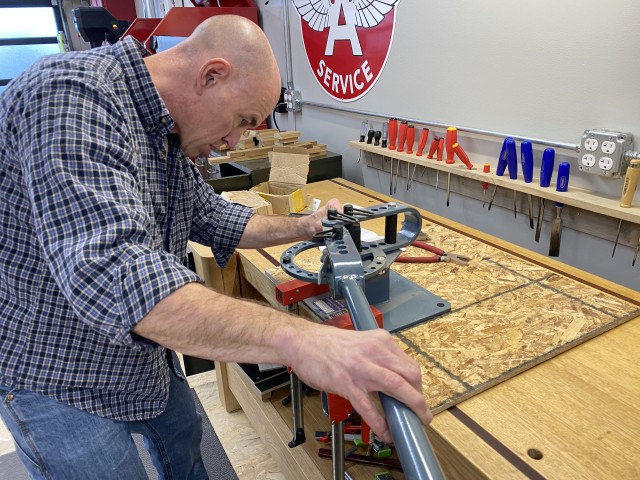
Then, it’s time to bend up some brackets. I made mine out of 1/8″ aluminum bar stock. I cut it into pieces about 8 inches long (but you could go a bit longer), and filed down all the sharp edges. You’ll need to get on the roof with a bevel gauge in order to determine the angle to bend the brackets to. Just clamp down the gauge and use it to transfer the angle – don’t try to measure it, that’s just frustrating. And even then, you’ll probably get it wrong the first couple of times (I did), so just make up some extra blanks from the get-go and you’ll be less grumpy about it. I wanted to match the slope of the roof to provide a smooth ride for the airflow – pictures later and you’ll see what I mean.
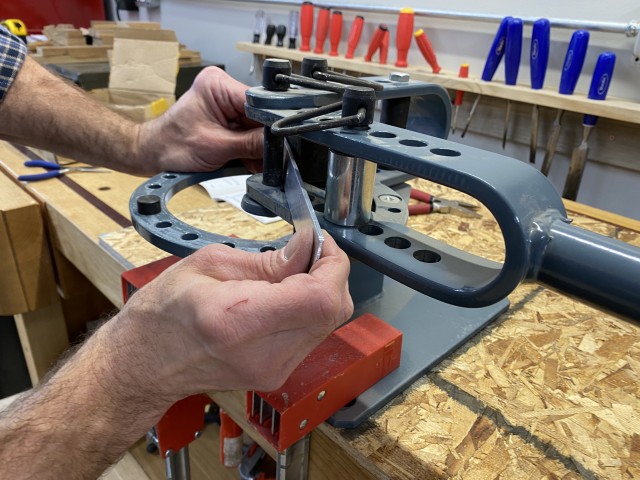
I have this metal bender that I got the last time I made a fairing, and I think that may have been the last time I used it, but it sure was nice to have. Since I don’t use it that often, it’s always an adventure to bust out the manual and figure it all out again. If you don’t have a metal bender, and don’t want to purchase one, you should be able to accomplish these bends with an anvil, a vise, and a hammer. I’ll admit to fine-tuning the bends I got from the metal bender with a plain old hammer.
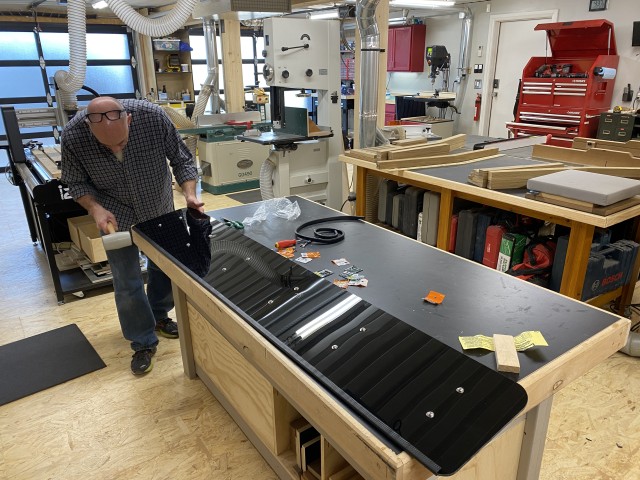
Once the brackets are made (I made 6, plus some extras), you can lay them out on the fairing.
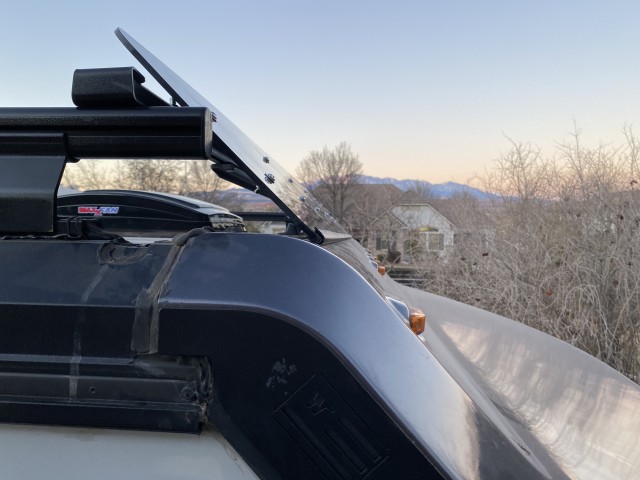
The fairing material itself is 1/4 black acrylic. I was able to get it from a Utah supplier and have them cut it to 75 inches long by 12 inches high, which was just about perfect. All I had to do was round over the corners of the piece and it was good to go. To round over the corners, I just traced around some jars and lids I had laying around. I put a decent sized roundover on the top corners, and a tighter one on the bottom. To make the cuts, I just used my (awesome) jigsaw with some fine-toothed blades. You need to worry both about shattering this stuff, and about melting it, so use the finest blade you can find and take it slow. But don’t linger too long in one place and get things melting. Come to think of it, maybe you should practice on a piece of scrap if you’ve never done it before, because I can’t exactly describe the feel. It’s not hard though.
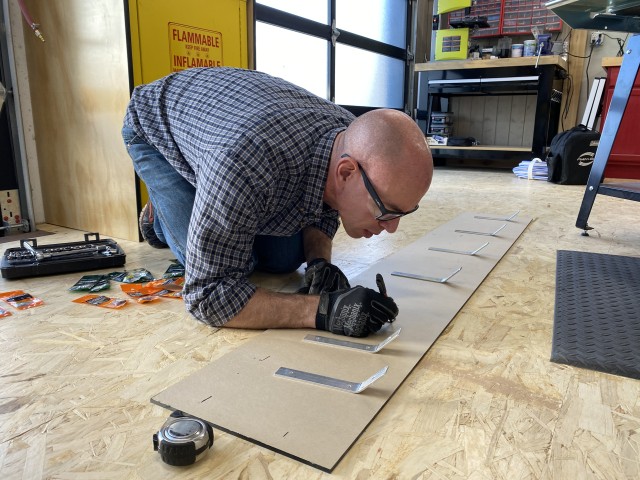
In addition to cutting the acrylic to shape, you’ll need to layout the brackets on the sheet so you can drill holes. I mounted the fairing to the bracket with 1/4″ stainless machine screws, washers, and nylon lock nuts. This meant I needed 1/4″ holes in both the brackets and matching holes in the acrylic. The holes in the brackets are easy. You can just use a twist bit, and you should drill these first. It helps to use a center punch when drilling metal so your drill bit doesn’t wander. Once you have one, you’ll wonder how you ever drilled holes and kept your sanity without it. With the holes drilled, lay out your brackets on the fairing, and mark the matching holes in the fairing. KEEP TRACK OF WHICH BRACKET GOES WHERE! There will be small deviations in the bracket hole locations, and you’ll find they won’t necessarily all be interchangeable.
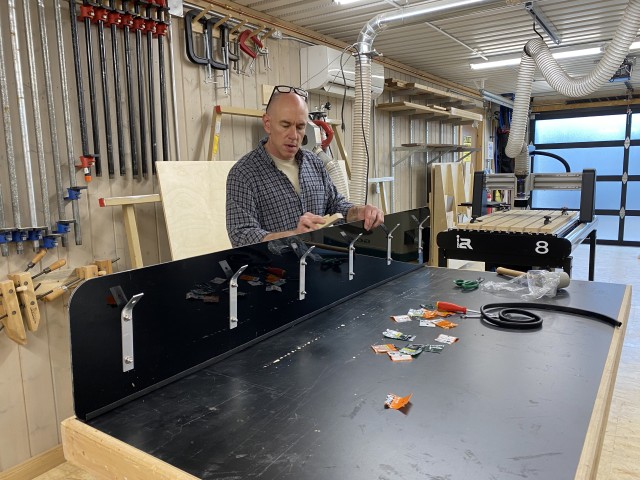
To drill the holes in the acrylic – and this is important – use a 1/4″ spade bit with spurs. I’ve tried to use regular twist bits on this stuff and it just grabs it and makes a mess and you’ll probably slice your hands open. This fairing is too large to take to the drill press without an army of helpers, so you’ll wind up drilling it with a hand drill. Just make sure to back up the cut so you don’t blow out the back side of the hole (which would be the front of your fairing).
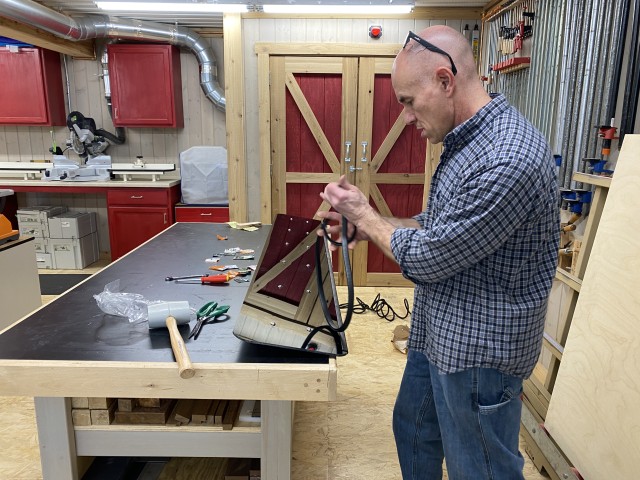
Once the holes are drilled, mount up your hardware with the stainless machine screws, washers, and lock nuts. For the bottom of the fairing – where it would ride on the roof of the RV – I added some of this edge trim. It just snaps right on to the acrylic, and stays there by friction. I was able to cut it with scissors, and just tap the last bits of it onto the fairing with a mallet. I’m thinking this should keep the fairing from rubbing through the paint or fiberglass up on the roof.
With that on, the last thing I did before mounting it up was to sand the edges of the acrylic. Nobody is going to be inspecting the edges of the acrylic way up there – I did this mostly to keep from shredding my hands while I was trying to mount it! If you were really super motivated, you could always flame-polish the edges of the acrylic with a MAP blowtorch. I’ll admit I almost did this just because I thought it would be fun to play with a blowtorch. But there was a chance I could damage it, and I only had one piece of the acrylic, so I stuck with just sanding it.
After that, it’s time to head up to the roof!
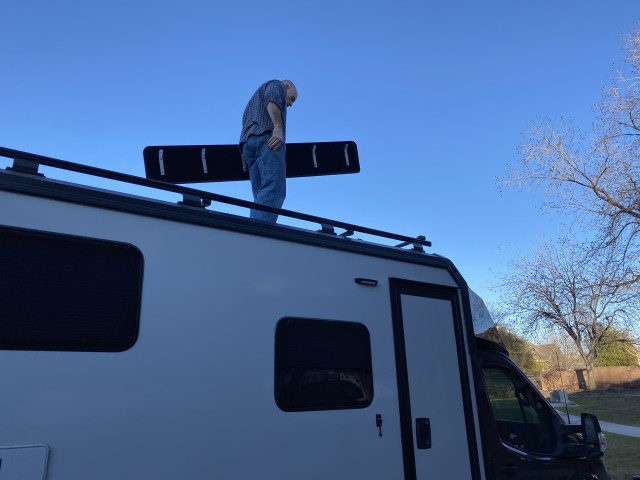
The fairing is held to the crossbar with more 5/16″ carriage bolts, washers, and flange nuts – just like the Winnebago installed solar panels. If you’ve forgotten to drill the crossbar-side holes in your brackets, that will be painfully obvious now. Also, if you installed your front crossbar before you put 6 carriage bolts into its track, this is when you’ll remember what a good idea that would have been if you had it a few hours ago.
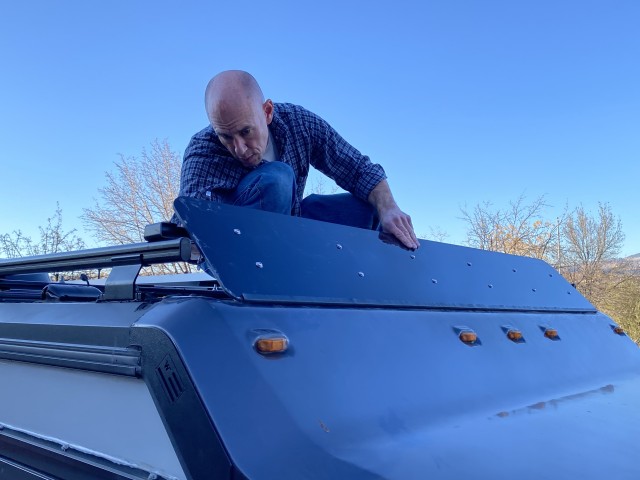
You really do want to make sure that the fairing is tight against the roof along the bottom. What you DON’T want is for the wind to get under the fairing and to lift it up somehow. That would be noisy and bad. You may have to do some fine tweaking of your mounting brackets at this point to get the fairing to sit exactly where you want it. Take your time here (I went up and down off the roof 3 times to get it right). Resist the urge to bend the brackets while they’re attached to the fairing – that will not end well.
Eventually, you’ll get things dialed in where you want them, and the job is done. Like I said, this only took me about 4 hours, start to finish. Unless you count all the time it took me to find the acrylic, and then drive to Salt Lake City to pick it up. (But we were going there anyway.) The rest of the parts and tools should be available anywhere cool stuff is sold.
Now, how is it working? As far as the noise abatement goes, it’s a fantastic success! We get very little wind buffeting or noise from around our vent fan anymore. Absolutely no complaints there.
As far as drag or gas mileage goes, the jury is still out on that one. I made the fairing so that it covers up the wind’s view of pretty much everything that was on the roof, except for the side towers of the rack. And I worked to get the profile of the fairing to match the existing roof cap line, as you can see in this picture. So why am I not sure that I reduced drag?
Here’s the deal. The equation for drag is this:
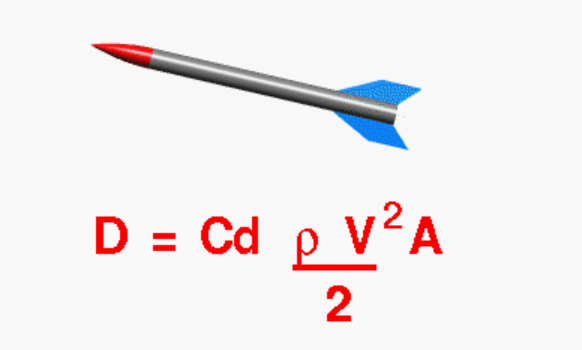
Borrowed from NASA. (really!)
And while this fairing might have reduced Cd, the coefficient of drag, I also increased A, the cross sectional area. The fairing is 75 inches wide and as angled on the roof presents 9 inches of height to the front. That’s just over four and a half square feet of surface area I installed. Now, not all of that was “additional”. We can deduct the cross sectional area of the things that were already there that I covered up: the crossbars, the Maxx Fan, the air conditioner, the solar combiner box, the ladder, and even the side-area of the solar panels (which was almost a square foot itself). So it’s probably somewhere closer to 2 square feet of area that I added. Did I reduce the Cd enough to make up for that?
Well, the only way I’ll ever know for certain is to take Number One into a low speed wind tunnel… which I’m totally game to do if I can find a tunnel that will work with us on it. I’ll keep looking. In the meantime, I’ll be watching our mileage to see if I can notice any changes. I’ll be honest though, our mileage varies wildly from 11 to 15 mpg depending on wind, hills, and a host of other factors I have no real way to compensate for.
So for now, we’re just enjoying the quiet and calling it a win. Hopefully some wind-tunnel-owner will offer to help figure out the drag bit for us.
Cheers!


I think the results might be surprising. On top of increased frontal area the Cd might also be worse. The lights on the promaster are dual purpose, they provide light but are also vortex generators to encourage the airflow to stay attached along the roof. It looks like EKKO might have a similar functionality. That fairing is going to really mess up the flow off the roof line, although the flow is already pretty junk because of the the rack.
Aero mods are tricky, airflow both up and downstream is effected by any aero mod and it’s nearly impossible to guess what a result will be. Luckily testing is cheap and easy without a wind tunnel so if you’re curious it’s worth doing!
Well, as I mentioned, the main goal of this was noise reduction, and that WAS a success.
As for drag reduction, after nearly two years now, I’m still going to have to say maybe, maybe not.
The lights on the top of the EKKO are a Winnebago-supplied and manufactured part. I can 100% guarantee you that they didn’t take the EKKO into a wind tunnel to test for any vortices or flow separation. They’re just what someone sketched up and thought looked good. Similarly, all the components on the roof are put on there somewhat randomly on the factory floor. Not completely randomly (the holes for the air conditioner and such are machined), but there’s a fair bit of variation in placement of components. And certainly the amount and placement of sealing goop – which covers the entire leading surface of the roof – is completely haphazard.
Of course, none of that is to say that I did or didn’t increase or decrease drag. It just means that I applied *some* aerodynamic treatment where literally none had been considered previously.
But measuring that is a different story. If I thought any of the methods you mentioned would have yielded useful or repeatable results, I would have tried them. I have enough experience with this vehicle to know that the random effects introduced by temperature, other vehicles on the road, and (mainly) wind gusts are far greater than those methods can account for. I simply can’t control those things well enough on the open road. At least, not without immense frustration and lots and lots and lots and lots of runs, and I just don’t have that much time or gas available to measure what was a secondary objective. Heck, just checking MPG on the same stretch of road into town with each trip yields dramatically different numbers depending on the day.
Even noise, which was the primary objective, is exceedingly difficult to get a consistent measurement of on the open road, though it’s fairly easy to measure on a bench. This, I learned in my soundproofing series…
Still might be cool to take it into a wind tunnel though.
Hi, check out Julian Edgar’s YouTube channel. There are effective ways to test aero mods to a vehicle that don’t require wind tunnels!
Tuft testing with yarn and masking tape is the simplest, but only shows you attached/detached flow.
Efficiency can be measured easily with three methods:
1. Coast down test: set the cruise control to 60mph+ Use a marker on the side of the road to use as a reference to turn off the cc. Measure the time it takes to slow to 40mph. Run the test with/without your aero mod and if it takes longer to get to 40mph with the mod you’ve improved efficiency! This is the least accurate method.
2. Throttle stop testing doesn’t work on all vehicles with electronically controlled throttles because a given pedal position doesn’t always open the throttle the same amount. Put a block of wood below the accelerator and floor it. Run the test with & w/o aero mod. If you go faster with the aero then you’ve increased efficiency.
3. A modified throttle stop can still be done in electronic throttles, it just requires an obd2 reader with data logging/output. Instead of setting the pedal position, set the cruise control to the same speed. Use your obd2 reader to read the throttle position req. to maintain that speed with & w/o aero. Lower throttle with aero improves efficiency.
James – followed the link over to Summit but cannot find any way to order that part number. What was your secret?
Others have gotten the part successfully. I think they just called – it’s not an online-order kind of thing.
Excellent, love to see businesses still doing it the classic way!
BTW – While you’re a perfectionist, is simple commoners could skip a few steps by picking up adjustable stainless steel mending plates of the correct length then jumping in at the bending step. My first Yakima wind faring used these and they held phenomenally. The almost infinite adjustability they offer was great too. https://forum.ih8mud.com/attachments/s-l1600-jpg.1508854/
Those would certainly work!
Hi James you create very interesting content keep up the good work.
My wife and I are considering ordering the Ekko and we are thinking that we do not need the roof rack. I see that you have the roof rack. Have you found a use for it and would you get it again?
I found this post interesting and close to my area of expertise. I am the primary architect of a CFD software package http://www.azorecfd.com. If I could get some CAD geometry of the Ekko it might be fun to run a virtual simulation of the Ekko in a wind tunnel and calculate the Cd value.
So, absolutely I would get the roof rack again! I don’t think I’d even consider an RV without a roof rack in the future. It allows the solar panels to be mounted to it, which is at least 12 fewer holes in your roof. It also allows you to move or reconfigure the solar panels in the future without putting yet more holes in your roof (which I’ve done). I have also mounted a Starlink dish to the rack (4 more holes) and a WeBoost cell booster antenna (more holes). And then there’s the fairing (even more holes), not to mention the things I haven’t thought up yet.
As far as CAD data – Winnebago posts many of their construction drawings online. Perhaps there would be something there that would help you out? It would certainly be interesting to see what you come up with!
Thanks for the comments about the roof rack. You have some really good points that I had not considered. Especially the point that the factory solar panels will be secured to the roof rack if it is included. Thanks for taking the time to point them out to me.
Not sure I am up to building a CAD model from 2D drawings just for the fun of it. Maybe someone has access to laser scanning technology that could generate the 3D geometry required to build the model.
Ford probably has the hardest bits modeled.
(Whether or not they would give it to you is another matter!)
Thank you for sharing all your modifications!
I had a quick question. You mention the quiet is nice. Did you happen to take any sound pressure measurements and compare the values obtained in the soundproofing modification effort? Just curious.
Thanks again!
Unfortunately, I didn’t! Sorry!
I have noticed that there is a high pitched “whistle” when I’m driving my EKKO. It’s noticeable even at low speeds and it’s not easy to know where it’s coming from. My guess is that it’s the MaxxAir fan housing but I’m not positive about that. If that is the case, then it seems as if this faring should stop that. Is this something you have noticed?
We get very little noise these days from the Maxx Fan, but before the fairing, we would notice noise from there.
Occasionally, in severe crosswinds, we will still get a whistle from up there, but that’s rare.
I’d also check the windows, and make sure the seal is tight around them as well.
Came out really nice. Any chance you would sell a set of those brackets? Even though f I have to make slight adjustments I’d be 90+% there. Oh wait, you have a life… well shoot… I’ll have to look, did you post info on your metal bender? I have to check, but around here we use to have a place called Taps Plastics that might be able to make the Deflector. Hmmm…. This just might be one of my first mods. Thanks for sharing. Really love that shop of yours.
Ahh found the link for the metal bender. Making brackets for multiple uses, this would be a nicely unit to have. Thanks.
(I should read all the comments before responding! lol.)
I think my metal bender is linked in the post? If that’s not the one, then I may have gotten mine from Harbor Freight.
I’ve considered adding a fairing on our 5th wheeler that has solar panels and standard array of roof top stuff. I well understand that fairings can greatly reduce air flow noise but getting much improvement in mileage seems questionable. I think if you could get some good wind tunnels tests that would serve our community well.
A concern I have always had with fairings is how does the deflected air flow over the rest of the roof top with all regular RV roof stuff, ACs, vents, solar panels, etc. What I’ve understood in my research is that the air flow drops back down to the roof deck level fairly quickly after passing over the flaring. While this may reduce noise of forward mounted items, what does it do for obstructions back say 10 or 20 feet from the fairing?
I’d also wonder if making the two side or ends of the fairing rounded would make much of a difference? I know fairings on semis tend to be curved.
I think your posting of this work is very helpful to many people. Thanks
All good questions.
In my case, a lot of the roof is covered with solar panels shortly after the fairing, so perhaps that helps.
As far as curving the sides, that would take some artistic fiberglass work, which isn’t in my current repertoire.
I kind of wish Winnebago had made a different front cap that covered the rack as the fairing does and provided a more integrated and rounded look… But I think they were going for “rugged”.
Check out the San Diego wind tunnel to test your rig. It’s the old General Dynamics slow speed wind tunnel. They also do testing for bicycle racers, so you might be able to do a two-fer!
http://www.sandiegowindtunnel.com/
Cool!
Except the height is only 8 feet, which wouldn’t fit the EKKO.
I actually did a wind tunnel on my TT bike once. I thought it would be fun, but it was MISERABLE!
It gets hot in the wind tunnel, and they have you pedal as hard as you can to see if you can still generate max power as they change your position.
Pedaling as hard as you can. Getting hotter and hotter. Not moving anywhere. 100dB. Ugh!
James, you make everything look easy. When you say 4 hours, for me it would be about a week! This mod looks great! Keep up the good work!
Well, I had thought about it for quite a while before starting to work.
Most of my mods are that way… I do it in my head about a thousand times. Stef thinks I’m not doing anything, but I tell her I’m working…
James, this is another super cool mod! Thanks for sharing. Curious where you ultimately found the acrylic panel… what sort of store? Also, did you look into any fairings offered by the likes of Thule or Yakima? I’m guessing they probably don’t make any wide enough.
I ultimately got the acrylic from http://www.plasticsdoneright.com. I picked it up in person.
I had looked at commercially available fairings when I made the last one for Lance. There was nothing large enough that would work with the mounting on the RV. I didn’t even bother looking this time around.
Very cool. Nice job. I wonder if a few vortex generators along its trailing edge would reduce drag further, and maybe even boost your MPG a tiny bit.
I’ve thought about those Air Tabs. But if I decided they didn’t work, they’d be kind of stuck there.
Maybe if I get that wind tunnel time I’ll give them a proper test!
Reminds me of the fairings installed on the wings of the airplane in the 1965 movie “Flight of the Phoenix”.
I’m not familiar with that one, but you’ve got me curious.
Ultimate modding under pressure. Check it out sometime. Photos and Youtube clips online. A remake was made in 2004, but too much “Hollywood”. Original 1965 film is better, I think.
I’m not sure the edge trim is a good idea. Grit embeds into the softer of two materials in contact and then grinds away at the harder material. Think of the rims on your bike getting scored by hard stuff embedded in the brake pads. It might be better to protect the roof by putting helicopter tape on the roof.
Or maybe both?
Not sure why you think you need a wind tunnel… just blow on it to see what the difference is.
Also, don’t forget what a wonderful sail that should make when your going with the wind.
The obstructions on the roof span 80 inches. It would take quite a blowhard to wash that all in one breath!
And I hope I have the sense to pull over if I find myself in 70 mph winds!
Blow blow blow… you can do it…
I just downloaded a free WIND TUNNEL app for my iPad… very interesting.
I would love to see a video of that in a wind tunnel. Got any friends at Nascar?
I wish!
Maybe someone at Ford will take pity on us???