This post may contain affiliate links.
I don’t think I’ve ever had more requests for a video than for this one. People have been seeing our induction cooktop and deeper sink in the background of other videos and then wanting to know how I did it. Well… now you’ll know.
To be completely honest, I wasn’t in the biggest rush to put this video together because the project wasn’t exactly easy. I just didn’t believe that many people would be into laminating their own countertops and getting them CNC cut. But who knows? You all might just surprise me!
In broad strokes, the basic steps I go through in this video are:
- Tearout of existing galley
- Removal of propane line from inside and patching and plugging the propane openings and connections
- Laminating a new countertop (twice!)
- CNC routing of the countertop to match previous counter exactly
- Install and trim work of counter
- Upgrade electrical for induction install (partially completed during 20k project)
- Install new sink
- Install new drain piping
- Install new faucets
- Build and install new drawers
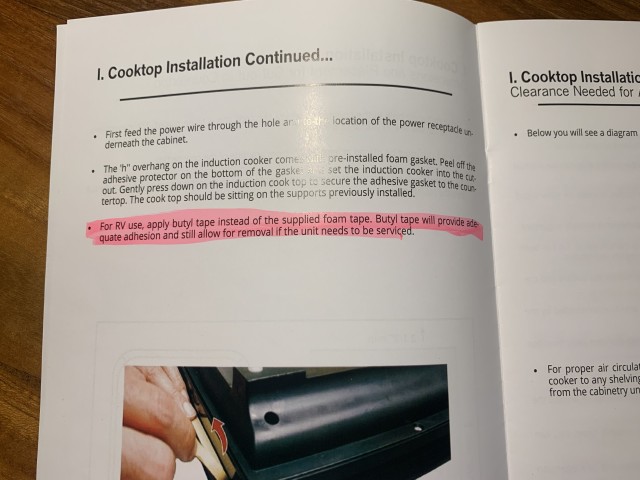
- Install induction cooktop
- General cleanup of wires, pipes, etc.
There are probably some steps I left out, but that’s mostly it. Below you’ll find a few links to the products I installed. (These are affiliate links.)
- The Induction cooktop I installed is the single burner model from True Induction.
- This is the sink I installed.
- And the faucet we wound up going with is this one.
- This is the Fernco Flexible Trap you see in the video (although, you can just get it from a home center).
Random note… this is the second time I’ve installed that same model induction cooktop. The first was in Lance!
After a super long video like that, I’m not sure what questions people will have, but if you saw a tool or technique or product you’d like to know more about, ask me a question below in the comments and I’ll do my best to get you an answer.
Enjoy!


Great reno, we thought it was a big improvement to switch it out and get the drawer space. We started watching as we were hoping to find some James quality insulation tips for the upper cupboards. We have a Travato 59 K and I’m frustrated that I can’t put cereals or cooking oil above without them going rancid in the air temps we’ve been experiencing in the last few years. We watched the insulation video for the headliner but probably don’t have tools/skillset to do it. Can you think of a product that would be thin enough and could be installed at this point? I’m thinking it might be helpful to lots of folks as it’s getting hotter through the summer everywhere. Thanks!
I know you’re probably wishing I would tell you to use some bubble-wrap-tin-foil stuff, but that’s used incorrectly about 95% of the time. If you’re talking about the backs and tops of the cabinets – there’s not a lot you can do once it’s built unless you’re willing to do some tearout.
You might try some of the melamine foam insulation from Second Skin Audio. Besides being quiet, it’s pretty decent temperature insulation. Or, you could try some 3M Thinsulate. But either of those will want to be covered with something, so you’re looking at adding a new false back and top. Still, it might be worth it to you. That’s the best I’ve got for you off the top of my head.
Good Luck!
Those are great ideas James, thanks for taking the time!
This is a cool remodel, what size is the sink you ended up using? From the video it looks like it is the perfect size for that area. We want to do something similar for our Ekko but can’t decide how big/small to go with.
I don’t remember the dimensions, but the exact sink I used is linked in the post above.
Hi James, do you still have the CNC file with dimensions you could share for others to use? I would be willing to pay for it as well so I don’t have to spend time redesigning since I’m using the same products you used. Thanks!
Hi James
Can the removed LP Kitchen stove be safely repurposed into an exterior stand alone LP cooker, attached to the exterior feed, or would that be unwise? (Removal wasn’t shown in the video.)
Thank you, Bill
I never looked into that. Propane burners are inexpensive enough that it’s probably not worth the hassle.
In general, when working with propane, I really try to play it straight. Don’t want anything to go boom…
Nice job! I liked the idea of Flip Flopping the Cook Top and Sink, this makes sense. Assuming there was space, I would have preferred a Double Cook Top.
I have never understood the trend to larger RV Sinks. Our 1989 Air stream had a small/shadow double sink which was perfect because it conserved water and let you have a rise and wash sink area in the sink. Ever since George from “Humble Road” installed one it seems everyone now needs one, I don’t get it, because now you use more Water and make more Gray Water, both are in sort supply!! Why?
I have two questions…
1. You do some amazing redesign work, so much so, that you make the EKKO a very desirable vehicle (not that I think it is a bad vehicle to begin with).
So the question is… why hasn’t Winnebago hired you to design an outstanding product line… something that just blows away anything out there?
2. Since you were a rocket scientist… why haven’t you made the EKKO my new flying car??
Okay… second question’s a little silly, but the first one is serious… you could really do some good over at Winnebago!
Well, first – I appreciate the compliment. Thank you!
As to working at Winnebago… have you ever been to Iowa in the winter?!!
Seriously though, I share my mods with them when they ask. And I know they’re keeping an eye on what the user community does with the EKKO, just as they do with all their coaches. Depending on demand, I wouldn’t be surprised to see some of my mods (and everyone else’s) wind up in future iterations of the EKKO.
James,
Great video, as always. I was waiting to see this one as I noticed the changes that had been done to the galley in earlier released videos.
Your shop is awesome, my dream shop if I had the room for it.
Keep those videos coming. I love watching and learning from you and Stef.
Thank you.
Because life happens, I would buy a second induction top like your first one, because those glass tops break and what would be the odds that you can’t find one for that opening a year or two down the line? They may have different models with different measurements. I always do that just to be prepared. CHEAPER than doing another countertop.
Did you run water in your sink? I would buy some sound deadening material (which you may already have) and apply it around the underneath of the sink and sides. You will be surprised by the difference in the sound.
You did a nice job with the project. Have never seen someone use rubber for edge banding, but I like it. Did you seal it so water can’t get between the countertop or the rubber with silicone? The reason I ask is that I did not hear you say you were sealing the edges/backside of the plywood and if any water got in there, it would swell.
That sink already had sound deadening material on the outside of it. (One of the reasons we went with that one.)
The original countertop was not sealed around the front edges – and it was just particle board. I’m not too worried about swelling.
Besides, if I ever need a new counter top or a new induction cooktop, I can just repeat the process. We’d probably want something different by that point anyway!
Well,
Why no comments in youtube, terrible.
-my take from a cook…
U never ever go from 2 burners to one burners…what is up with that? We r disappointed..
.so this mod is not a go..
The comments in YouTube ARE terrible. That’s why we disabled them!
The two burner cooktop that was there was much less capable than the induction burner we replaced it with. You cannot put two normal-sized pans on those burners at the same time. They are too close together, and rather anemic. Maybe one pan and a metal coffee mug would fit, or two old-school percolators… but not much else.
Additionally, the induction burner is fifty billion times safer than an open flame.
But – there’s not one right way to RV. So if you want two burners in your rig, go for it!
Have you ever weighed the pros and cons of routing the cook top opening with a lip so it is flush with the counter and sealing it with black or clear RTV? We also travel with a cat but keep a silicone pad over the cook top glass for protection. Will watch that.
At present I am hard wiring in a 1500 watt heater into a new commercially built RV . Will use it when we have shore power. I “think” it could cut my propane use significantly and thereby reduce the number of propane refill station I have to locate to refill. I did install one in the Green TARDIS, our previous DIY RV. We used it for several months only when we were present. I then checked it out to make sure everything still looked as good as when I first installed it. We then felt safe on using it night unattended while sleeping.
Again: Happy Travels and Stay Safe
I did think of recessing the cooktop even further, but decided against it. Mainly, I was thinking that – no matter how tight the opening or how well I sealed it – crumbs or something would get in there and drive me bonkers. Either that or water.
Also, if the cooktop ever goes bad (and I hear they sometimes do) it will be easier to remove with the top mounting by just sliding a razor under the lip to break the silicone.
I just last month installed an electric heater in Number One for “plugged in” situations. It works well for us down into the 40s, and it’s been solid enough that we are comfortable sleeping with it running.
I installed a small commercial 1500w space heater with a steel case….no plastic. The shortcoming was I could not find one that had 750w/1500w settings. It would be nice to have something that can “chop” the incoming voltage to make the heater output variable from 0-1500w.
We have had a heater (750w/1500w) for 21 years in our previous RV the Green TARDIS. Had a Sportsmobile canvas pop up top installed. Two heater on medium (~800w each) near the front and back kept the temperature inside fairly even on 10f-20f nights. To many air leaks for one heat source to keep the living area comfortable.
My thinking at the present is two 1000w heaters with infinite adjustable heat would be the optimum design. One near the front and one near the back.
Again
Safe Travels
Superb video James!
Basically, you redesigned the kitchen they way it should have been done in the first place. Storage, the stove and the sink and faucets are vastly improved.
Winnebago, are you listening? Make the “James-spec kitchen” the new standard, effective immediately.
I’m sure Winnebago gets quite the earful about the mods I do…
That said, they’re frequently improving and updating their rigs. We got – literally – the very first EKKO delivered to a customer.
As the model progresses, I’d expect improvements and options to expand.
James saw you were having issues cleaning up the excess silicon.
Here’s a tip when calking or setting sinks with silicon.
1. Apply Silicon as you did.
2. BEFORE you wipe the excess that squeezes out. use a mister to spray the silicon and surrounding area with Isopropyl Alcohol. 70 or 90% doesn’t matter which.
3. Wipe up the excess. Silicon will only stick to the areas it was on before you sprayed.
I was taught this trick years ago by a contractor reworking the caulking around a bathroom tub.
My understanding in plain water will work but the alcohol works as a wetting agent to better cover the area and evaporates faster.
Interesting.
James, classy work as usual. I’ve been waiting on this to ask a burning question. What are the dimensions of the original cutouts for the sink and stove? Some folks have been contemplating doing some work and would like to see what would fit the stock countertop.
NOW you ask me…
I discarded the original countertop, and I didn’t take the measurements of those cutouts (as I didn’t intend to use them again).
You can see in the video that the stovetop cutout is a weird non-rectangular thing.
The sink was close in size – but just a bit larger – than the recommended cutout for the induction cooktop.
If I had known you wanted them, I could have measured them. Sorry!
Well darn, I was kind of afraid of that. When the “shower pump fairy” shows up at the dealer with the replacement parts, I can finally get it home and find out for myself. But it would be nice to be able to source some parts in advance if possible.
Could you share the name of the p-trap manufacturer or where you bought it?
Thanks
That’s also a Fernco product. I added a link to the list above.
I was surprised to see Winnebago using a rubber propane hose simply run through the floor then connected to the stove: I thought that all propane lines had to be copper tubing!
It’s always been propane as far as I remember.
4′ X 8′ sheet of Baltic Birch?? I have only gotten it in 5′ x 5′ sheets. Did not know you could get it in that larger size. Hmmmm. Oh, and at my local lumber yard the price has literally doubled in the last month 🙁 Will still use it on projects but will measure three times and cut once. Always like your posts. Have safe travels
5’ x 5’ is typical, but our local dealer had it in 4×8, so I got that.
I just wish I hadn’t ruined that first piece…
James, your wiring clean up is the way it should have come from the manufacturer, especially at that price point. We always love your videos. This one was awesome.
Thanks for sharing.
Glad you liked the video!
James you have a very unique way of determining what to clean…”what’s that…cheese ? No”…..
🙂
Thumbs up for the clean results btw !
If Stef had been filming then, she probably wouldn’t have let me get away with that…
Love this mod and think it was extremely well thought out. Surprised induction is not more fully embraced by the industry yet for all the reasons you cited.
That said, it looked like the fabrication of the replacement countertop was one of the more technical and involved portions of this mod…but a great way for you to use your incredible shop! What are your thoughts on using some other solid surface option to replace the countertop (i.e., Corian, quartz, whatever) which may be easier to order/fabricate?
Thanks for all your incredible hard work on each video and really appreciate sharing so much.
PS Hope to see you in Tampa next week at the show…beer is on me!
I’ve used other solid surface materials in the past. There’s no reason they wouldn’t work. You’d just need to get someone to fabricate it for you.
Those other materials do weigh more though, so there’s that to think of.
And we are planning to be at the Tampa show, so swing by the Winnebago booth and say hi!
I’ve never tried Quartz, but Corian is actually pretty easy to work with. I fabricated the countertops in our van using 1/2” Corian, and used a CNC router for the cutting and a round over bit in a hand router to put a small bullnose on the countertop edges and hole for under mount sink.
I should think about reworking the countertop for an under-mount induction burner – right now we just use two small countertop ones.
I thought about an undermount sink, but didn’t like the thought of taking up even more space under the counter – even if it was just 3/4 of an inch. But I do think it would have looked cool, and been easier to clean.
Enjoyed this video, good job! My RV has an induction cooktop and I was always concerned about something falling on it and cracking the glass so I bought a cutting board that fits over it. It has feet straddling it so it doesn’t slide off. This gives me more counter space when not using the stove as well. I side benefit is I can not accidentally turn on the stove.
I actually toyed with the idea of recessing the cooktop even further – making it completely flush with the top. But then I got worried that crumbs or something would collect in the tiny gap around the cooktop.
The cutting board idea is a good one! I’ll ask Stef and see if she’d like something like that.
(We’ve never been too worried about cracking the cooktop though. Maybe we’re naive?)
That cook top is designed to be removed and used outside if needed. See the feet on the bottom. In addition it would have set lower on the counter top. No need to glue in down.
Uhhhh…
Thanks, but… I’m well aware of what the feet are.
We simply have no interest in using this cooktop outside, or having it take up our limited storage space, or in hearing it rattle around while driving.
As far as mounting instructions, I find it’s always better and safer to follow the manufacturer’s recommendations.
Greetings… On this episode “https://www.youtube.com/watch?v=Lo98RhvmBkA” you held screws with your lips as you were under your RV, scary thing, I recommend a magnetic bracelet to hold screws, nails, etc… wouldn’t want to swallow any metals while trying to talk to your YouTube Subscribers; similar to this one in Amazon https://amzn.to/3ffdfK4
OR perhaps build your own? Thx, just worried for you.
I figured someone would notice that. I was super conscious of the screws while I was under there (just didn’t say anything about it).
The wristband is a cool idea! I may have to get myself one. Thanks for the idea!
Super nice work! I like that the sink is now out of stock… didn’t take long.
Thanks!
There are several similar sinks on Amazon. I don’t have experience with them, but they look the same in the pictures…
love you guys and didn’t u just get the ekko?
hahaha
a galley remodel is nothing for u!!!!
We got our EKKO about 7 months ago. It’s already very different from any other EKKO out there!!