This post may contain affiliate links.
By this time, I had been working on the 20k project for several weeks in 100+ degree heat, and the transformation from “This will be a cool, fun mod!” James into “Can you please get that camera out of my face?” James was well underway.
(I’m trying to set your expectations for this video.)
So, keep that in mind as you watch. Sometimes, we forgot to film steps. Sometimes, we filmed steps, but never made any audio to explain. Sometimes, I say “I’ll show you that later,” and then I just don’t. But in spite of all that, I was able to piece together this video that should let most of you follow along. You just may have to pay attention when it gets a little non-linear. Here you go!
There are two main things you’ll see in the video.
First – The Dinette Build
This is largely a woodworking project, with some metal bits thrown in. Basically, I build an L-shaped bench that’s attached to the structure of the RV. The bench boxes themselves are fairly standard. They’re attached to the RV with angle brackets that I made in-house, and I use those to attach to the walls and floor. The pieces of the bench connect to each other using Festool Dominos, which provide a solid attachment that I can disassemble later if I need to.
I did cut all the pieces of the dinette bench using the CNC router. I learned that if you want to cut a rectangle that’s 2mm longer on one side than its opposite, that’s really easy to do with CNC, but pretty hard with just a table saw. I only had to build as far as the bench, and then Stef took over and was in charge of getting cushions and fabrics picked out for it. That’s a very good thing, and you’ll realize why when you look at the finished product.
The dinette was finished off with the Sexy Italian Table Base from Lippert, on top of which I added a bamboo top that I sprayed in-house as well. While I was at it, I made a smaller version of the table top for the passenger-side Lagun table that Stef uses.
I also made a couple odds-and-ends pieces for the dinette area (which you’ll see in the video), and wrapped the base of the table as a super-awesome scratching post for Mel.
Second – the Electrical Burn-In Test
In IT, where my day job takes me, when we stand up a new system, there’s typically something called a burn-in test. This is where we turn everything on and turn it up to 11 for as long as we can stand it to make sure that it all works and everything can handle the loads. That’s the other thing you’ll see in this video – the Burn-In Test of the 20k electrical system.
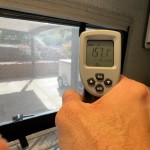
What I did is park Number One in the sun on a 100 degree day, unplugged, and cranked the air conditioner, and let it run. All. Day. Long.
I’m happy to report that we passed the burn-in test with flying colors. Sure, things got hot. The inverter got hot, but kept running and didn’t even get into “warning” territory. (That was the piece I was most concerned about – that inverter compartment outside in the sun.) So I’m calling my fan and venting solution a success. Other wiring and cabling maybe got warm… kinda. But nothing concerning. The circuit breakers got warm, but no warmer than they would get on shore power. The batteries, happily, didn’t seem to heat up much at all.
Solar was on-line and contributing as well. Our 455 watts of theoretical solar on the roof was consistently giving us 250 watts or so throughout the day. No issues from solar.
It got dark and cooled off well before we ran out of battery power, but it looks like we could have about 14 hours or more of air conditioner run time in full-sun desert conditions. Not too shabby! That will get us an overnight stay with air conditioning in any conditions I can dream up. I’m happy with that.
Though we don’t show it (because it would be super boring to watch), the next day we had the second part of the burn-in test… where we charged the batteries as fast as we could. That also went well, and nothing overheated during that exercise either.
The Final Word
I am planning on one more video on the 20k project, but that one will wait until we have a few months of real-world usage on the system. That’s where we’ll explain what it’s like to have such a system day-to-day, what we’ve had to do to adapt to the system, and how it’s changed our RVing style. But since I want that to be as authentic as possible, that will have to wait. (Plus, I want to include Stef in that one too, since she observes things from a different perspective than I do.)
I’m sure there will be questions. Sound off in the comments below!!


Where did you purchase the fabric for the bench seats and divider curtain? I’ve been looking for something similar and can’t find it.
The ones in this video I think came from JoAnn Fabric. I believe Stef designed it online and they shipped it to us.
I’m in the middle of completing this mod and my duct hose is way shorter than yours….having a hard time finding that part. Do you know where to find it?
I think that’s a special metric-sized hose.
If I needed more, I’d call up Truma. They should have the hose and the connectors available in-house in Indiana.
(Never tried to buy any though…)
I was wondering why 20K? I like the idea of not having a generator.
Are the batteries on the same scale as the Battle Born Batteries? Are the batteries you used more reliable, better quality, etc.?
I’m wondering if this would work for my older class c.
Just responded to this same question on the Part 3 post.
The 20k Project: Part 3 – Electrical Install!!
Hello James, I am your youtube fans and really appreciate your contents. I also own an Ekko. I am very interested to install the 4 directions rotating table (Italian design), but I can’t find it on the internet.
Can you please direct me who I can contact?
The table base is linked in the post above.
The link is a dead end. It doesn’t appear in the LCI catalog for the US
Bummer. If you search around for Lippert Planet Table, you’ll find places that do sell it, like this one:
https://pitstopcamper.com/gb/table-structures/14106-table-support-2-direction-planet-lippert-h740-mm.html
Unfortunately, no easy way to click and buy it in the US. You could always try calling their customer service?
Thanks for sharing. Love seeing your mods, but it’s a bit overwhelming for someone who isn’t handy. I hope that Winnebago sees your mods, discusses them with you, and sifts through the ones that they find most important for future builds/floorplans.
With the amount of energy in our current NPF Travato Volta system, I wouldn’t want to sacrifice that if I ever switched to an Ekko. I hope in future builds of the Ekko, a similar energy supply becomes available.
I also really hope they consider a dinette like this mod as a floorpan for those of us that only travel as a couple or some sort of convertible/couch type seating.
Thank you again.
We absolutely do share our mods with Winnebago.
I can’t speak to what they may do in the future, but I know that they are definitely interested.
Best of luck to you!
I am just now catching up to your channel and your Ekko mods. Since you have a Domino and felt the urge to “remodify” your bench, you could use the fasteners that Festool has for creating knock-down furniture and panels. that way they are mechanically attached and can be disassembled in the future if needed.
If I ever take it apart again, I may look into something like that.
Some of the Winnebago carpentry is done with Confirmat-type screws, so that was interesting to see.
For most of our cabinetry, I joined things with pocket holes, which means that for outside corners I had to use interior tendons.
But without glue, they survived the first year driving about before I took them apart and glued and finished them.
I actually think I did not need to glue them; very strong and they didn’t seem to vibrate loose.
The Festool Dominoes are so tight, I have to dry them out slightly before they’ll fit easily into their holes!
hi james. I am removing the current dinette table and adding one of our own. Was there any issues drilling the base of the table mount into the ekko floor? What kind of screws did you use? I am assuming it was several 3/4″ wood screws. Or did you use bolts, washers and nuts on the underside of the carrage and temporarily remove anything thing that was in the way?
thanks,
chris
The underside of the table is directly over the gas tank. I would have preferred to bolt it through, but would have had to drop the gas tank to do it. (If that gas tank ever comes out, you can bet I’ll be putting bolts in.)
You can see the thickness of the floor if you remove the ramp between the cab and the back. I put in the longest and fattest screws I could without going all the way through the floor. I think I wound up using inch and a half screws? Maybe inch and three quarters? And big ones. #12 or #14. Take a look at the floor and use the biggest screws you can. Pre-drill as well.
Watching you wrap that table has me wondering if you have tied flys or built fishing rods? That technique is used a lot in those cases.
Thanks for watching!
No, I haven’t. But I’ve always been fascinated by the seemingly endless ways sailors can fasten things with rope!
Wow! That looks distinctly better than Winnebago’s initial creation and a whole lot more power. Very impressive electrical layout and beautiful lounge area, very Euro styling. Now you need a little wine bar with acrylic wine glass holders – another use for the CNC machine. Check out Adria or Dethleff, Hymer, or Pilote for the wall mounted wine bar models.
Love the fabric and cushions, Steph! What an eye for color you have. Excellent job, both of you!
To heck with the wine bar… I want a sauna!
James & Stefany,
Love the videos.
With regards to the 20K Project it’s above my skill level. However, I did find out the you can get an after market generator auto-restart installed which can be set for either come on for temperature or battery charge. I was given an estimated cost of approximately $800. How does that compare having a 2nd lithioniccs battery installed?
Also can you give me the pros and cons of either alternatives?
Naturally, a Lithionics battery of this size and spec is more than $800. But it’s not about the cheapest way to go about things.
The point is, we simply don’t want the noise, the fumes, the noise, the maintenance, the noise, the hassle, or the noise of dealing with a generator.
Imagine it’s 6am at a quiet campground, and you want a piece of toast.
With a generator, you have to wake up the whole campground for that piece of toast, and since you’re not supposed to run a generator for just 3 minutes and then stop it, you’ll be keeping the campground awake for 15 minutes or so. yay.
Us… we just make toast.
James, What was your combined total cost for all the batteries and electrical components? I have been looking at a Leisure Travel Van 2022 MB. And noticed another owner replaced his two std lead batteries with one of the types you chose, he stopped at one, because it fit in the same space as the prior 2 lead batteries. The cost of a LP generator is about $4500, and the cost of a Diesel Generator is about $8500. How many of your batteries would be need to replace the need for a generator? Is that how you came up with the 5 batteries you installed?
Honestly, we came up with 20,000 after Stef blurted it out in a video! But that was at least partly informed by our previous experience with a 7000 watt-hour battery in our last RV.
If you’re looking to replace a generator, then the piece of equipment you need to be thinking about is the *inverter*. Once you’ve got an appropriately sized inverter, then your battery capacity simply determines how long it will run – and that’s a call only you can make.
I was wondering what Winnebago thought of your mods. Do you think we’ll see a dinette or similar alternative to the current seats? That space is much more practice with your mod. I’m not a fan of the two seats. Still too small I think for a third sleeping spot though which is too bad. You lose too much with the pop top option.
I can’t really say if another floor plan is in the works or not. I know Winnebago has seen the video and the rig itself. But they didn’t tell me if they were working on something similar or not.
If you weren’t doing the whole 20k bit, just the dinette mod wouldn’t be that bad.
Do you know how much of a difference in weight there was between what you took out and what you put in?
I remember you saying you weighed the seats while holding them on a scale but i do t remember if you said how much weight went in except for the carrying heavy stuff when its hot.
I didn’t measure the weight in exactly that way. It would have been too difficult to measure each wire and cable, and I kind of don’t care, as long as there’s enough capacity for us to travel and bring all the things we want.
We did go to a scale after this project, and fully loaded for a multi-week trip, we still had about three hundred pounds of capacity available. So it’s all good as far as we’re concerned.
Awesome. I know all the wires can add a ton of weight, and i figured you would get a weight when you were all done. Thank you.
James,
Could you supplement the Truma with waste heat from that monster inverter? Or, would I be so minimal as to be silly?
Please made caps for those battery terminals…..I’m frightened! 😉
Bill
Well, when the inverter really puts out heat is in the summer, when we don’t want it. We tend not to use as much inverter power when we’re not running the air conditioning. SO I think inverter waste heat isn’t worth chasing.
The terminals are now covered with a bar/cap, and then there’s a storage area built over that. They’re safe!
Cool, literally! Thanks for the reply.
Bill
Hi James,
Can you please do a video on the new range top (and how you chose this specific induction stove model) and how you reversed the position of the stove and sink. It looks awesome.
Thanks.
There will be a video coming on that. I’ll warn you though – it’s not a beginner mod. I used a CNC router to cut the top… after I made laminated it from raw materials.
What is plugged into the outlet under the seats?
What is the temp of the inverter when on shore power, running the AC and charging the batteries?
Fair and full disclosure I have two of the same batteries and same inverter and the temps get up there under the conditions listed above.
Thanks, Greg
That’s the ventilation fan plugged in under the seats. It only needs to have power when the inverter/charger does.
I actually did use the inverter to charge the batteries and run the AC one time (the day after the burn-in test). I didn’t track the temperature super closely, but it remained cool enough to not reduce its output. The ventilation fan was running full-blast, full-time though, so I’m sure that helps more than I know.
I don’t think I’ve ever seen the inverter temperature up over about 42 degrees celsius. (I’ve since found the setting to change the display to Fahrenheit.)
I won’t be able to do any more testing of that until it warms up again next spring.
Do you have separate cooling or venting under the seats for the Lithionics batteries and Victron equipment?
Nope. We do not. And that’s not an oversight.
The thing is, with 5 batteries, none of them are working hard enough to heat up, whether charging or discharging. Running the air conditioner only asks about 22 amps from each battery.
Think of it this way: It’s not like one guy picking up 300 pounds. It’s 5 guys lifting 60 pounds… nobody breaks a sweat.
Nice build but the Coachmen 20XG/22XG has similar specs to the Ekko but already has a dinette built-in behind the drivers seat, and the drivers seat rotates. Its also built on the Transit AWD dually chassis. Did you look at any of the Coachmens? I would be interested in your thoughts if you did, and why you chose the Ekko over the Coachmen. Thanks!
Yes. We did consider a Coachmen. In depth.
See our analysis here: https://www.thefitrv.com/blog/rv-model-comparisons-and-weve-chosen-our-next-rv/
Are you able to spin the drivers seat 180 degrees and use the table or is the seat too low?
Yes, if you’re willing to take the 45 minutes to do it, the driver’s seat does spin around 180 degrees. (There’s a video somewhere on YouTube of me failing miserably to turn the driver’s seat.)
As-is, the seat is a bit low, but if you use the cushions Winnebago provided for the driver’s seat, then the height is just fine. The height of this table is just about the same as the factory table.
With two circuit breakers, are you wiring the Auxiliary DC Breaker signal from the Accessory Connector of the first battery to both circuit breakers, or are you wiring the Auxiliary DC Breaker signal from a second Accessory Connector from a second battery?
Also, are you using the FCC signal from the Accessory Connector to the Balmar regulator?
Sounds like you’ve got a good handle on this.
The DC breaker signal from one (and only one) battery is routed to both of the DC circuit breakers.
The FCC signal (from the same battery, and only that one battery) is wired to the Balmar regulator.
Love the dinette. I am looking at the Planet table leg. Did you get the sliding 4 direction model, or the sliding 4 direction rotating model?
I didn’t show it in the video, but ours rotates as well.
We never really rotate it though. Would have been just as well off with the sliding-only model.
Thanks for the reply. Helluva workshop you got there. My son is a carpenter in NW Montana. He would be impressed.
It’s taken me a long while to equip it! (And I’m not done… it’s never done…)
Hi James. Sorry to bug you but I called Lippert and they are having trouble finding the Planet table leg in their system. It’s listed in their catalog, but they can’t find it. Any help on how you got yours would be appreciated. Thanks!
Let me try my contact at Lippert and see if there’s a proper process for this. Hang tight.
OK. I heard back from Lippert. If you want to order it, here’s what they said:
“The part number is 2021027273 and it has a 6 week lead time. The retail cost is $332.95.
If someone wants to purchase it, they will have to call the Care Center 432-LIPPERT and order it that way.”
Thank you so much for the prompt reply and ordering info. Much appreciated!
Your professionalism is impressive. I’ll be placing the order today.
James,
Does the European Lippert table leg in the article link that you used, have a “lock” position for driving? I can not find much information in the Lippert PDF file.
Yes. It does lock.
We all knew that a solar panel awning was just a matter of time.
https://www.caranddriver.com/news/a38056659/rv-solar-awning-xpanse-revealed/
I thought 600 lithium amps (7200 watts?) in my Promaster was a lot but 1600?! I’m not a scientist or a woodworker and I defer to you in all do-it-yourself but I do wonder… with my modest system and a rooftop Coleman we get sufficient overnight cooling to sleep in South Florida. By morning we do need to run the twin alternators to get the bank full again. Our Promaster built for us by CCC in North Florida is well insulated maybe that helps.
The question I am trying to get around to is the weight and recharging requirements against the usefulness of the size of the bank.
I don’t mean to be critical, and one can never tell online but I am sort of wondering. Perhaps the further testing will give me better answers.
Best wishes
Yes, the battery bank is huge, but that doesn’t mean we use it all up every single day!
If we don’t use more power than you do on a day-to-day basis, then it takes us no longer to fully charge after an evening than it does you.
The difference is, we don’t *have* to charge the next day. And if we wanted to spend all day in Death Valley with the air conditioner on, we could.
But those would be extreme situations. In all seriousness, it really doesn’t take us longer to charge than anyone else.
As far as weight: We didn’t have a generator, and the seats I removed were well over 100 pounds. We gained a little on the weight, but maybe only like 60 pounds. We’re good!
Thank you for taking the time. I’m very interested for future builds.
Great dinette and whole job.
How do you like the Nova drill press?
Love it. I especially like that it has the speed chart built in and I don’t have to go looking up in a chart how fast I want to run it.
where can i get a “snazzy” cool t-shirt like James?
We ran that as a promotion some time back. We don’t have any more of them.
But now that we have a new RV, we probably need to make new ones!
Watch our channels, and when we settle on a new design and campaign, we’ll be posting it.
Cheers!
I wonder: the dining table has sharp corners…perhaps it’s a little safer with chamfered/rounded corners? Overall, a really beautiful job and what’s really nice? Your considerable attention to detail AND precision cutting, shaping etc. so everything fits REAL TIGHT! Your workshop is really nice, too! (I live in a small apartment in NYC, so projects even approaching 5% of this are really not possible for me). I do enjoy your videos…and thanks for your time & effort!
We’ve actually been living with it a while, and nobody has banged into the table even once.
It helps that the table is very easy to push out of the way when we’re not using it. Even so, I could always round them over in the future if it becomes an issue.
Even in an apartment, you could always try working with hand tools on smaller projects? Every so often, in Fine Woodworking’s annual shops issue, they show someone who’s built a killer shop in a London closet or something. Where there’s a will, there’s a way!
How did you finally anchor the support for the bench under the window if you only found metal at each end?
I used a long and reasonably wide piece of plywood to span the two metal pieces. I also put a few short screws into the luan just for good measure.
BUT – due to the way the “L” comes together, I ran a continuous brace across from the short side that intersects the 48 inch side at 16 or so inches. I also anchored the plywood to that. Basically, if you see how I cut the seat top pieces, I don’t have an unsupported 48” span anymore.
Maybe I’m not explaining that right. In any case, there’s been no sag or creaking in our usage so far. I would have preferred to find some structure in there, but it worked out OK even though I didn’t.
Hi J&S
Really nice job.
Wondering if you might list some of your construction materials, in particular:
Baltic birch plywood: thickness? (I have some 3/8″ somewhere in the van, maybe the bike slider)
Bamboo wood: thickness and source?
So, in the end, did you mount your back support brace to the two pieces of metal you found? I would have been tempted to use a 1/2″ piece of plywood supported on the floor or batteries if no room, tacked in loosely to the wall.
I used 1/2 oak plywood though out the van, including the toilet box, which is smaller but similar in function to your build (this stuff: https://www.lowes.com/pd/SoyStrong-NAF-1-2-in-HPVA-Oak-Plywood-Application-as-4-x-8/1000096482) It’s just thick enuf to draw it together using pocket holes/screws, and reinforce with glue (or not). Finishes up pretty.
As for lounging about, we seem to use the swiveled driving seats more than the toilet top. Maybe because we have the 10 point seats, we can get them higher, like a seat more comfortable for working on the computer?
Cheers
-d
I used half inch baltic birch for the seat tops.
The bamboo (plyboo?) is 3/4 material. I got it from “woodworkers source”. They’re not the cheapest, but all the stuff I’ve gotten from them over the years has been good quality. When I’m buying something without seeing it, that’s important to me.
See my answer above about the mounting of the seat support. I thought about adding a floor-based support, but it hasn’t been necessary.
As for turning the seats… we really dislike the Ford factory swivels. I think I’ve turned the driver’s seat maybe once since having the van. They’re that bad. If we had the ProMaster seat swivels, I might think differently about the space, that’s for sure!
Hey,
Do you know which swivel base Winnie is using? We have SCOPEMA swivels and sort like them.
Love: Wonderful on the passenger side, with a normal stock seat on it, and our van doesn’t have a steering wheel on that side. Easiest to swivel when the door is open but very easy with the door closed.
Love/hate: The driver’s seat, which is a 10-point electric seat, is slower. First, you need to raise the seat all the way to clear the pedestal. And to clear the steering wheel you need both to flip the seat back forward and move the seat forward. So a lot of adjustment, which is a pain, made worse by the fact that you need to do it slowly.
Some wiring worries too, with close clearances.
Nevertheless, the swivels are not made to work with the 10-point, so that’s our fault. We got that seat so the Rachel (5′ 2′, eyes of blue) could more easily drive the van. And that has worked great.
Winnebago is just using the factory Ford swivels.
The problem with those swivels is that the swivel rides on top of the slider. So the seat can only actually move in a straight line, forwards and back. Though it can rotate freely.
The infinitely better solution is to do what they do in the ProMaster, and have the slide ON TOP OF THE SWIVEL.
This way, the seat can move and rotate anywhere within a circle, and not just up and down a straight front-to-back path.
That makes the seat very easy to rotate, even with the door closed.
Are the Scopena swivels “a swivel on top of a slide” or “a slide on top of a swivel”?
Hi–
I am thinking that the reason that Ford might have done that is for their 10 point seat. The slider motor is right over the hole that the wiring harness comes thru, and preventing the slider from rotating would ease some wiring difficulties..
I went out and looked at ours; the mounting screws for the seat to the slider are different from the mounting screws from the slider to the pedestal, so you can’t just move the slider up. You would need to drill new holes. But I bet you could do it if the swivel has enuf fore aft distance..
You could just (“just”!) remove the slider and replace it with a Scopema, if you have multiple hundreds of $$ lying about. If you do that, do the passenger side first, that seat is the easiest to flip.
–cheers!
Opps, and I didn’t answer you Q, yes the Scopema is between the pedestal and the slider. Actually I think all the commercial sliders are in the same position.
Well darn…
Where did you find the pedestal base, do you have a link?
I linked it in the post above.
You’ll have to contact Lippert. Tell them you saw it here!
They were able to get one in from Europe. It took a while though.
James as a former woodworker I’m in awe of your shop! Every time you are in there I sob a little. I had to end my shop work due to arthritis and sell it all. You are a true craftsman and your planning is remarkable. Thanks for sharing
My shop is my happy place.
I love making stuff.
1) would a stud finder find the metal in the wall?
2) how do you keep your shop this clean?
Lol. 🙂
I tried two different stud finders. They weren’t super reliable. A construction diagram… now that would have been reliable.
And yes, I have a bit of a clean thing. I clean up the shop at the end of every day and periodically as I work. It helps me reset the brain between tasks (and find things!).
Hi S&J,
Did we notice correctly that you ordered your Van Made window shades with reflective material? Is that an optional add-on and is it effective for both warm and cold climates? Did you have a windshield shade in your Travato, requiring removal of the W supplied shade?
Yes, we’ve always ordered our Van Made Shades with one reflective side. We face that side outside in the summer, and inside during the winter.
We had them in our Travato as well, and uninstalled the Remis shades (that I had installed myself) to be able to use them.