This post may contain affiliate links.
In the first part of my functional fitness series I shared the “Fab 5” movement patterns. If you missed that, well then here you go:
- Hip Dominant Movements
- Knee Bends
- Push
- Pull
- Locomotion
Let’s delve in deeper to the first category, and take a closer look at Hip Dominant Movements. And one in particular…
Our hips, I have to say, are pretty amazing evolutionary marvels. They do a ton of work throughout the day, starting from dragging ourselves out of bed in the morning all the way until we’re happily stepping into our PJ’s at night. Just try to think of a large movement we do in our daily lives that DOESN’T involve the hips in some way. Go on, I dare you.
The hips, like our shoulders, are a super cool ball and socket joint… the most mobile type of joint we’ve got in our bodies, and therefore the most badass in my book. Unlike our knees, which are a simple (and rather boring) hinge joint that can mostly only flex and extend, the hips can move in 6 different ways: flexion, extension, abduction, adduction, lateral (external) rotation, and medial (internal) rotation. Try all THAT with your knees! (Please don’t.)

In addition to being flexible and move-y in loads of awesome ways, our hips, and all their supporting actors… the muscles, tendons, and ligaments… have a pretty big job. They’re responsible for supporting our body’s weight along with any other forces that also might be acting upon the body (things we’re carrying, for example). Those forces multiply many times over when we’re doing intense physical activities and placing extreme demands on the body, like jumping up and down to celebrate scoring the last space at a first-come-first-served campground!
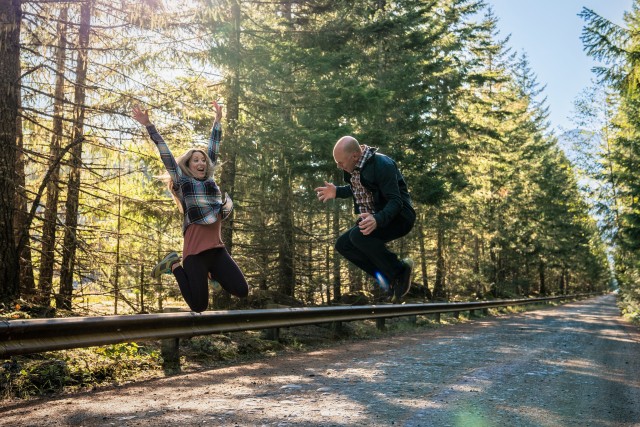
Imagine the amount of force our joints absorb on landing… But who cares cuz YAY FOR AWESOME CAMPSITES!!!
Without healthy hips, we set ourselves up for injuries, and then there’s no jumping up and down celebrations happening.
Of all the hip dominant movements we do, the most critical is the hip hinge.
The hip hinge is basically flexion or extension at the hips that involves a posterior weight shift. When the hip hinge is done correctly, you maintain a neutral spine and bend at the hips without rounding the low back. This takes the stress off of the lumbar spine and protects from any low back injuries.
I’m just going to say it; Adult humans suck at hip hinging.
We all used to be great at hinging, you know, like back when we were toddlers. Watch any tiny human bend over to pick something up off the floor and you’ll see a beautiful hinge. It’s unfortunate that as we become adults we unlearn this movement. If we were better at it, you can bet the majority of the bazillion dollar spinal pain industry would be out of business.
Let’s relearn and reactivate our ability to do this pattern.
Okay, gang, let’s get to work fixing you up. Our starting point isn’t with hitting the gym and loading up on weighted deadlifts. Nope nope nope. First, we want to get your hinging muscles ready for prime time. Hinging requires some healthy core stability in your posterior chain muscles, particularly your glutes, erector spinae, and hamstrings, so we need to build those muscles along with your joint mobility and stability before we start doing any hard core hinge exercises.
The exercise progressions below will help you master the basic principles of hip hinging and build the muscles needed to do it. Besides either a bench or chair and a wall, you’ll need no equipment. And hey if you try anything and it hurts in that red-flag sort of way… STOP. Hinge exercises, while they do strengthen your low back, they make it a little vulnerable too. So at the first sign of a problem, immediately stop. Okay? Okay, onward!
Stef’s Guide To Being A Jedi-Master Hip Hinger:
Elbow Plank:
I know. This looks strange in a list of hip hinge exercises. But trust me, planking is an EXCELLENT place to start. Allow me to explain:
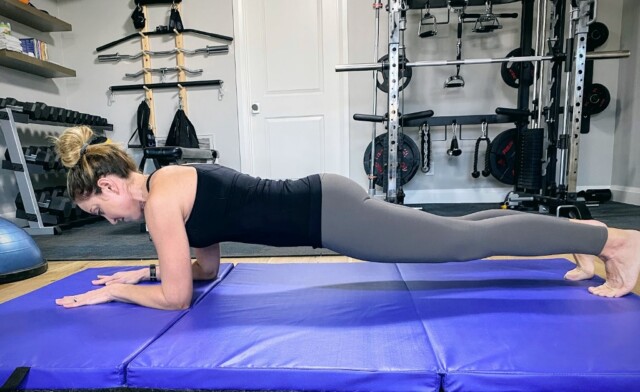
One requirement for doing quality hip hinges is that your core must be strong enough that it can stabilize a neutral spinal posture without you having to round your back (aka ‘spinal flexion’). This means core stabilization training is a crucial component for hip hinge training, and that makes plank varieties a great place to start.
If the traditional elbow plank down on the floor is too hard, then try an inclined version with your elbows on a bench or stable chair:
Exercise beginners or seniors, you can start by doing an elbow plank against a wall. Whichever version you try, form is everything! Keep your core tight, your hips aligned and try to hold it for at least 10 seconds. Advanced exercisers, try to hold for a minute. Rest 30-60 secs and then repeat for 3 sets.
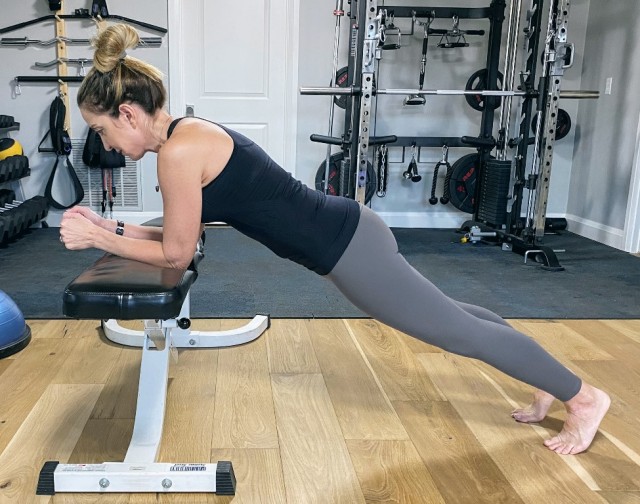
Plank Pike-ups:
Now things start getting exciting! With these Pike-ups, we’re still building up your core strength and stability, but now we’re jazzing it up by adding in some hip mobility AND we’re improving flexibility in the muscles involved with hip hinging:
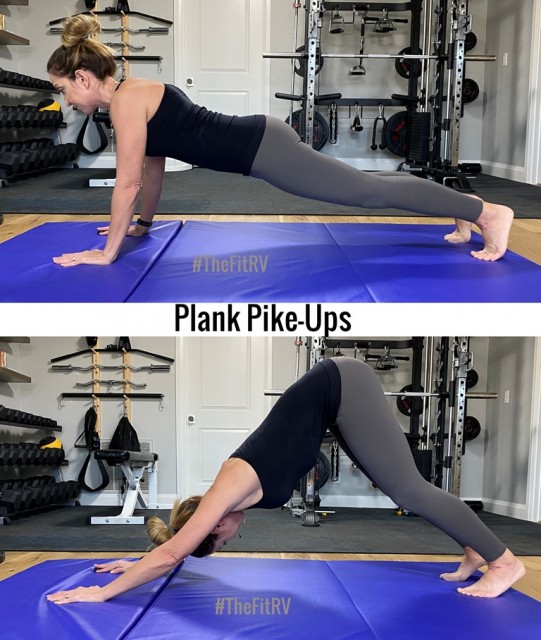
I, personally, love doing pike-ups. My trainees can attest to this, as they tend to pop up often in their various plans, too. Basically, you’ll start in a push-up position holding your core tight and your body aligned. From there, drive your hips up and back, keeping your legs fairly straight but do allow the knees to soften so your back won’t round. As you pike, you want to focus on lengthening your spine, and lifting your sit bones up toward the ceiling. So if your knees need to bend to make that happen, then go for it.
As with all planks, you can also modify these and do them standing with your hands on a wall (for beginners), or for a little more challenge with your hands placed on a sturdy chair or bench:
Plank Opposite Arm & Leg Raises
More planking?!?! Yes! The first two only worked you bilaterally. I wouldn’t sleep tonight had I not made sure there was a unilateral plank variation in here. And since we’re training our bods to rock at, you know, LIFE, we need to make sure we’re training the way we actually do life. Which is mostly unilateral.
I was too lazy to take a picture of doing this one traditionally, down on the floor, so you’ll have to use your imagination. Just like the other two plank variations above, you can do this one either standing with hands on a wall, with your hands on a bench or sturdy chair (like this picture below), or down on a mat.
To do this one, start in a traditional pushup position with your body aligned and your core super tight. If you’re doing it on the floor however, do these on your forearms and widen your feet. From there, raise your right leg and your left arm off the floor simultaneously. When you raise your arm and leg, focus on stabilizing your hips and torso, not allowing any movement beyond the arm/hip extensions. Lower them back down to start position, and then raise the opposite limbs. All that completes one rep. Try to do these slowly and with control, no swinging or twisting of your hips.
Lower-Lifts:
This is a Pilates mat class staple, and not only does it work your abs, it also works your hip flexors (especially the sartorius). Plus it requires activation of your quads (the front of your thighs) and your glutes (your bootie)… all the same muscles we’re using during a hip hinge. The benefit of this one is that we’re down on the floor with our spine neutralized, so it’s another good hip hinge supporting exercise.
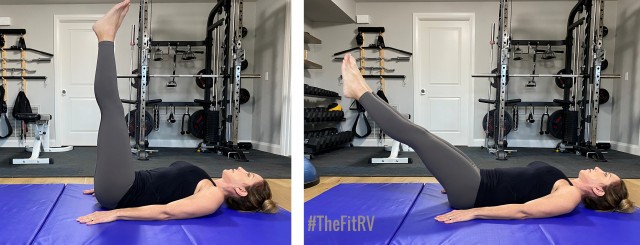
Start by lying down on your back. You can either leave your head down like the picture or you more advanced people can round your shoulders up and place your hands behind your head. Either way, tighten your core and stabilize your spine in a neutral (natural) position… so don’t over-round your low back down into the mat. Lift your legs to the ceiling, with feet together. Slowly lower your legs until you cannot maintain the neutral spine any longer and you feel your back starting to arch. Wherever that happens, that’s as low as you go. Return to start to complete one rep.
Hip Bridges
I’m sure you’ve all done this one before, and for good reason! Hip bridges are an awesome bodyweight exercise that, when done correctly, will effectively target the muscles of the posterior chain — glutes, hamstrings, back, etc. Hip hinges require a strong posterior chain and this exercise is a great way to begin building that strength. If you have back issues you do want to be careful with this one. The tendency is to arch your back to get the hips up, but you want to avoid that and keep your spine neutral as you lift.
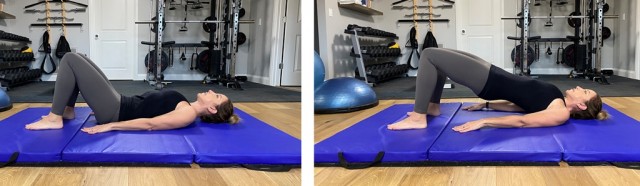
Lie face-up on the floor, with knees bent, feet flat around shoulder width, and hands by your sides with palms down. Pushing mainly with your heels, very slowly lift your hips off the ground. Don’t worry about getting major height here, instead, go as high as you can before you feel your back start to lose its neutral position and begin arching. Squeezing your glutes tightly, hold for three seconds at the top, and then lower back down to start. If there’s any pain, don’t do these.
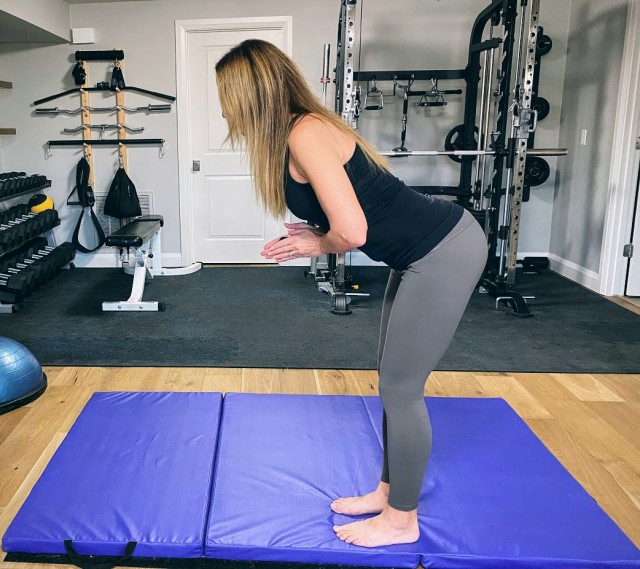
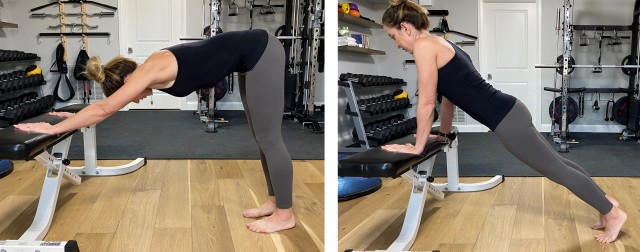
Assisted Hip Hinge:
And finally, we’re off the floor!!! This exercise modification is a great starter hip hinge. We’re actually the most vulnerable at the bottom of a hinge, when our hips are most flexed. So, by doing a hip hinge to a bench or chair, we’ve got support once we hit that vulnerable range. Beginners, you can even use something higher, like a counter. And, if necessary, you can use your hand a little to give you a little gentle push back up. The key here is to gauge any discomfort, and don’t hinge beyond any point of pain.
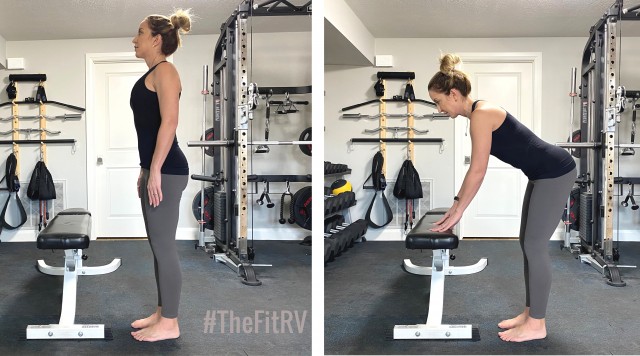
Stand tall with your feet hip- to shoulder-width apart, and your arms at your sides. Tense your thighs, glutes, and abs, and pull your shoulders back & down. Keeping your lower back naturally arched, push your hips backwards as you bend at the hips, and lower your torso towards the bench. Keep your knees “soft” so they have a slight bend. This will also help keep you from rounding your back. Keep your neck aligned with the rest of your spine, so as you lower your torso, your head should lower as well. Slowly raise back up by driving the hips forward to initiate the torso raising. Keep your core tight and your spine neutral on the way up as well.
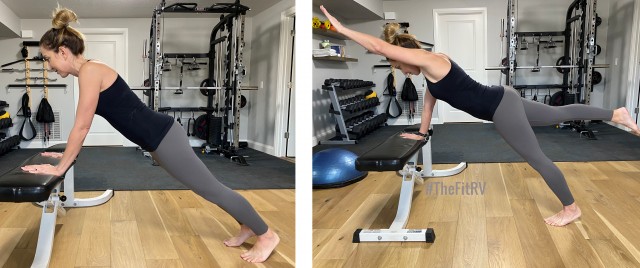
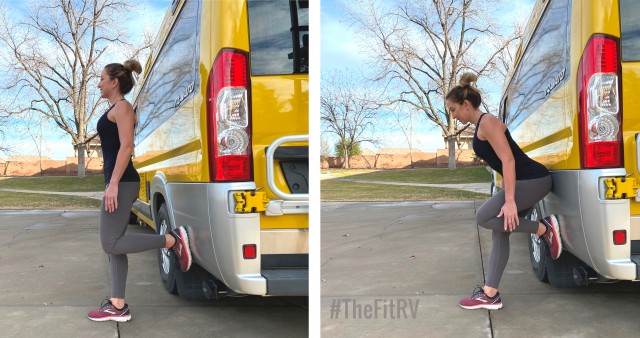
Assisted Single Leg Hip Hinge
The single leg hip hinge is pretty much just like the last exercise, only now we’re doing it on one leg (another unilateral exercise, YAYYY!). I really love how functional this exercise is. Think about how you unload the dishwasher. Are your feet aligned like the last exercise? NO! They’re likely more split with the majority of your weight on the front leg. And when I’m grabbing things off the floor, I oftentimes raise my back leg similar to this exercise:
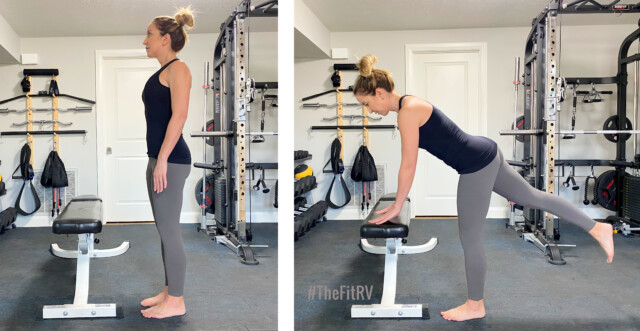
Stand tall with your feet hip-width apart, and your arms at your sides. Tense your thighs, glutes, and abs, and pull your shoulders back & down. Keeping your lower back naturally arched, push your hips backwards as you lift one leg behind you while simultaneously bending at the hips, and lowering your torso towards the bench. Keep your planted knee “soft”. Keep your neck aligned with the rest of your spine, and allow your head to lower with the movement. Don’t allow the hip of the raised leg to lift up to the ceiling, instead keep it aligned with planted hip. Slowly raise back up by driving the hips forward to initiate the torso raising and return you lifted leg back down to start. Complete all reps on the same side before switching legs.
Wall Bootie Touches
I like this one as a hip hinge training tool for two reasons. First, it’s another ‘assisted’ hip hinge, so it provides support at our most vulnerable point, when our hips are flexed, while still providing a stopping point like the ‘assisted hip hinge’ I demonstrated above, only this time the assist comes from the back where our glutes touch the wall. And second, this exercise teaches you to focus on the very important mechanic of driving your hips backwards. Really, that right there should be how all hip hinges are initiated, by first driving backwards, with the bend following that. That’s one of the things we commonly get wrong when bending, and where back injuries can happen.
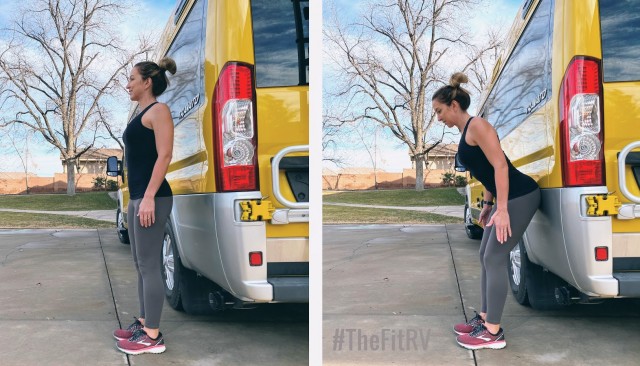
Stand tall with your back to a wall, and start around a foot away from the wall (you’ll adjust your feet after trying here first). With your feet hip-width apart, and your arms at your sides, tense your thighs, glutes, and abs, and pull your shoulders back & down. Keeping your lower back naturally arched, push your hips backwards until your buttocks make contact with the wall. Raise back up by driving your hips forward and lifting your torso.
Wall Single Leg RDL’s
And the grand finale!!! This is an awesome unilateral version of the previous exercise, and really challenges the glutes nicely. And actually on a personal note, this one’s in my current exercise cycle, only I do it holding 2 25lb dumbbells. But, for those of you retraining your hinge, start with no weights. Trust me, when done right these are hard enough as they are. Do these enough and you’ll be ready to hold dumbbells in no time.
Stand tall with your back to a wall and one foot against a wall. Be away from the wall enough so that your knees are pretty much aligned. Hinge at the hips by driving your hips backwards until your buttocks touch the wall. Straighten back up by driving your hips forward and contracting your glutes. The foot that’s on the wall is mostly there for support and balance, it’s not really assisting either the flexion or extension phase. You want the planted leg & hip doing most of the work. Do these slowly and focus on loading up the glutes. Make sure your spine stays neutral.
AND THAT’S IT!!!!
Do these exercises a couple of times a week for about a month.
I usually recommend doing each exercise for 10-15 reps and for 3 sets. You don’t have to do all exercises in the same workout, just mix them in with your regular workouts. If everything’s feeling good after consistently training for a month, then you’re ready to progress to some more intermediate hip hinge movements: weighted deadlifts, good mornings, kettlebell swings, and things like that. I’ll be sharing those in a future section of my Functional Fitness series, so stay tuned!
But if you really want to rock your hips, that’s not all!!!
Besides strengthening, you also want to work on increasing your range of motion in your hip hinge. So I’m talking stretches here. You want to target both your hip flexors and your hamstrings. One of my favorite hip flexors stretches is the Lunging Hip Flexor Stretch, and you can’t go wrong with the Lying Hamstrings Stretch especially since it forces you to keep your back neutral… no accidentally over-rounding your back. Win win!
Master the hip hinge with proper form before it’s too late!
Once you train it enough, you’ll eventually start using it automatically in your daily activities instead of rounding your back and over-stressing your lumbar spine. Improved hinging form, strength, and range of motion will help you avoid chronic flare-ups, lower back tightness, and full-on back injuries. So, it’s a preventative thing, you taking care of future you.
Phew, that’s all I’ve got for now! Let me know your questions, comments, or just feel free to continue the conversation down below!
Stay strong gang, you’re so worth this stuff. Also hey, I think it’s awesome you’re interested enough about improving your hip hinge that you actually read this far down. I’m so proud of you for your commitment! I think you are amazing. I hope you do, too.
Love,
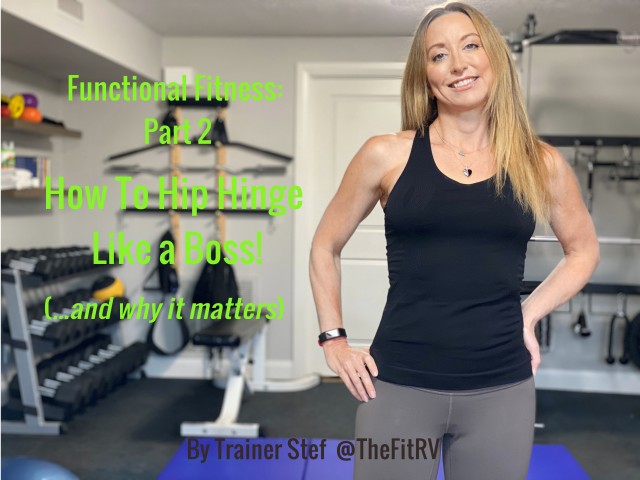
Trainer Stef


Thanks Stef. This post is great!
Glad you like it!
Shout out for air bridge (sitting on an invisible chair with your back against the wall)! Killer for quad and glute strength that fades so quickly. May not be precisely a hip HINGE exercise though…
It’s a great exercise indeed!!!
Great article…bookmarking it! I’m training for my second marathon right now and found (during the first) that my hips were my weakest point. I’ll definitely have to work these exercises into my routine!
Awesome, Bryan! Best of luck on your marathon training! Make sure you’re focusing on unilateral hip strengthening exercises to optimize your marathon performance!