This post may contain affiliate links.
AUTHOR’S NOTE: This is part 4 of my Functional Fitness Training series. If you’re just jumping in, begin with PART 1 HERE!
The oldest person I ever trained was 99 years young. He was only 96 when we started working together, and we didn’t stop until just before his hundredth birthday when he decided to break my heart and move out of state to live with his son. I remember those years fondly. Every Monday, Wednesday, and Friday, I’d finish up training my morning clients at the gym, then after a stop at Starbucks I’d head to his apartment with my bag of exercise equipment in tow. Man, do I miss that witty (and cranky) old fart. I learned so much about training seniors (and about debating politics!!!) thanks to him.
Three years of that, and you can bet I knew ‘Jon’ and his abilities well. He could impressively squat and hip hinge like someone 20 years younger, and he could push and pull as well as someone even younger than that. Of the main functional movement patterns, Jon’s biggest weakness was ‘locomotion’.
What is Locomotion and Why Do I Need To Train It?
Locomotion, when it comes to the human body, means moving from one place to another. Things like walking, jogging, backing up, moving around obstacles… really, it’s THE movement pattern that the human body is most specifically designed to perform. And while locomoting does take some general strength, it involves so much more than just strength. We also need to have sufficient dynamic balance, control of our joint mobility/stability, and the ability to adapt & adjust our movements to the environment. Strength wasn’t the issue for Jon, it was all these other things.
Struggling with gait and locomotion is a common aging problem, and a great reason we should be doing exercises to target locomotion efficiency while we’re still ‘young’. Besides that, doing locomotion-building exercises also makes us move more efficiently and require less effort to get around. Even better, locomotion training means we’ll be less prone to injuries and accidents.
Here’s the thing with our bodies. They’re dumb and lazy. They will always try to find the easiest and least painful way to do whatever task you’re trying to do. So an example, if one of the muscle groups in your core is super weak, your body will change positions and find other stronger muscles to get the job done. That actually is a pretty cool thing, since it means no matter what happens, it will find a way. Like when we’re in pain, the body will adjust so we move with less pain. But when it starts compensating too long over too much time, that’s when problems set in. New gait patterns, tight hips, spinal deformities… hello injuries! So, training your locomotion patterns strengthens your weak areas, stretches your tight areas, stabilizes your unstable joints, improves your posture, and keeps everything in tip top shape so your dumb and lazy body won’t do any weird compensations that could eventually wreak havoc.
THINK ABOUT IT! Walking Is Really Just Controlled Falling
When we walk, we take a step forward and then shift our hips forward in an upside-down pendulum movement. The only thing stopping us from falling forward is our other foot planting down, which starts the whole process over again on the other side. This is how the body is designed to work, so as long as we stay healthy and uninjured, we do these controlled falls a gajillion times over our lifespans without any thought. But with age and with our sedentary lifestyles, we get less and less efficient at it. It’s another one of those sneaky things we can start losing and not even realize it until things have gotten really bad.
At Locomotion’s Core Is Your Core
Walking and all other types of locomotion have a few things in common. They require us to stabilize our core while our legs and arms move in opposition. Moving our limbs contralaterally requires some rotation in the thoracic region of our spine but also requires our muscles to stabilize and resist the limb movement so there isn’t excessive spine rotation.
So, when we’re choosing exercises to make us more efficient at locomotion, it’s important that core stabilization tasks are at the top of the to do list. Hey, wouldn’t you know it! I’ve got core stabilization tasks at the top of this list down below!
Locomotion Training, Here We Go!
The following exercises are all designed to improve your locomotion movement patterns, and as always, I’ve given options for beginners and seniors. Make sure to include locomotion training in your regular workout plans on the regular! And besides that, don’t neglect your cardio time. Bike rides, power walks, jogs, swimming… it all comes back to the Principle of Specificity. Doing the actual locomotion activities themselves will contribute to improving your locomotion efficiency. I can’t say it enough:
USE IT OR LOSE IT.
USE IT OR LOSE IT.
USE IT OR LOSE IT.
Okay, that’s probably enough. Let’s get to the exercises, shall we?
Exercises To Train Locomotion Movement Patterns
(Besides the obvious exercises like the locomotion patterns themselves: walking, jogging, swimming, biking, etc. So yeah do those, too.)
Bird-Dogs
Bird-dogs are pretty much a staple when it comes to core and spinal stabilization exercises. The main muscle target of the bird-dog exercise is the erector spinae muscle, which is a long muscle that runs the entire length of your spine. It’s the first line of protection when it comes to stabilizing your spine and a key player in our ability to locomote efficiently. I especially love bird-dogs in how they mimic the crawling movement pattern. Crawling involves opposite arm and leg movement, which happen outward from a stabilized core. So you’ve got the contralateral thing happening AND the erector spinae training happening AND core stabilization in general, which all come together to make this a fabulous exercise for building locomotion efficiency.
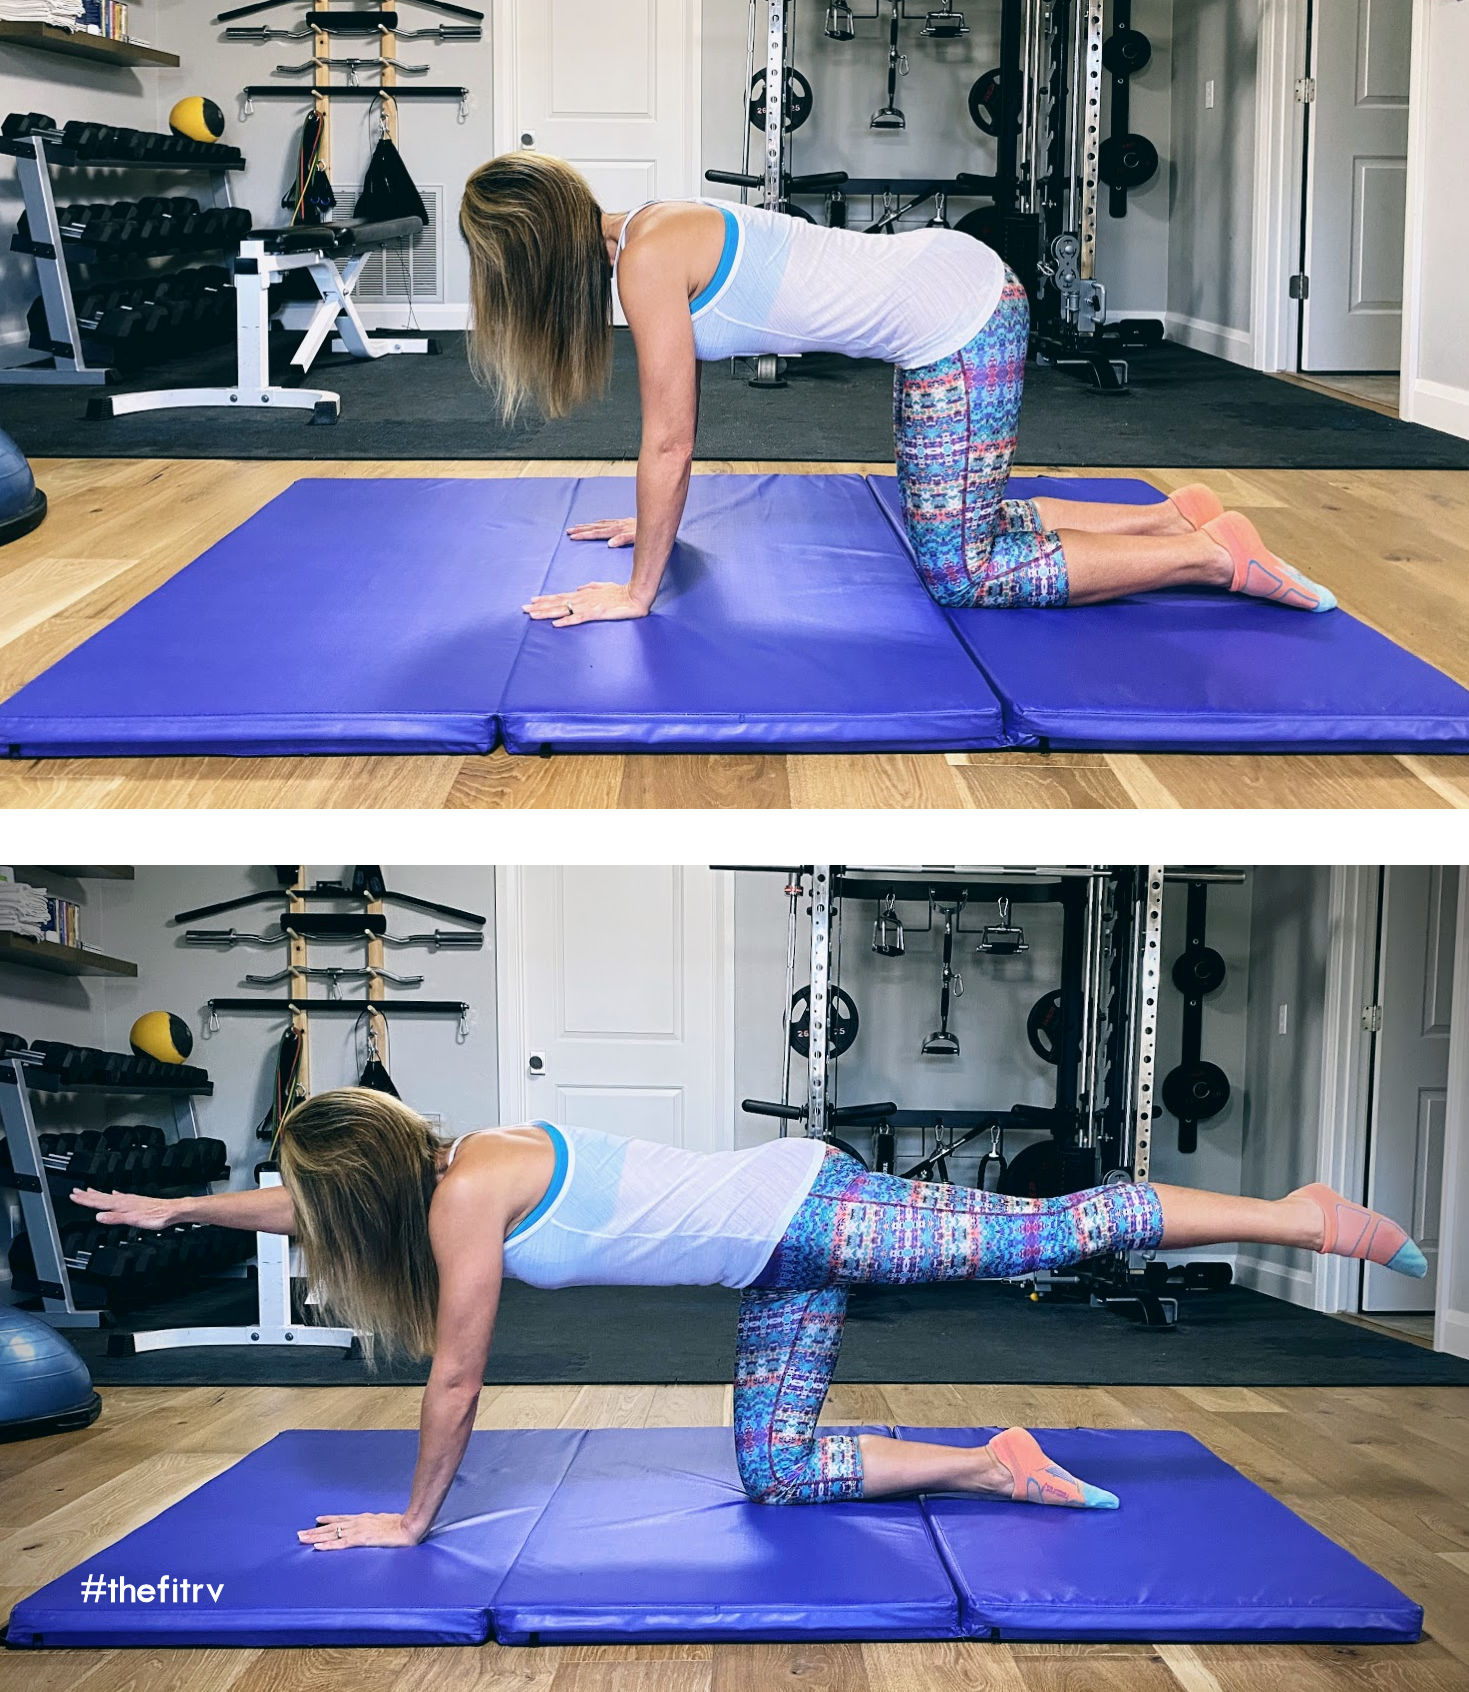
Get on all 4’s with your hands directly under your shoulders and your knees below your hips. Slowly and with control, raise your opposite arm and leg straight out, keeping your spine neutral, core braced tightly, and your whole body in one straight line from head to foot. Your goal is to resist rotation and extension forces that will attempt to destabilize your spine, so focus on holding your spine still and not allowing any of the rotation to happen (so don’t lift one shoulder higher than the other or one hip higher). Slowly return back to all 4’s, and then repeat on the other side.
Too Intense? If it’s difficult to maintain control lifting both your arm and leg simultaneously, start by lifting just one limb at a time.
Dead-Bugs
Without training, most people struggle with being able to move their hips without engaging their lower back muscles, or even raising their arms overhead without sticking their ribs out or arching their backs. The Dead Bug exercise fixes these deficiencies by training you to isolate movement at the hips and shoulders without moving your spine. In other words, and I’m quite possibly about to start sounding like a broken record, this exercise requires you to stabilize your core while working your arms and legs contralaterally. Exercises that promote efficient locomotion are going to have that in common… core stabilization during limb movement. Pretty much any exercise that requires those two things is going to help you be a rock star locomoteur. (It’s French! Look at me, I’m worldly!)
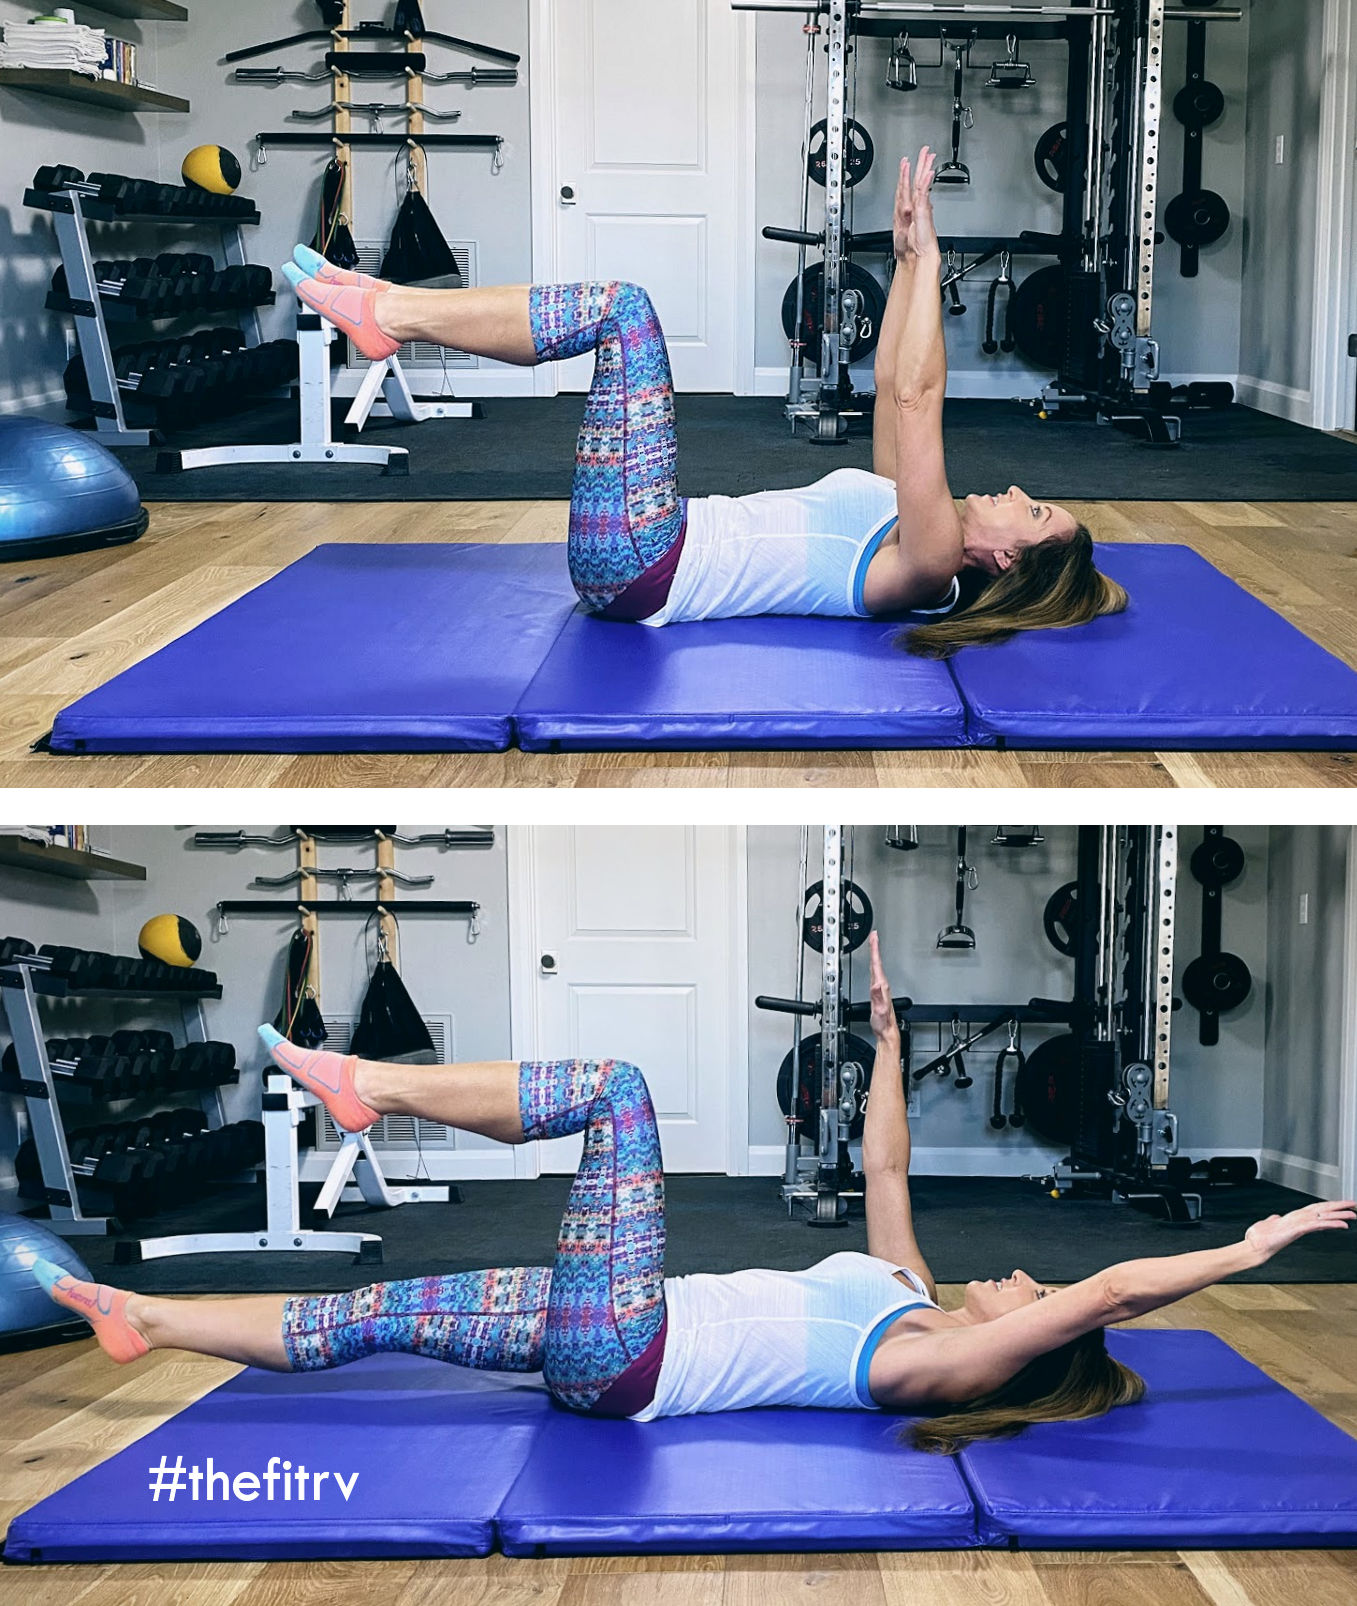
Lie on the floor with your arms and legs in the air, knees bent 90 degrees. Tighten your core and press your lower back into the floor. Keep holding your core tightly braced throughout the whole movement. Take a deep breath in, and then as you exhale, slowly and simultaneously lower your right leg and your left arm until they both nearly touch the floor… WITHOUT letting your back arch at all during the move. Pause, then return to start and repeat on the opposite side.
TOO INTENSE? You can modify these by not lowering your leg so far when you extend it. The higher you extend, the easier it’ll be.
Bicycle Crunches
In an ACE Fitness study done back in 2001, bicycles ranked as the #1 most effective abs exercise there is. That’s great and all, but the trouble is there’s so much going on with this move that it’s easy to totally botch it. A common flub is speed. Pumping these out as fast as you can makes you vulnerable to injuring something. They should be done slowly. And boy if I had a dollar for every time I’ve seen someone at the gym cranking on their neck! Put your hands to the sides of your head, and only lightly touch it. Even though I’m leery of assigning these to beginners, I’m putting these in here because when done right, these are fabulous. When doing bicycles, your core is once again leading the show, as its being tasked with controlling the hip flexion/extension and the ever-so-slight spinal rotation. Unlike the other 2 exercises above where you’re completely stabilizing your spine, with bicycles you are rotating it a little, and that’s okay! When we walk, our spine rotates a little, too. Bicycles train you in rotary stability while allowing just a titch of that rotation to occur. It’s a fine balance, and something we need to be building. Just please, do these safely!
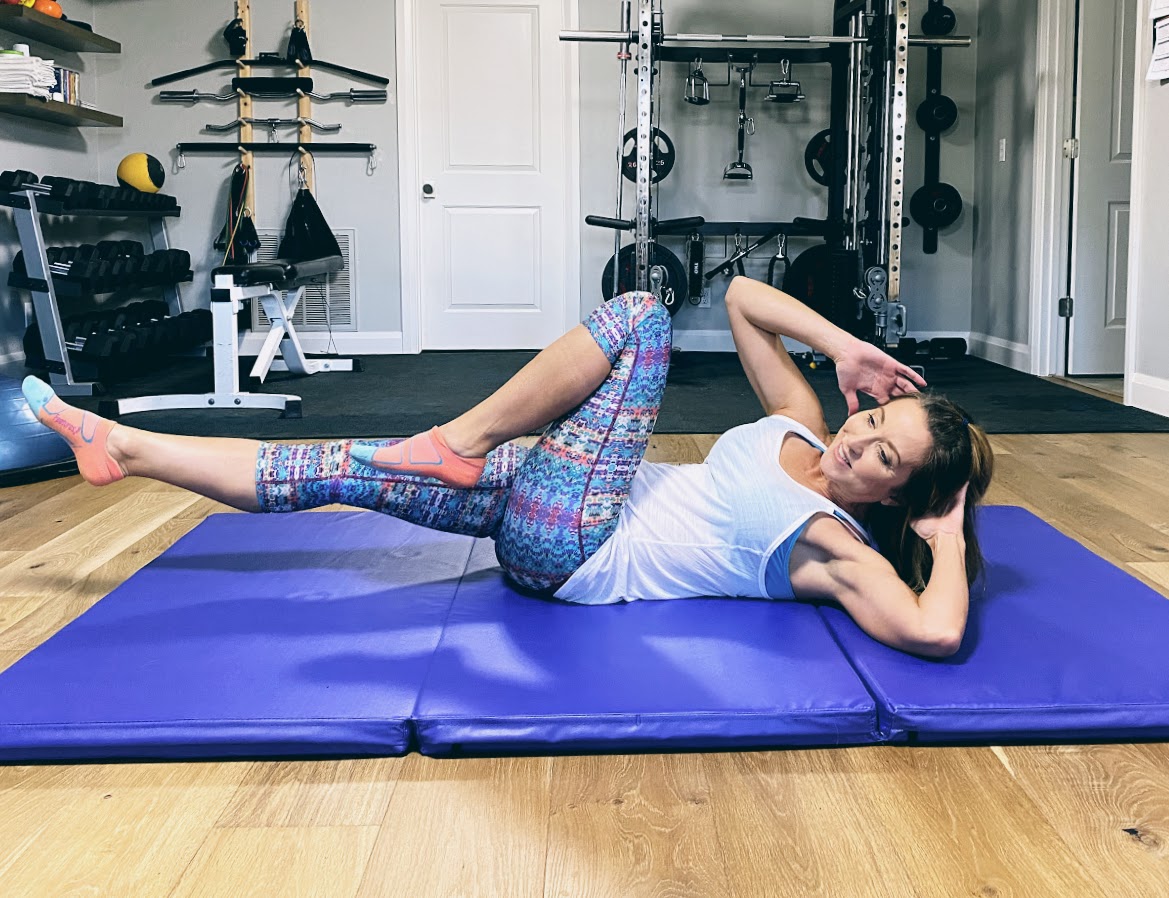
Lie face up on the floor and place your hands to the sides of your head, lightly touching it with your fingers. Tighten your core. Lift your shoulder blades off the ground. Straighten your left leg out to about a 45-degree angle to the ground while slowly turning your upper body just a little to the left (not too much), bringing your right elbow towards the left knee (but don’t force them to touch). Now switch sides and do the same motion on the other side to complete one rep.
TOO INTENSE? Start by lying on your back with your knees bent and your feet flat on the ground and your head down. Practice holding your core tightly while lifting one knee, and then the other… all without letting your spine change its shape from neutral alignment.
Side-Plank Thread the Needles
Okay, true. There’s no hip flexion/extension happening here like in typical locomotion-building exercises. So let me explain. Thread the Needles correct a common muscle imbalance, which is our over-reliance on our hip flexors and our superficial stomach muscles for support, including when we’re walking or doing any sort of locomotion. We don’t use our lateral muscles much in daily life, so doing any sort of side-plank helps teach our brains how to more effectively engage the muscles along our sides. The rotation required specifically in the Thread the Needles version promotes spinal integrity, which ultimately does translate to better posture when you’re walking or doing any other sort of locomotion pattern in your normal daily life.
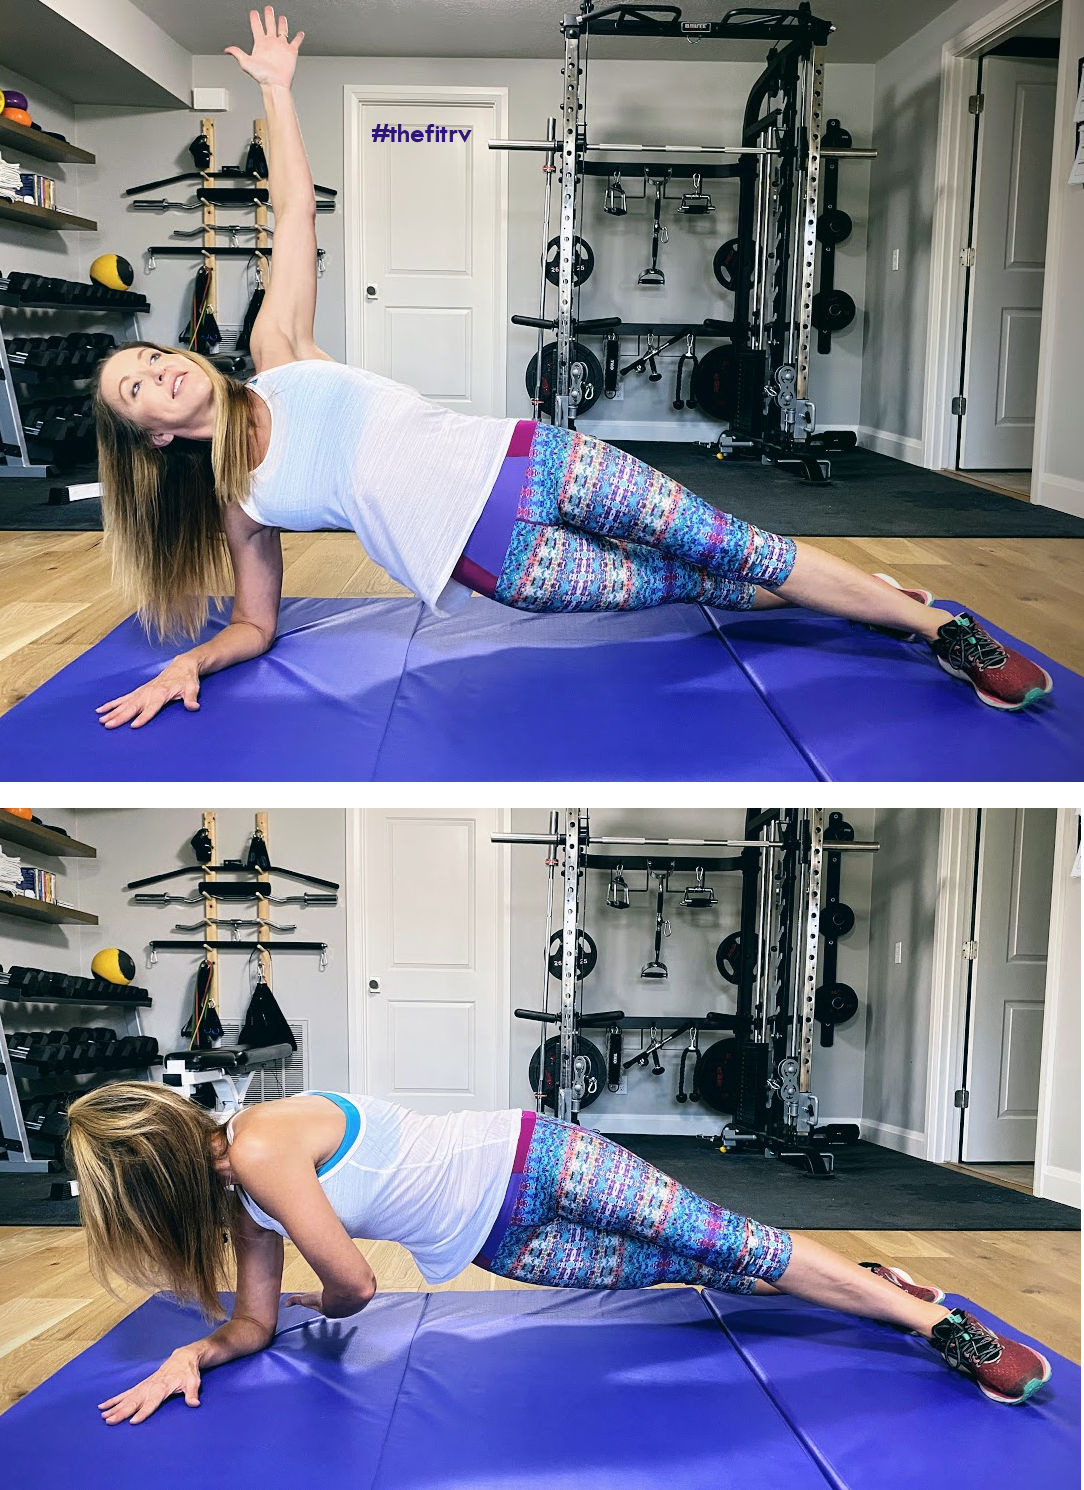
Begin in a traditional side elbow plank with your top foot in front of the other, and your body in one straight line from your heels to your hips to your shoulders. Reach your top arm down and under your ribs (as if you’re threading a needle through that open space), followed by rotating this arm open towards the ceiling. Move controlled and slowly.
TOO INTENSE? One option is to do these against a wall. Same technique, only you’re upright with your elbow braced on a wall. A second option is to do these in a modified side plank position, with your knees down instead of fully planked on your feet.
High Knee Marches (with arm crunch)
There are various things that can go wrong when we walk incorrectly, and the High Knee March exercise can address one of those common problems… the foot strike. If your foot isn’t interacting with the ground correctly for whatever reason, it can set off a problem-causing domino effect. Marches require us to grab the ground fully and create stability with each step before moving on to the next. This is great for retraining our foot strike and ensuring we’re stepping more efficiently.
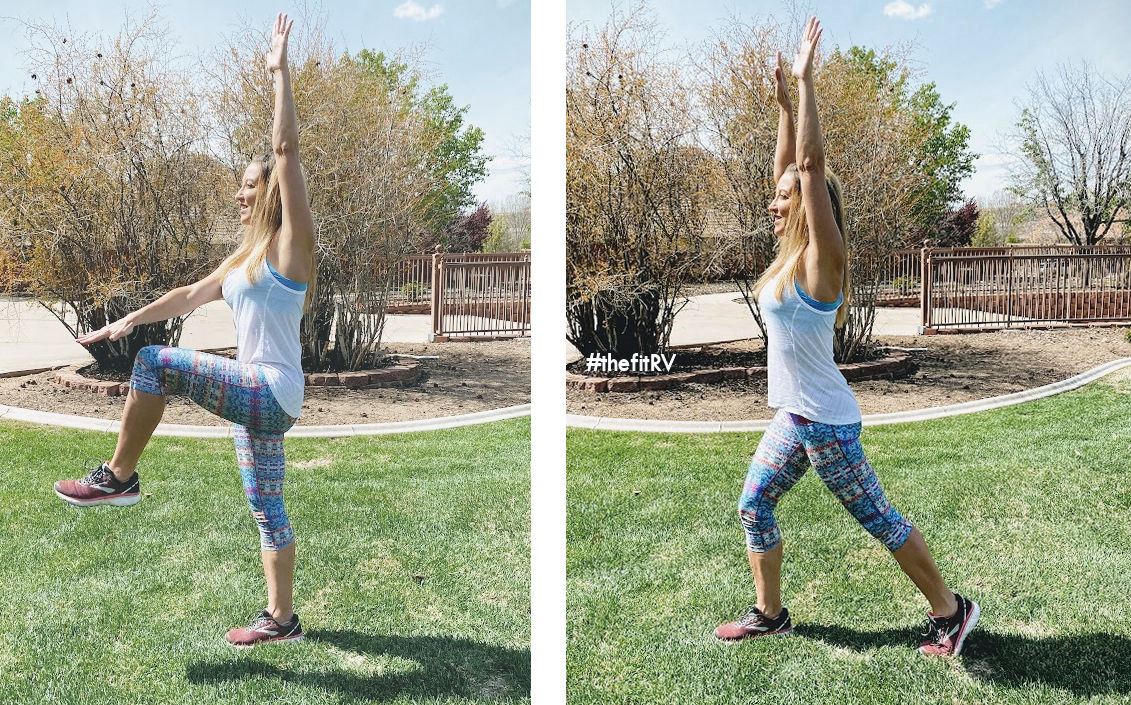
Begin standing with good posture and an upright spine, with both arms raised up to the sky. Simultaneously (and slowly) lift your left knee and lower your right arm until the two touch. Set the left leg down on the ground in front of you while at the same time raise your right arm back up to the sky, and then repeat the move on the right leg. Continue making very slow forward marching progress as you bring your opposite arm down to meet whichever knee is lifting.
TOO INTENSE? Modify these by holding on to a wall as you go. Only do the arm motion on your free hand. Once you’ve gone the length of the wall, turn around and repeat the arm motion on the other side.
Bear Crawls
There’s a whole lotta good going on with the bear crawl. Since you’re down on all 4’s, you’ve got gravitational forces working in different, unfamiliar directions. One interesting difference between crawling and typical walking is how the requirements of spinal stability and mobility get reversed. Remember how I mentioned when we walk we need mobility in our thoracic spine while the rest stays pretty stable? In crawling, it’s the opposite, you want your thoracic region more stable while the lumbar region and sacrum have the mobility so you can move in the flexed hip position. That whole juxtaposition gives the body quite an interesting challenge, making these super popular in functional training and one you should be doing, too.
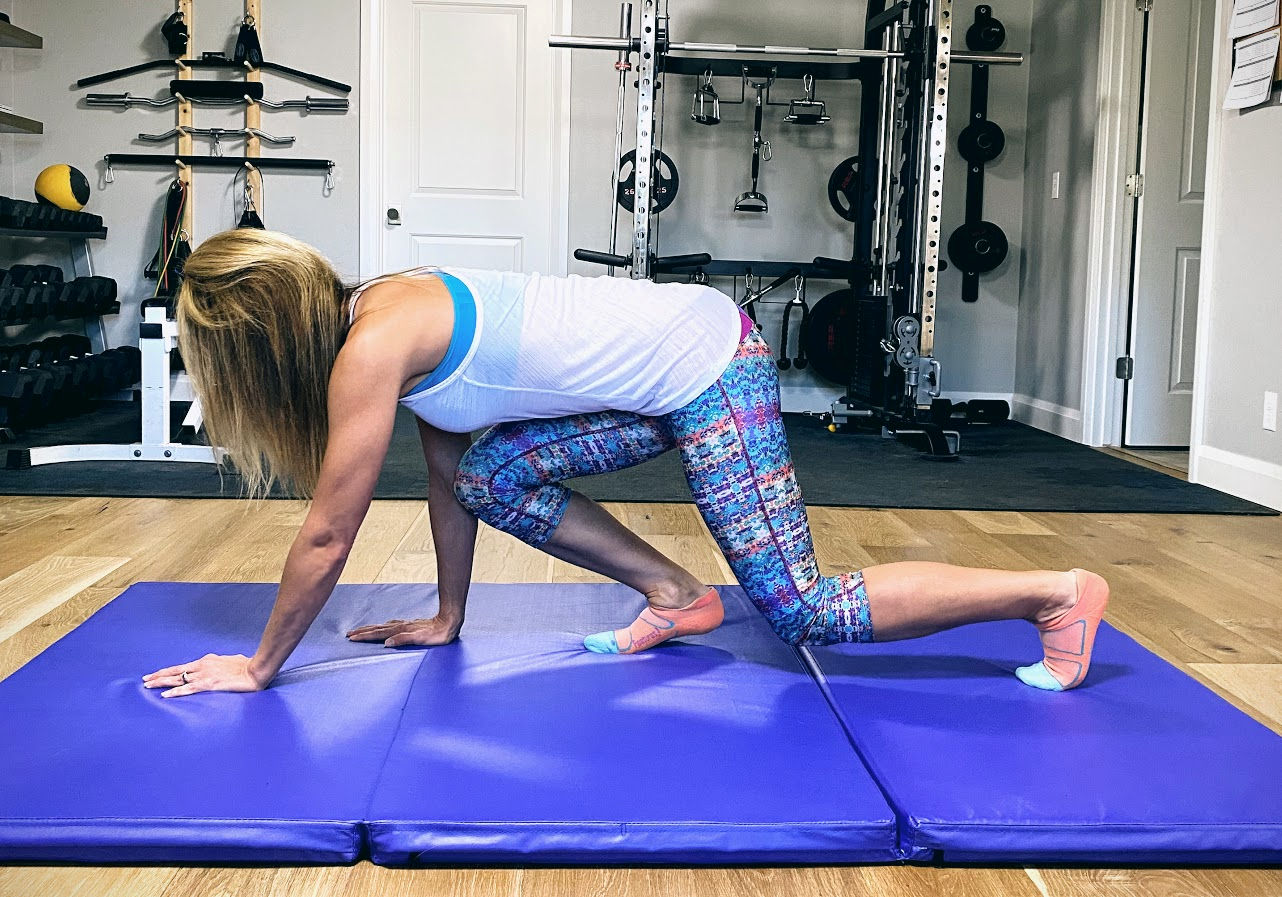
Try to find a long stretch where you can crawl uninterrupted 30 feet or more. Start on your hands and feet with your knees bent and super close to the ground, but not touching the ground. Move the left hand and the right leg forward to start crawling. Alternate the arm and leg movements while keeping your back straight and your hips and shoulders at the same height. Keep your core tight and do these very slowly. Biggest mistake made is sticking the hips super high up in the air… don’t be that person. Think of keeping your spine close to parallel to the floor. Once you’ve gone forwards, try going backwards for a super fun and totally challenging brain tease.
TOO INTENSE? Get on your bed on your hands and knees. Practice crawling a few steps on your hands and knees going forward and back.
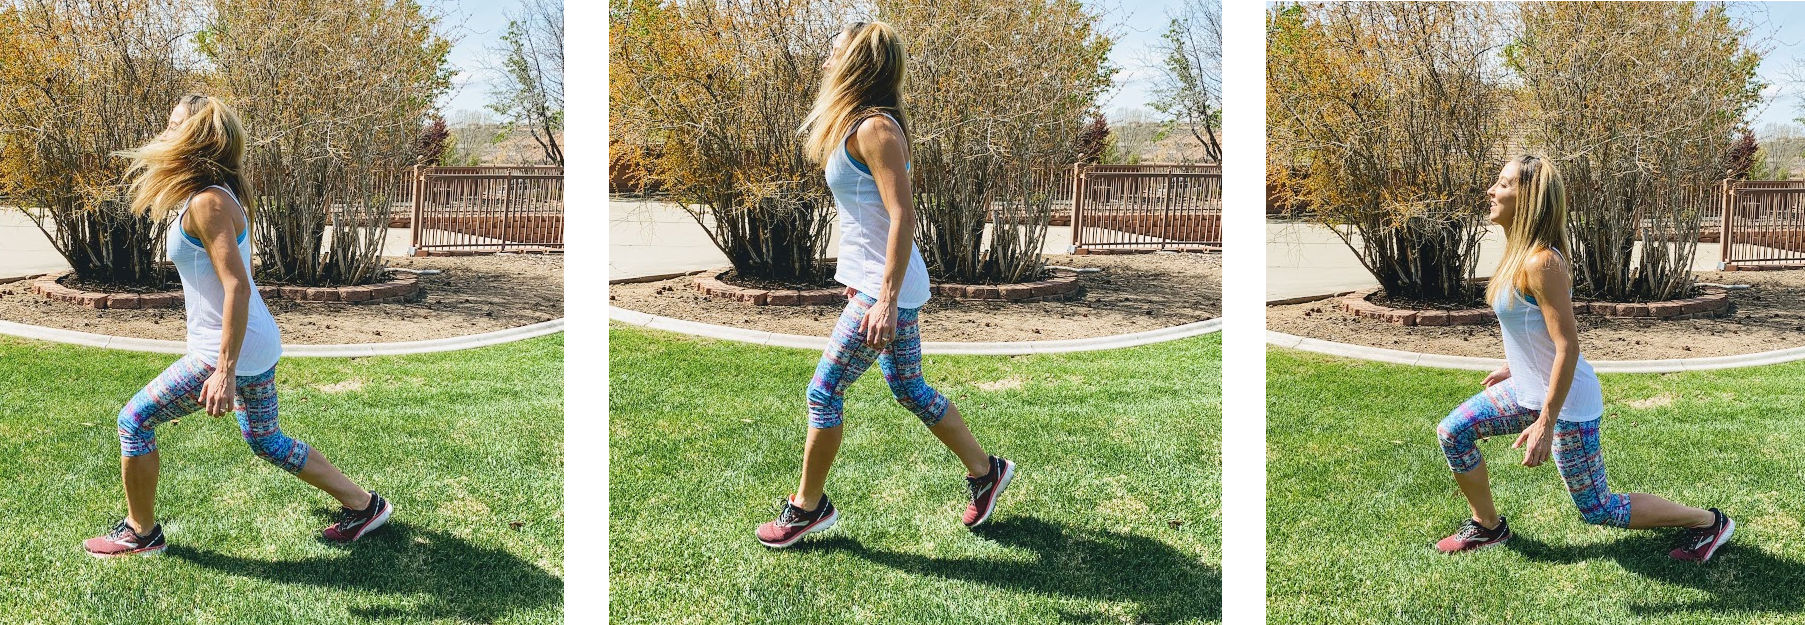
Robot Lunge-Walks
A client of mine named these many years ago, and I got such a kick out of it I’ve stuck to it. Any sort of lunge-walking challenges the core to maintain stability in a split stance (super important for locomotion), but this Robot version takes that a step further. It requires some trunk rotation with each lunge, making it even more challenging on your balance and stability. That rotation means you’ll be working your mobility in your thoracic region. Training our spines to have some healthy mobility where we need it is so very critical when it comes to how we locomote.
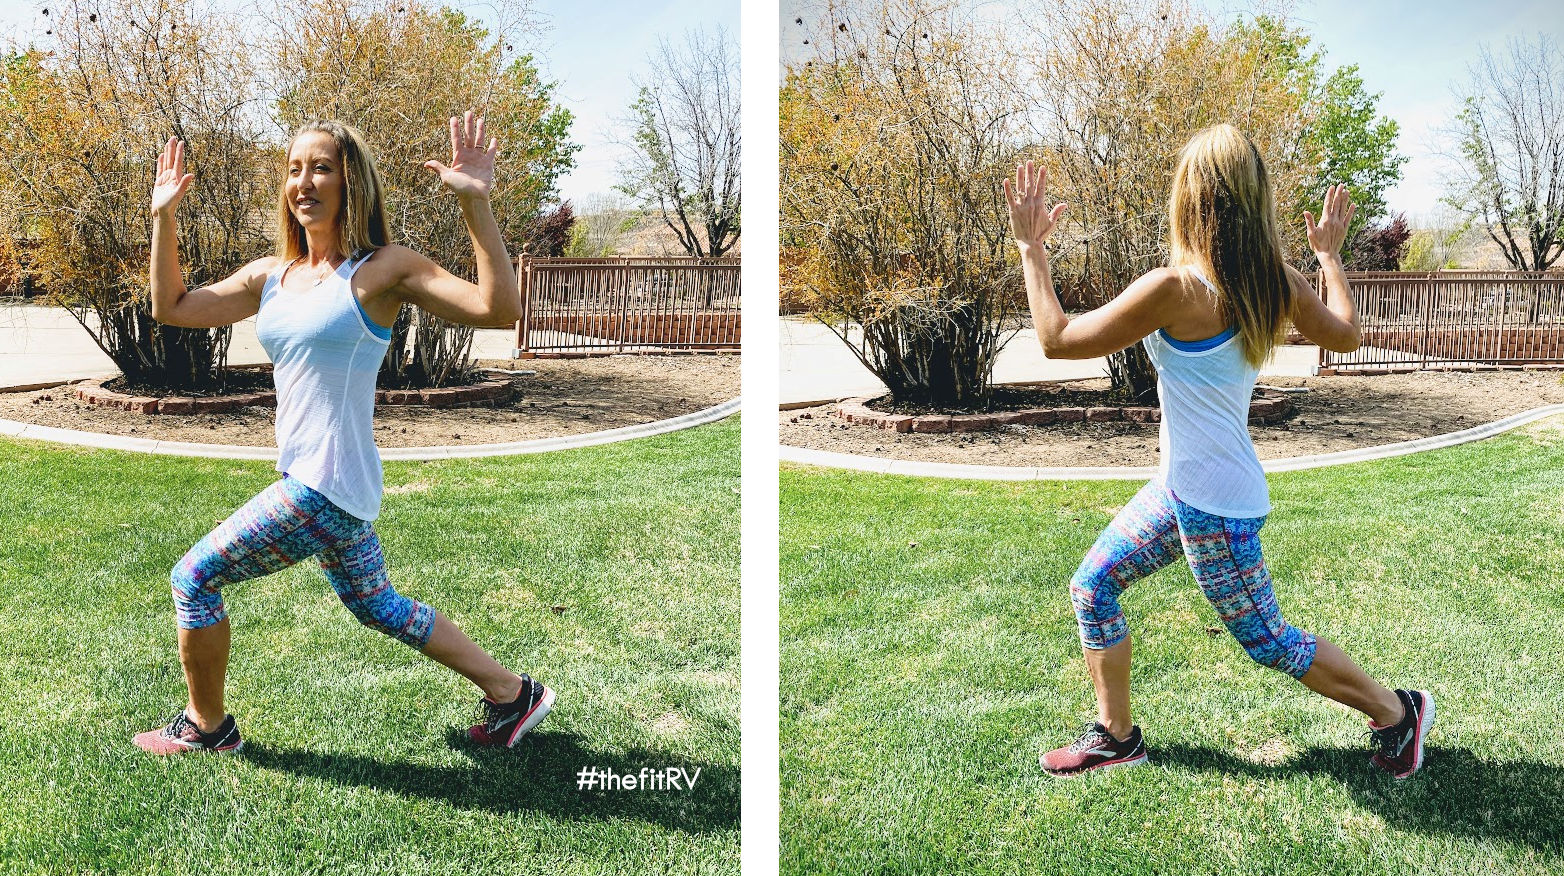
Stand up straight with good posture and your feet hip-width apart, arms are negotiable but I usually have trainees either hold them straight out to sides or out with bent elbows. Engage your abs and step forward with your right leg putting your weight into your heel. As your right foot hits the floor and stabilizes, bend the right knee to lower into a lunge while simultaneously and slowly rotating your torso to the right (just a slight rotation, not too much). Rotate back to center and start to lunge forward with your left leg, this time rotating your torso to the left. Continue lunge-walking forward and rotating over the lunging leg. Make sure your torso remains upright and you’re not leaning forward.
TOO INTENSE? Hold on to a wall, take shorter steps, and take out the trunk rotation.
Preparatory Plyometric Exercises: Split Jumps (just one example)
Plyometrics is just a broad term for any sort of jumping exercise. They’re mostly popular for increasing muscular power, but here’s why they’re so important to locomotion training. Plyometrics use a stretch-shortening cycle that begins with an eccentric movement (lengthening the muscle under tension) followed by a concentric movement (shortening the muscle under tension.) Think about how you prep for a jump. You bend your knees and slightly squat. That’s where you’re eccentrically loading the muscles. When you’re walking fast or running, you’re also using a stretch-shortening cycle. That’s what gives you the force to transition from one foot to the other. This is why plyometrics training can make a huge difference in improved walking and running efficiency—you are training your stretch-shortening cycle, the thing that propels you forward. Now, if you’re a newbie you don’t want to go crazy jumping right into advanced jumps. Start with simpler jumps and build yourself up.
In the picture, I’m doing split jumps, but that’s just one of a bajillion options for you…. like jump-roping, skipping, jumping jacks, gentle jumps in place, etc. Plyometrics are such a great anti-aging tool! As long as you’re generally healthy and medically cleared, I encourage you to make them a regular part of your workout routines no matter your age.
Stand with good posture in a split stance, one foot in front of the other with your knees bent. Lower the back knee slightly to help propel you upwards into a jump. Prepare to switch your feet while in the air by bringing your front foot back and your back foot forward so that you’ll land with feet in opposite positions. Continue repeating the same jumping pattern, switching your feet in the air. Work on landing softly and with control.
TOO INTENSE? Hold on to a counter or rail while you’re facing it. Start by doing calf raises as quick as you can, using the counter to assist in raising up higher. When you feel ready, try turning the calf raises into small jumps, using the counter as an assist propel you up. Make sure you land softly with bent knees.
AND THAT’S IT!!!!
Do these exercises a couple of times a week for about a month. After that, continue to incorporate them regularly into your weekly workout plans.
Do each exercise around 10-15 reps for 3 sets. If everything’s feeling good after consistently training for a month, then you’re ready to add in some harder locomotion-building exercises… things like farmer’s carries, box jumps, weighted lunge-walks, etc.
Make Locomotion-Building Exercises A Priority!
With regular training, you’ll get around more efficiently, it’ll take less effort, and you’ll be less prone to injuries. SOUNDS AWESOME, RIGHT?!?
Phew! Lots of info here to process, but great job sticking with it! Let me know your questions, comments, or just feel free to continue the conversation down below!
Stay strong gang! You, and Future You, are so worth it!
Love,
Trainer Stef ——>


I’d love for these exercises on YouTube video. I think it be more motivating for me.
Thanks for the feedback, I was kicking that idea around myself! Will come update the article if I ever do. Be well!
Stef –
Thank you for explaining the WHY behind the HOW of these exercises. My local sports training gym uses these same movements (plus more) under different names, but I’ve never know more than the vaguest rationales for them, other than “we’re working on the hips and lower spine today” and the fact that they work amazingly well. I never did bear crawls before I broke a hip…afterwards, a bunch of these exercises cured my persistent weak knees as well. Shows how much we compensate if we mono-exercise rather than mix it up, and how much weakess in one area leads to pain in a seemingly unrelated part of the body.
Oh good! I was hoping the explanations would be useful! Even though this got really long I left it that way for that very reason… this isn’t the first time seeing these exercises, but for many, it may be the first time hearing the WHY behind them! xo