This post may contain affiliate links.
Indoor bike storage while RVing has always been our Holy Grail feature, and it’s one of the main reasons we instantly jumped into an EKKO when they first came out. We’ve tried a number of approaches in the past, from blocking our sliding door in Das Bus, to giving up the under-bed storage in Lance, to finally resorting to a small trailer. But none of them compare in ease and convenience to the EKKO’s gear garage. And now – FINALLY – I’ve got it tricked out to suit our cycling habit. Have a look!
The video pretty much says it all, but a couple things bear repeating here. First and foremost, that garage is for bikes. There may be a few other things in it, but they’re all secondary to the bike storage. It looks pretty sparse in there, because it is. I didn’t want to store a whole bunch of crap in there that might get in the way of the bikes, fall on the bikes, or in any way be a DIS-incentive to going for a bike ride. So could I get more stuff in there? Absolutely. But we’re just not going to.
And a word about weight here. I weigh our RV obsessively, before every trip. Depending on how long we’re going out, and how much stuff we’re bringing along, our surplus cargo capacity ranges from a few hundred pounds to “not much”. Bear in mind, we don’t have a generator, a patio awning, or a batwing awning, and Stef and I together might weigh 300 pounds on a bad day. Now sure, I’ve made some mods, but I’ve also removed some bits of metal support structure, the spare tire, and 114 pounds of dinette seats. I guess my point is: if you haven’t weighed your rig, do so before you head out on your next trip – loaded with all the people food and gear, and water (which can be a lot in an EKKO) you’re going to take. Weighing your RV is easy enough to do that Stef did it in an evening dress. The results may surprise you.
What’s In The Garage
This is probably what you’re here for, so let’s get to it. (Some may be affiliate links.) For those links to Organized Obie products, don’t forget to use the discount code THEFITRV for 5% off!
Aluminum Channel – I got this in 5 foot lengths from Online Metals. Like I said in the video, putting the back wheels in a channel means that once you get the wheel in there, you can just shove the bike the rest of the way in and the channel takes care of the placement.
1/4″ Aluminum Bar – I purchased this from Online Metals as well. The rounded over edges make it easy to handle, and it’s thick enough that it doesn’t bend much at all while underway. You’ll need 24″ to get between the EKKO floor tracks.
L-Track Bolts – These are the bolts I got to secure things to the L-Track. Both below and above.
L-Track Rings – With all the stuff I’ve got secured to the L-Track, I needed some extra rings for securing items. These are they.
Traditional Fork Mount – This is the fork mount I have holding my bike down. (Confession – I filed the lawyer lips off my fork to make the quick release, you know… quick.)
Unaka Gear Co. Through Axle Mount – This is the mount I have holding Stef’s bike down. Another Confession: I absolutely HATE through axles on road bikes. Worst. Invention. Ever. Besides not even being actual axles (they’re just there to provide tension to keep the real axle in place), they completely destroy a hundred years of making bikes more convenient to add a supposed “benefit” I don’t need because I’m not an idiot who can’t secure my front wheel. Great. I shouldn’t have even gotten started on this because now I’ll just be mad the rest of the day.
Strap Things I Made to Hold The Wheels – You can’t buy these, you’ll have to make them. It’s pretty quick though. All you need is some nylon strap, and some swivel hooks. And you have to know how to sew, obviously. I won’t try to give you exact dimensions or anything, because I just pinned them to length in place. Plus, nobody needs to take sewing instructions from me.
Organized Obie 10×20 Stretch Net Organizer – We have three of these in the gear garage now, and as soon as I can get those blocks out of the way, we’re going to have 4.
Rigid SNADs – The stretch nets are held up with SNADs. You want the rigid ones, because in my experience, they hold better. The only problem with the rigid SNADs is that you can’t get them to stick to a curved surface.
Organized Obie 4×9 Plastic Framed Net – This is the small net on my side of the garage, that holds my lights and Garmin computer.
Organized Obie 8×16 Plastic Framed Net – This is the larger net we have on Stef’s side of the garage.
Flat-ish Multi USB Device Charger – The three devices on my side of the garage are plugged into one of these so they can all charge at once.
Organized Obie 30×24 Gear Net – We had this net in our small trailer. So it was easy for me to just take it out and put it in the garage. It fits perfectly on that spot of wall between the doors.
Organized Obie EZ-Net – Get them while you can! The prices on these are crazy cheap, which makes me think they might be discontinuing them? The loops at the four corners work great for mounting to the L-Track with carabiners.
Nite Ize S-Biner – These are the carabiners I have holding the corners of the EZ-Net to the L-Track rings.
ALPS Mountaineering Table – We have two of these tables (in case we want more table space). They fit on the “shelf” in the garage and stay put without any additional fastening.
GCI Outdoor Pico Directors Chairs – These are the amazing chairs you see me storing on the ceiling in the video. We love them!
Vinyl Fence Post – I know some joker is going to ask me which vinyl fence post I used. Well, it’s this one. I think. I just went down to Lowe’s and picked one up. But it really doesn’t matter what fence post you use – just get one that fits!
Camco RV Equipment Storage Bags – I have two of these bags with our electrical and fresh water supplies in them. So far so good!
The Topeak Mega Morph Bicycle Pump – This is the best bicycle pump ever made for RV travel. But good luck finding one! It’s great because basically, all you have to store is just a stick. I haven’t seen one for sale for years. So if you do find one for sale, leave a comment and let me know the link, because I want to buy like, 5 more, in case mine ever dies.
The Broom Holder Holding the Pump – This isn’t exactly what I have, because that just came from my spare parts. But these command holders are pretty darn close.
Adjustable Bungee Cords – I like these adjustable bungee cords, because you never know exactly how long of a bungee you’re going to need. Why aren’t ALL bungee cords adjustable, anyway?
Mel’s Cat Carrier – I know someone is going to ask me about it, so here it is. This is the hard-sided, collapsible cat carrier we have for Mel. Mel hates soft-sided carriers, but he took to this one right away and genuinely seems to like it.
I think that just about covers it. If I forgot something, let me know. Cheers!


Cool Mods! Curious what campground you filmed this at? Thanks,
I believe that’s Sand Hollow State Park in southern Utah.
7:35 – The vinyl fence post hack for ceiling chair storage in your RV garage is genius! I would have never conceptualized that. A very clever hack, James. Love what you did to this garage space. Its so functional and lightweight. Love the Obie wall storage with the SNADS as well. Bravo!
I’m wondering why you guys have a stiff cat carrier when a mesh foldable one would take up less space. Love the hose mesh bags, very organized.
Mel actually HATES fabric and mesh cat carriers. He lets his displeasure be known by destroying them. 🙂
From the comments it sounds like you used #8 screws for mounting the 30 x 24 gear net – and you noted to use short as possible. Would that be 1/2” or 3/4”? Have those held up ok in the fiberglass wall with weight in the gear net? Did you use anything along with those screws ( like washers or?). When installing screws into fiberglass – are wood screws the type used? Thanks!
I believe my screws were just 1/2″. I also used some small washers on the front of the gear net to keep the fabric under the screw head.
It’s been quite a while with it now, and they show no signs of failure.
The one thing I will say is imperative when screwing into fiberglass is: PRE-DRILL YOUR HOLES!
If you don’t, you’ll crack it up into a mess.
Thanks. You’re a brave with your drilling into fiberglass wall and your shower wall. I keep thinking “If he can do, I can do it” … but we’ll see if I get the courage or not!
You absolutely CAN do it!
Here’s wishing you no unintended consequences in your mods!
James, I have a quick question. You calculated the width of the EKKO floor tracks to be 24″. I measure mine at 23.5″ (that’s the total width, wall-to-wall of the floor in the garage). I’d like to put an order in with Online Metals for aluminum bars, but unsure of the size. I’d hate to have to jam them in if they’re too long, nor do I want to be left too short so I can’t put a lug through. Do you have any suggestions? Thanks.
If anyone else wants to chime in, that’d be great. And James, thanks for an awesome list and for the FitRV. Great stuff!
No real suggestions… other than measure twice and if you’re in doubt, always order long.
You can easily make aluminum shorter with a hacksaw. But I haven’t found out a way to make it longer!
Thanks. I thought about a hacksaw but haven’t cut aluminum much. Happy to hear it’ll cut it! Thanks for the list you provided and for FitRV!
Oh you can make a short bar longer by hammering, or passing thru a jewelry rolling mill or similar technique. Heat it up first so metal softens as it anneals. Then the hammering or mill will harden metal after a few passes, so repeat annealing and hardening. At the end, you remove fire scale with picking compound (or household chemical), buff to a shine and ready to use. Not that this is practical, but if you were a few mm short, this could be fixed, using jewelry techniques. This is how they make wire from metal.
Interesting. Never really got into metalwork before.
My latest endeavor is sewing.
So awesome! You guys are really creative.
I’m nervous about screwing into the panels of my gear garage. What size screws did you use, Jim? And what procedure? Pre-drill? Anything to worry about in the back or forward panels?
Typically, I use #8 screws. Use the shortest length that will get the job done – just to avoid blowing through the backside.
Pre-drilling is always a smart and safe practice. I’d like to say I pre-drill 100% of the time, but I don’t.
In the fiberglass though, you REALLY DO need to pre-drill.
The exterior walls are the 1.5 inches thick that you see.
The forward wall and roof of the garage are thinner – be careful there and check what’s on the other side before drilling or driving.
Good Luck!
As an avid bicyclist I can definitely appreciate how you organized the garage… just awesome!!
Anyway, I currently pull a tent camper, so I always have a vehicle to go scout out new areas without breaking camp. However, I will be making a change in the future and have considered the EKKO for a while. Would I miss a tow vehicle or would I be satisfied without. I know this can be an individual preference, but I have never seen you tow a vehicle with any of your current or previous RV’s.
It’s true, we’ve never towed a vehicle. We’ve towed a small cargo trailer sometimes, but never a vehicle.
You’ve hit on one of the reasons we like to RV small… we don’t want to tow. We can get the EKKO anywhere we want to go.
The one problem you’ll find is with first-come-first-served campgrounds. If you pull up and leave temporarily, someone else may take your spot!
(And one time we had a small rug stolen when we took our EKKO somewhere.)
We generally don’t do many first come first served campgrounds unless we plan to be in for the duration – OR it’s within cycling distance of anything we might want to do.
Hi James,
Love your review! I’m curious how the L-Track Bolts you purchased worked out? The reviews on Amazon are mixed. Also were the bolts long enough? Looks like they make a longer 45mm version.
That’s kind of weird… how do you give a bad review on a bolt?
Anyways, the bolts are fine. I bought longer and shorter ones, and wound up using the shorter ones.
I haven’t used the longer ones at all – they’re too long for what I did. But if I were mounting wooden items in there, the extra length might be needed.
We’re on a ski trip right now, and I removed the floor mounted bike trays so we could fit skis and boots. Took me like, 10 minutes to remove. No issues.
Thanks for the info! The reviewer said the bolts spun in the track so they wouldn’t tighten. I guess you didn’t have that problem?
BTW, have you installed the SOG mod for your cassette yet? I’m very interested to see if that thing works as advertised, it seems so simple.
SOG installed. Still testing. Video eventually when we figure out our best case.
James, FYI, I did have trouble with the bolts you referenced installing a bike fork mount in my 2021 Solis. The squared shoulders of the bolts were too narrow and rounded for the L-Track rails in the Solis and wouldn’t hold while tightening. I ordered these instead and they worked MUCH better. https://amzn.to/3pXMEHl
I think the track in the Solis is a lower profile track. So I guess it makes sense.
Thanks for the link on the bolts!
Lots of “thru axel” debate above, and I am completely with you on this. The. Most. Stupid. Thing. Ever. From quick release to slow release in, what, 5 years?
That said, I was wondering, what with all of your casting above on van weight, how close are you to your GVWR? It seems you are trying to save ounces, so you must be quite close.
The other Q is, being nosey, what is the difference between your empty weight and that being ready for a trip. For us, including humans, dog, water, bike, and lotsa stuff, it’s on the short side of 1000 pounds max.
(We don’t have grey/black water tanks to worry about, unless you count our little 7 gallon gray water tank, which just holds for a little while the water from the 100 liter fresh water tank…)
I keep hoping they’ll go back somehow, but that probably won’t happen until everyone has a garage full of through-axle wheels. I thought about trying to invent a quick release adapter, but then I realized it would require people to saw the ends of their forks…
I never weigh the rig empty, because that seems like a waste of money and time – since we never travel that way, and I’m not a fan of eyeballing how much stuff weighs.
If we’re loaded up for a long 6 week trip with full bikes and 3 weeks of cat food, etc. then we’re very close to 11,000 lbs. The exact amount depends, so it varies.
If we’re just out for a weekend trip skiing, or just to visit family, we have a couple hundred pounds left.
Of course, we do travel with a full 50 gallons of water, so there’s 400 pounds right there…
But if you were to ask me to bring less water so I could bring something else, that something else would have to be more useful than water – which is difficult.
Beer. Which is sort of a form of water I guess.
Don’t forget your 5% discount code from THEFITRV when buying your nets on OrganizedObie.com! THEFITRV. all caps, no spaces.
Cheers!
That discount code didn’t work for me.
I think we got you taken care of!
Let me know if there are any further issues.
Hi, Thanks for all your videos. Does the EKKO gear garage wide enough to fit MTB bars (ie 800mm width) ?
You might have to turn them somewhat sideways. The garage is 24 inches wide (roughly).
Thanks for the reply James. Is it the door that is 24 inches or the garage interior width ?
Extremely Complete Winnebago EKKO Review- With UPDATES and MEASUREMENTS!
I don’t plan on owning an RV, but I subscribed because your mods are creative and your workshop are amazing!
Well welcome aboard anyways! RVs not required.
Glad to have you watching. 🙂
Great video. Love following you guys.
Question, where did you pick up the chairs?
Thanks
Ed&Judy
The awesome chairs are linked in the post above!
Thru axles are hands down better than quick release, it’s not even a debate. Safer, more intuitive, stiffer so better steering, almost always lighter, idiot proof, do not require retention tabs that people who shouldn’t will file off, no one will get sued – holding down costs for all of us…
We’ll just have to agree to disagree. Keep drinking the Kool-Aid if you want.
The “better steering” argument is specious, at best. Sure, it sounds plausible on the surface. But if you go ride bikes with both through axles and quick releases, you won’t notice. Unless you’ve pre-disposed yourself to already believe a certain way. But in that case, you’d be like one of those audiophile guys who insists that their digital audio source has “fuller bass”, and “more nuanced midtones” because their interconnect cables are made with Japanese copper instead of US copper. And we all know those guys are full of it. If you had said rim stiffness, lacing, or even tire pressure contributed to better steering, I might agree. But as long as the ends of your forks don’t allow the wheel to move, then it doesn’t matter how you keep the ends of the forks in the same place.
I can’t comment on “idiot proof”, as I’m not an idiot.
As for the lawsuit argument… Let’s just be honest, you don’t know of any such lawsuit. Again, you’re just saying something because it sounds plausible and you heard it somewhere. I’ll send you a Fit RV water bottle if you can find me a case where someone bought a bike with lawyer tabs on it, filed the tabs off, and then sued the bike manufacturer because the bike didn’t have laywer tabs. That would be like removing the airbags from your car, and then suing Ford because your car didn’t have airbags. No matter how much we all want to believe that lawyers are evil dolts, that doesn’t happen.
You end with “holding down costs for all of us” based on a premise that doesn’t happen. But you know what really DOESN’T hold down costs for all of us? Having to buy all new freaking wheels!!! Not to mention new wheel accessories like fork mounts, wheel mounts, and even spare through non-axles themselves Further, each and every bike is guaranteed to use a different combination of through non-axle diameter, thickness and thread pitch – try swapping your axles between bikes like a quick release if you don’t believe me. In fact, nothing could be further from the truth, as the move to through axles is calculated to do EXACTLY THE OPPOSITE of keeping your costs down.
Don’t sugar coat it there James, tell us what you really think. : )
I like the set up, other than I wish it could fit more than two bikes. Have you tried it with mtn bikes with wide handlebars? My bikes have 760 or 780mm wide bars.
We likely *could* get more than two bikes in there… but then it would not be nearly so convenient, fast, and easy to get them out.
As far as mountain bikes – a similar strategy would probably work for them. You would just need to rotate the handlebars in some way to get them to fit. Taking the Molle panels off the doors would be key.
In the off-road spirit of the Ekko’s design theme, I wish the rear “garage” had the depth to reasonably accommodate mountain bike (MTB) handlebar widths.
Well, it can fit them, you just have to turn them somewhat sideways until they fit.
The track I show here would still work (well, a wider track, I mean).
First time poster. After watching many of your videos, I’m close to pulling the trigger on an EKKO!
Would like to know what you do for security of the garage. The door locks don’t look difficult for a thief to defeat. Are there aftermarket door locks, or any devices that can secure bicycles and other valuables to the L-track or somewhere else in the garage?
Thanks, James, for all your invaluable videos and blog!
The security of the EKKO doors is on par with most other RVs out there. So honestly, we don’t do anything beyond the locks on the doors for security.
But, if you’re concerned, there’s a whole universe of bike locks as well as DIY security systems like Ring or Blink you could add.
Nice work!
I love those chairs too, the open back does not push my spine the wrong way
Thank you for all of these good ideas. I wonder if you and Stef would ever consider putting together some pointers or ideas on bike loading for folks lacking either of your height or strength, not to mention lacking lightweight bikes. I travel alone, and while I would like to bring a bike with me, I find loading bikes into either a garage or a rack just impossible — and I know I’m not the only person with this problem. I’ve considered getting a ramp or something, but I’m kind of afraid I’d fall ascending a step stool to get the bike into position once it’s partially up the ramp or partially in the garage. Anyway, if you ever see something at a trade show that could help folks like me, I know a lot of people would be interested.
We’ll certainly keep an eye out for easy solutions in this regard!
Love this, thanks so much for showing how to effectively use this RV for the one purpose for which we would consider buying it.
We have a Class B camper van without a garage. It’s nice and we like it a lot, but we wish we could store our bikes inside. So, when considering a replacement, we can’t even consider any Class B or small Class C without a bike garage, intended primarily to store two bikes, vs. a whole bunch of random junk we don’t want to bring along anyway.
In future posts, we’ll be interested to see / hear your rationale for leveling jacks, to which you alluded in this one. We have zero interest in that feature on a camper with the required danfoss-compressor-type fridge because we see levelers as heavy, expensive to fix, etc., and you already have a VB Air system in there….
Last, but far from least, are the folks at WGO consuming your ideas for future editions of the EKKO and it’s offspring? Man, oh, man, such great upgrades, especially the power systems and the kitchen, along with many smaller common-sense improvements (light switches, anyone?) that we can’t believe they overlooked.
Nice. Really like the less is more functional approach. The detail listing of products was likely as much work as loading the gear garage – so thanks for that. The PICO chairs and vinyl fence post are brilliant! Are the 30 x24 gear net and the organizer stretch nets screwed into the RV – I noticed one comes with screws but not the other? The adjustable bungee cords link straight to the 32 inch – in my memory that gear garage is 37″-39″ in depth so wondered if the 32″ is really what you are using?
YES! Gathering all those links up was very time consuming!
The gear net is screwed in. Although, if I had really wanted, I could have attached snaps from the local JoAnn Fabric and attached that with SNADs as well.
The 10x20s are attached with SNADs as you saw. The framed net pockets are screwed in.
The bungees are about 32″. I tried to find as close as I could, but I have a hundred bungee cords around here and I just used the ones that fit.
They run top to bottom, which isn’t full height with the shelf. They also run front to back, which is only about 24″. I think you’d be fine with 32″.
James. When I saw the video I thought “he removed the lawyer tabs” , then I read the article.
Through axles are necessary for disc brakes. When you use a quick release with discs you must use EXACTLY the same pressure on the lever every time or the rotor will rub.
Through axles are *not* required with disc brakes. Behold a bike that has been working fine for over a decade:
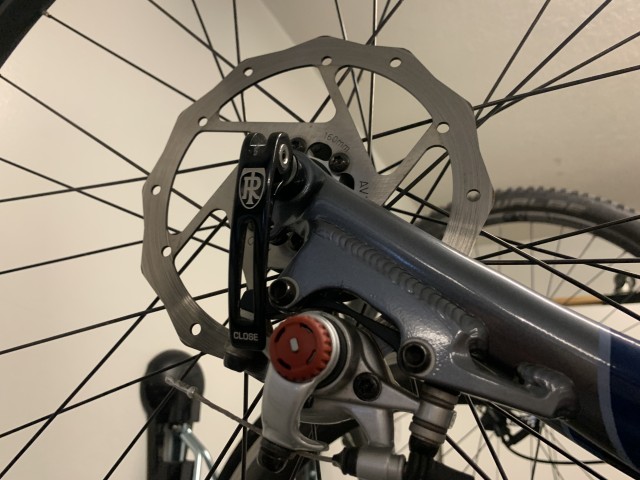
(Although, due to the forces involved in braking, I’ve left the lawyer lips ON this bike!)
The bike industry wants us to *think* that they’re required, so that we’re eager to buy all new wheels and accessories.
As an aside – if you think that both Stef and I tighten a through axle with the same pressure, you haven’t been present for one of our “jar lid” debates… 🙂
The amazon affiliate link on your last video doesn’t work for me.
Looks like you have all the links here.
Yeah, the one on the video is just a general amazon link. The ones on this page go to specific products.