The RV Remodel
There’s a ton of pictures on this page, so it may take a while to load…
Stefany and I bought an RV a few years ago. It’s a 2003 MB Cruiser. It’s based around a Sprinter van (one of those vans you see the FedEx guys driving). We started off just using it to go to my bike races. It contains pretty much everything you’d need, and we had vacationed in it several times. But it was getting old…
The carpet was gross. The ceiling was sagging. The cabinets were water-stained and worn. We would get stuck by staples if we touched it in certain places. The list went on. I got the approval to renovate the RV.
I kind of wish I never started, because it was 10 weeks of every night, every weekend, every spare minute I had to get the thing done. I was very… unpleasant… during this time. Fortunately, Stef is very understanding, and now we’re done and we have a totally pimped out RV. Pictures from beginning to end and descriptions follow.
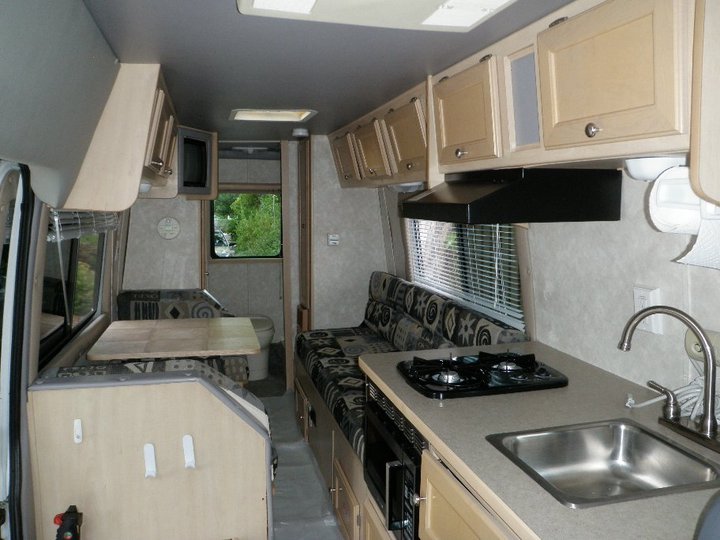
Here’s what it looked like the day we brought it home:
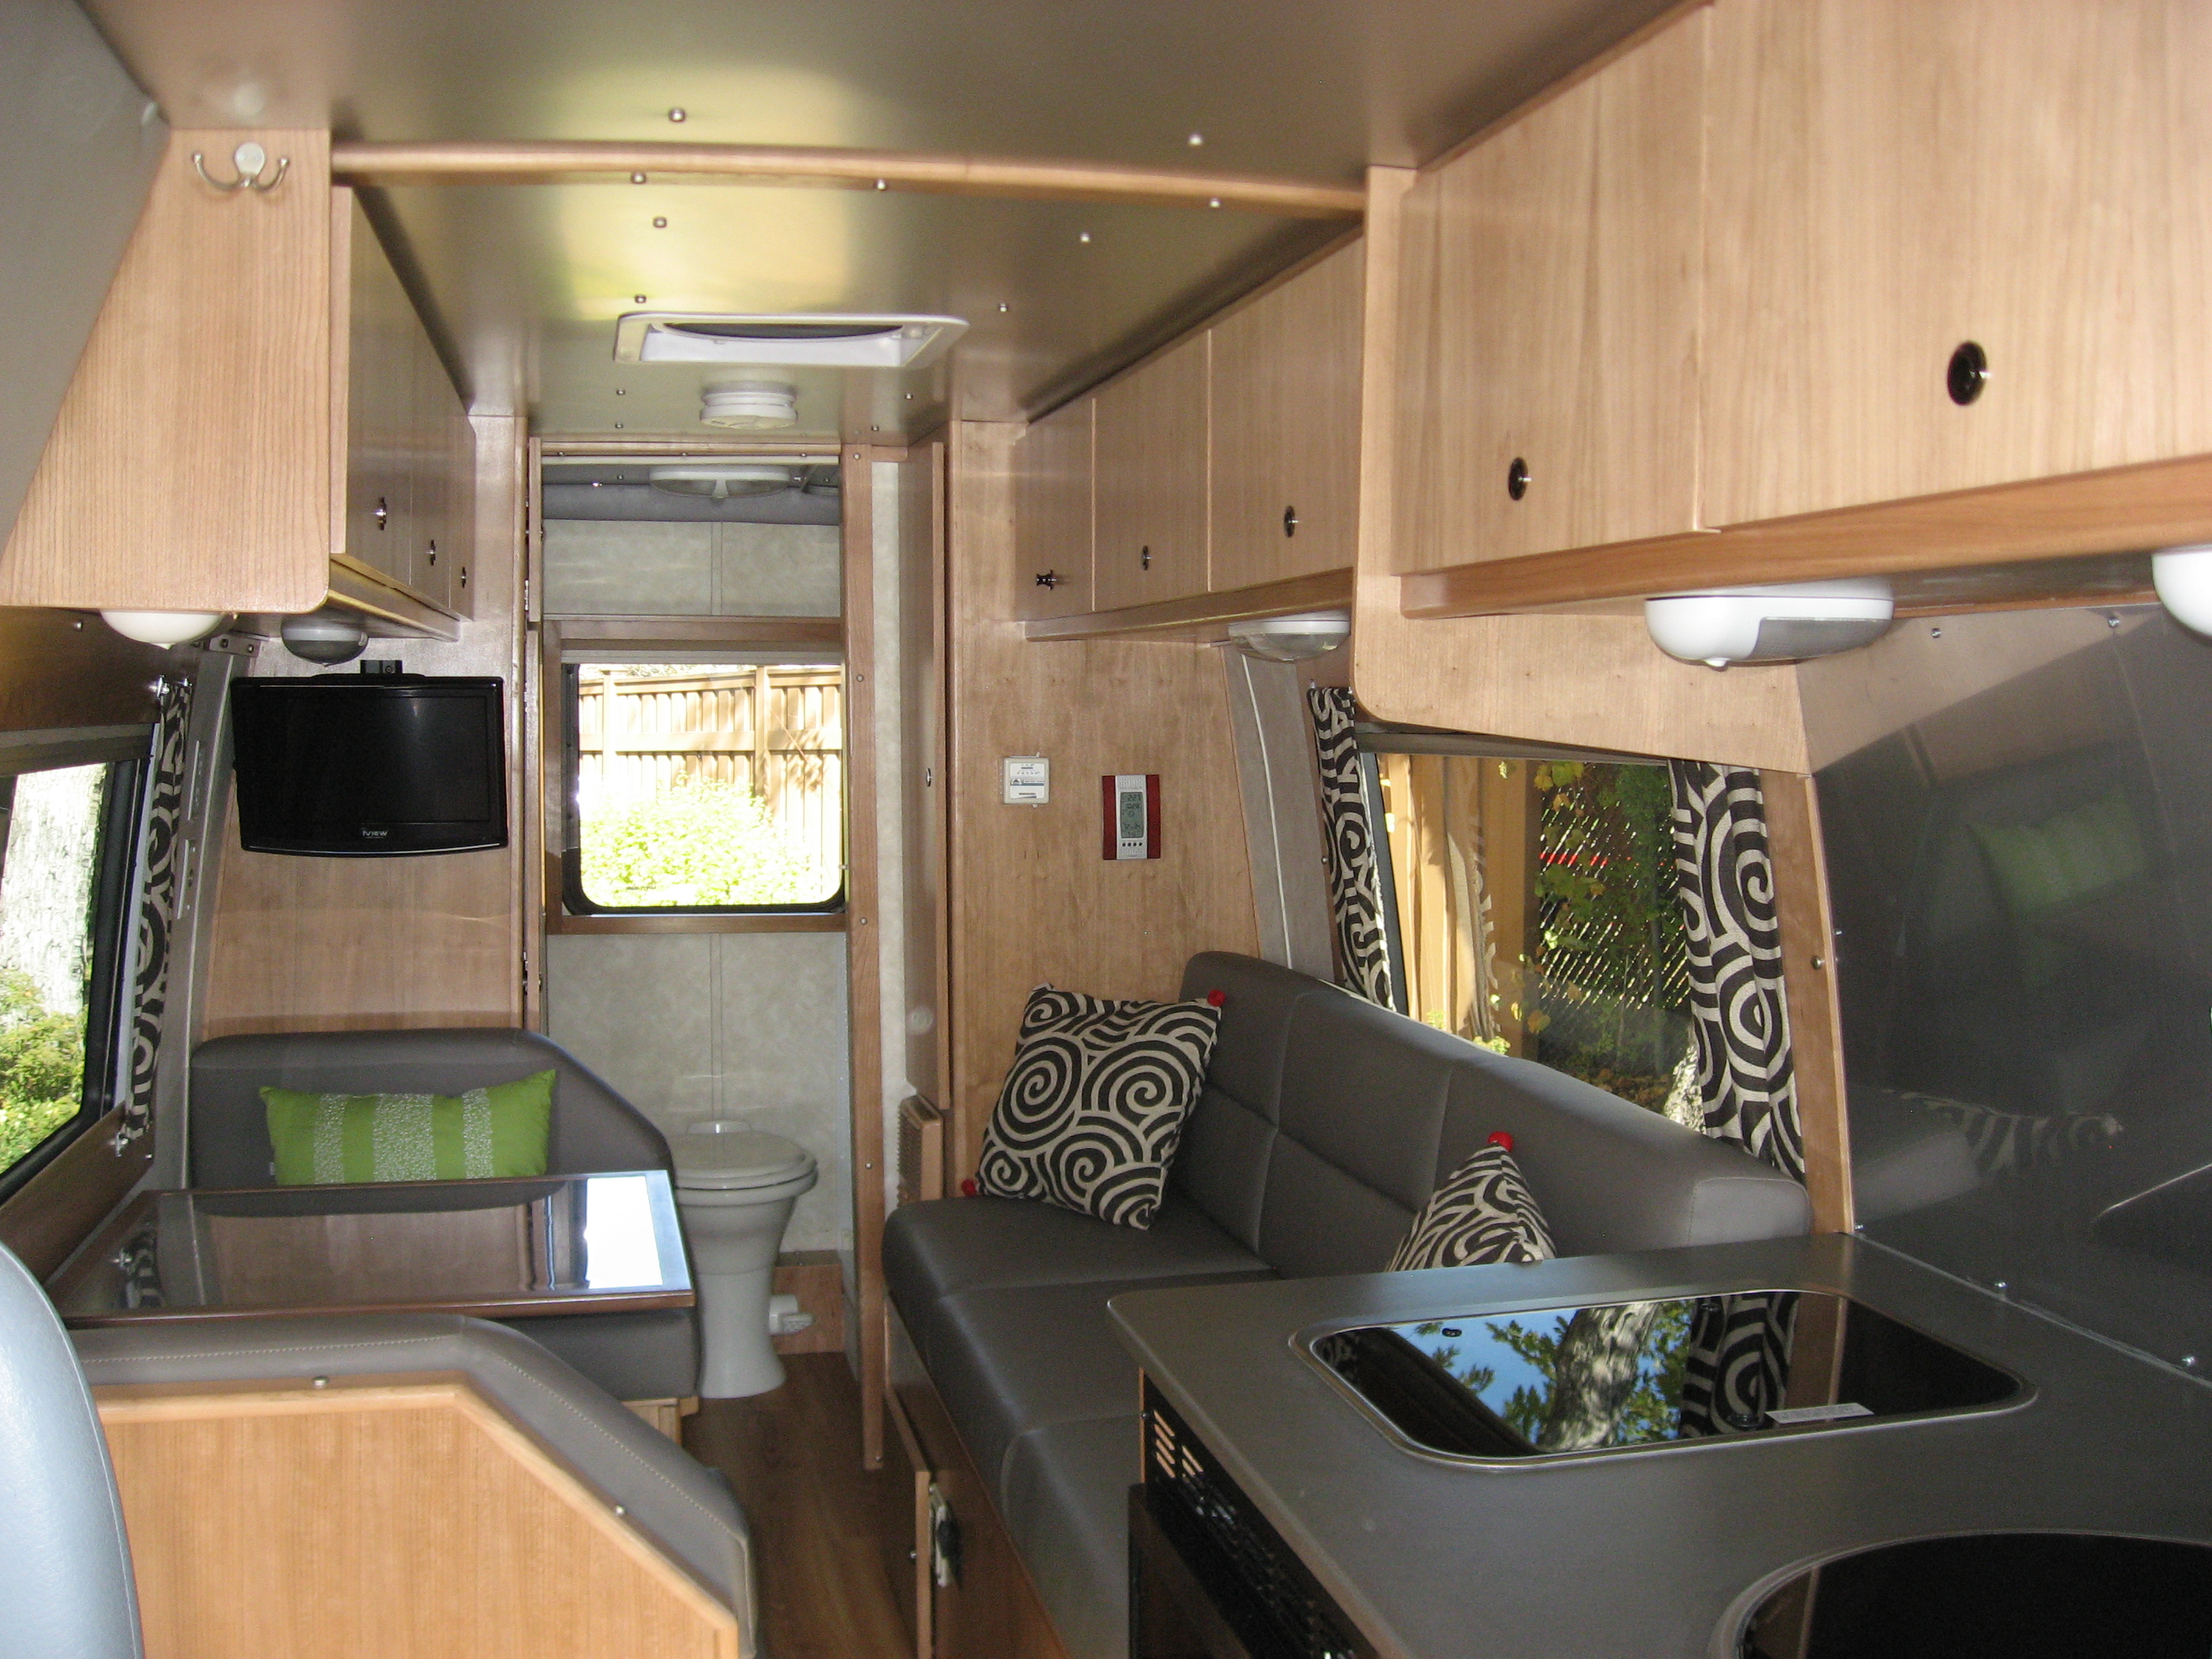
And here’s what it looks like now…
But it was a long process to get there. Here’s me starting to rip everything out of the RV.
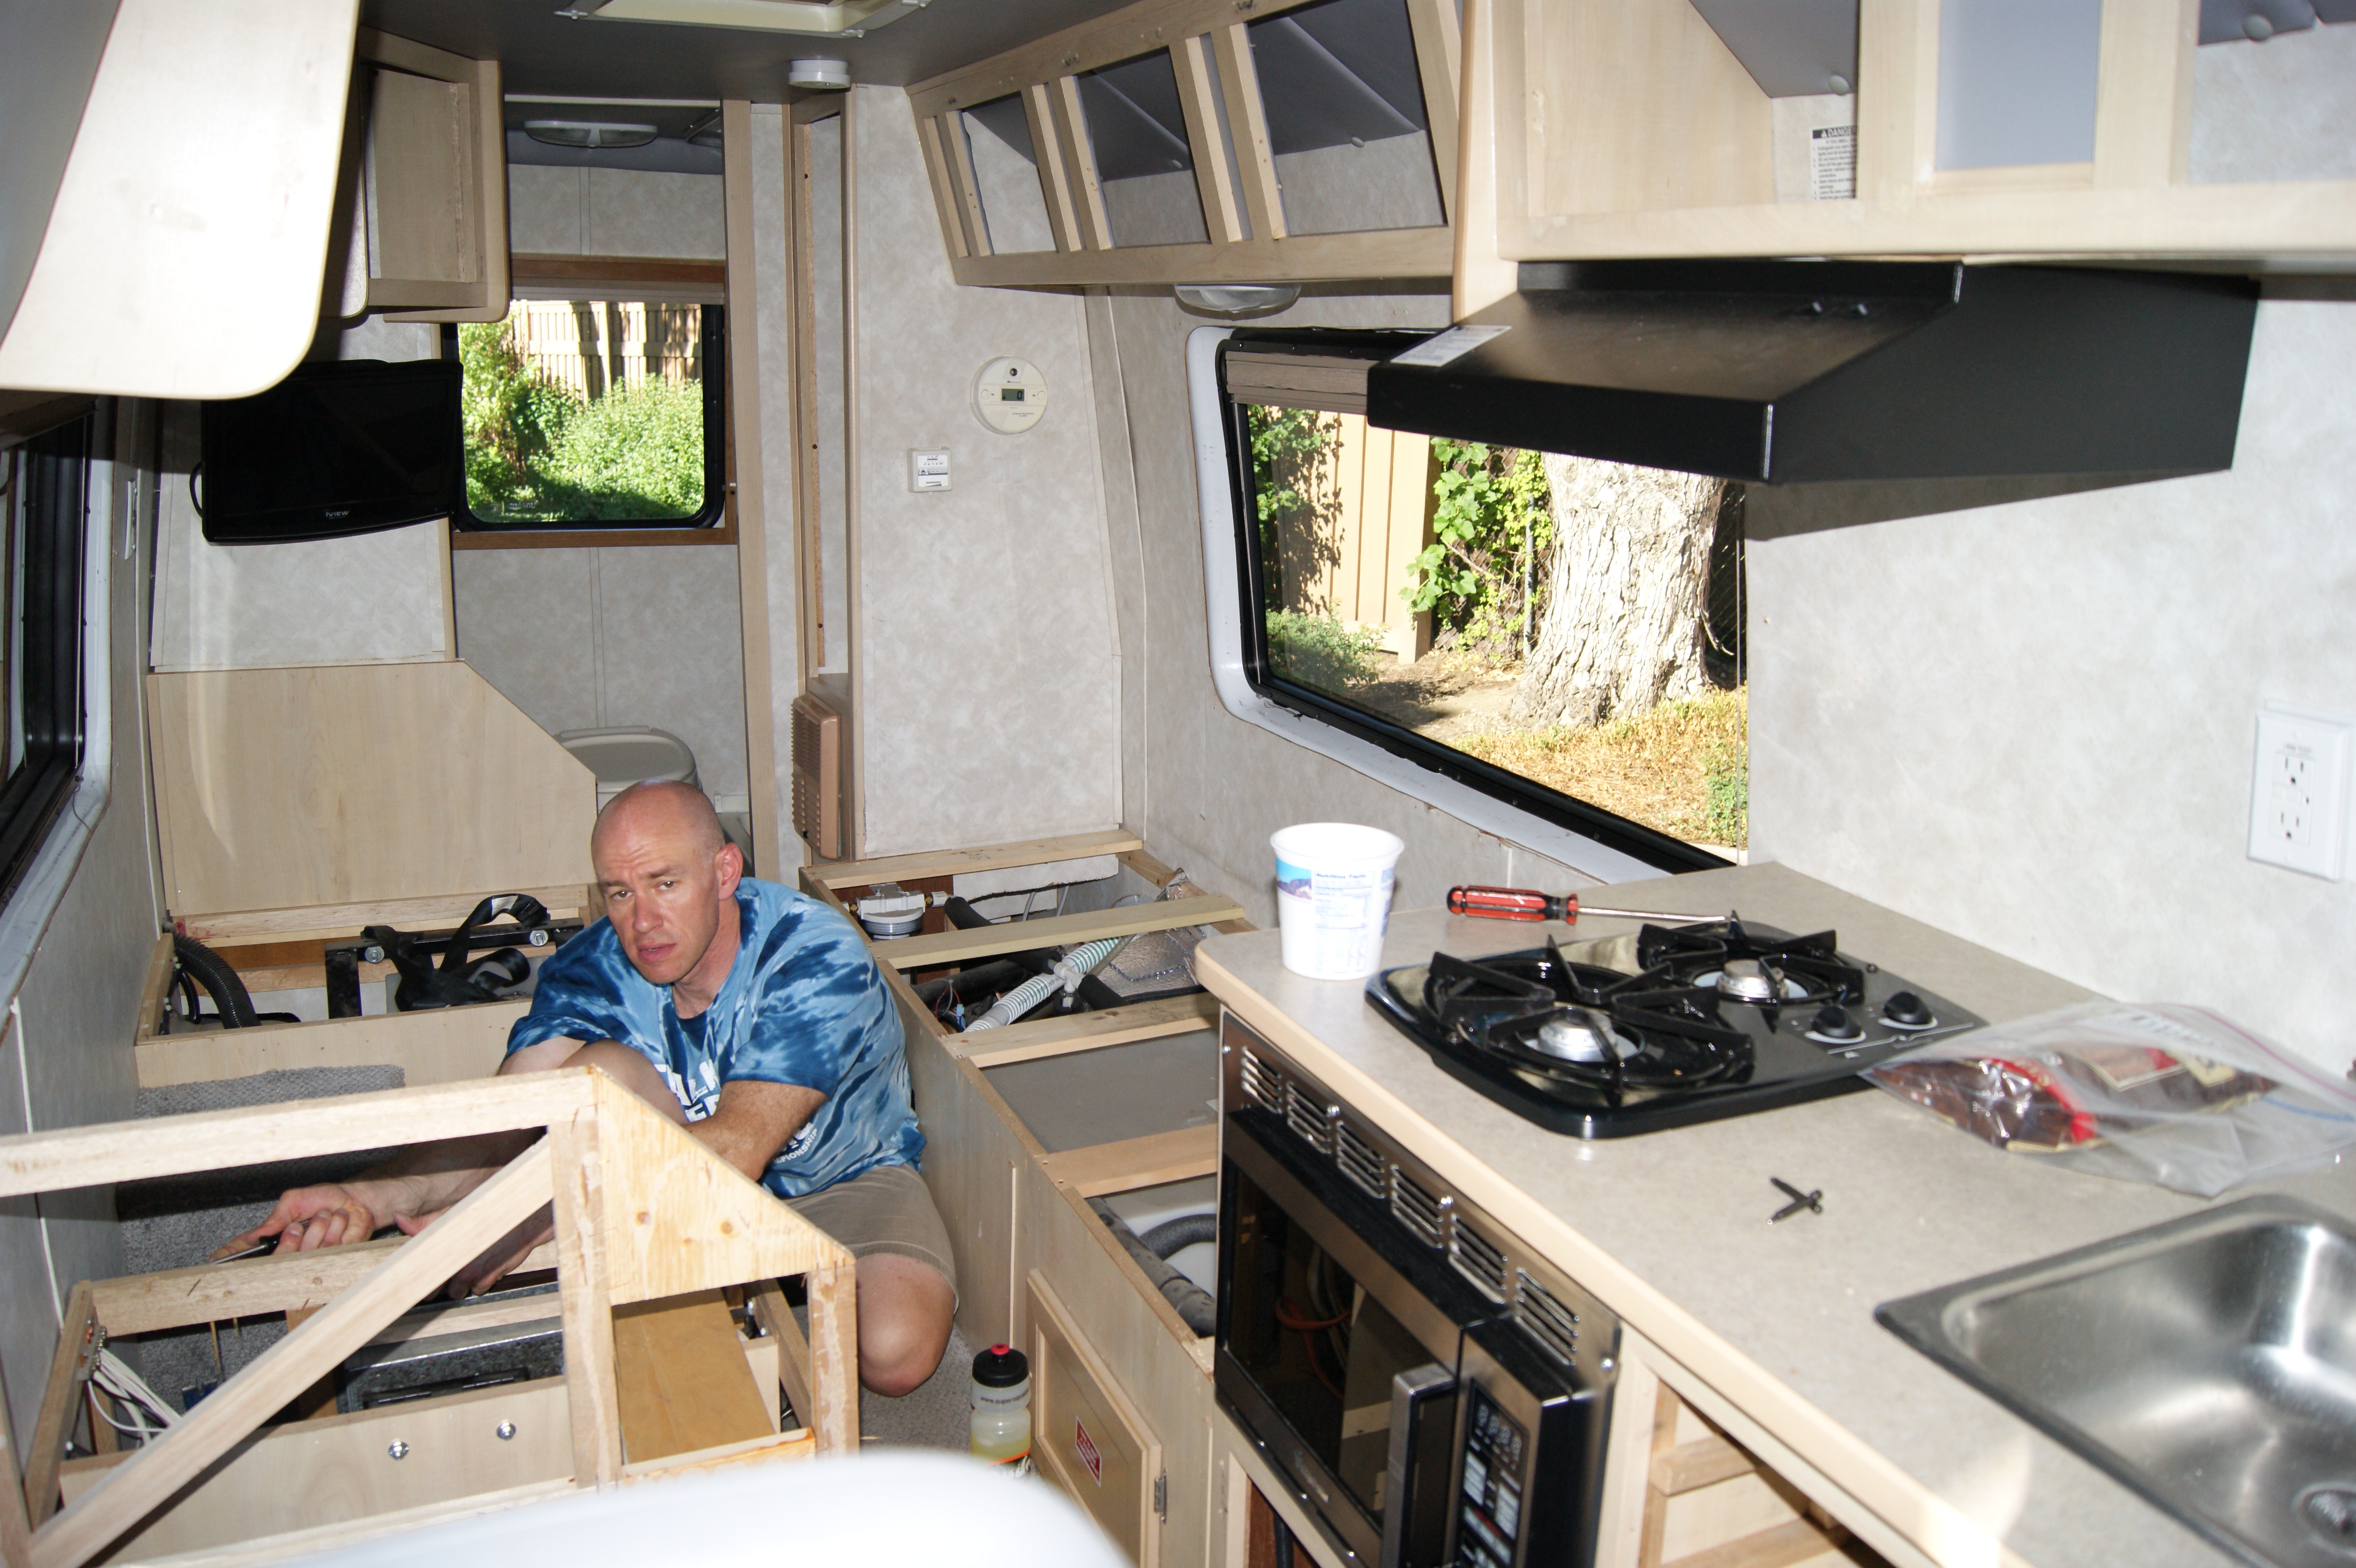
Do I look happy? No? It’s August – and it’s over 100 degrees outside – and over 110 degrees inside the RV. Seriously. And since I was gutting it, I had the power off, so no fans, no AC, just heat. Lesson #1: Renovate RV in a garage, or in the spring or fall.
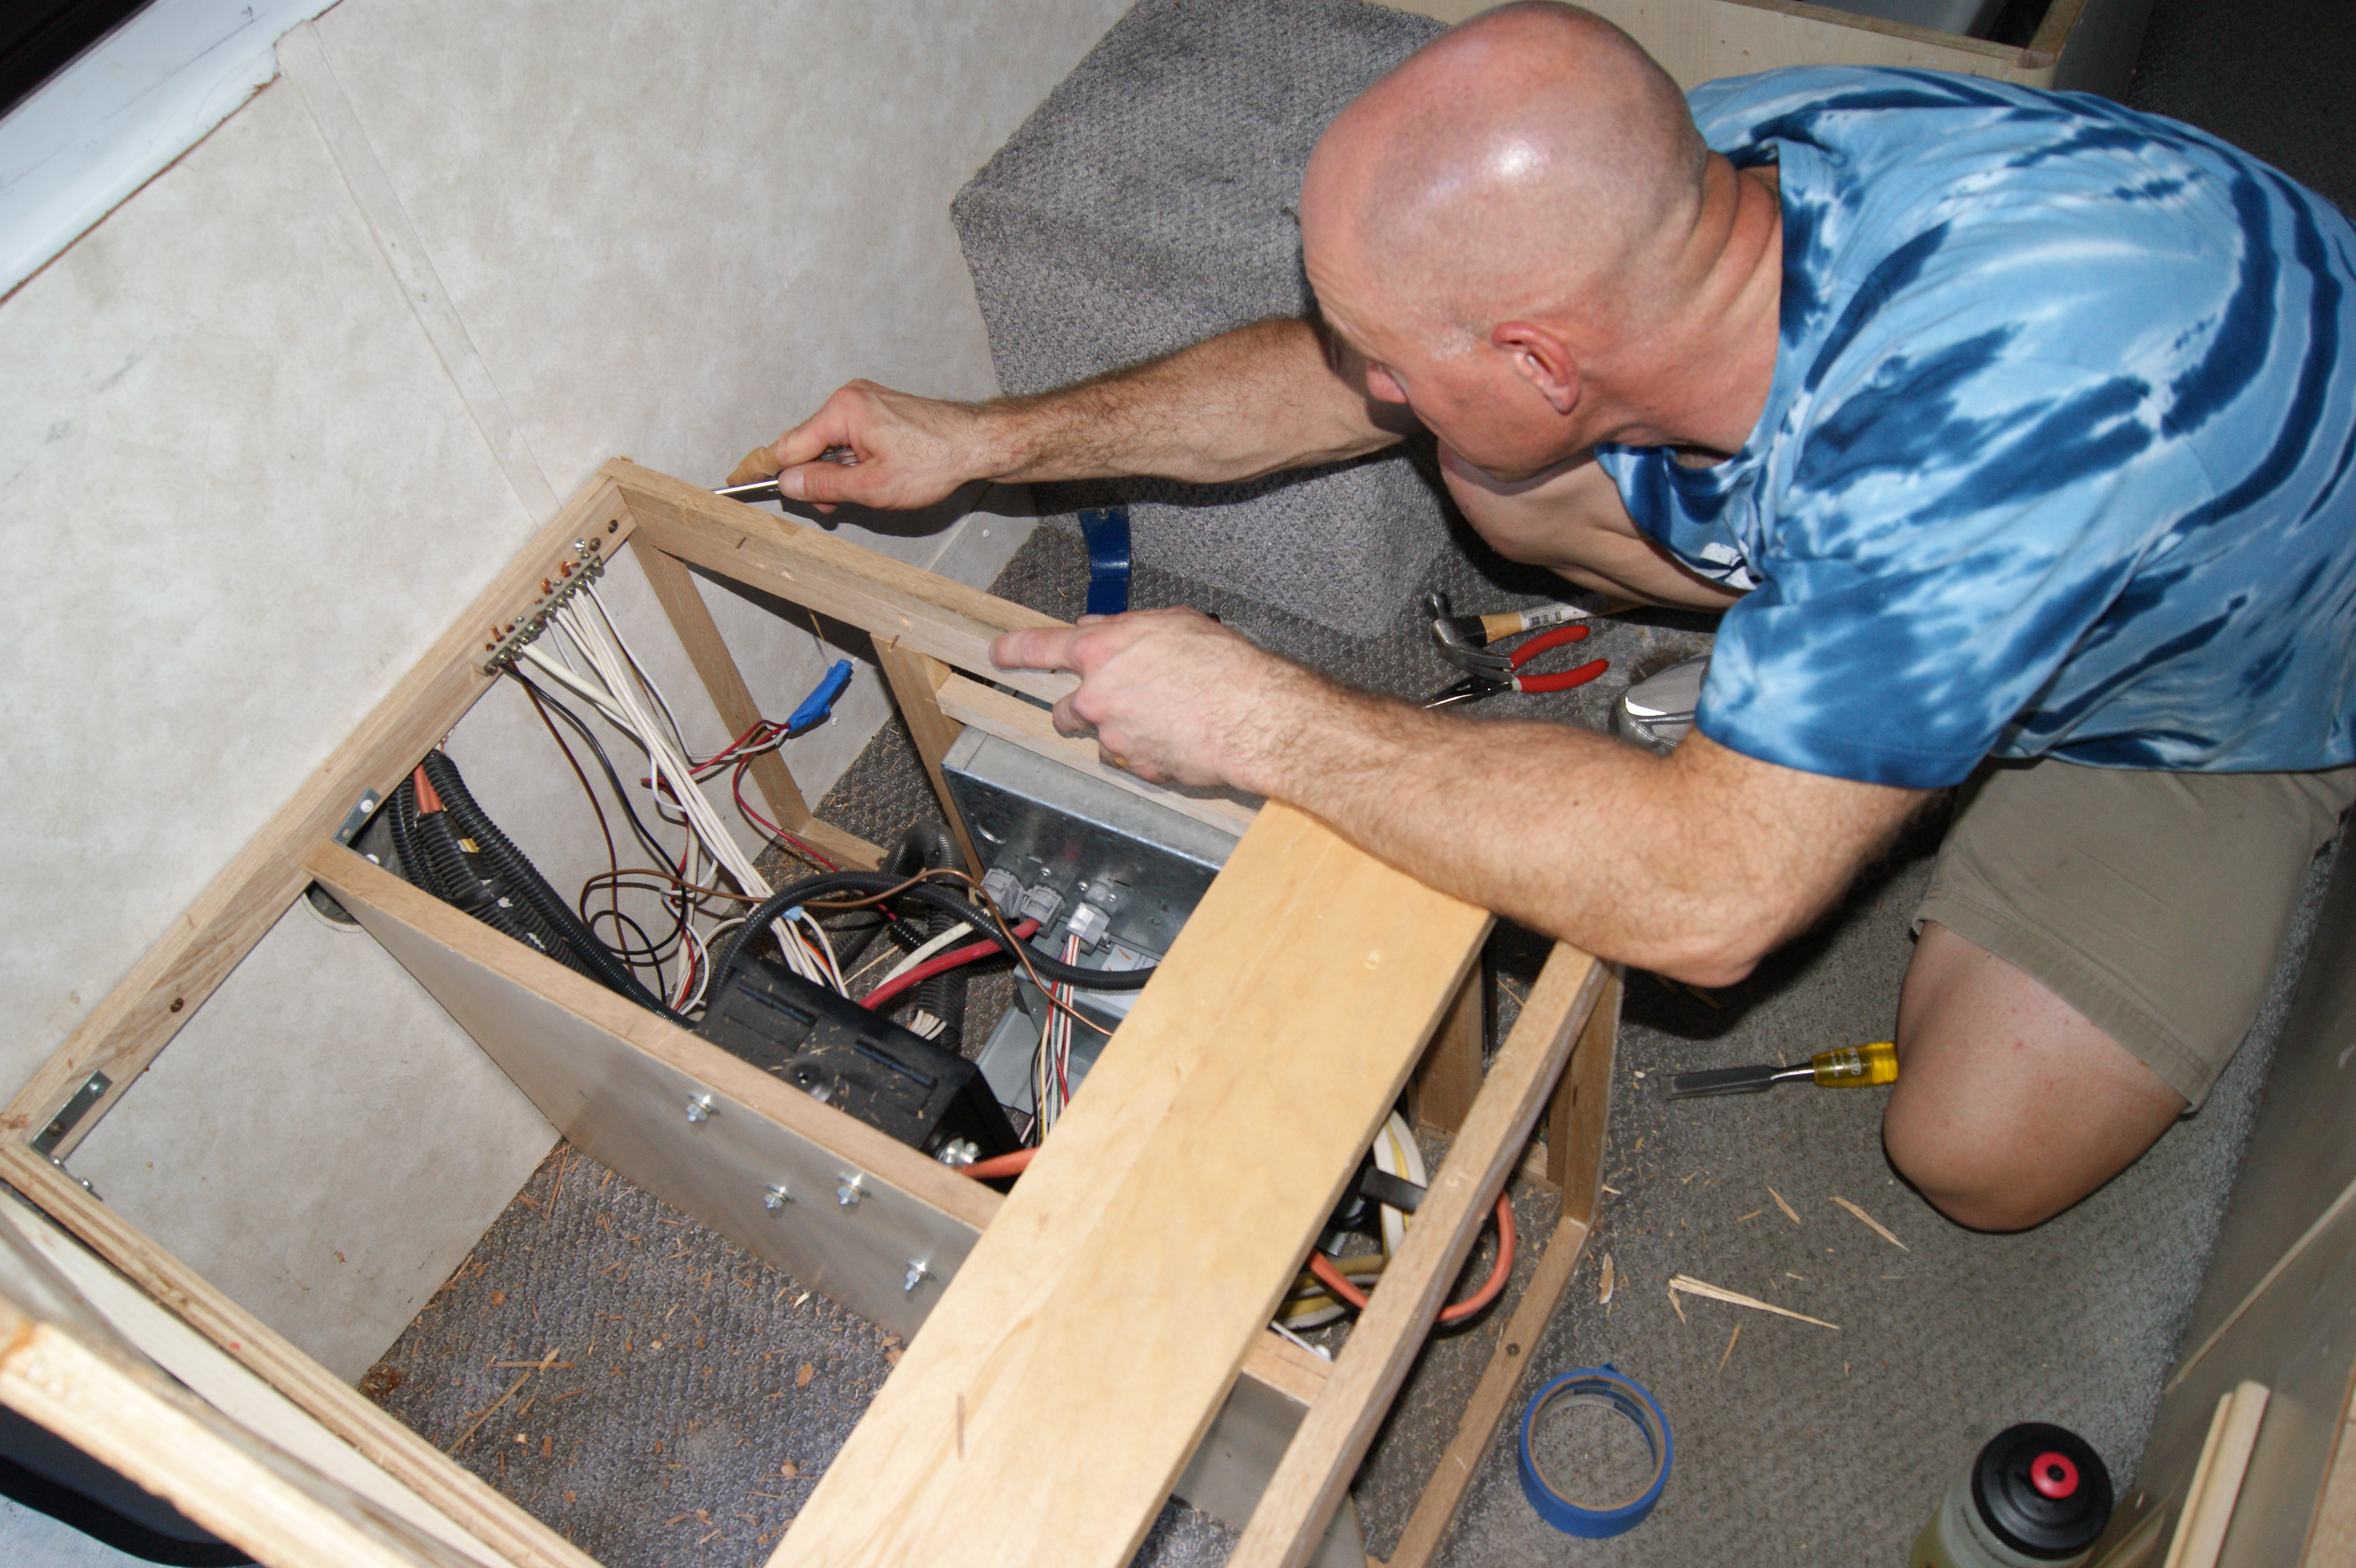
I had decided to leave the frames of the old stuff in place, and to just recover and re-skin the cabinets where they were. This kept me from having to move anything really major, like plumbing, wiring, tanks, generators, etc. I did wind up reinforcing most of the cabinets, as they weren’t put together all that great to begin with. (OK, actually they were built like crap and I’m surprised it stayed together for 10 years.) Regardless, Stef and I were basically happy with the layout, so this approach made the most sense. Here you can see me working on cleaning up one of the dinette seats/cabinets. Wiring/circuit panel/Converter/etc. stayed in place.
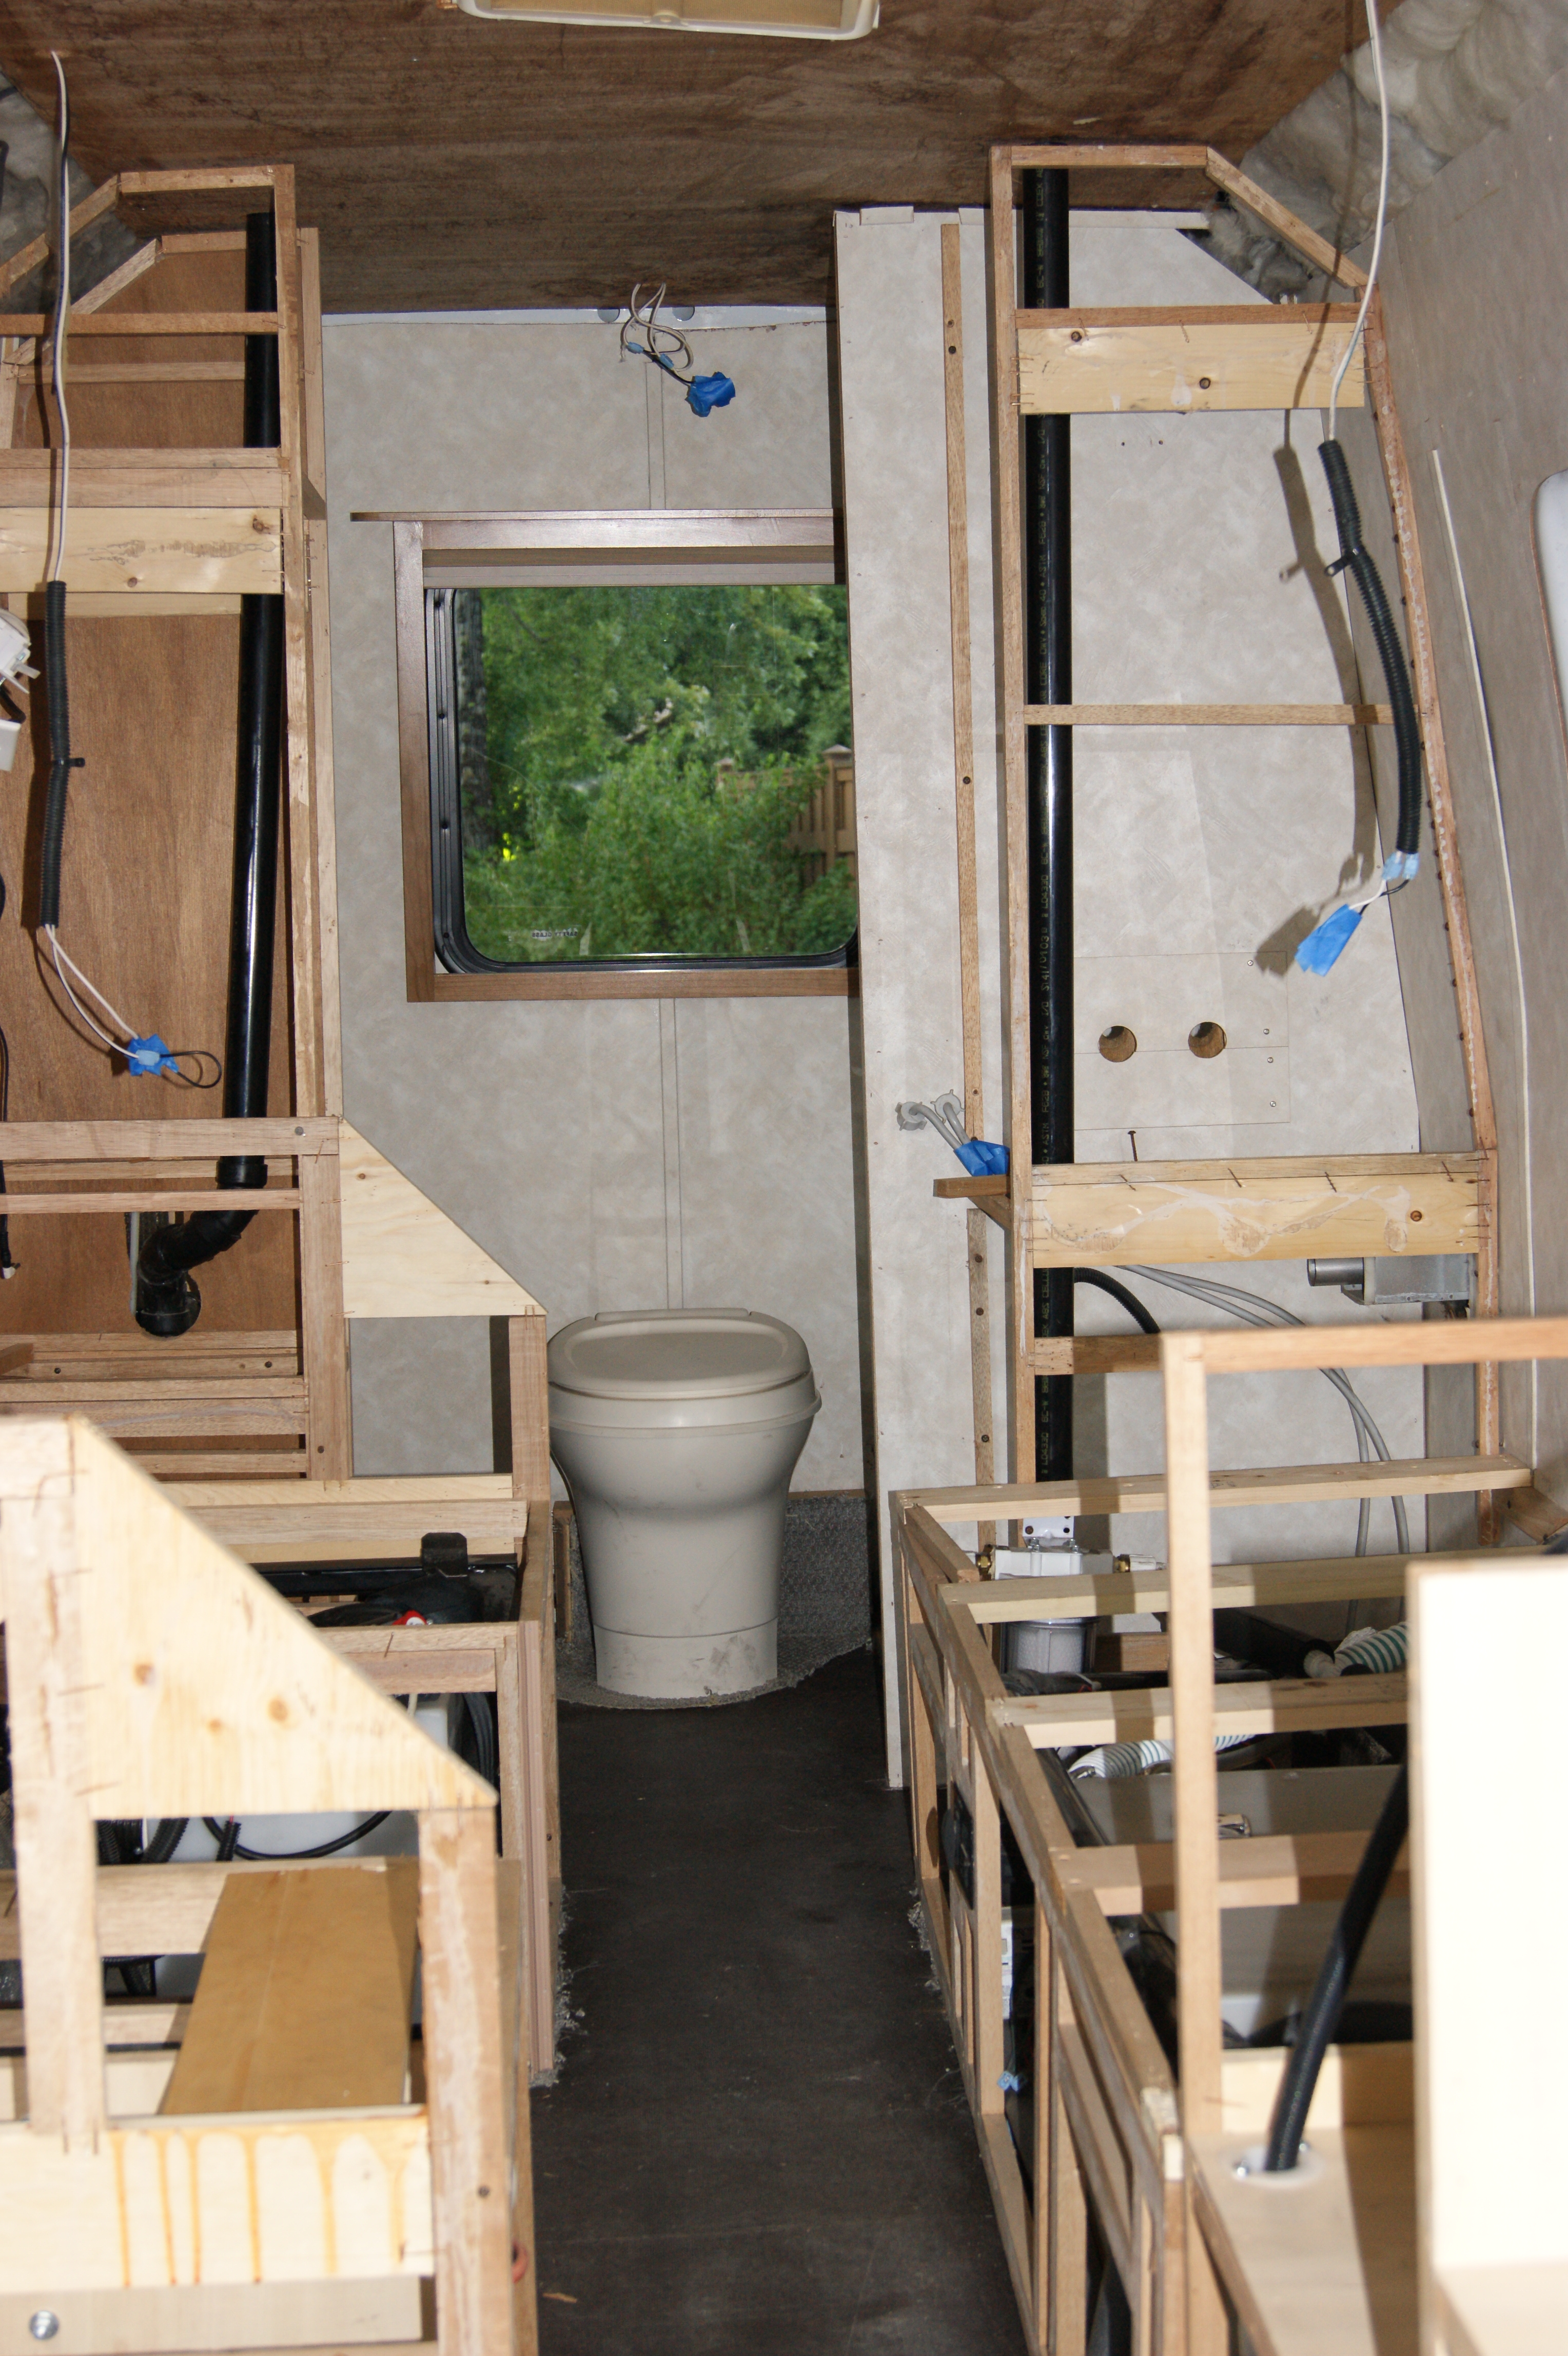
This next picture is about as far down as I took it. The upper cabinets are completely gone. The lower cabinets are down to skeletons. I left a couple walls in the bathroom. I kept the old toilet in place as long as I could, so I didn’t have to worry about having an open “toilet-hole” to work around. The vinyl ceiling liner is out. Replacing that ceiling was what defined how far apart I had to take things.
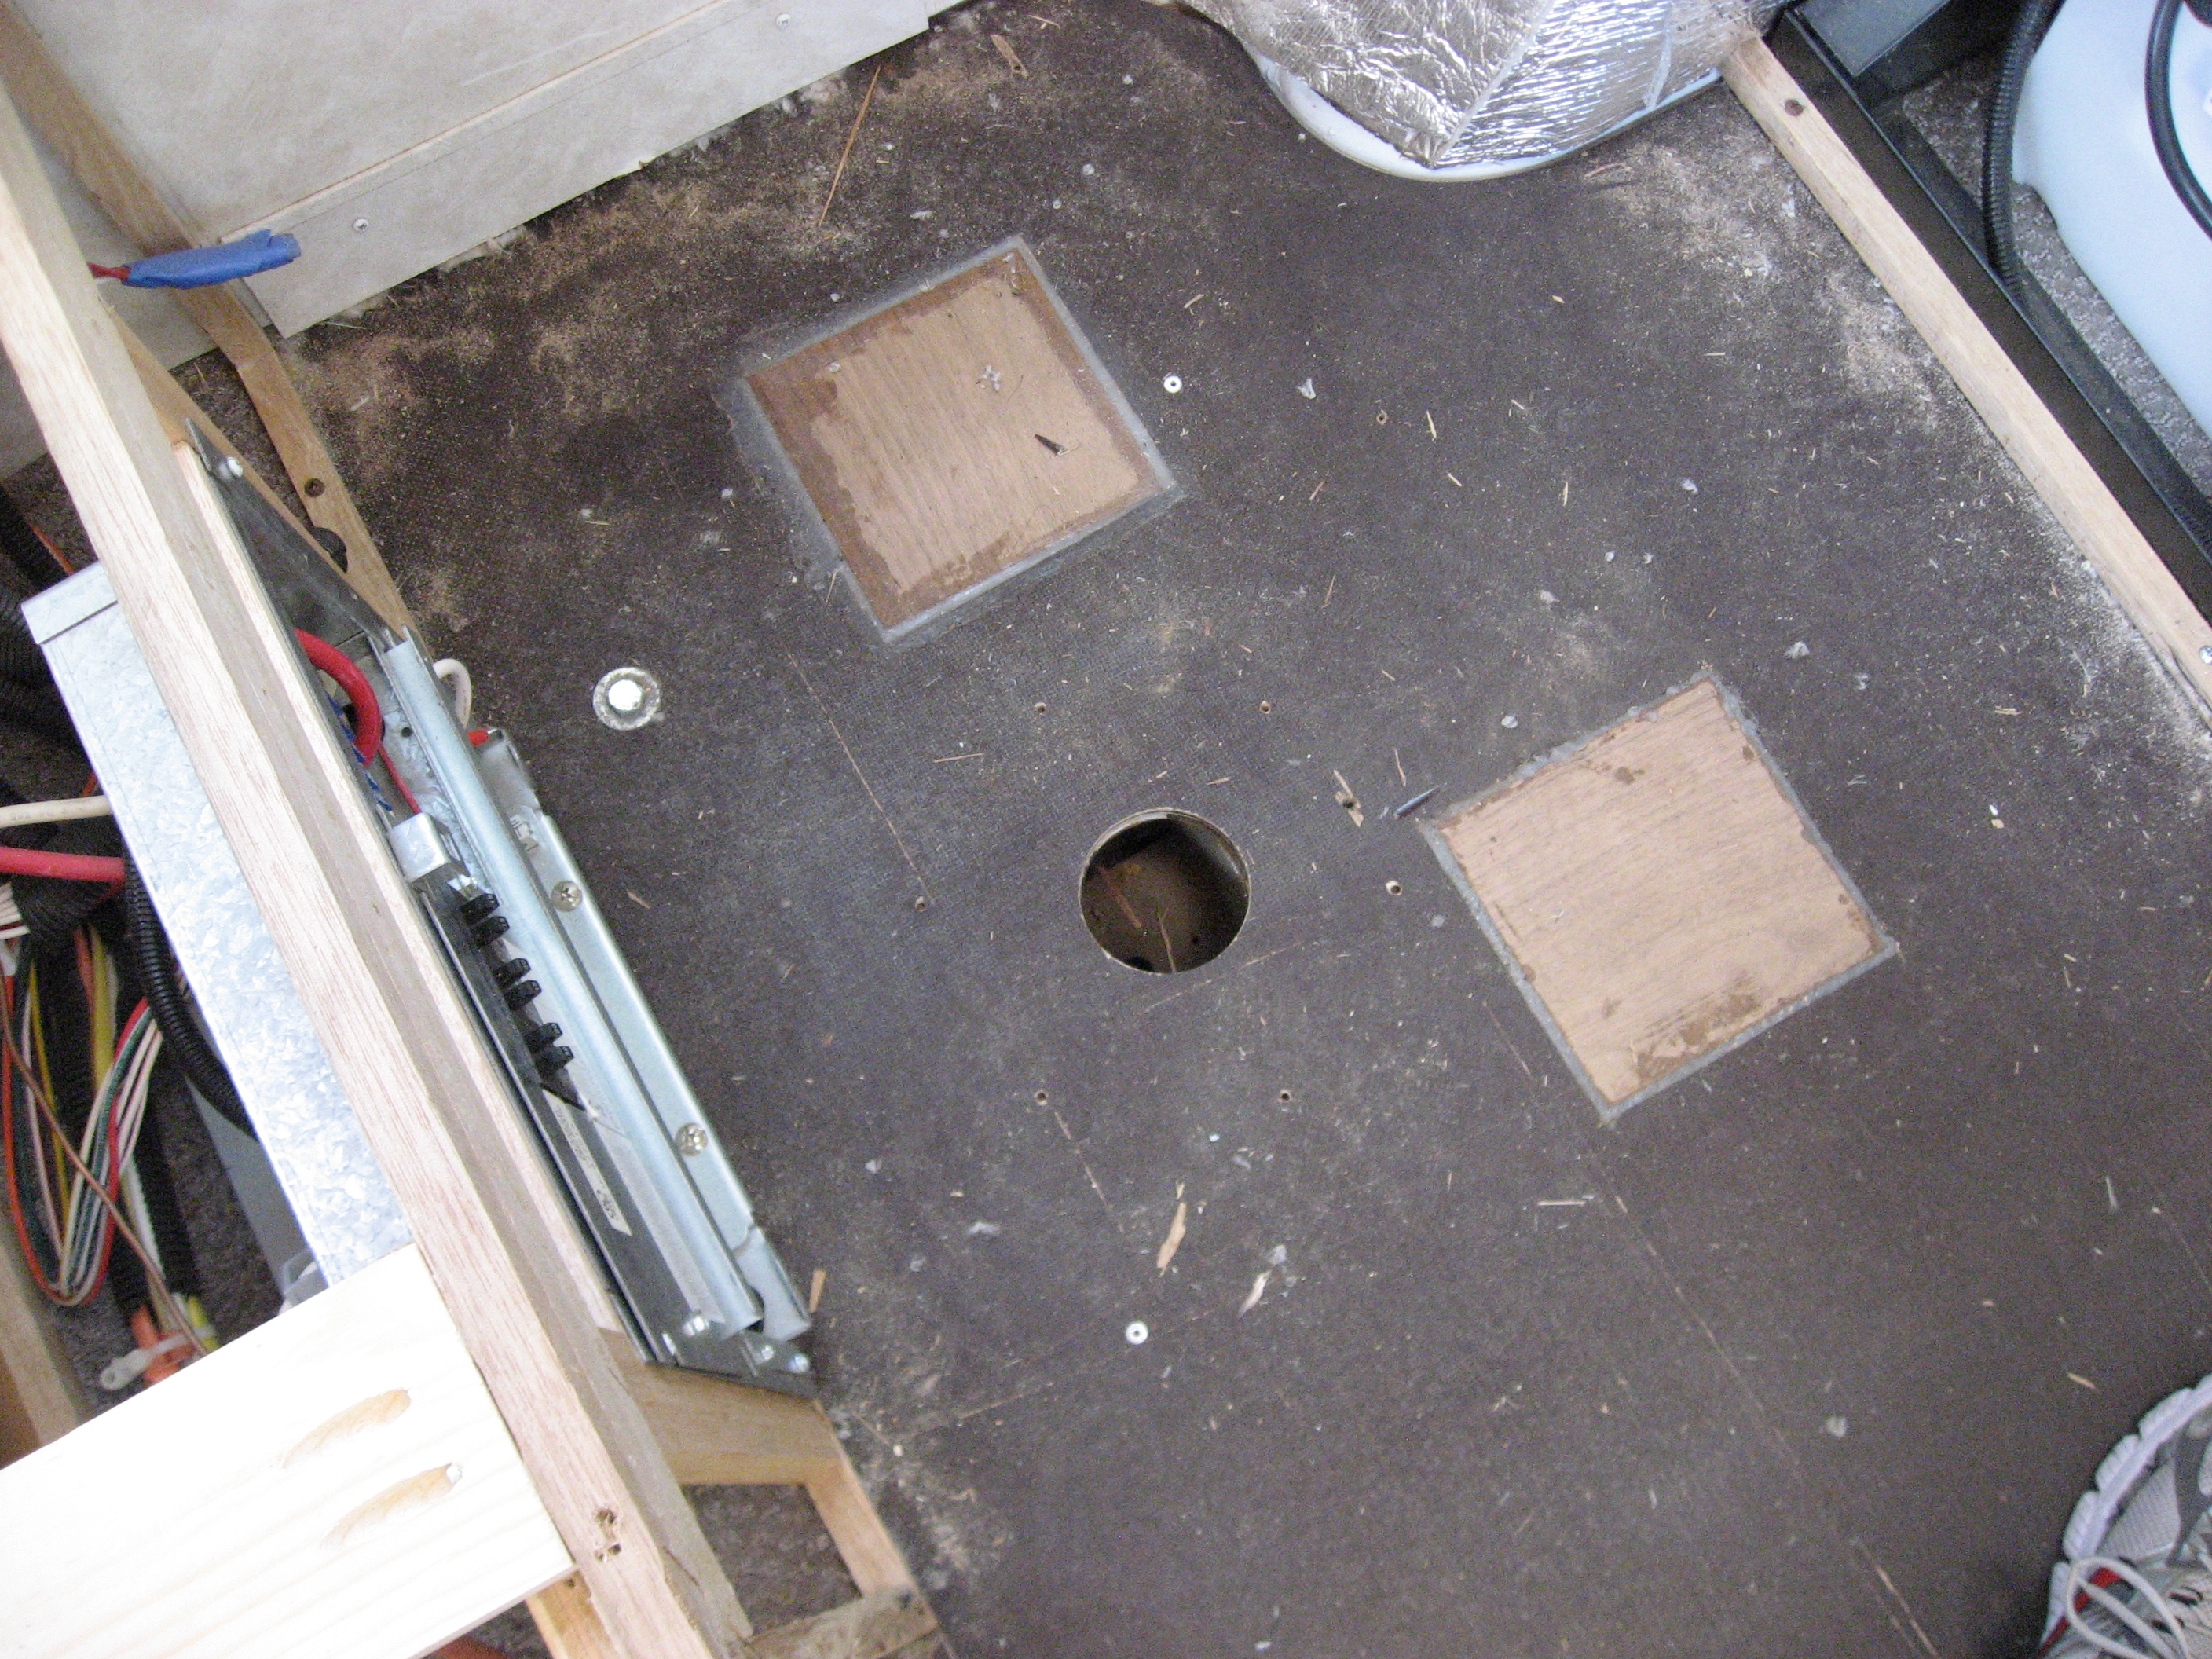
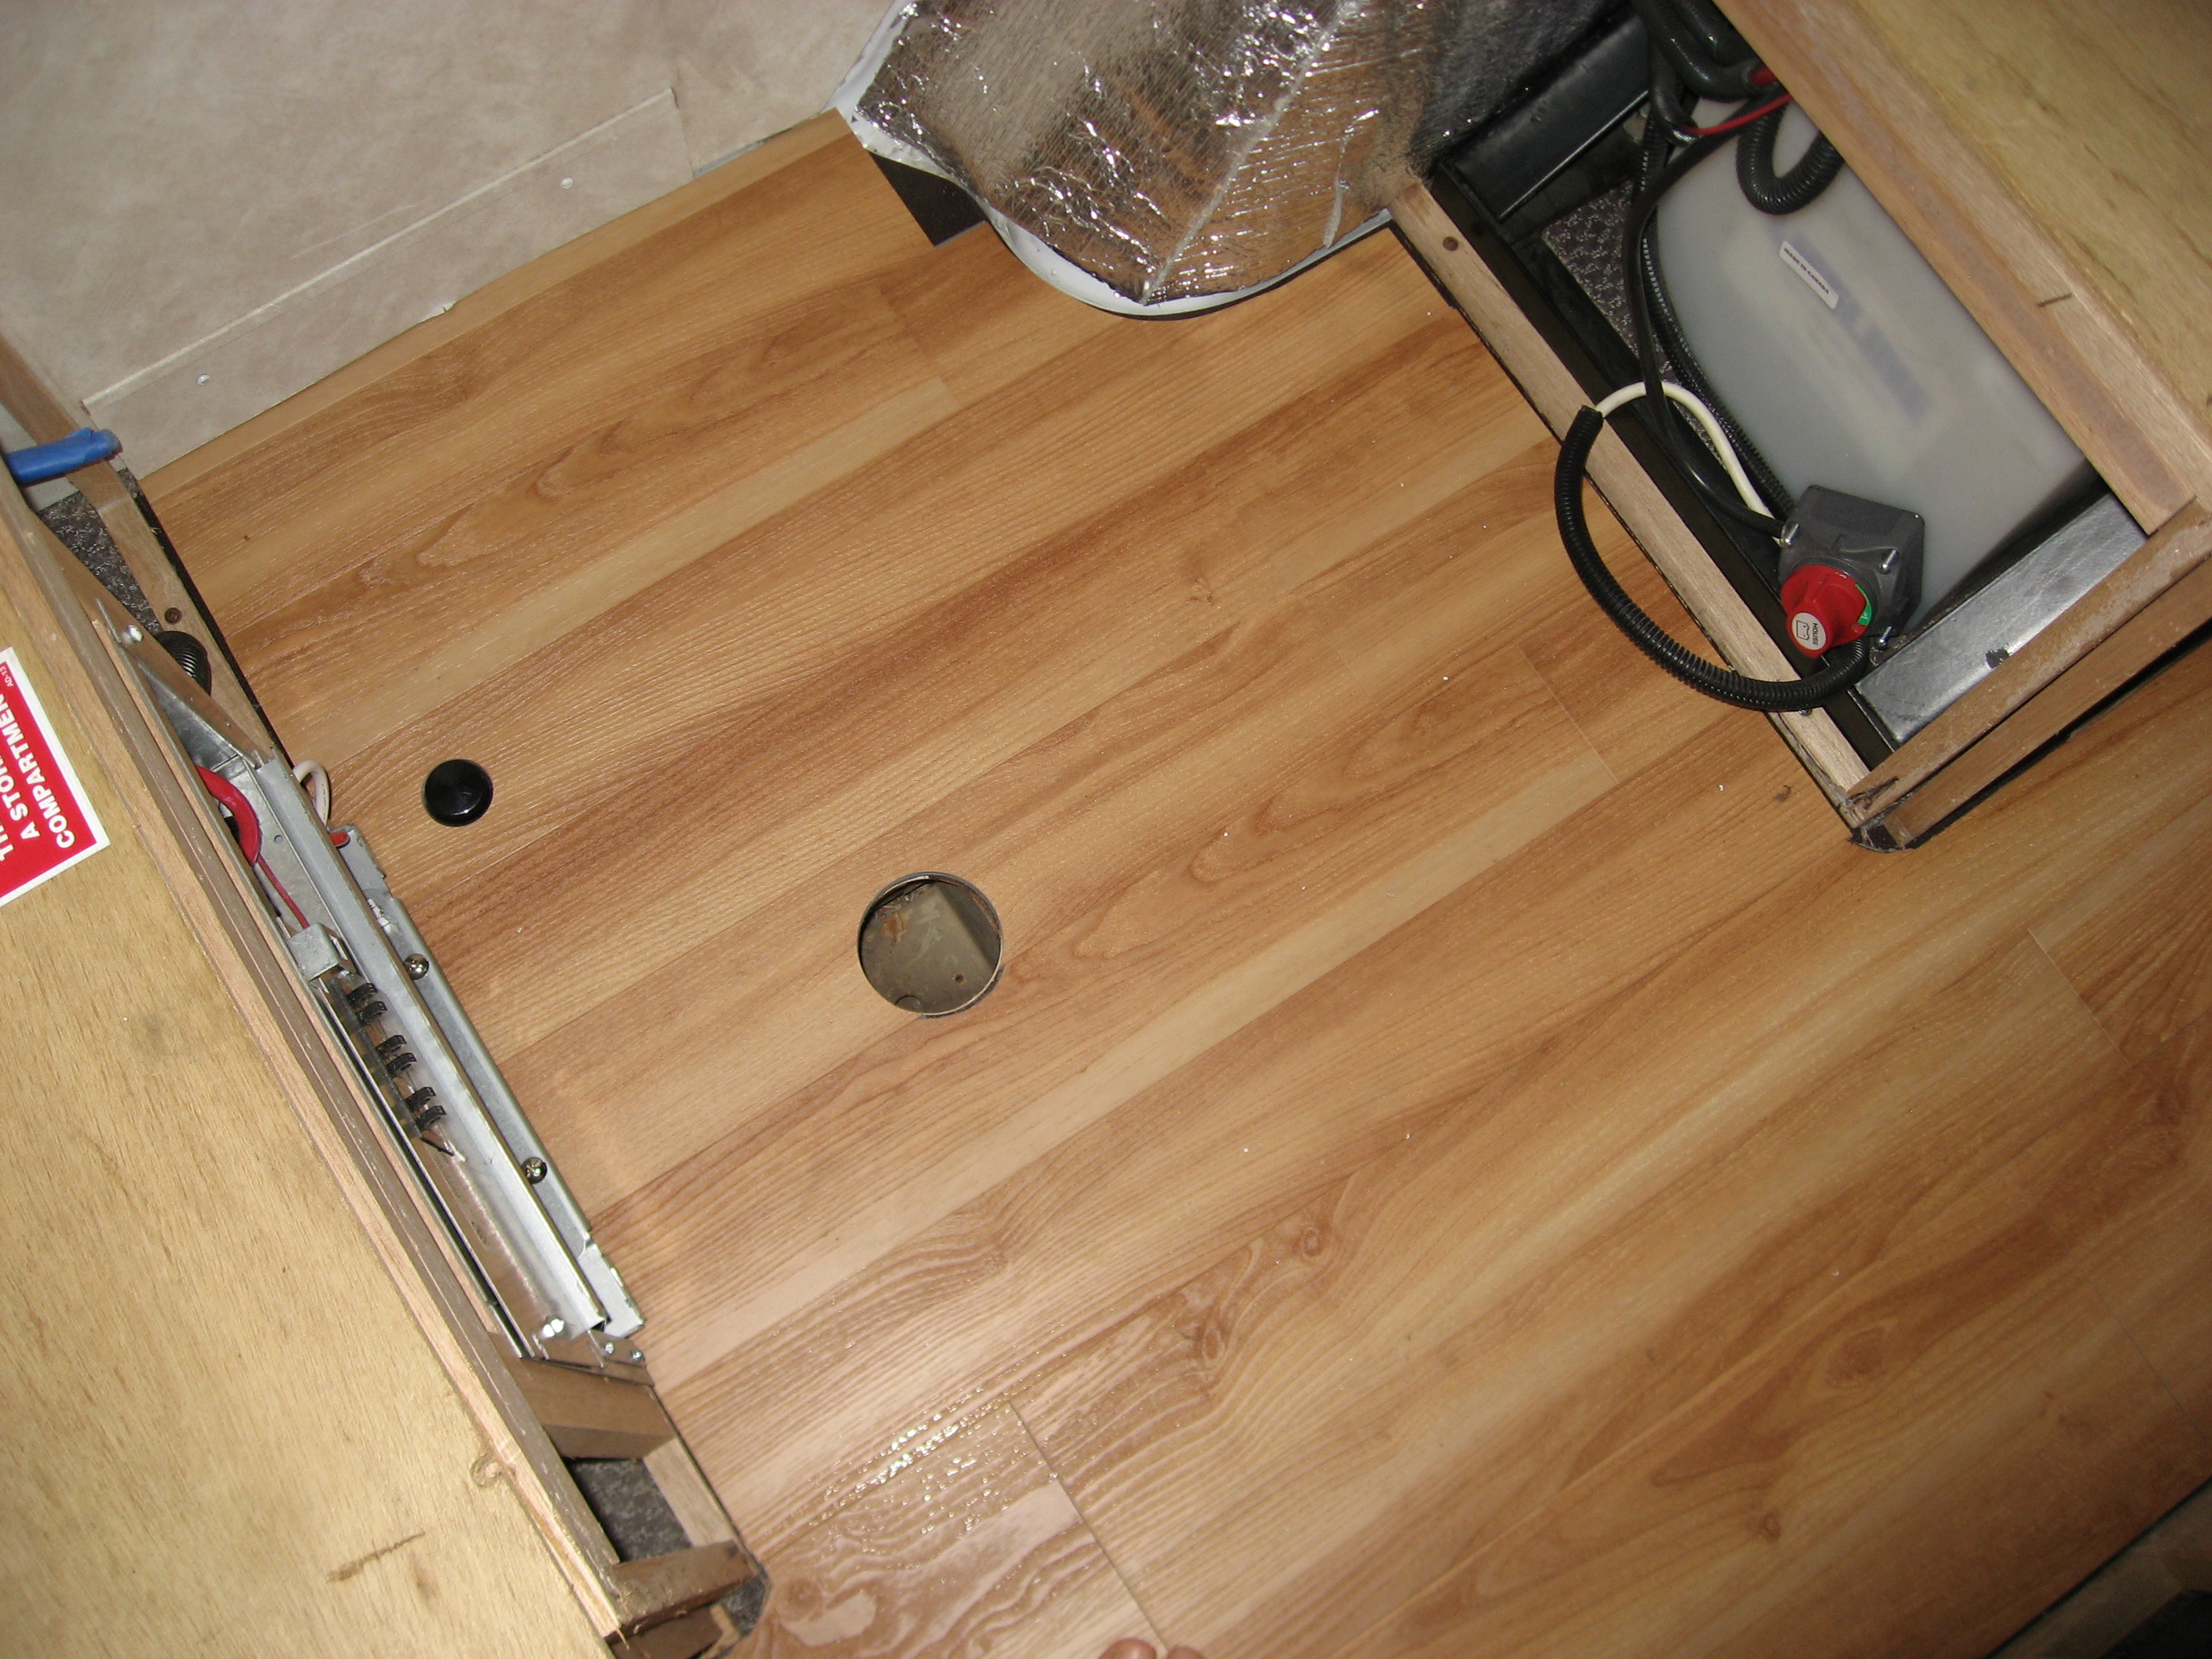
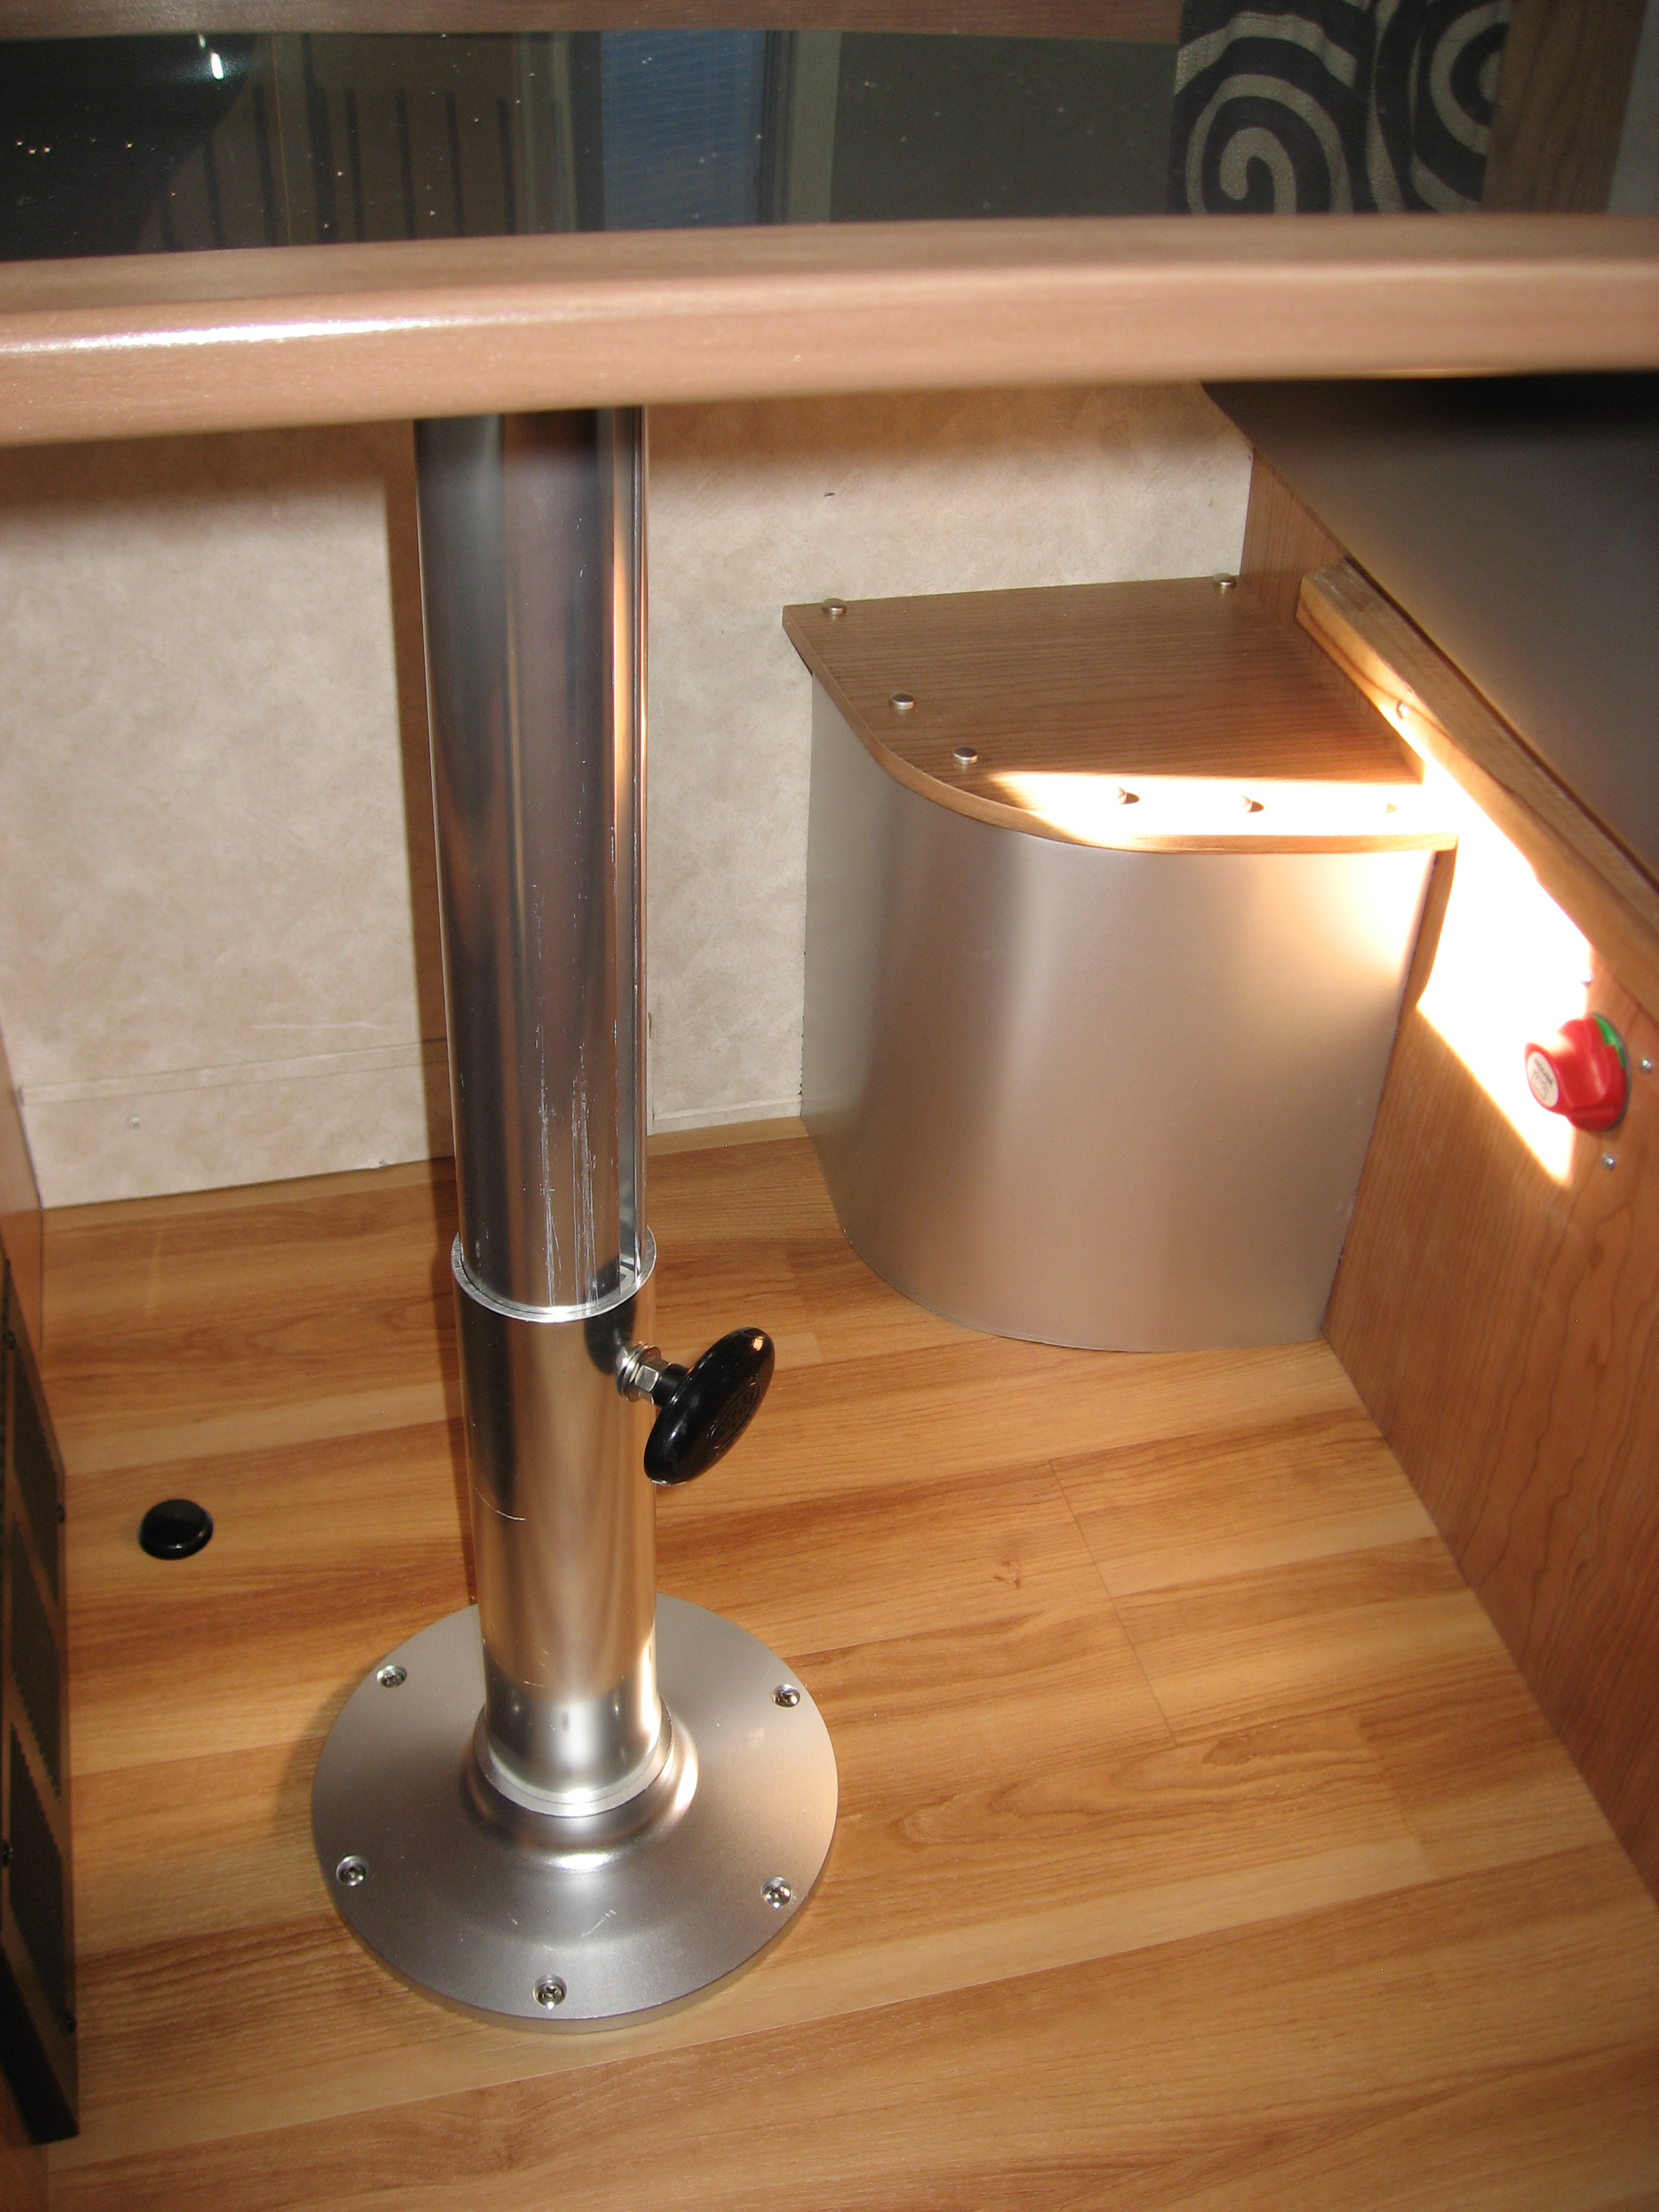
One of the things I did was to replace those stupid RV friction fit table legs with a marine pedestal table base. This picture shows where I patched the old holes in the floor and the new hole for the pop-up table. You can also see the Dynamat and ProDex insulation on the wheel well.
OK. Time to start putting things back together. Here we can see in the bathroom, I’ve got the ceiling in (it’s anodized aluminum) but still with the protective cover on it. The back window trim stayed in place (I had previously remade it). The ceiling went up with adhesive. I’m still amazed that everything in the RV wasn’t coated in adhesive in the process…
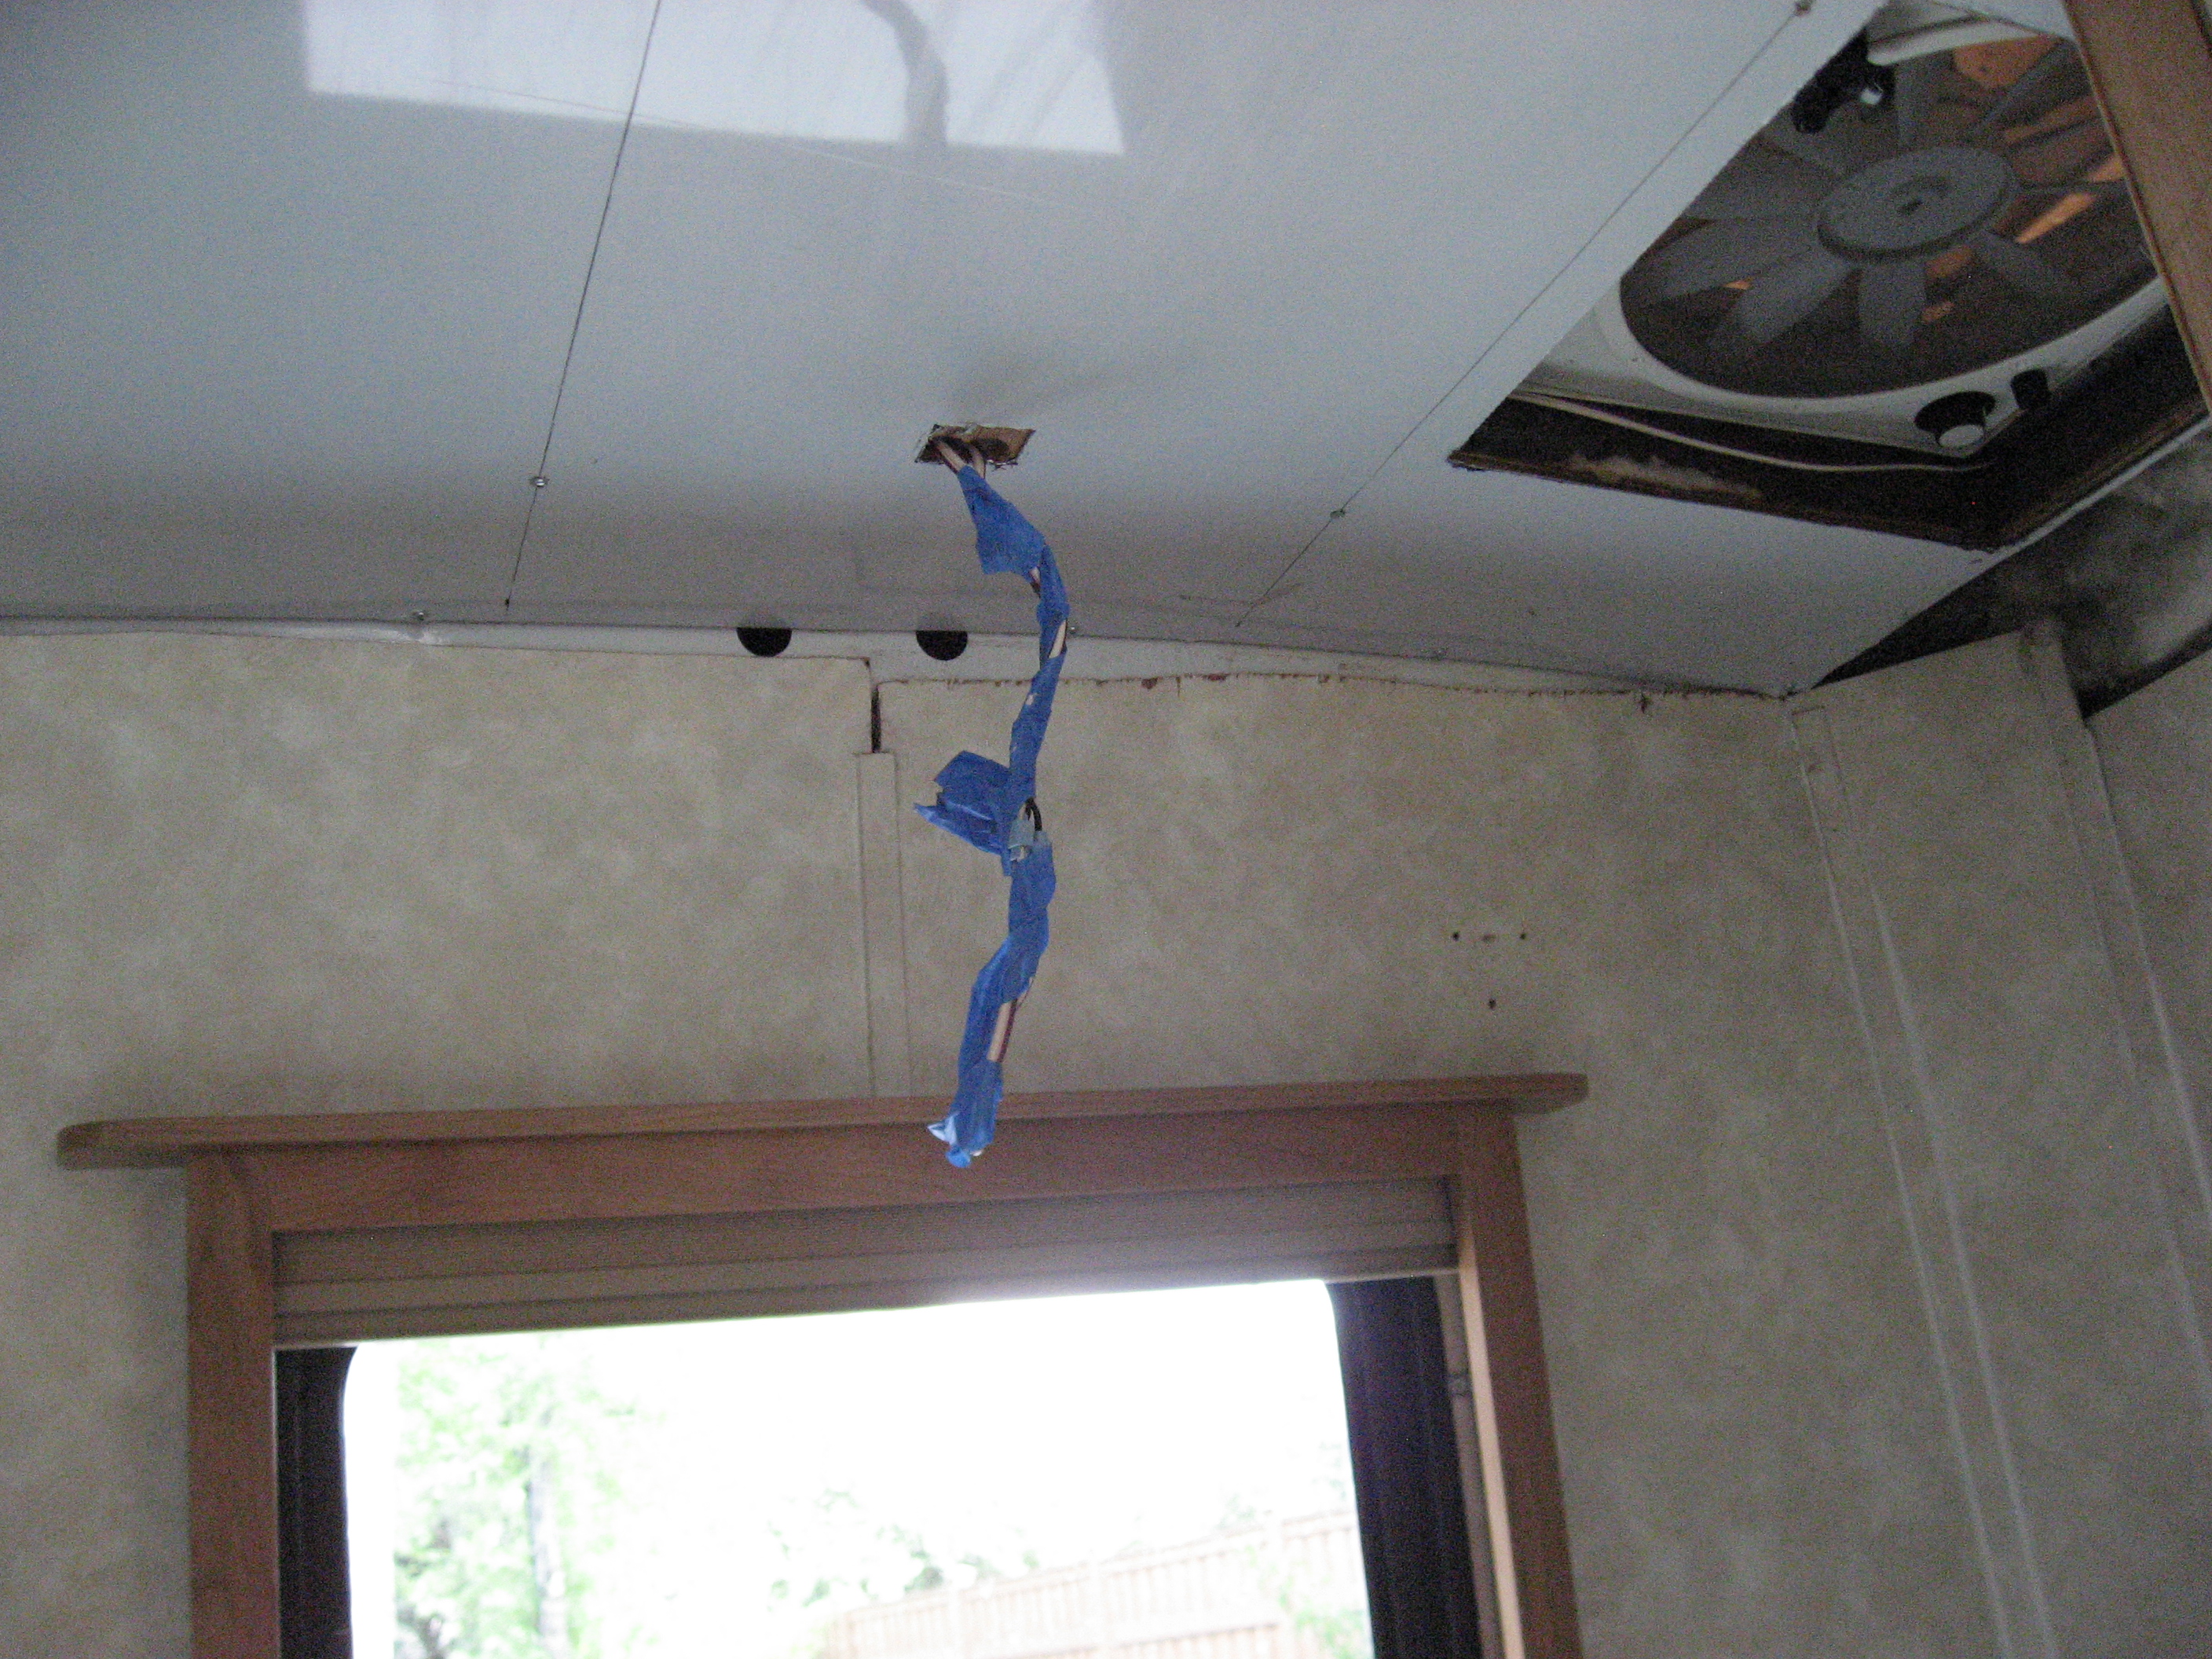
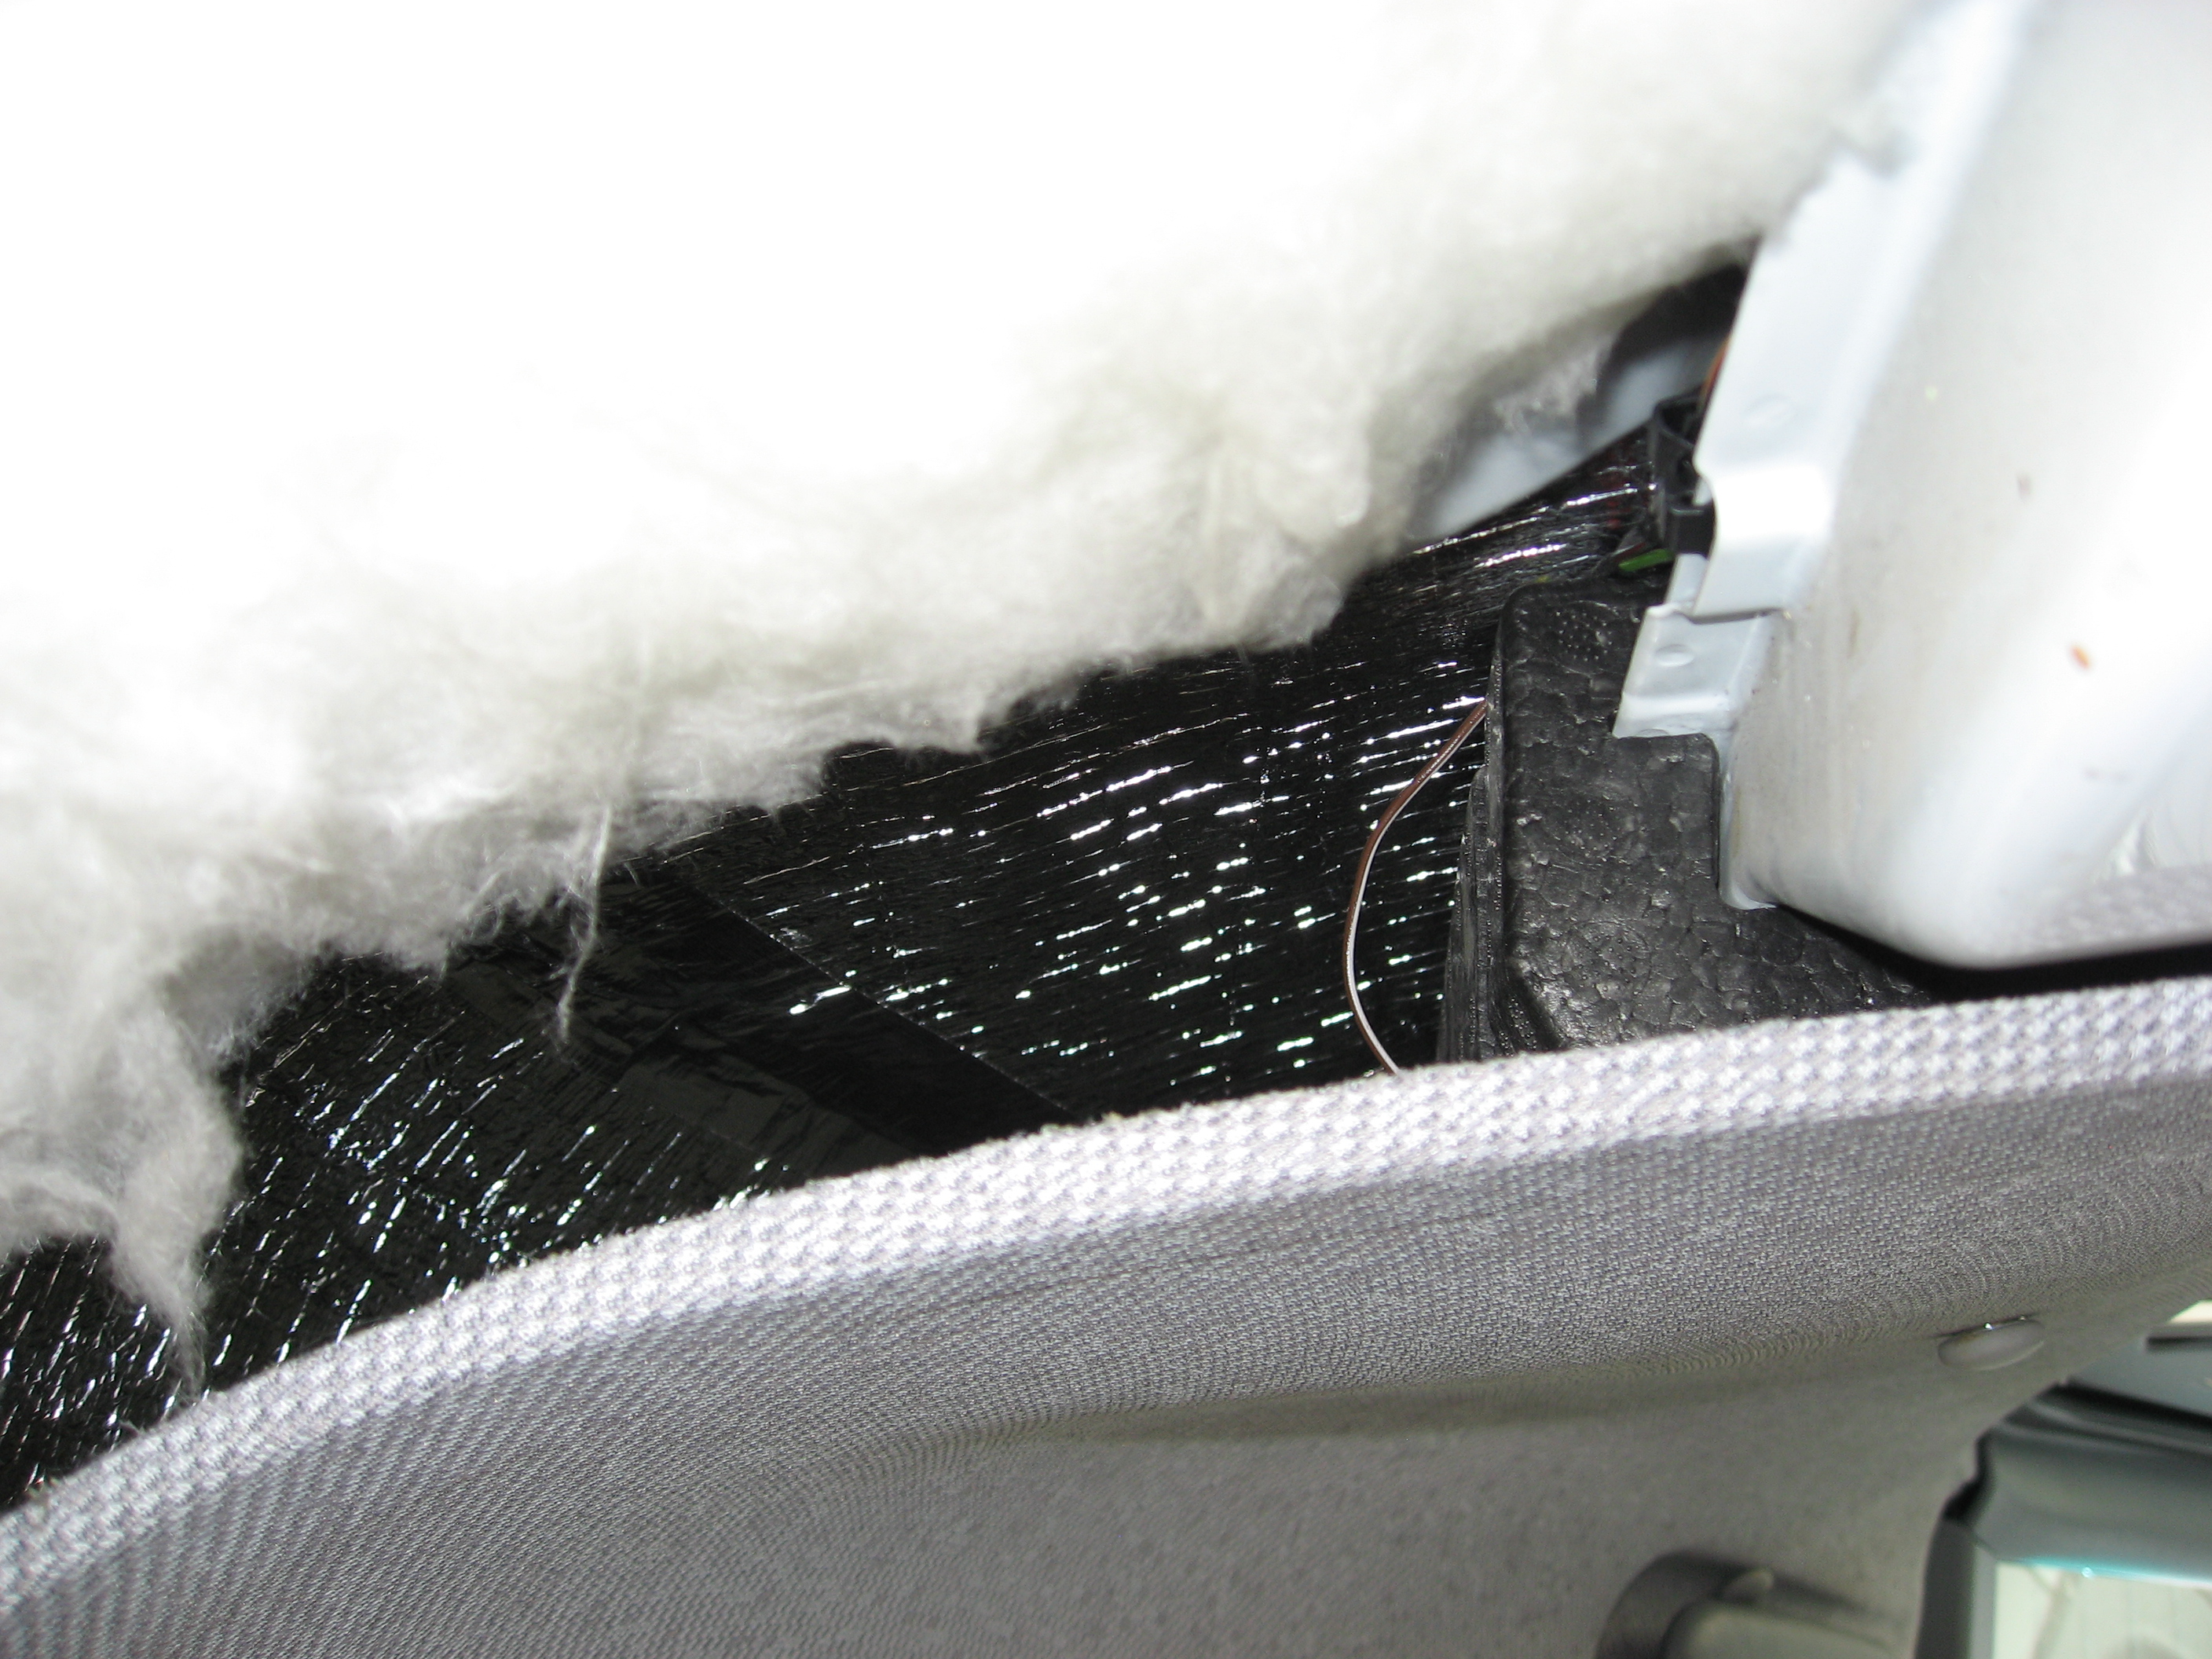
It’s kind of hard to tell what you’re looking at in this next one, but what I’m trying to show is the sound deadening and insulation I installed on the ceiling of the cab. There’s a layer of Dynamat, covered with a layer of ProDex insulation. Cab is much quieter now. (I can’t really tell if the insulation is working or not, but let’s just say that it is so I don’t feel silly for spending the time and money on it.)
So the walls of the shower were just some kind of RV wallpaper. I guess it was waterproof… maybe, but it didn’t seem right. I had some FRP panels to add to the walls of the shower surround, but the special FRP adhesive wouldn’t stick properly to wallpaper. So I had to peel it off. This was a fun afternoon.
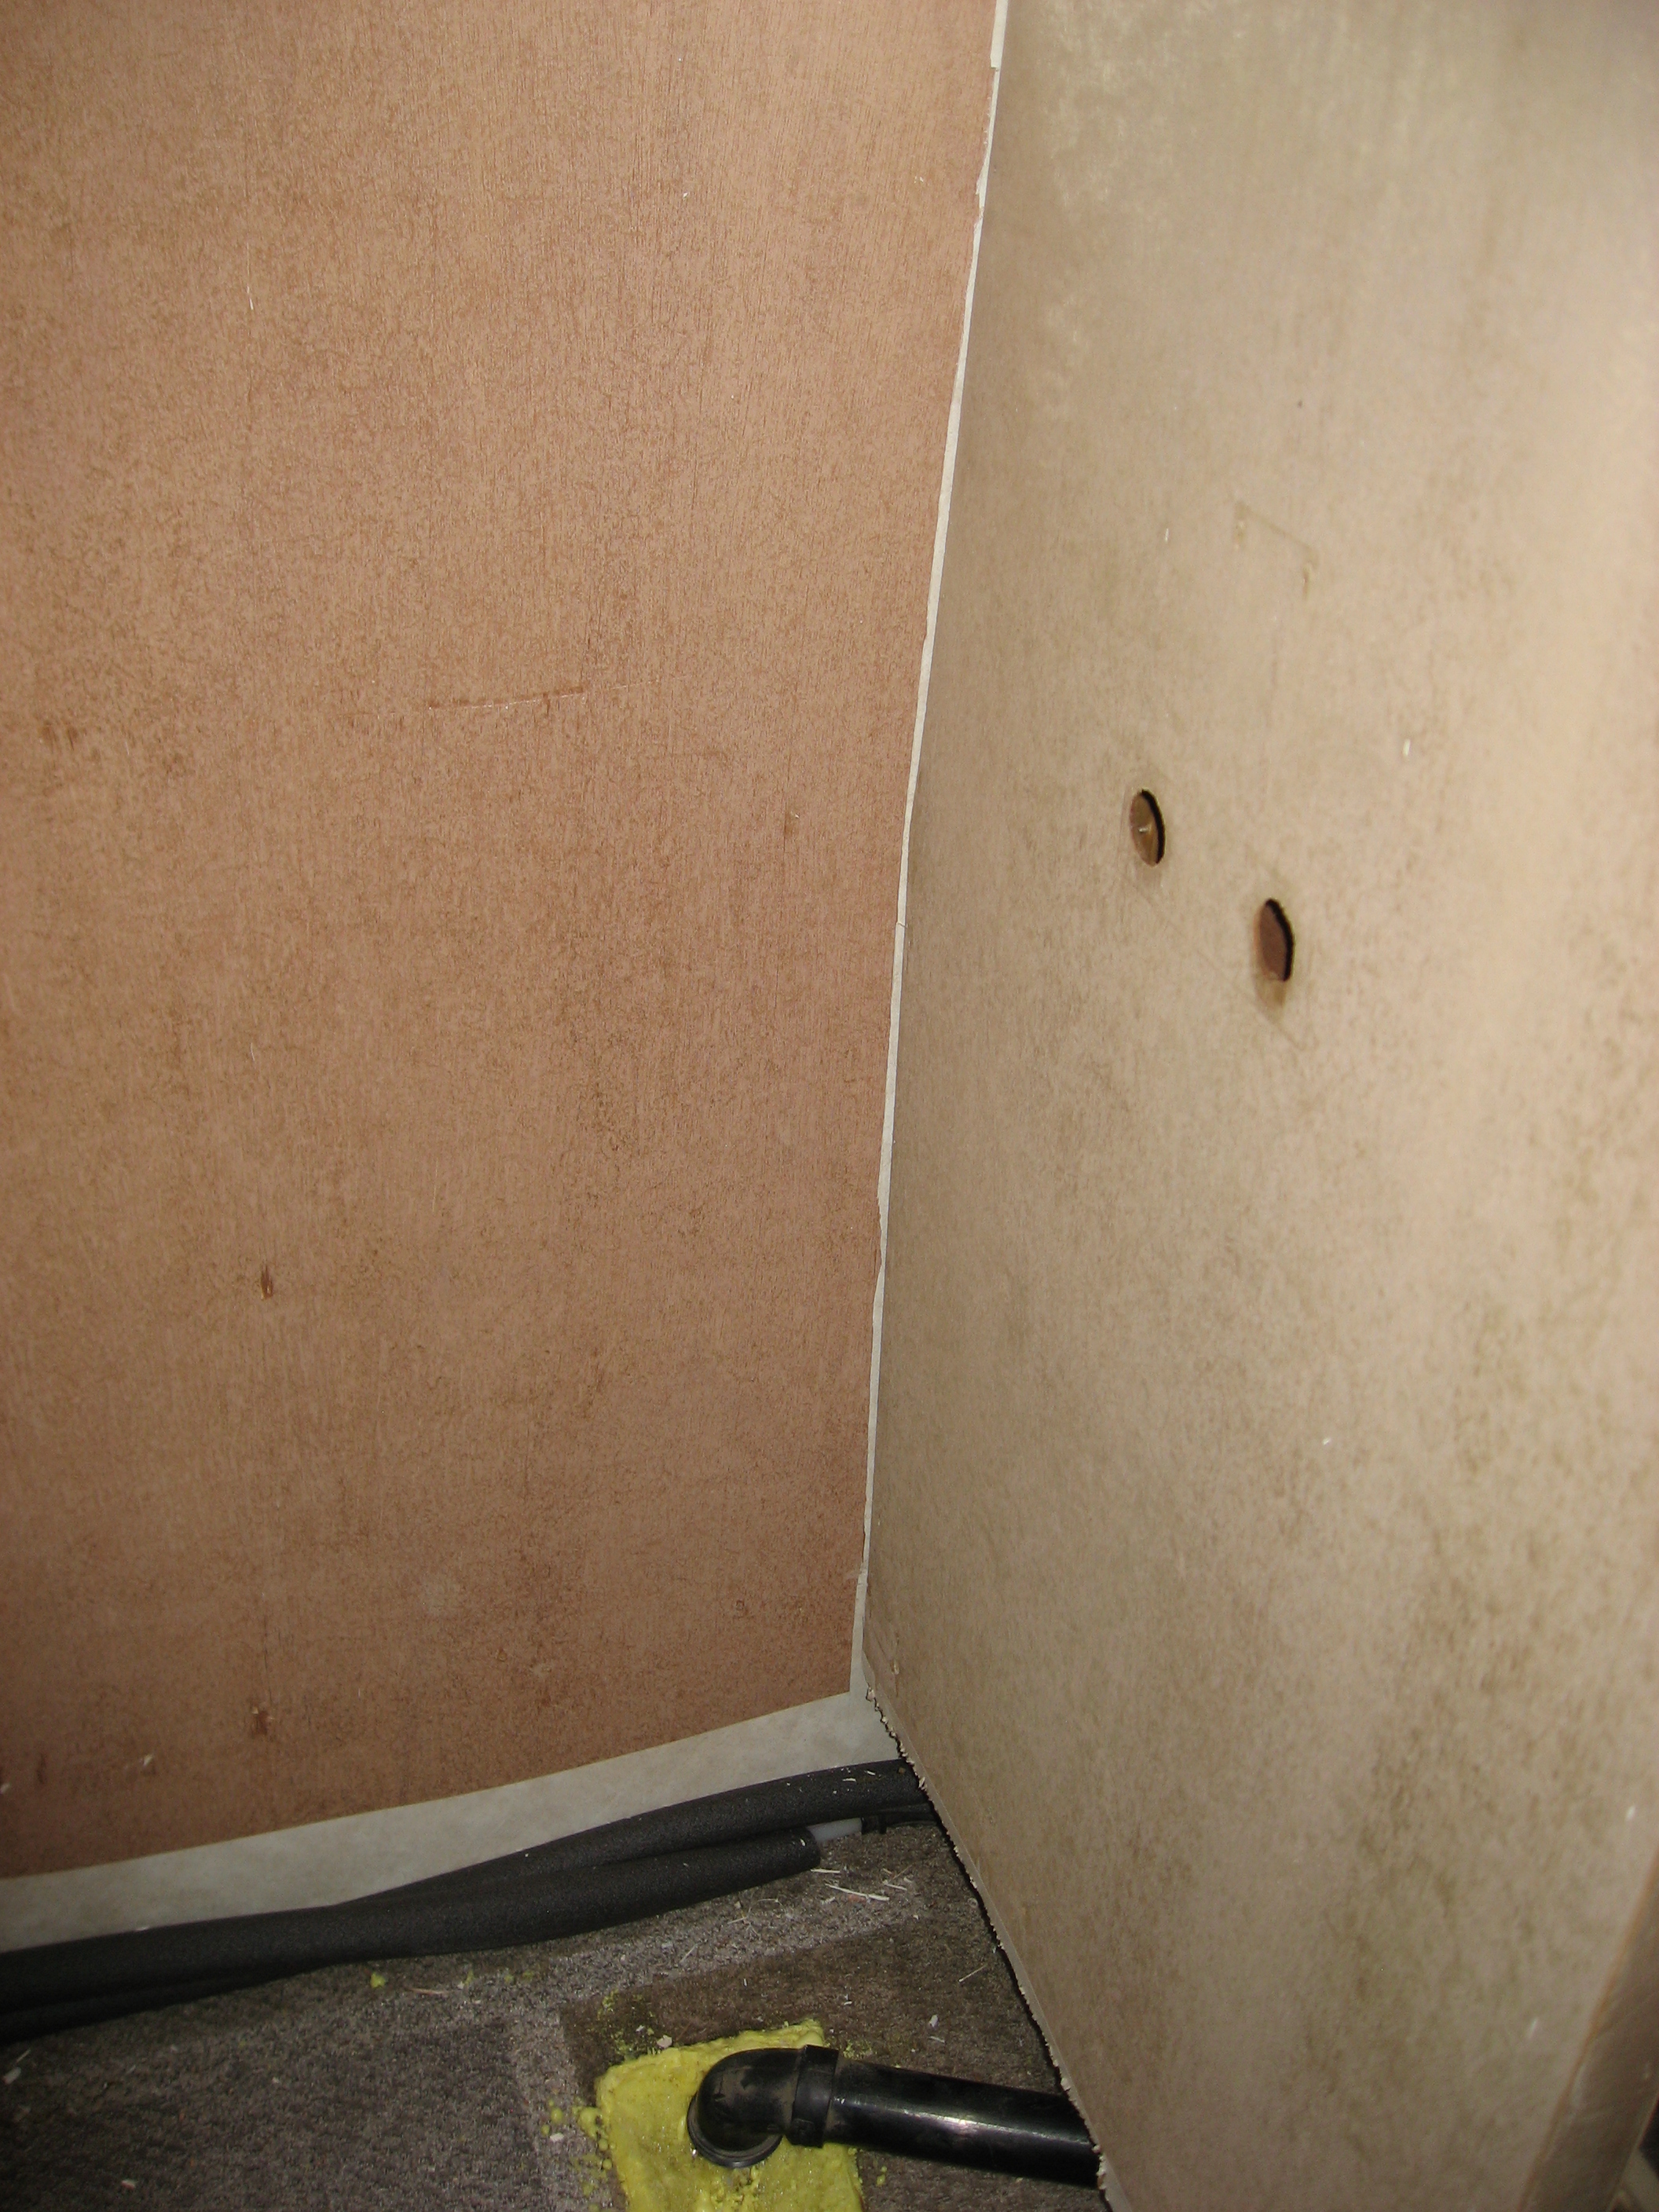
You can also see the expanding foam stuff I put in the hole where the trap was for the shower. When they built this, they just put a plastic cover over a huge hole in the floor they cut. It would let in all kinds of cold in the winter. So I filled it with that evil expanding foam, and then carved out space for the trap.
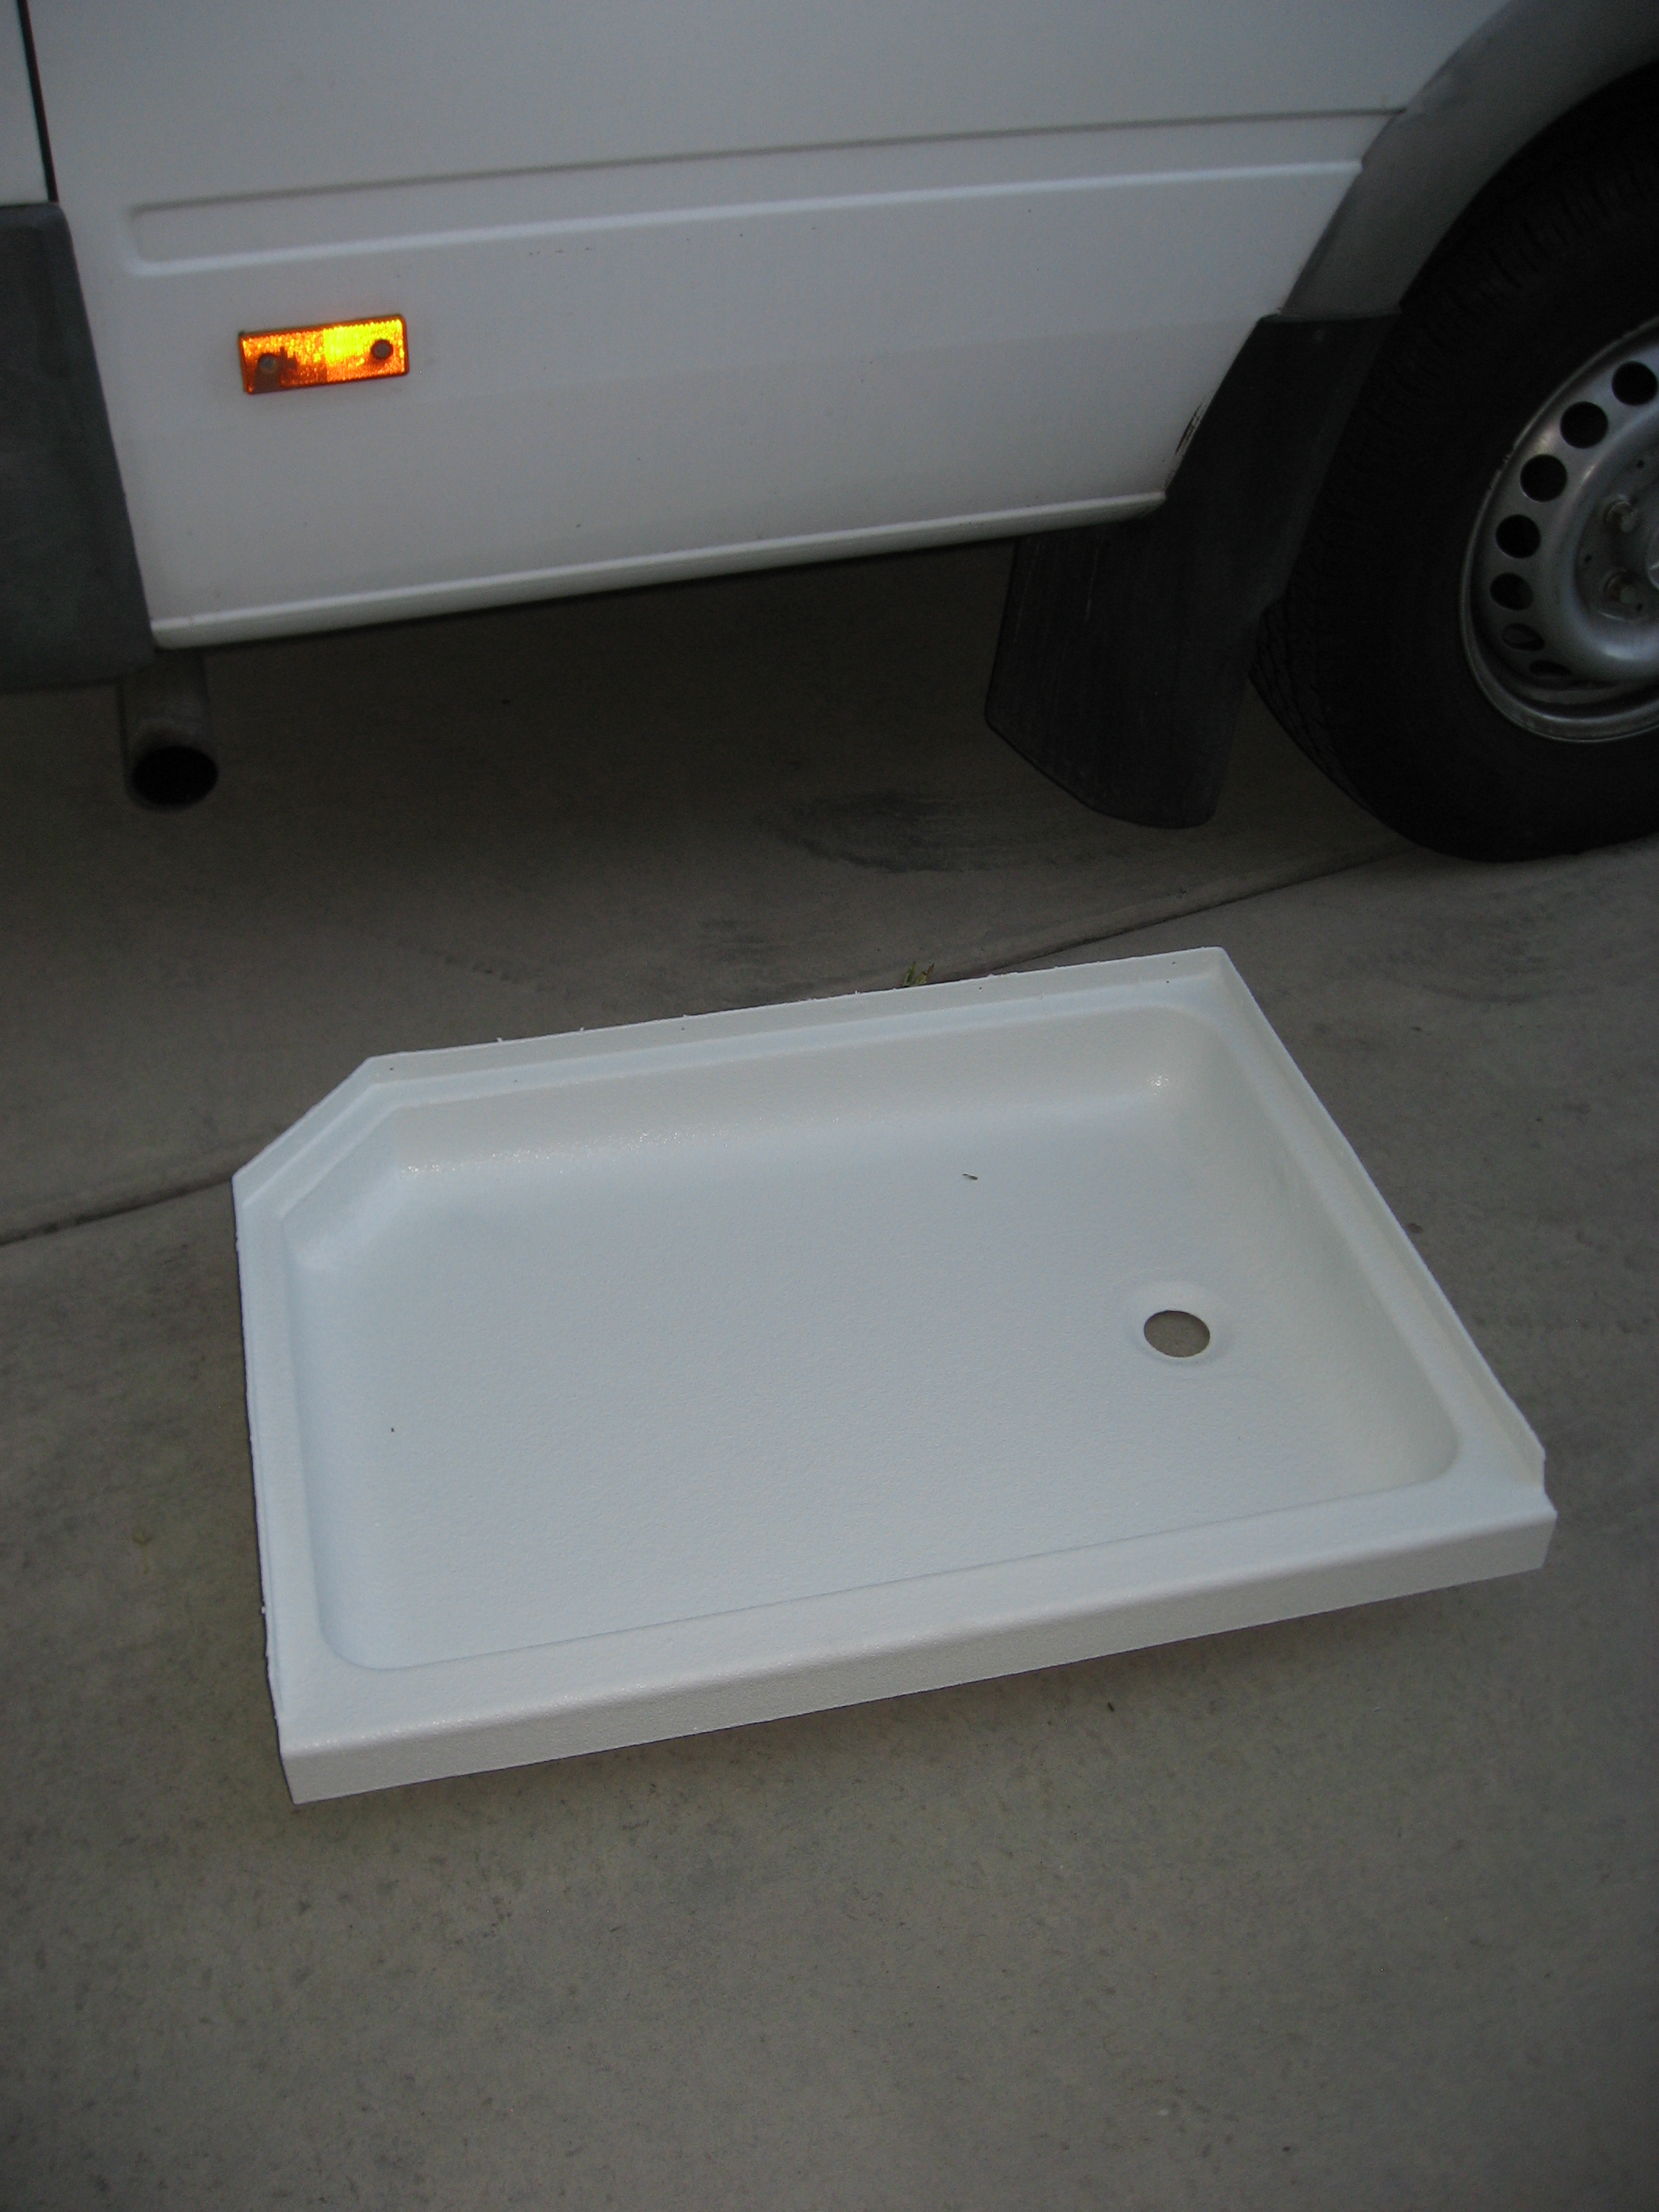
The shower pan was yellowed and gross looking, but structurally sound. I could have had a new one made for about $350, but instead, I got the original one coated with LineX for about $60. It turned out pretty well.
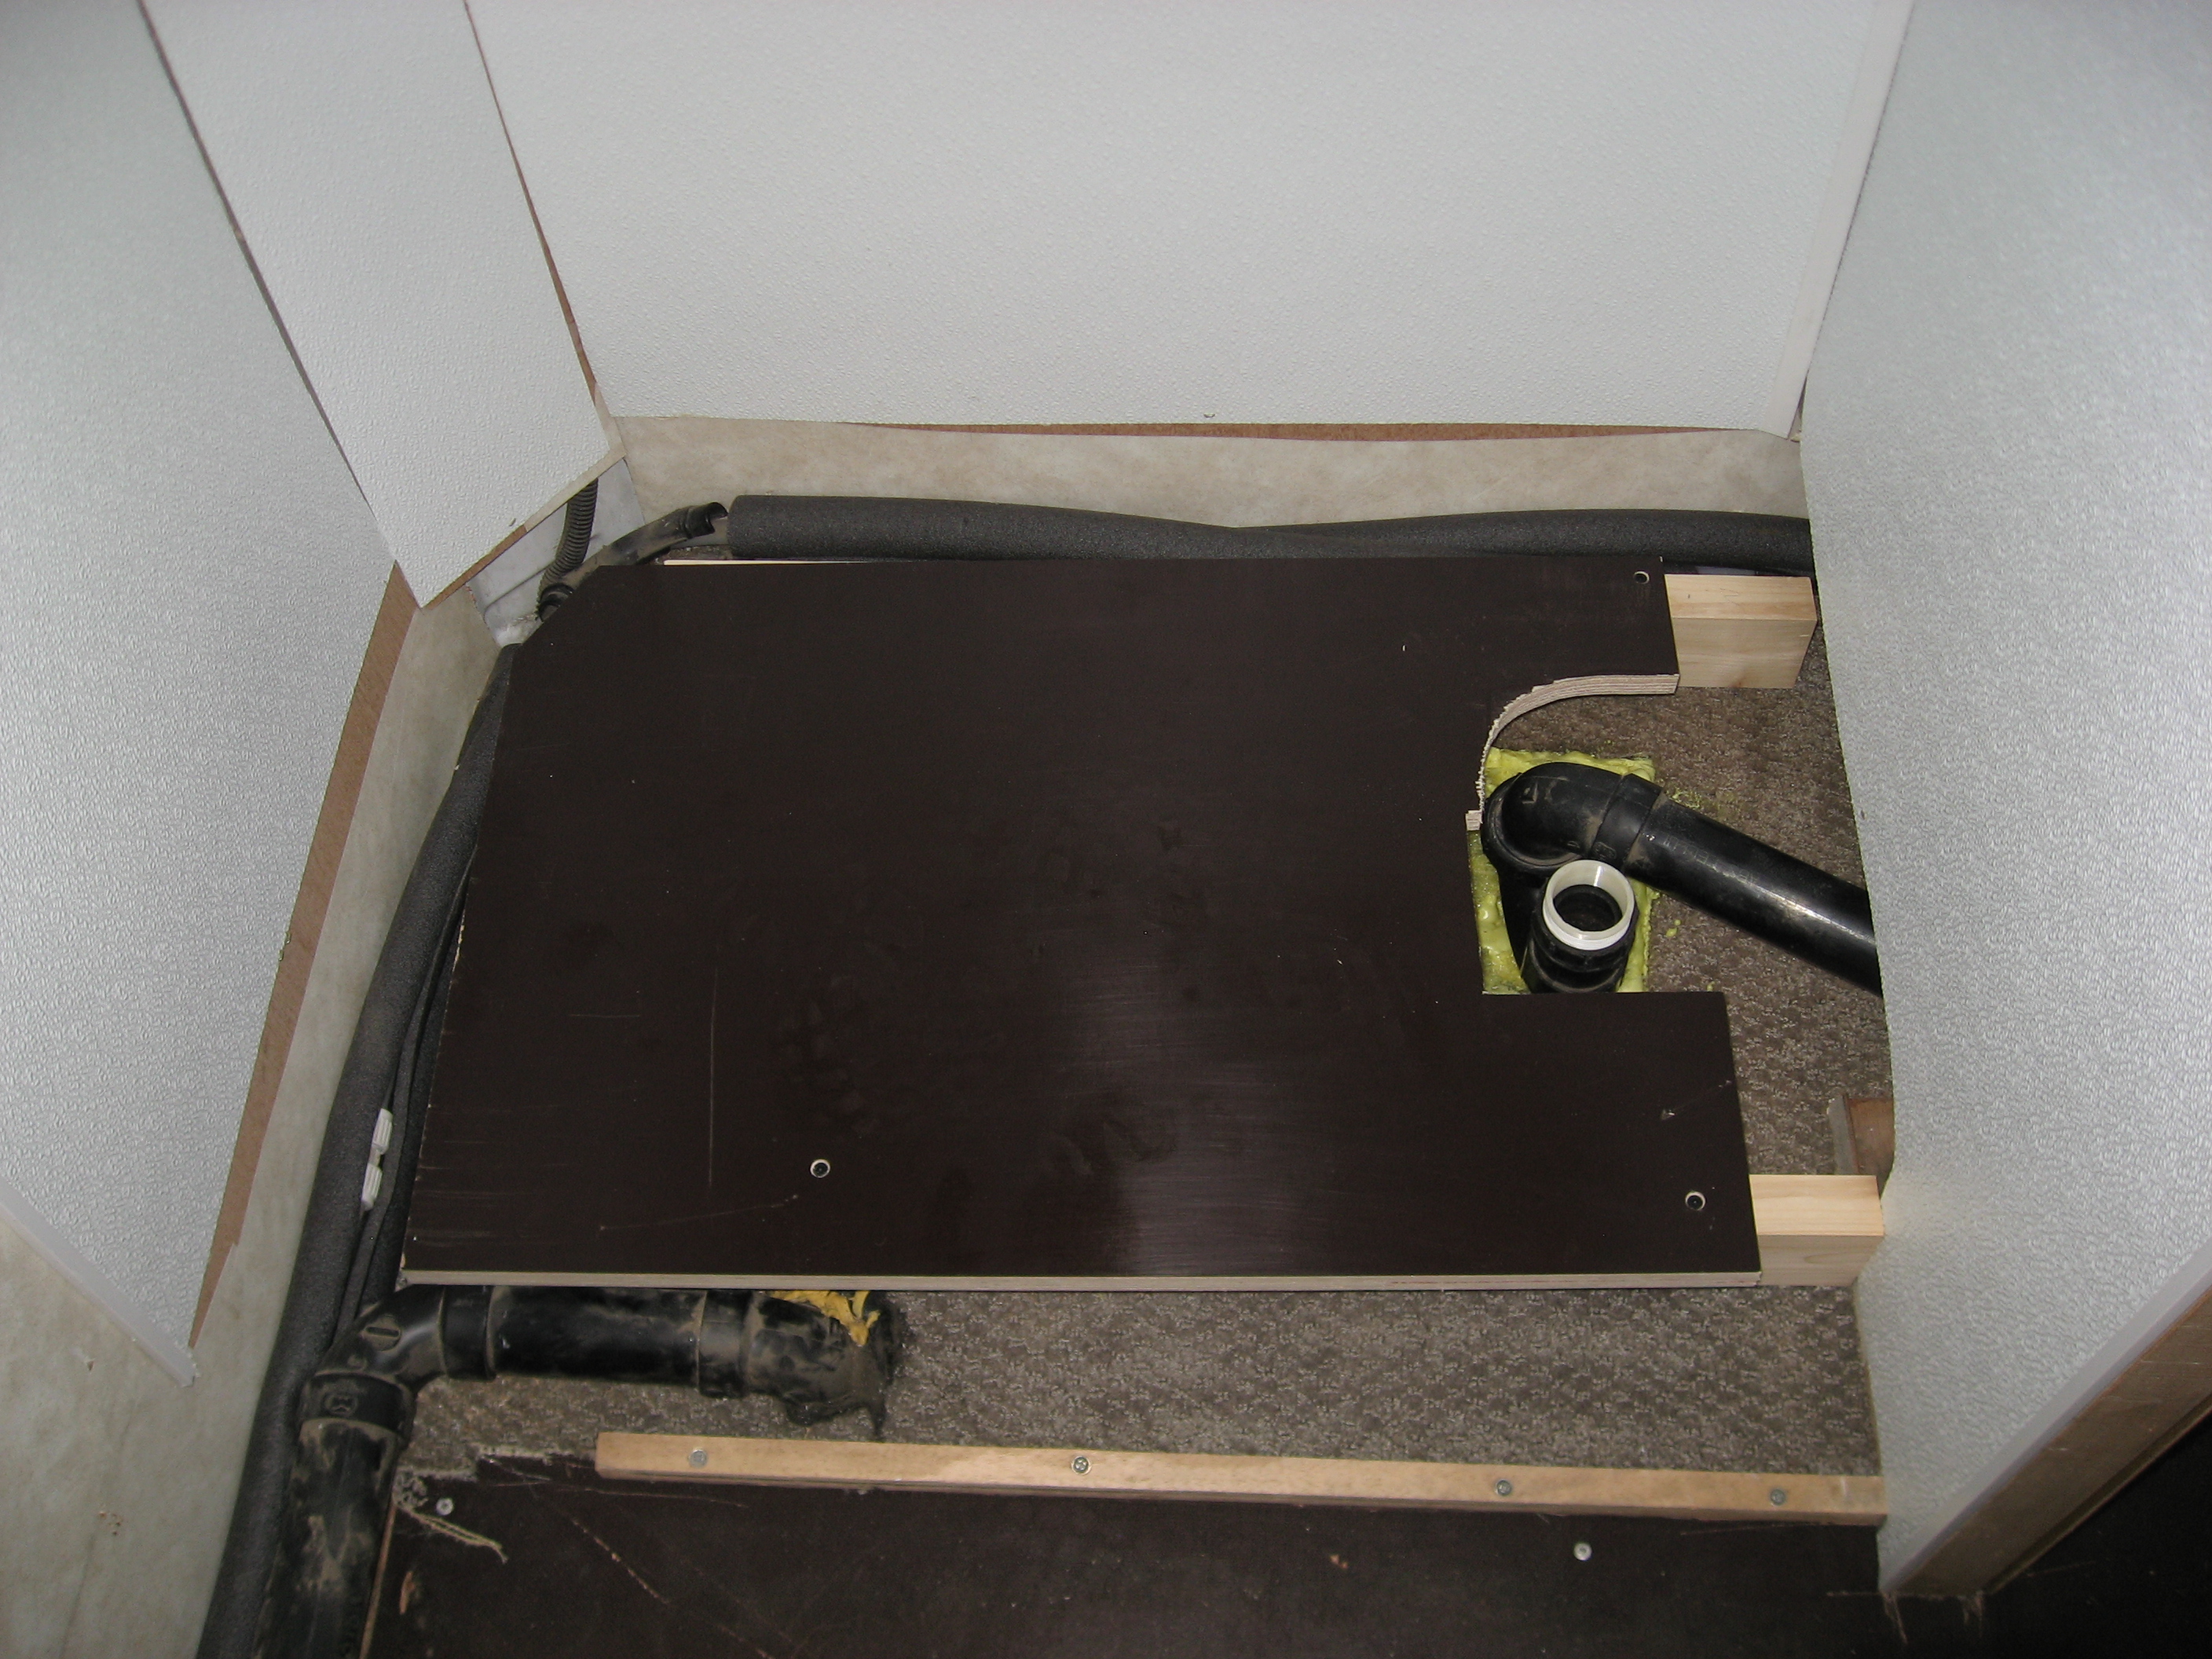
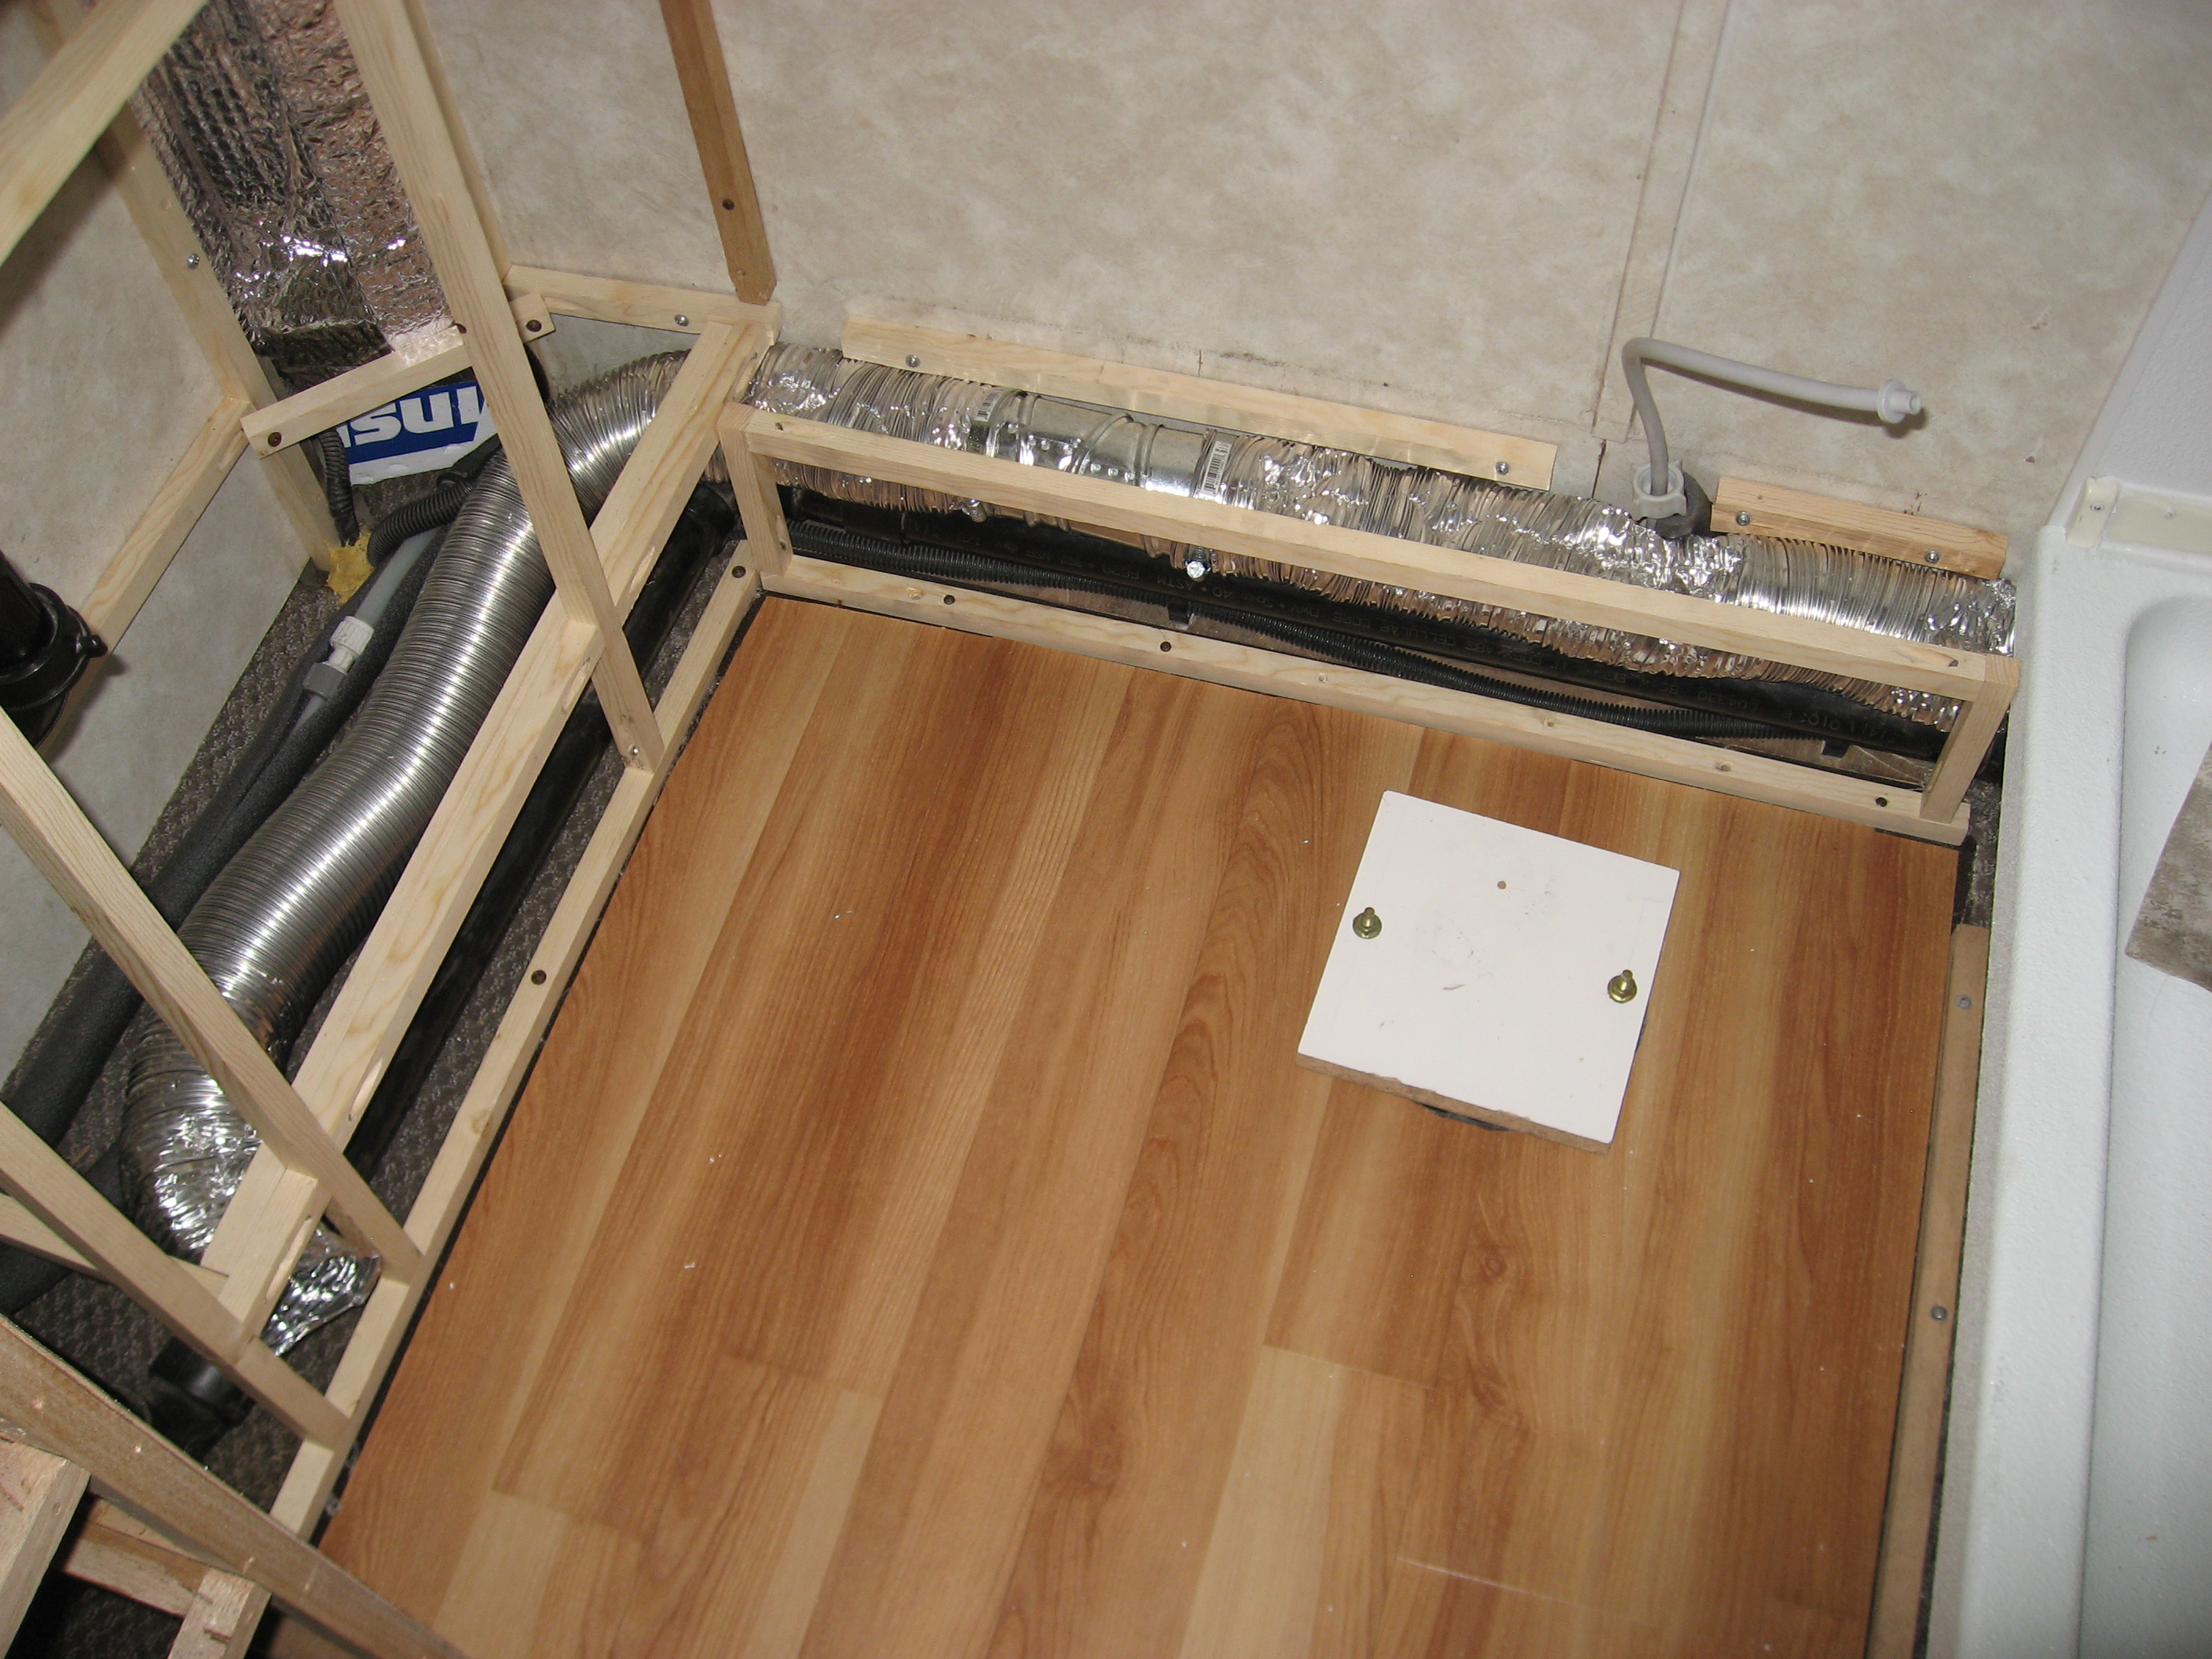
Here you can see the support I put in under the shower to keep the pan from flexing. You can also see where I carved out the foam and fit the trap back in. I also later ran ducting for heat around the back of the shower. It helps with heat distribution, but mostly, I hoped it would keep the water pipes from freezing. Also, you can see the FRP panels glued up, but not finished out yet.
The bathroom lower cabinet was this weird, face frame abomination. It sucked, bad, and had to go. This is the new frame-up I made for it. You can see lots of pocket screws. LOTS of pocket screws and glue went into this rebuild.

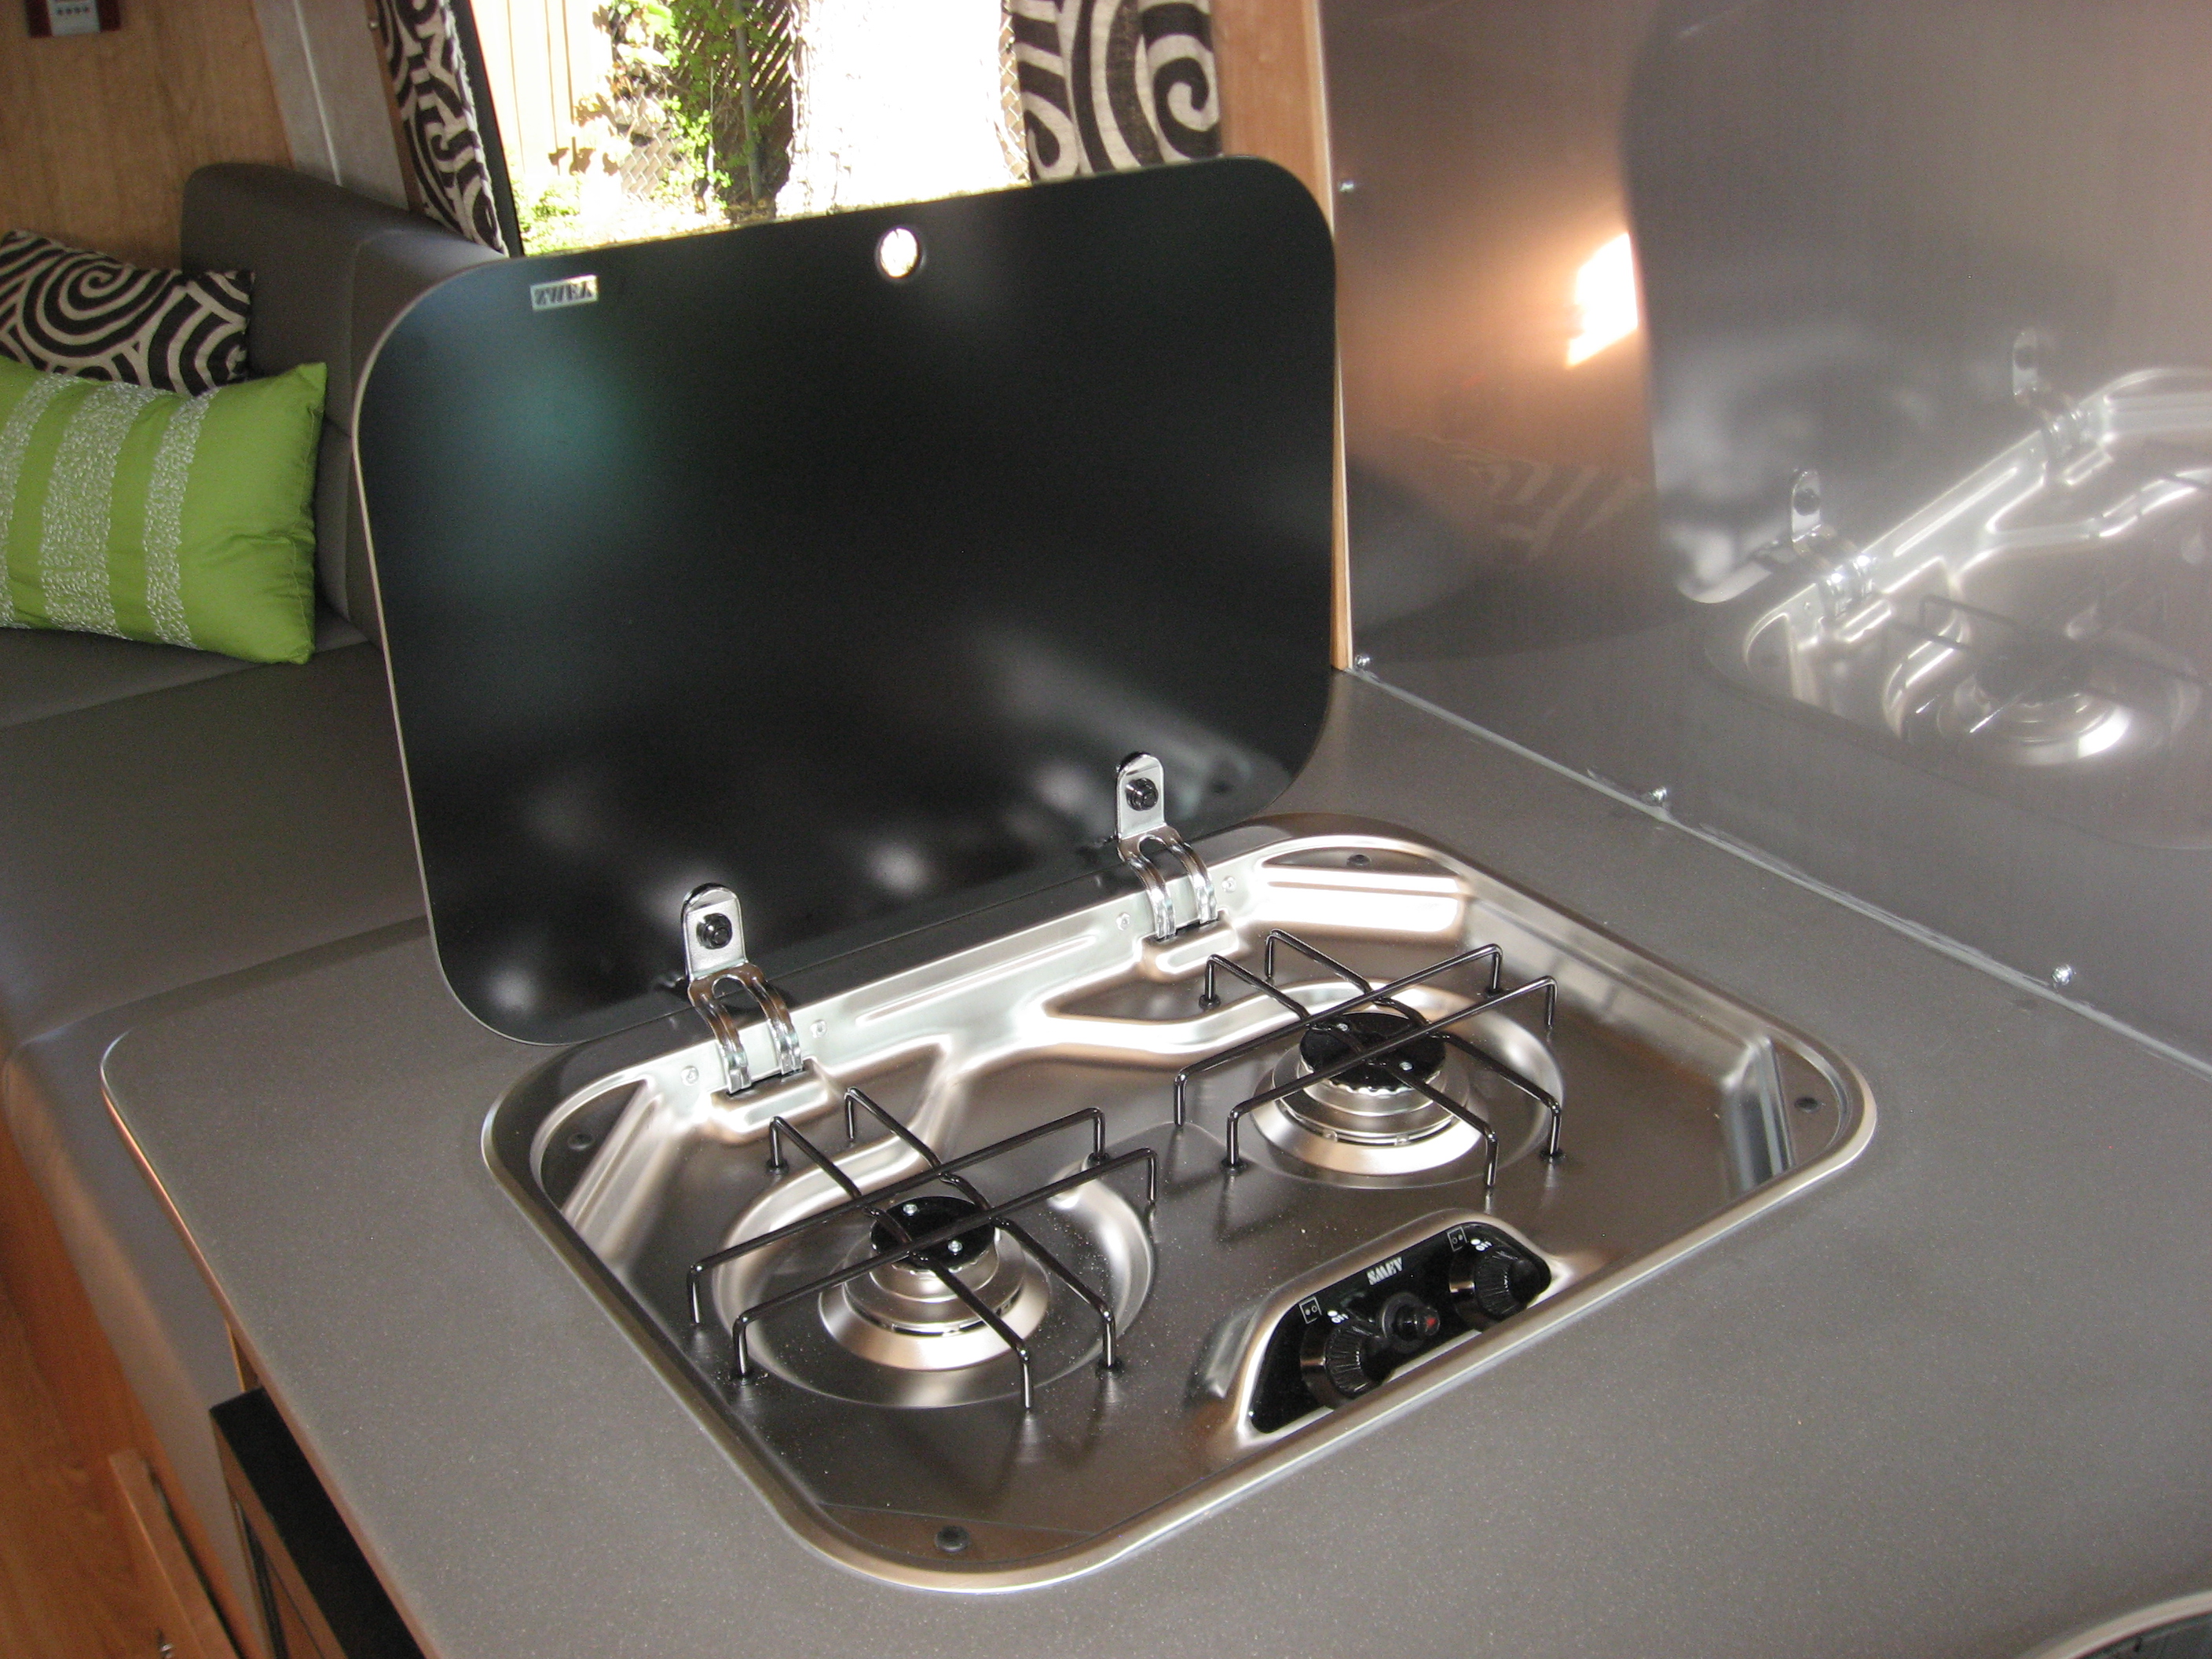
Here you can see the upper cabinets in in the main coach have gone in, and even the Corian countertop is in place with the cooktop mounted. The face frames are actually solid cherry. Where you see panels, they’re cherry faced, veneer core plywood.
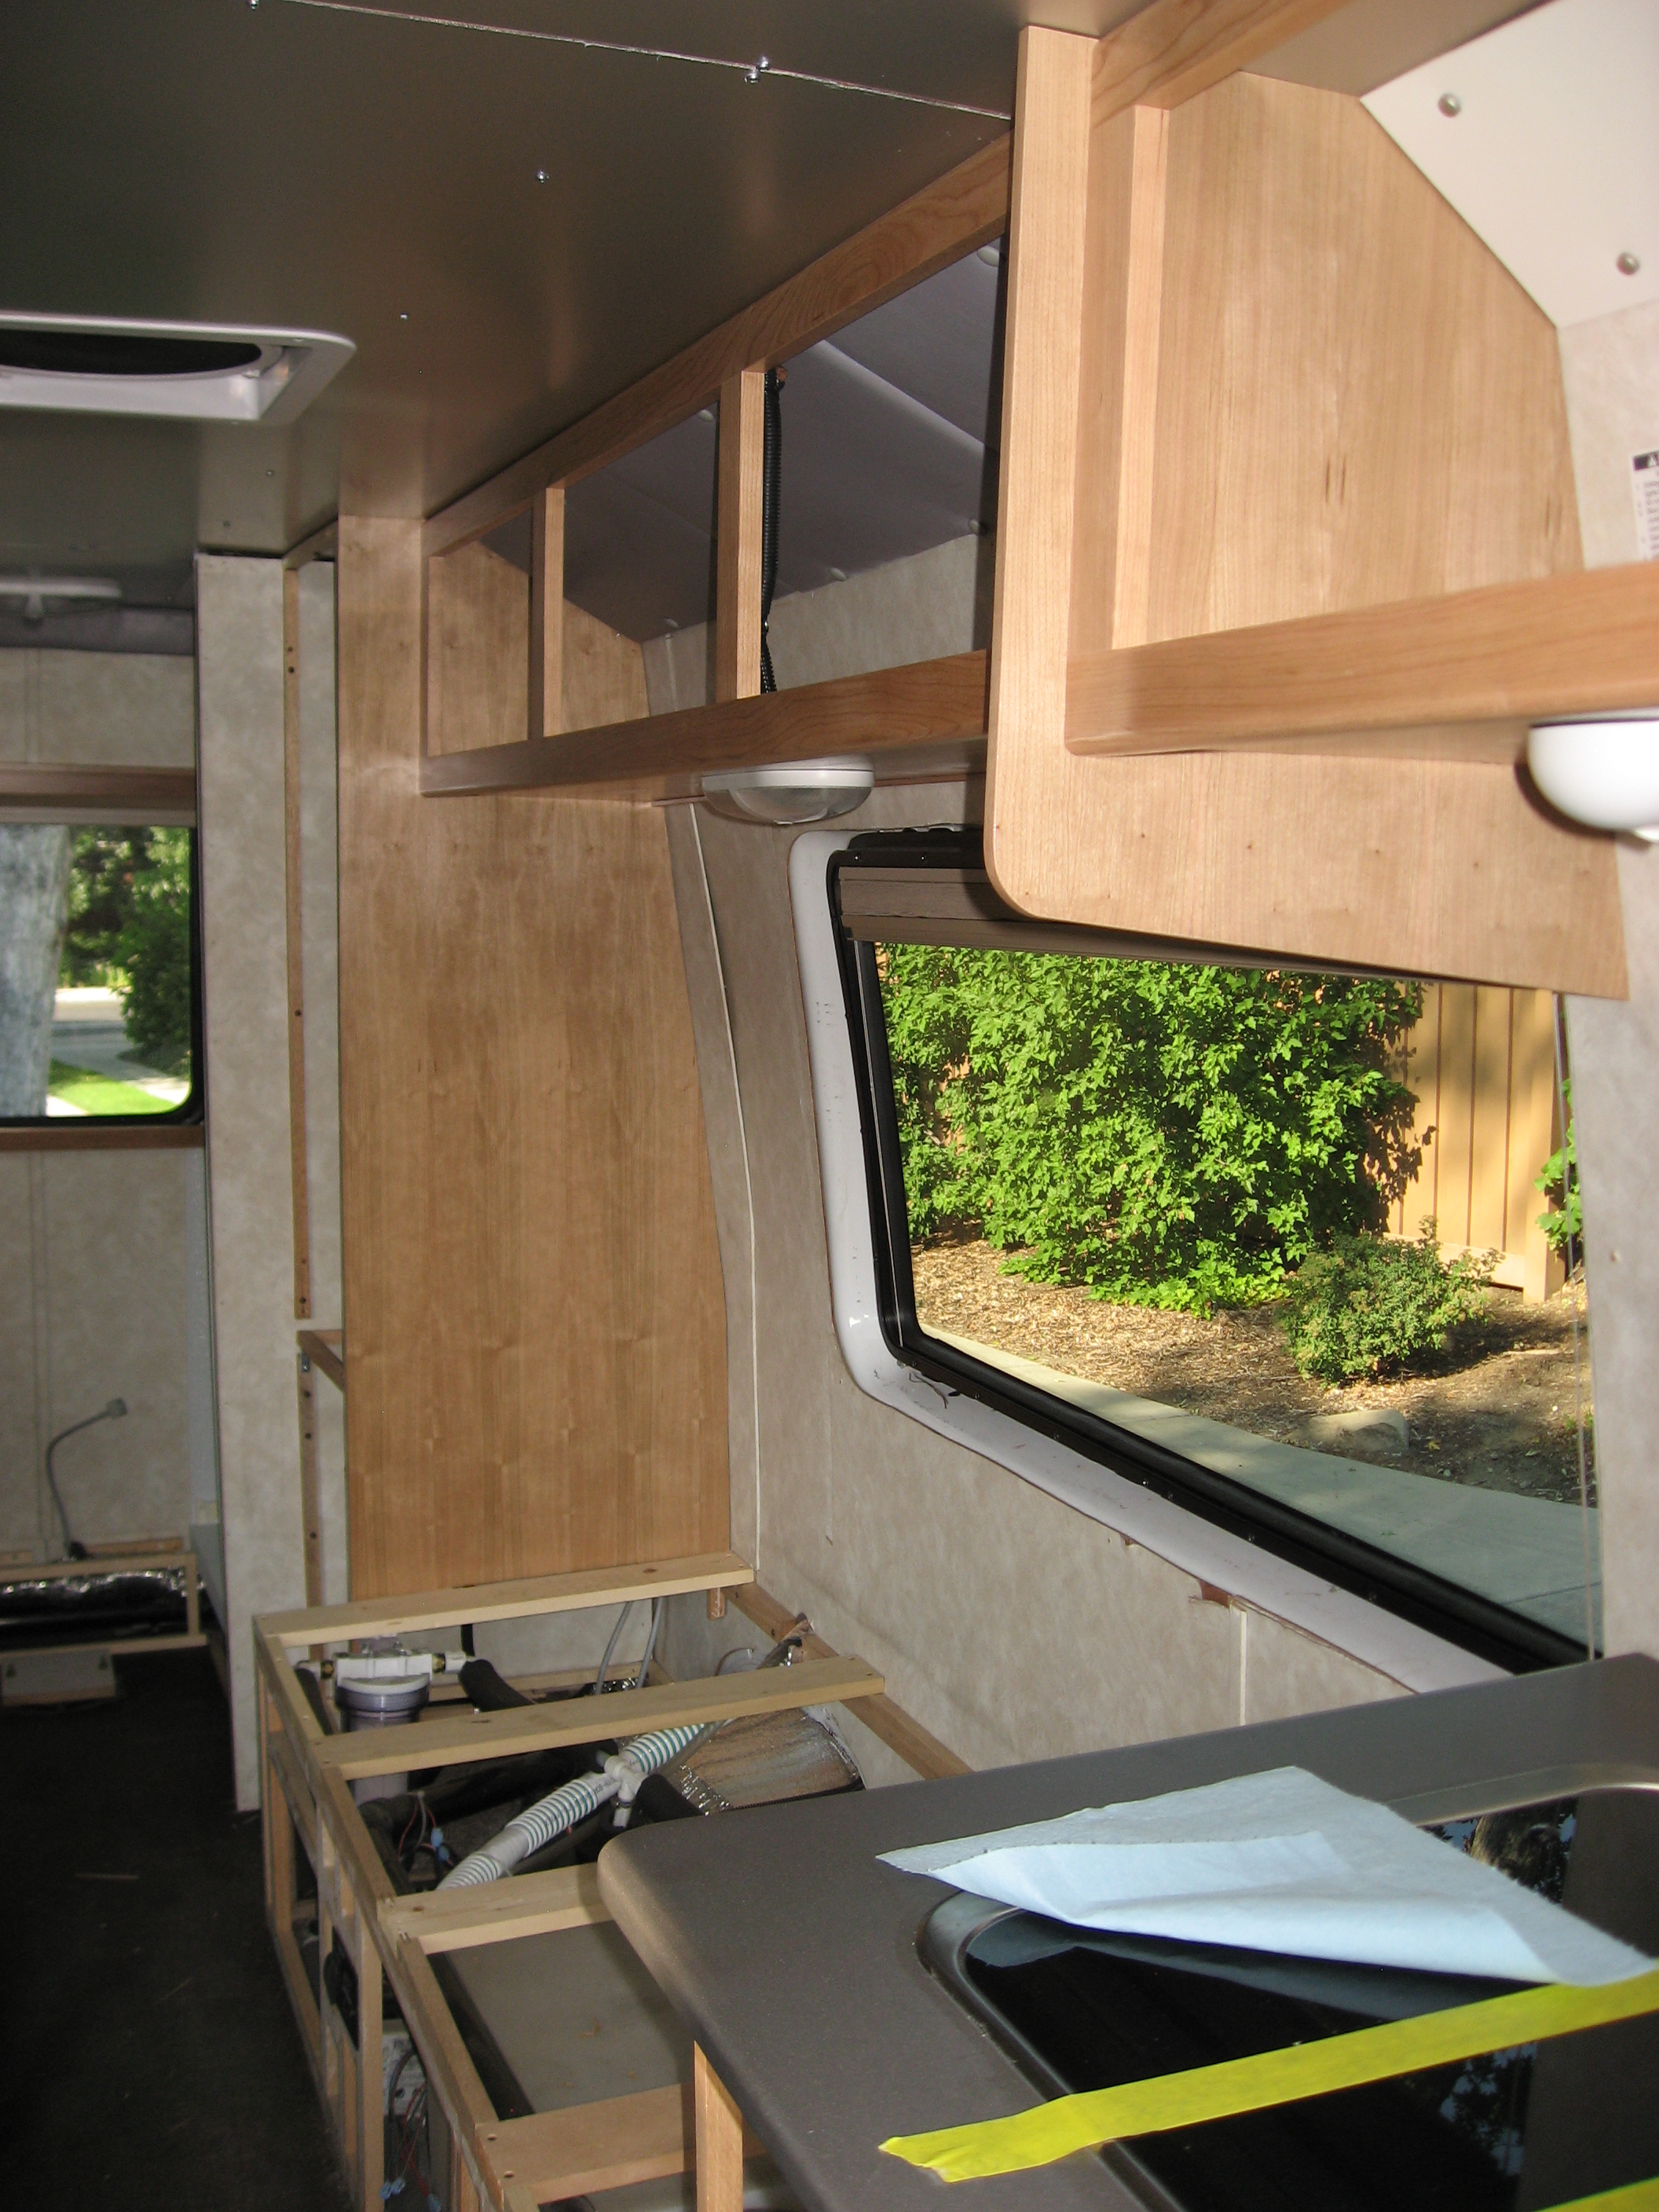
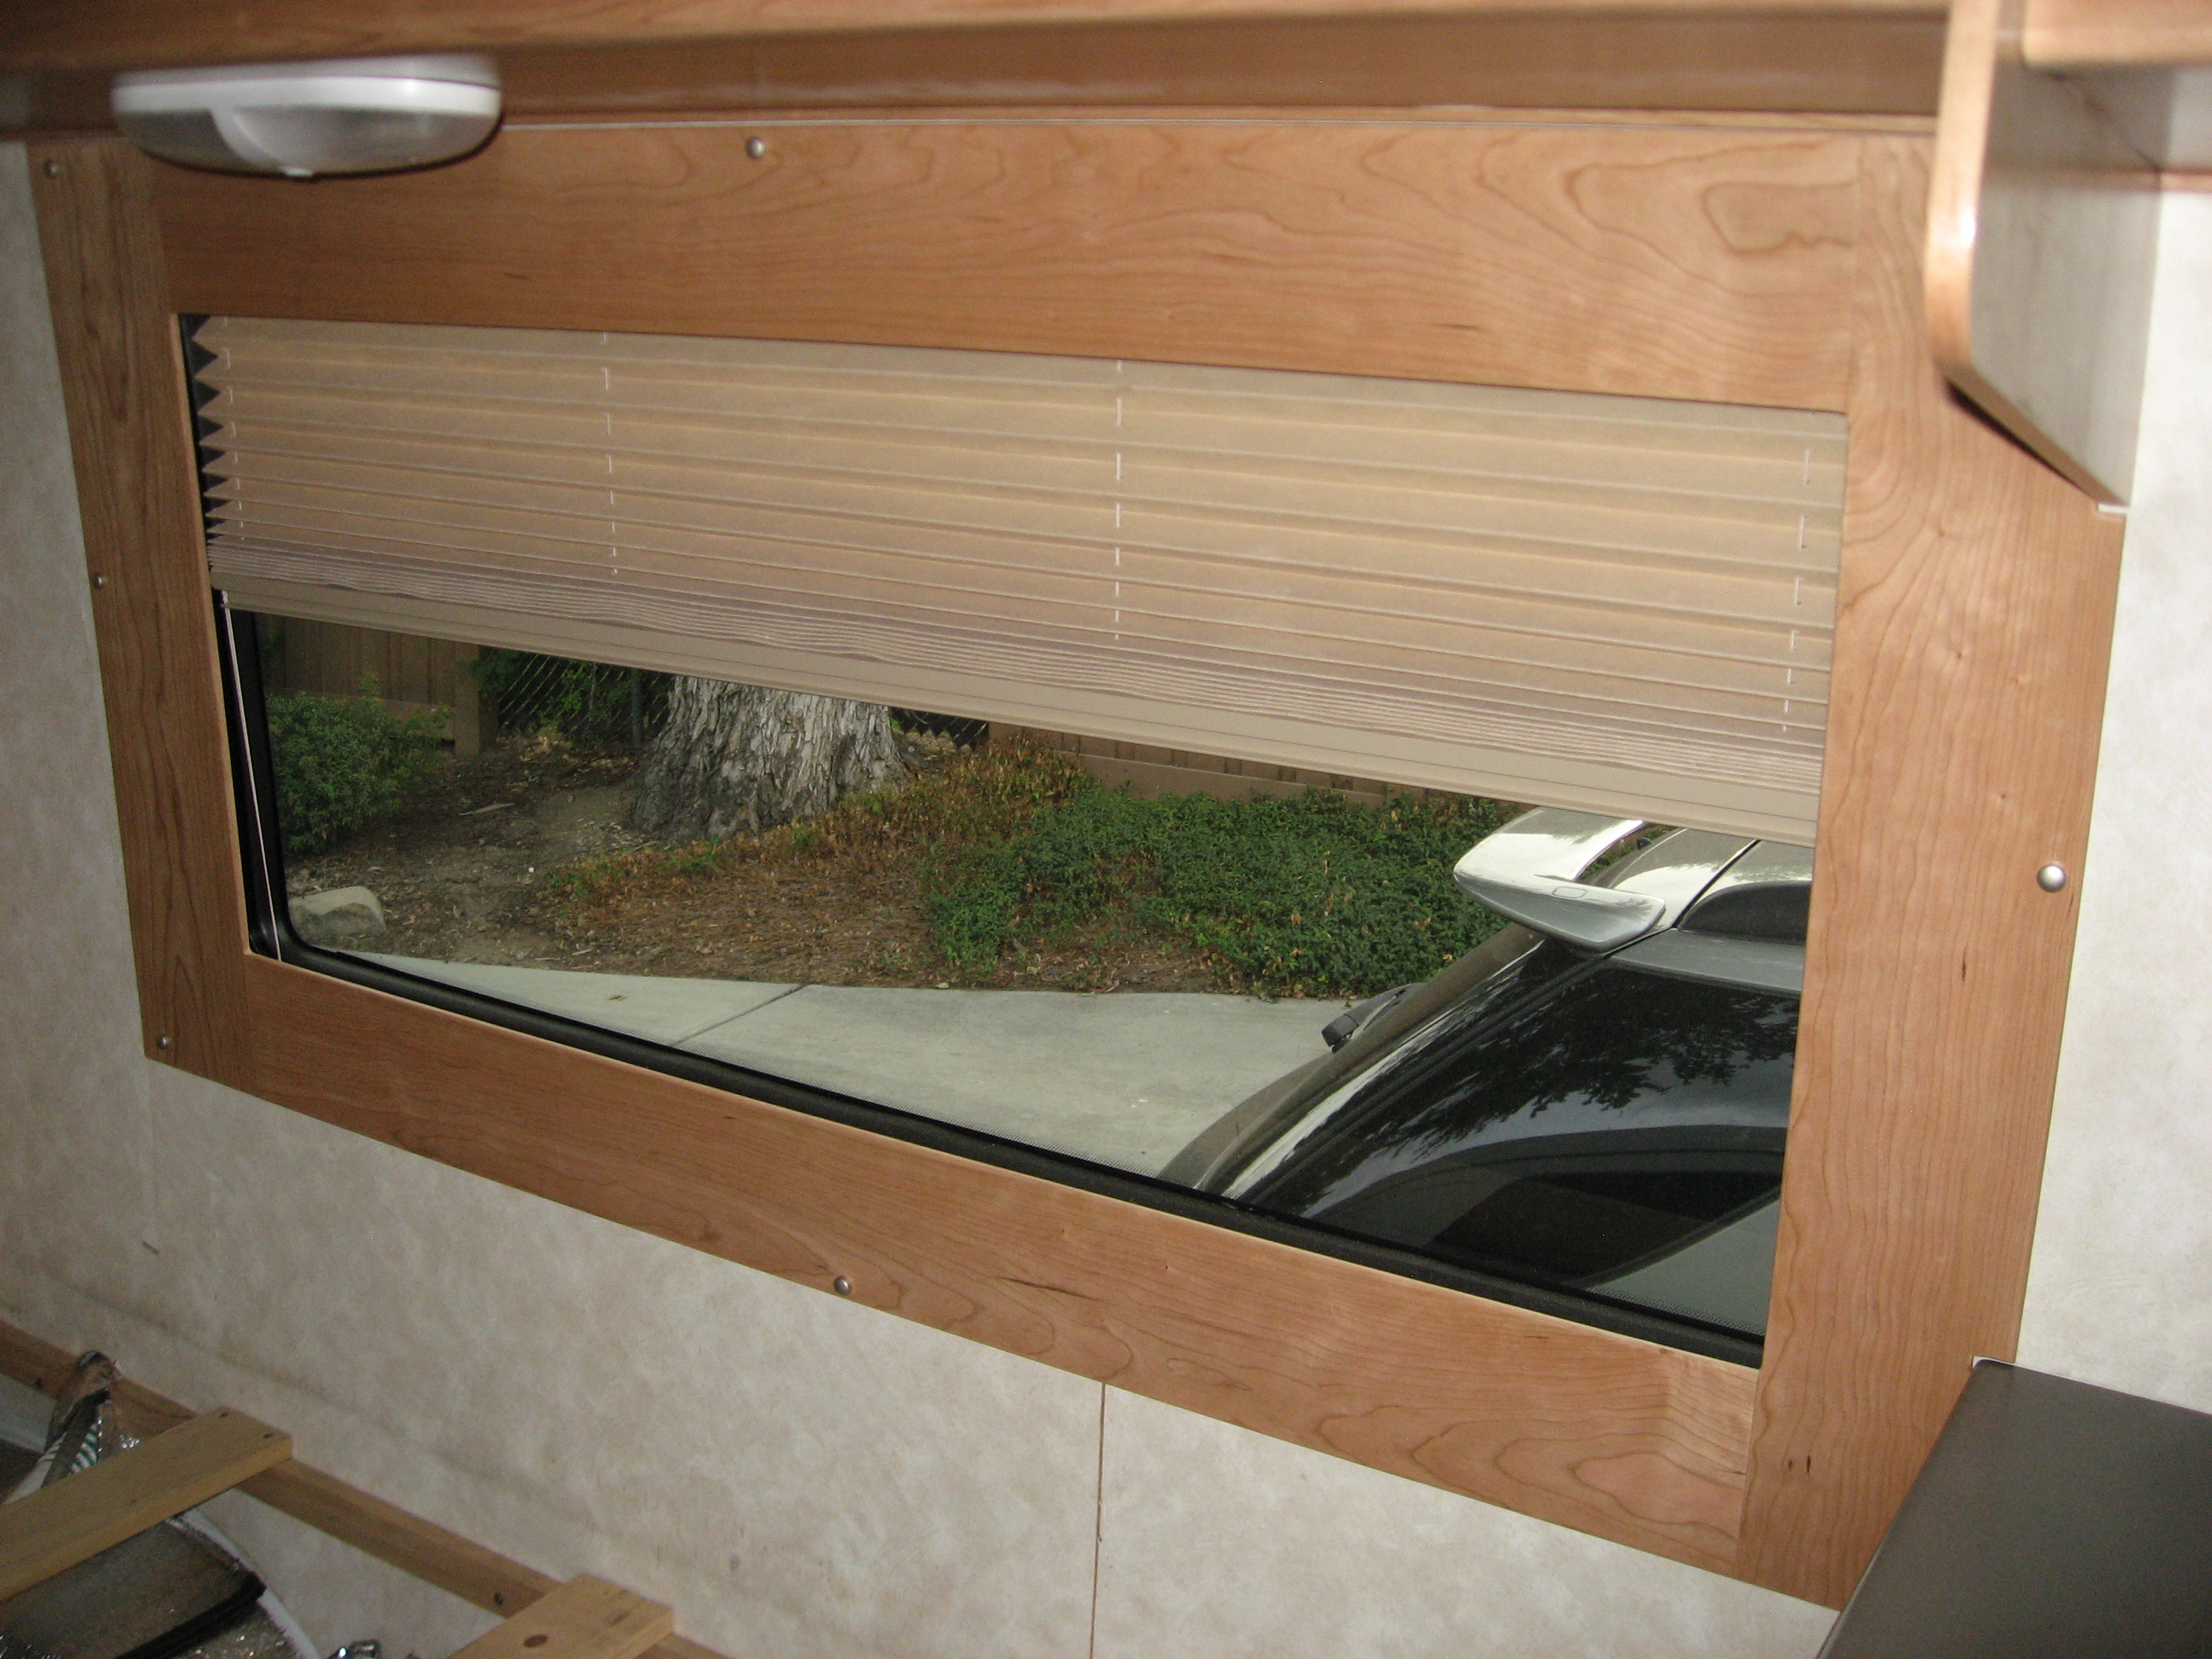
The windows were a bit tricky. I didn’t want to do the vinyl covered whatever-it-was that was in there previously. So I made these out of solid cherry. The walls of the RV are curved though, so I had to mill the stock down to about 1/4 inch to get them to bend enough to conform. I didn’t have a lot of joinery options in quarter inch stock, so the pieces are joined with big old lap joints. They should be plenty strong.
And the same kind of treatment for the sliding door. Had to be pretty careful here with the screw covers to make sure nothing rubbed on the side of the van when it opened and closed. (The old window treatment did.)
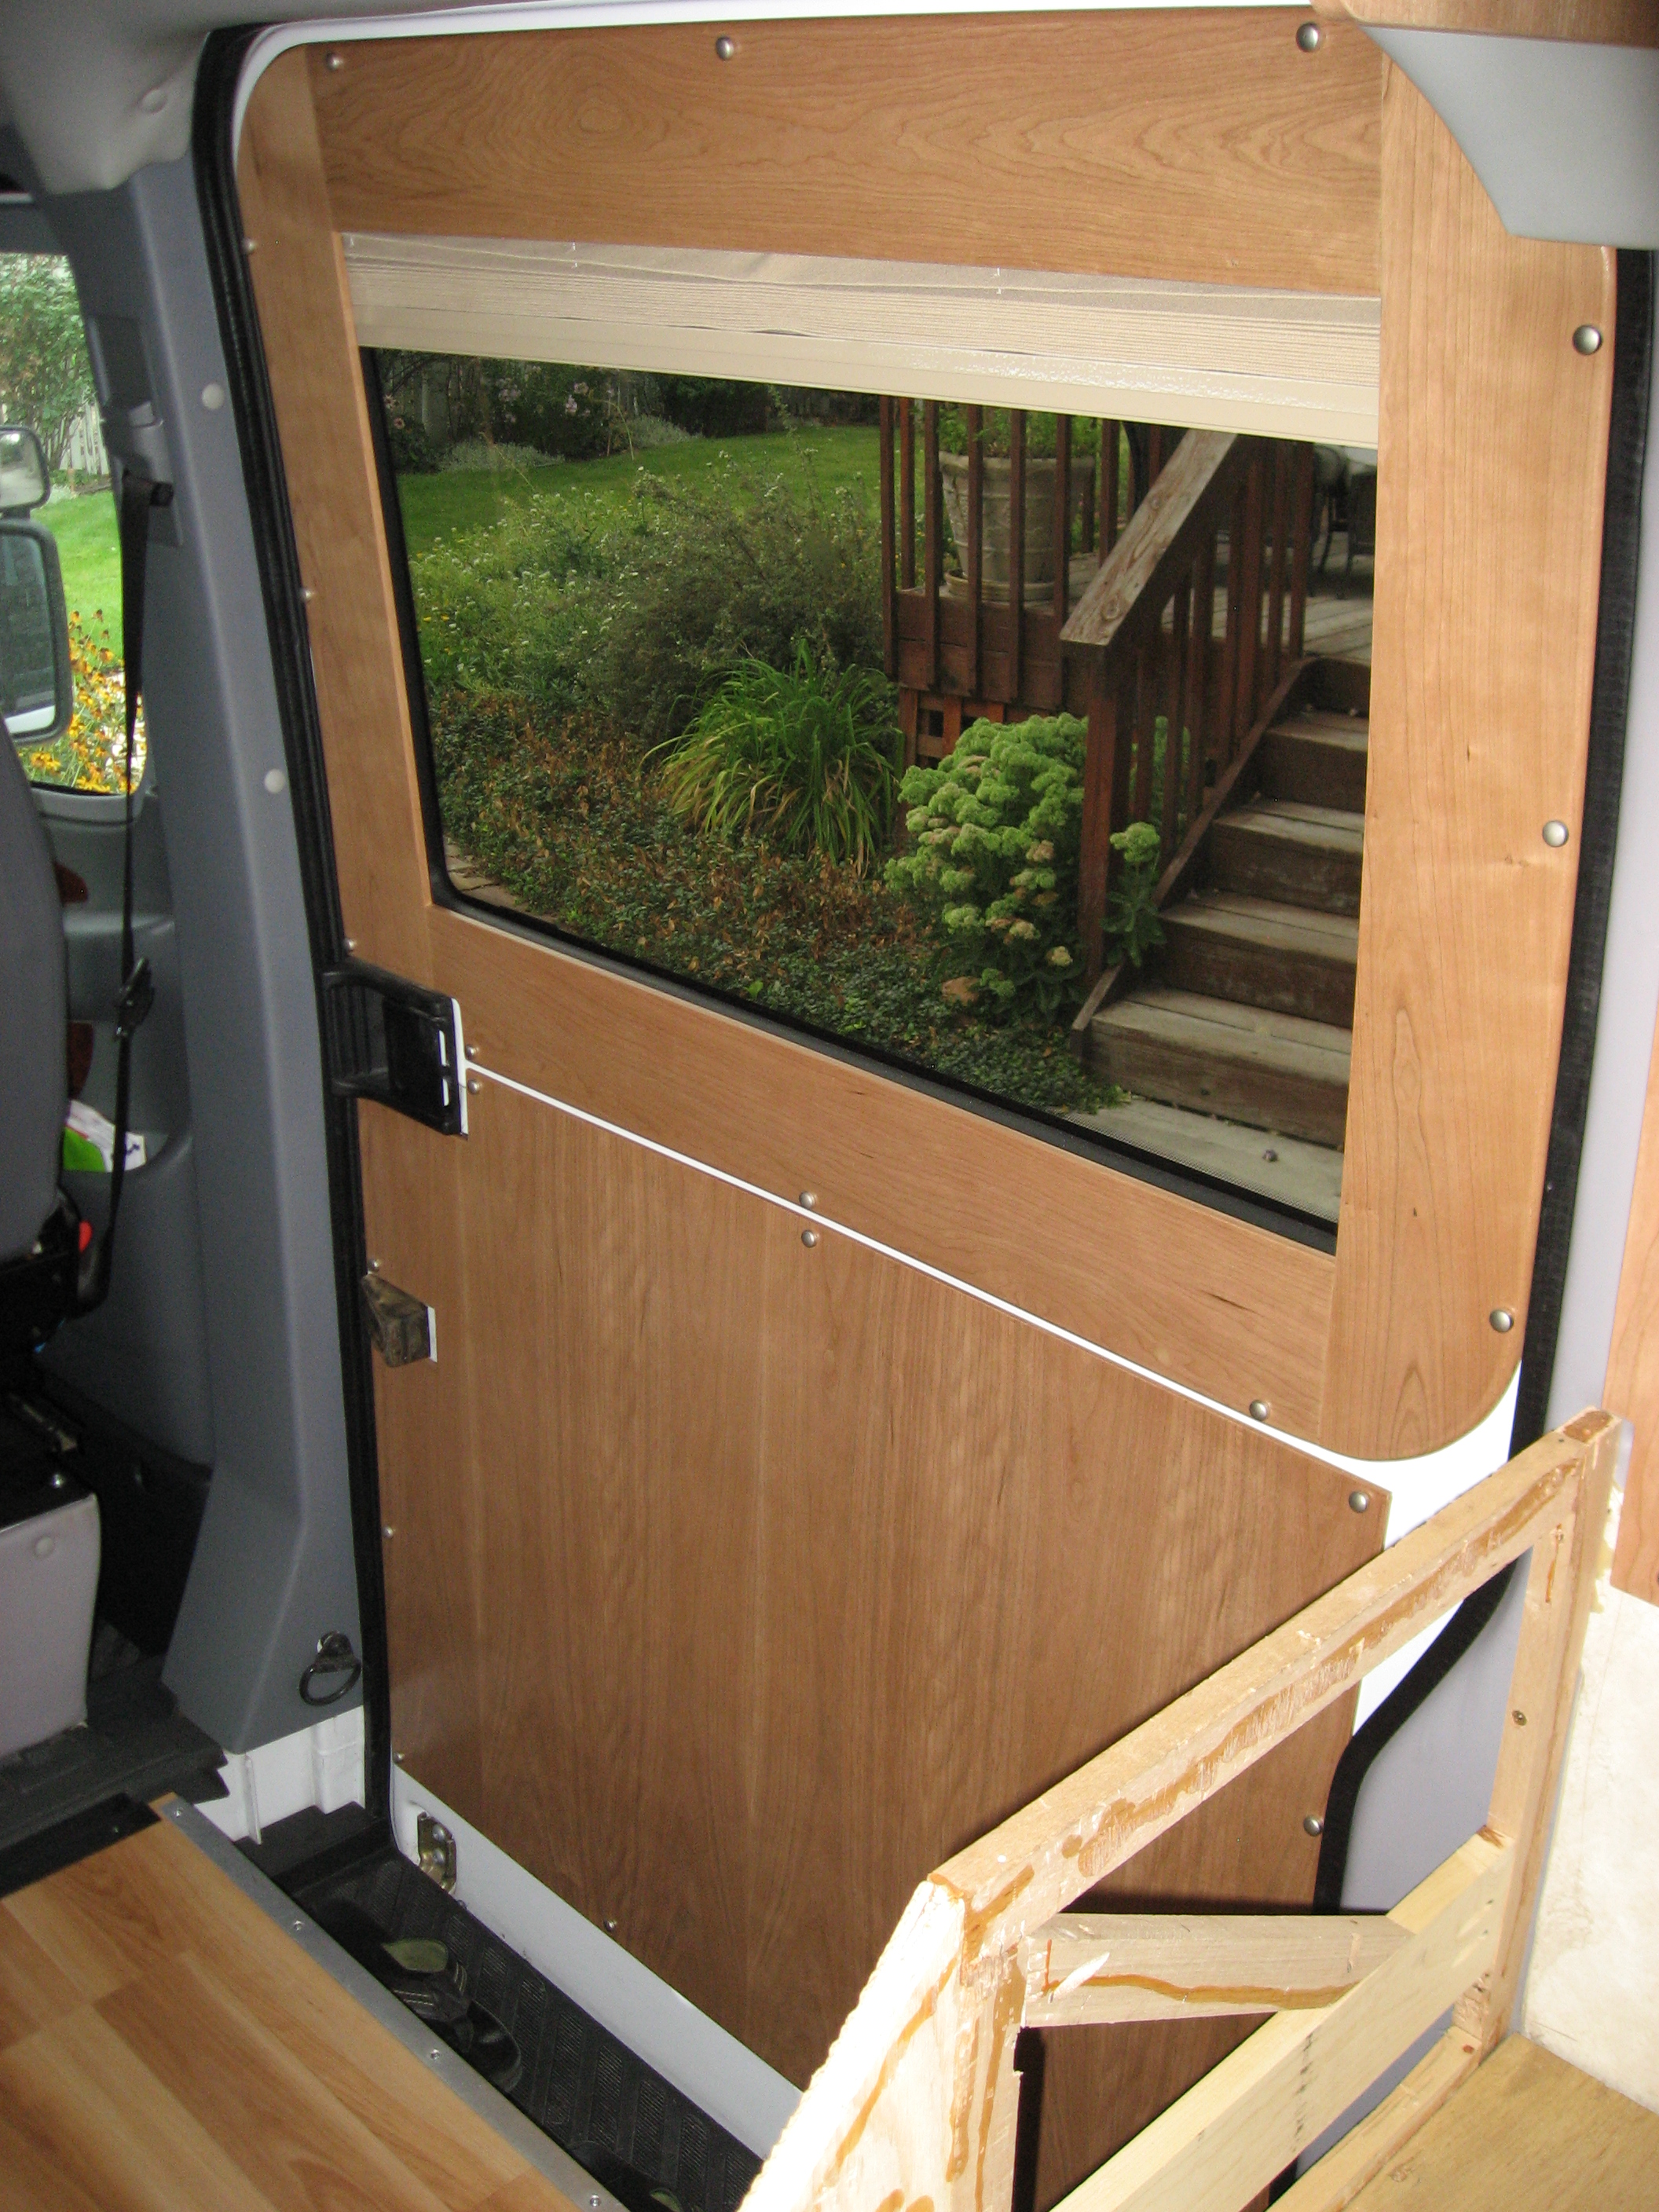
You can also see a little bit of the floor covering in that one. It’s Allure Traffic Master or some such that we got at the Home Despot. If I had to do it again, I would prefer a single sheet vinyl flooring. (That would have been difficult with all the cabinets already in place.) Alternatively, the correct time to install vinyl plank flooring apparently would have been in February. In Barrow, Alaska. This crap starts separating at the seams if the temperature drops 5 degrees. Whether you’ve left a gap around the edges or not. It’s embarrassing, and the perfectionist in me hates the floor. I’ve replaced and re-joined pieces multiple times and it doesn’t get any better. Lesson learned. Anyway, you can see the hole in place for the table, and the way I covered up the bolt head that holds up the propane tank – It’s a motorcycle bolt head cover! Hey, whatever works.
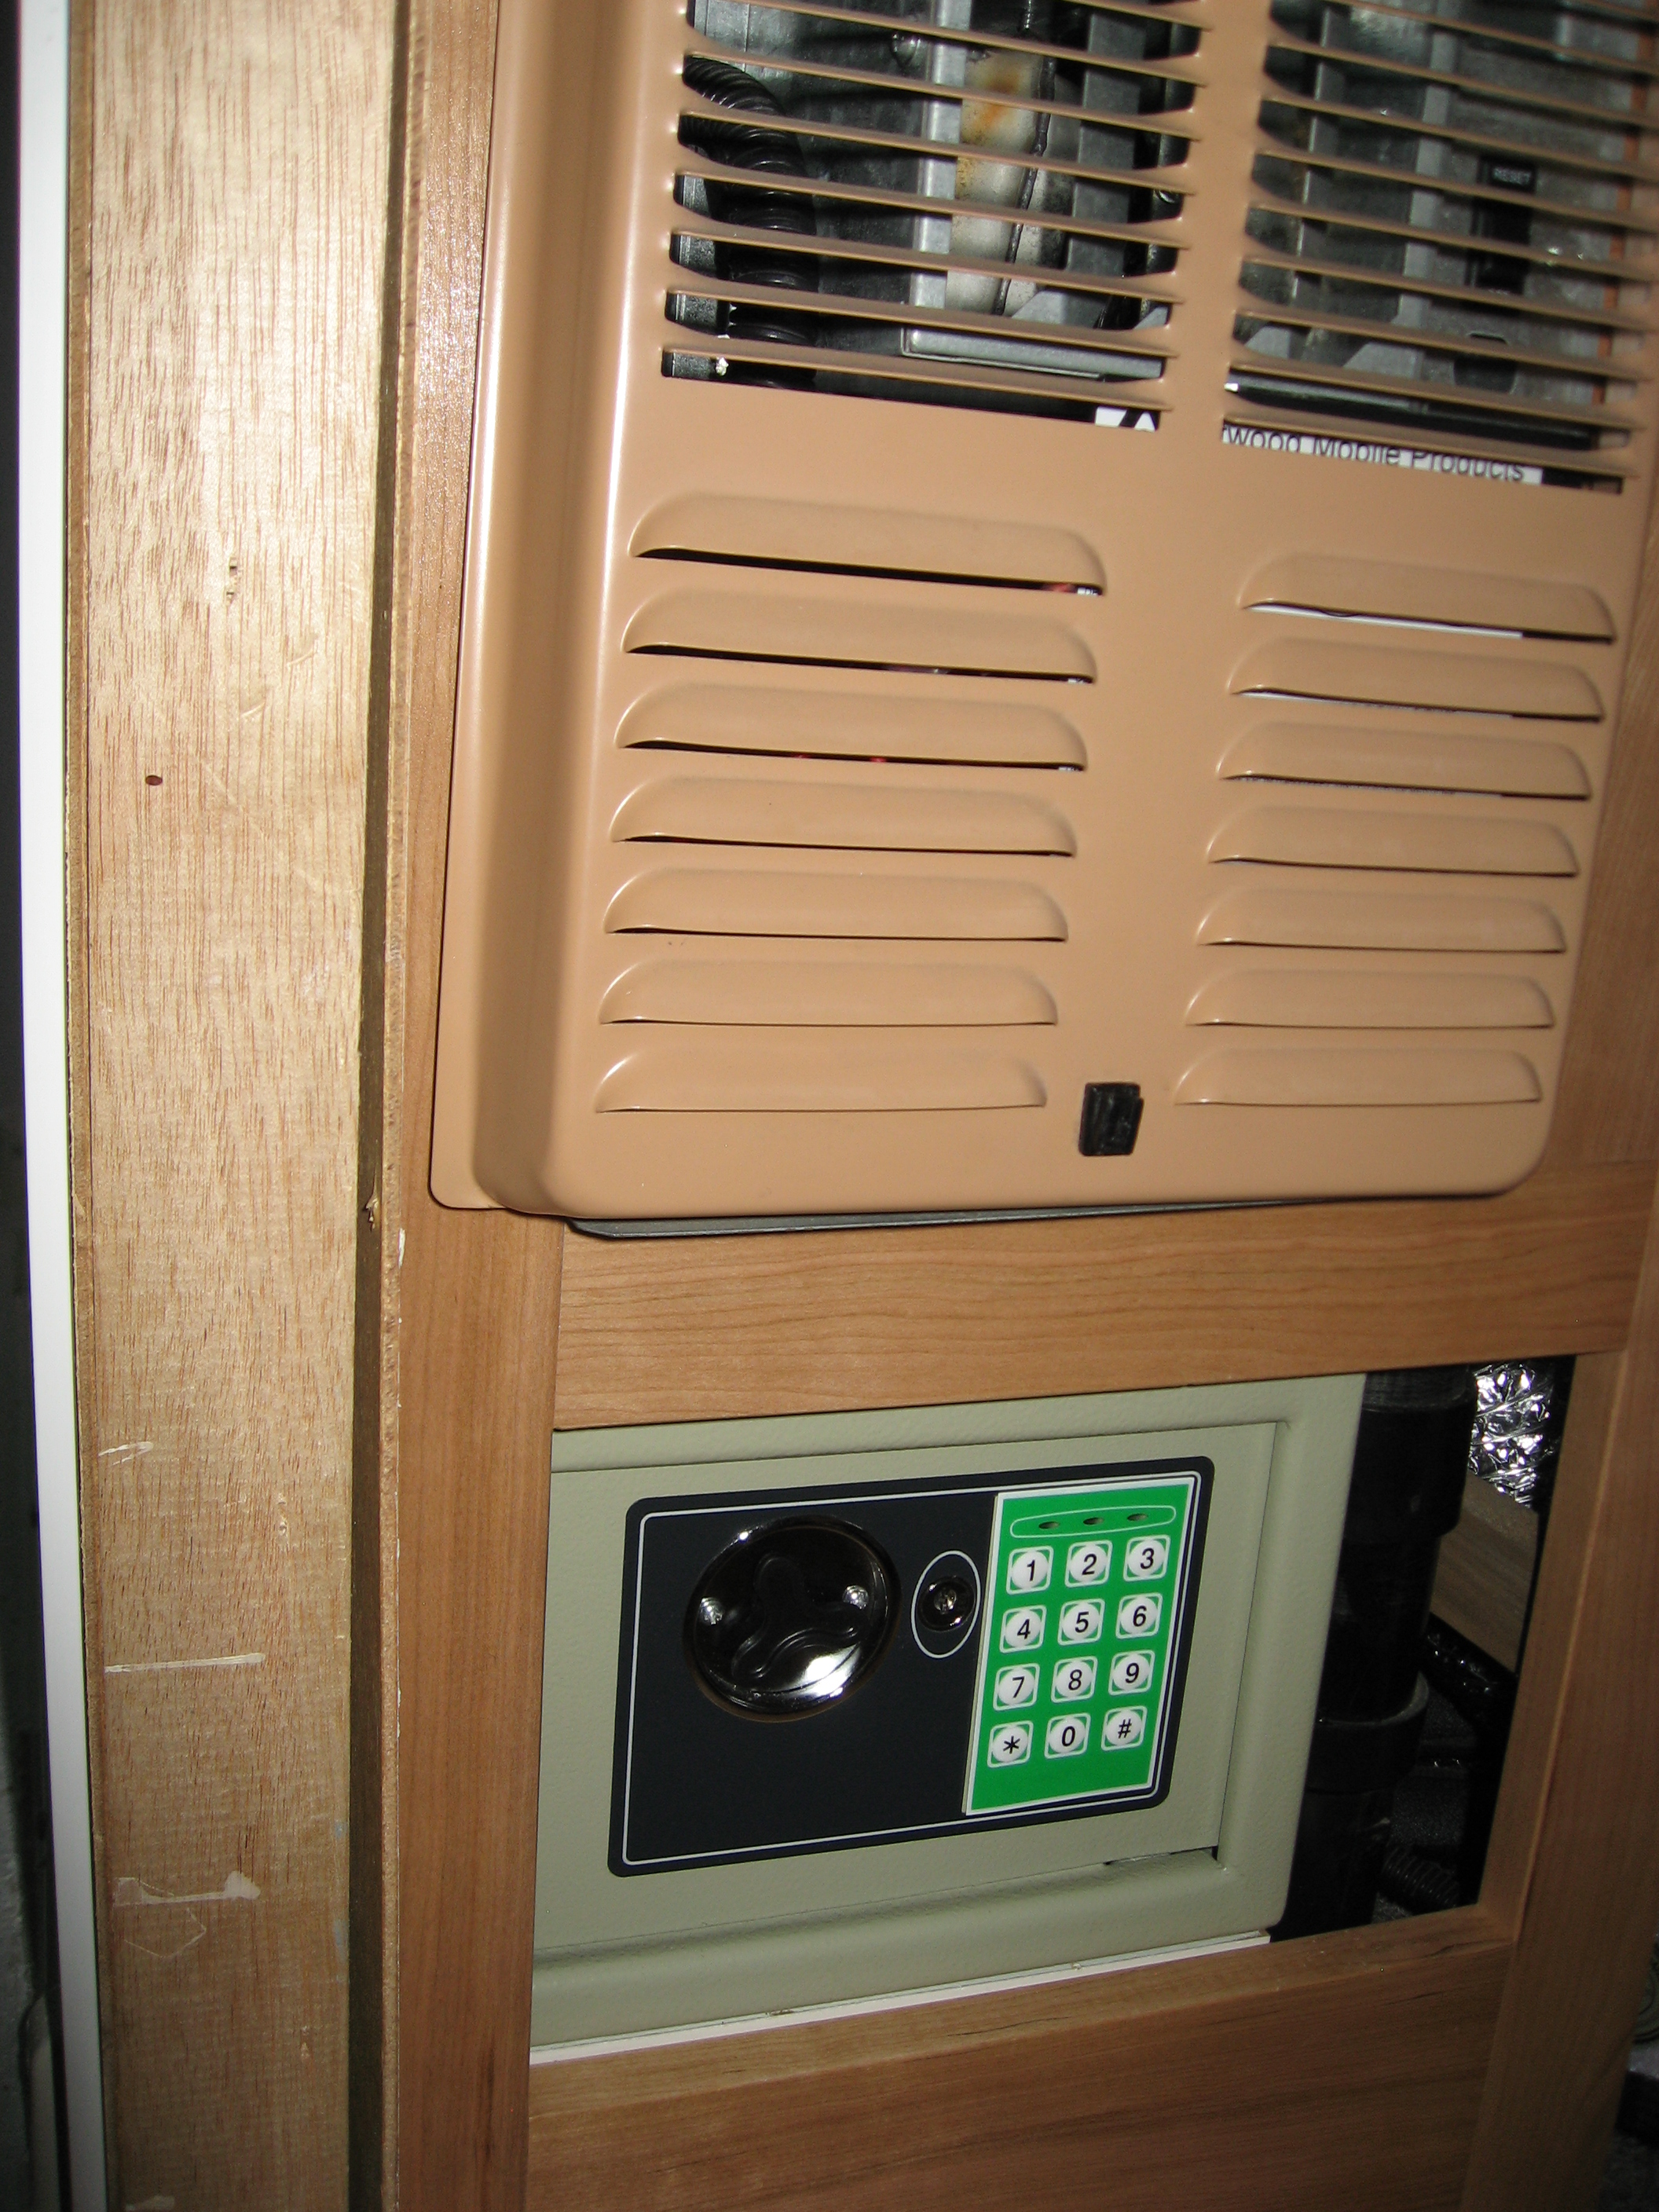
I don’t know why I wanted a safe in here, but I did. It’s just a cheaper one from Harbor Freight Tools. At this point, I’ve also got the furnace back in and the cherry face frame on the cabinet.
Here you can see what I eventually did to work around the “toilet hole”, as well as the ducting I ran behind the shower to keep the water lines warm. This was before I finally wised up and put some plywood down to protect the floor. (I dropped my driver on the floor and it ripped a gouge in a piece. This led to much cursing, and ripping the floor up and laying it a second time to replace that piece – because they all lock together.)
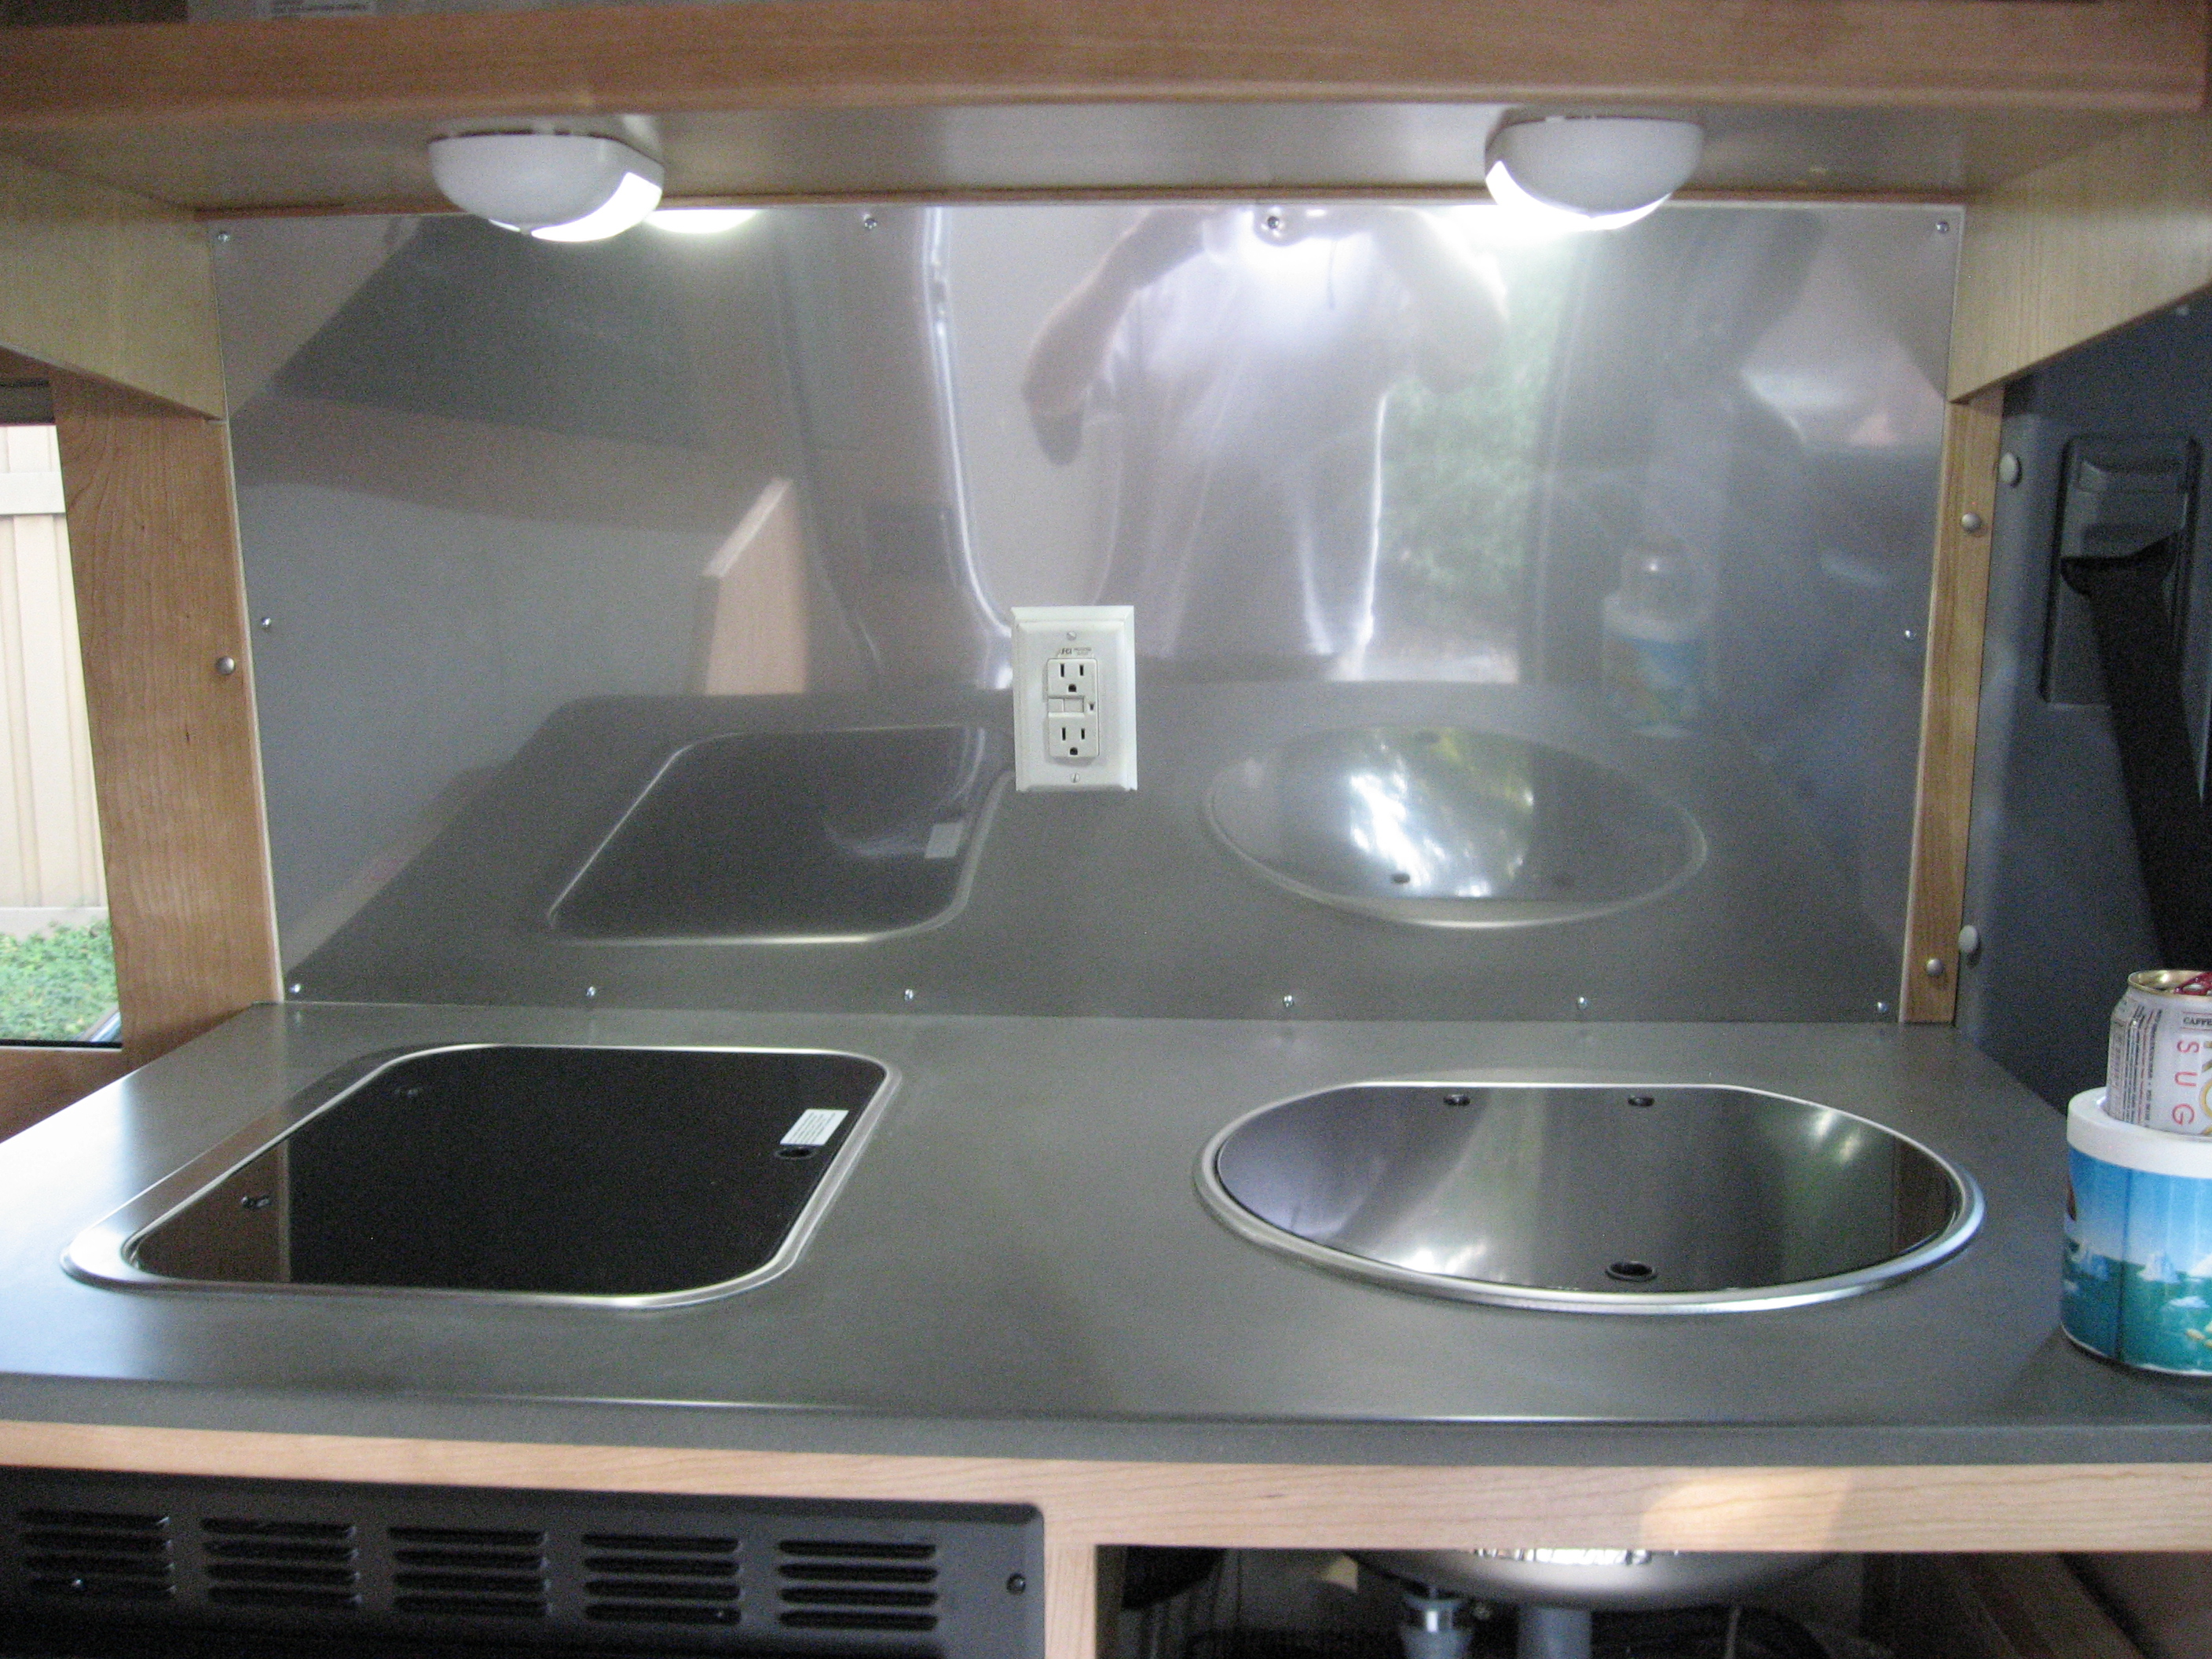
Here you can see the galley backsplash in place, as well as most of the galley cabinet and sink and cooktop. The appliances are SMEV something or other from Italy. Apart from the weird size water connections, they were not too bad to get working. The backsplash is 430 series stainless steel. It’s expensive, but you can stick magnets to it! Why don’t they make refrigerators out of this stuff?
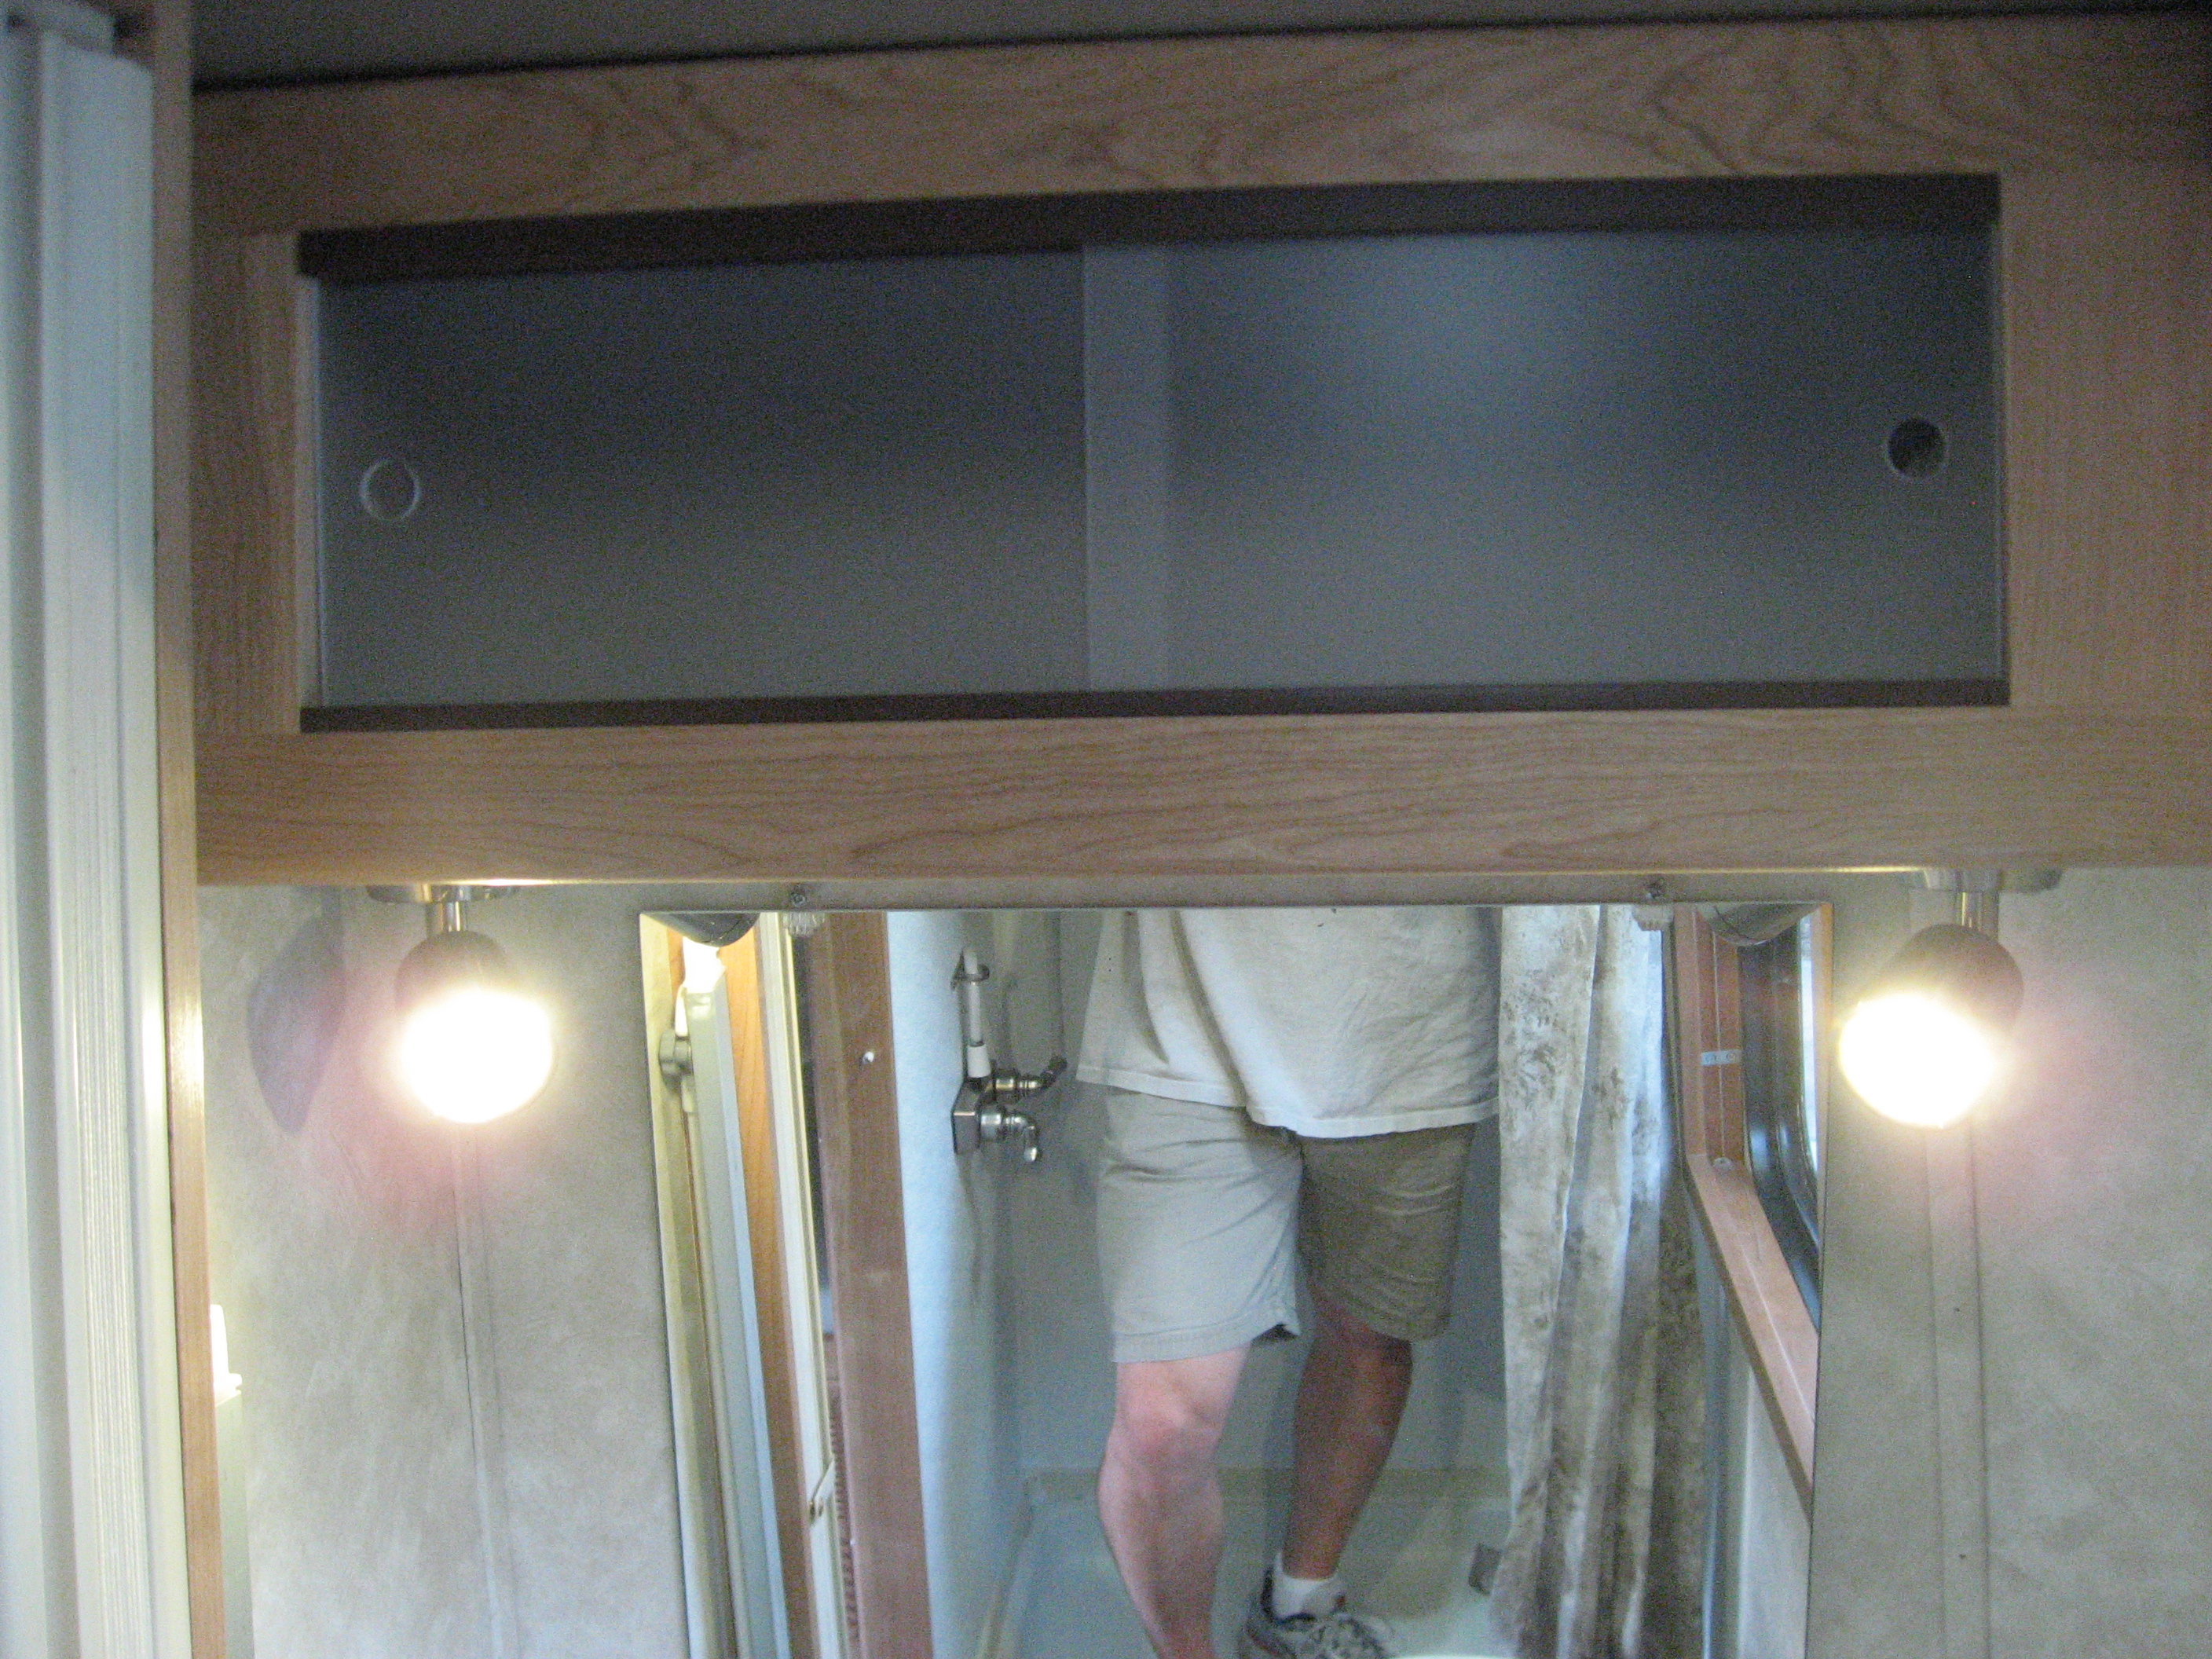
You know, I put this cabinet up over the bathroom vanity, and I thought I was pretty cool. But then I realized I couldn’t put a door on it without it being a head banging hazard. So I went with sliding doors with frosted Plexiglas. Came out pretty good. The lights underneath are also LED, but they’re a warm white, and the thinking was that they would help Stef with makeup or other girl stuff. I had to turn the mirror sideways to get it all to fit, but it works out OK. I have to bend over a bit to shave, but that’s the only negative.
While I was at it, I installed a ball valve onto the water heater drain. We often head out in the winter, and being able to winterize quickly and easily (I use compressed air) is a good thing.

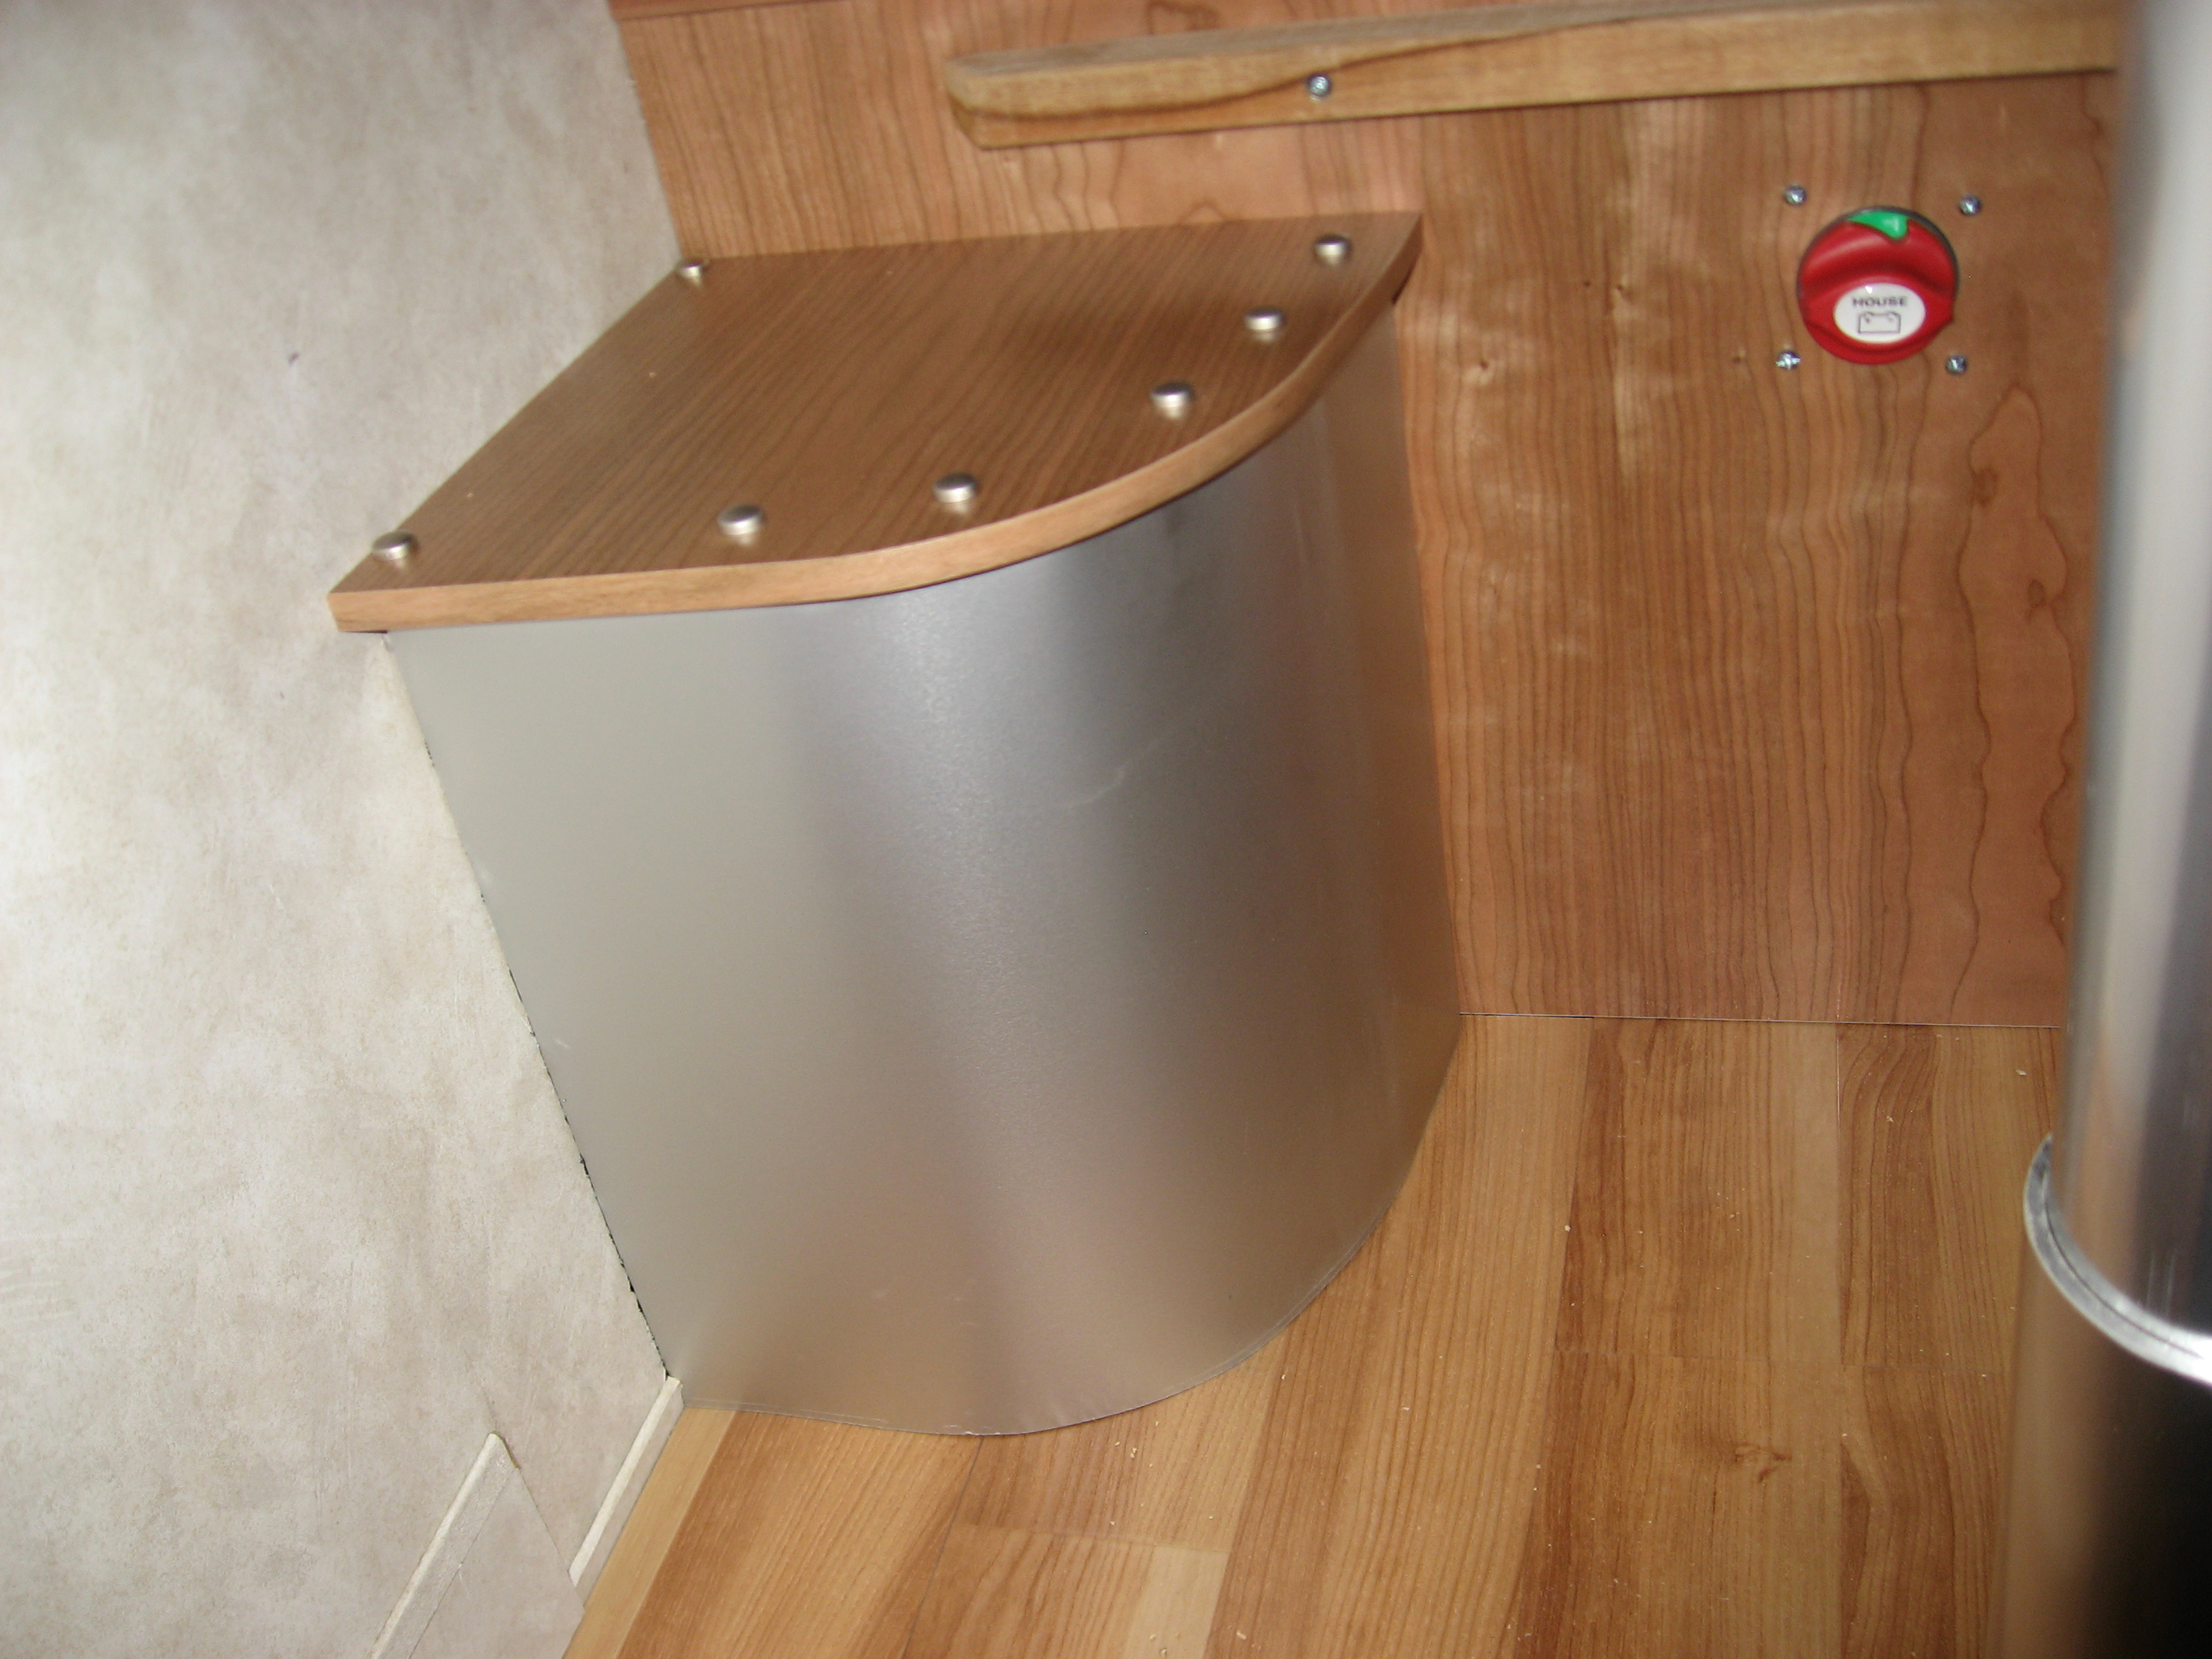
Maybe I shouldn’t be quite so proud of this next thing, but I am. I’m pretty competent with wood, but I suck at metal. In spite of that, this came out OK. It replaces the enormous carpet covered box that hid part of the wheel well. It’s just some of the left over aluminum from the ceiling that I coaxed into a curve and was able to bend some mounting tabs on. It’s about half the volume that the stupid box was, so now we have some more foot room under the table.
And so at this point, I’m done. All that was left was to get the re-upholstered seats back into the van and take some pictures. (I hired out the upholstery.) The remainder of the pictures are of the completed van.
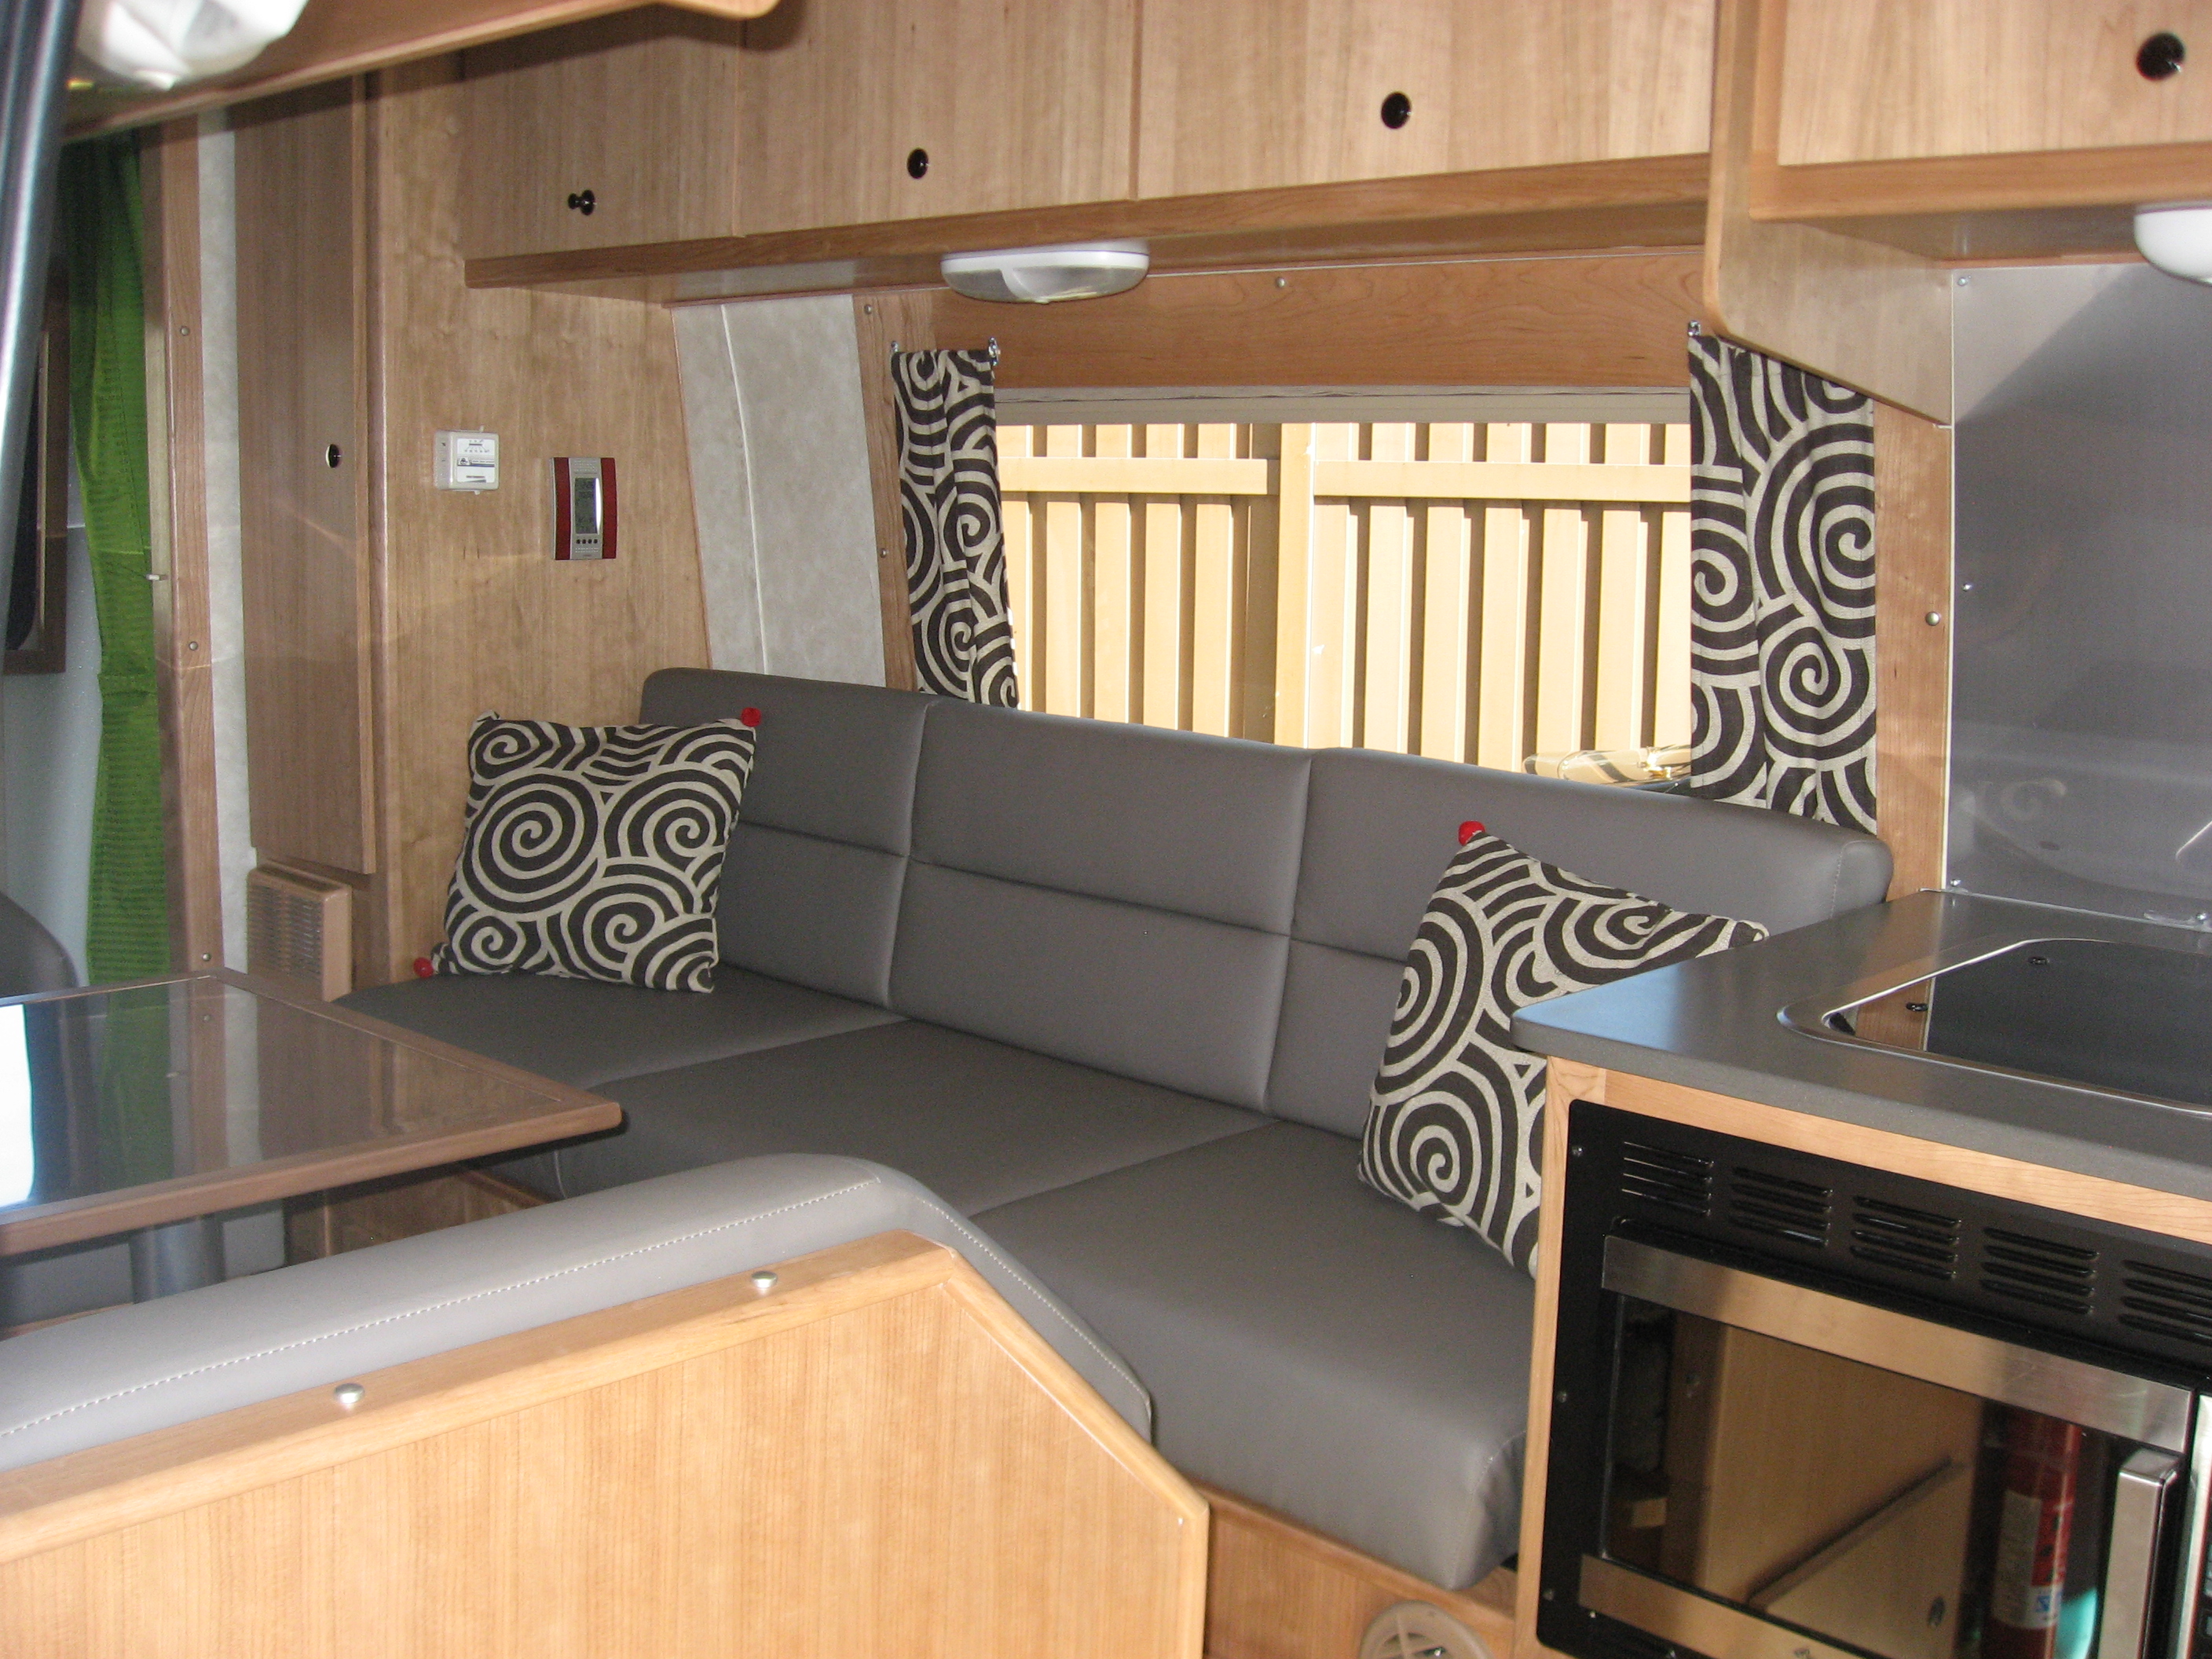
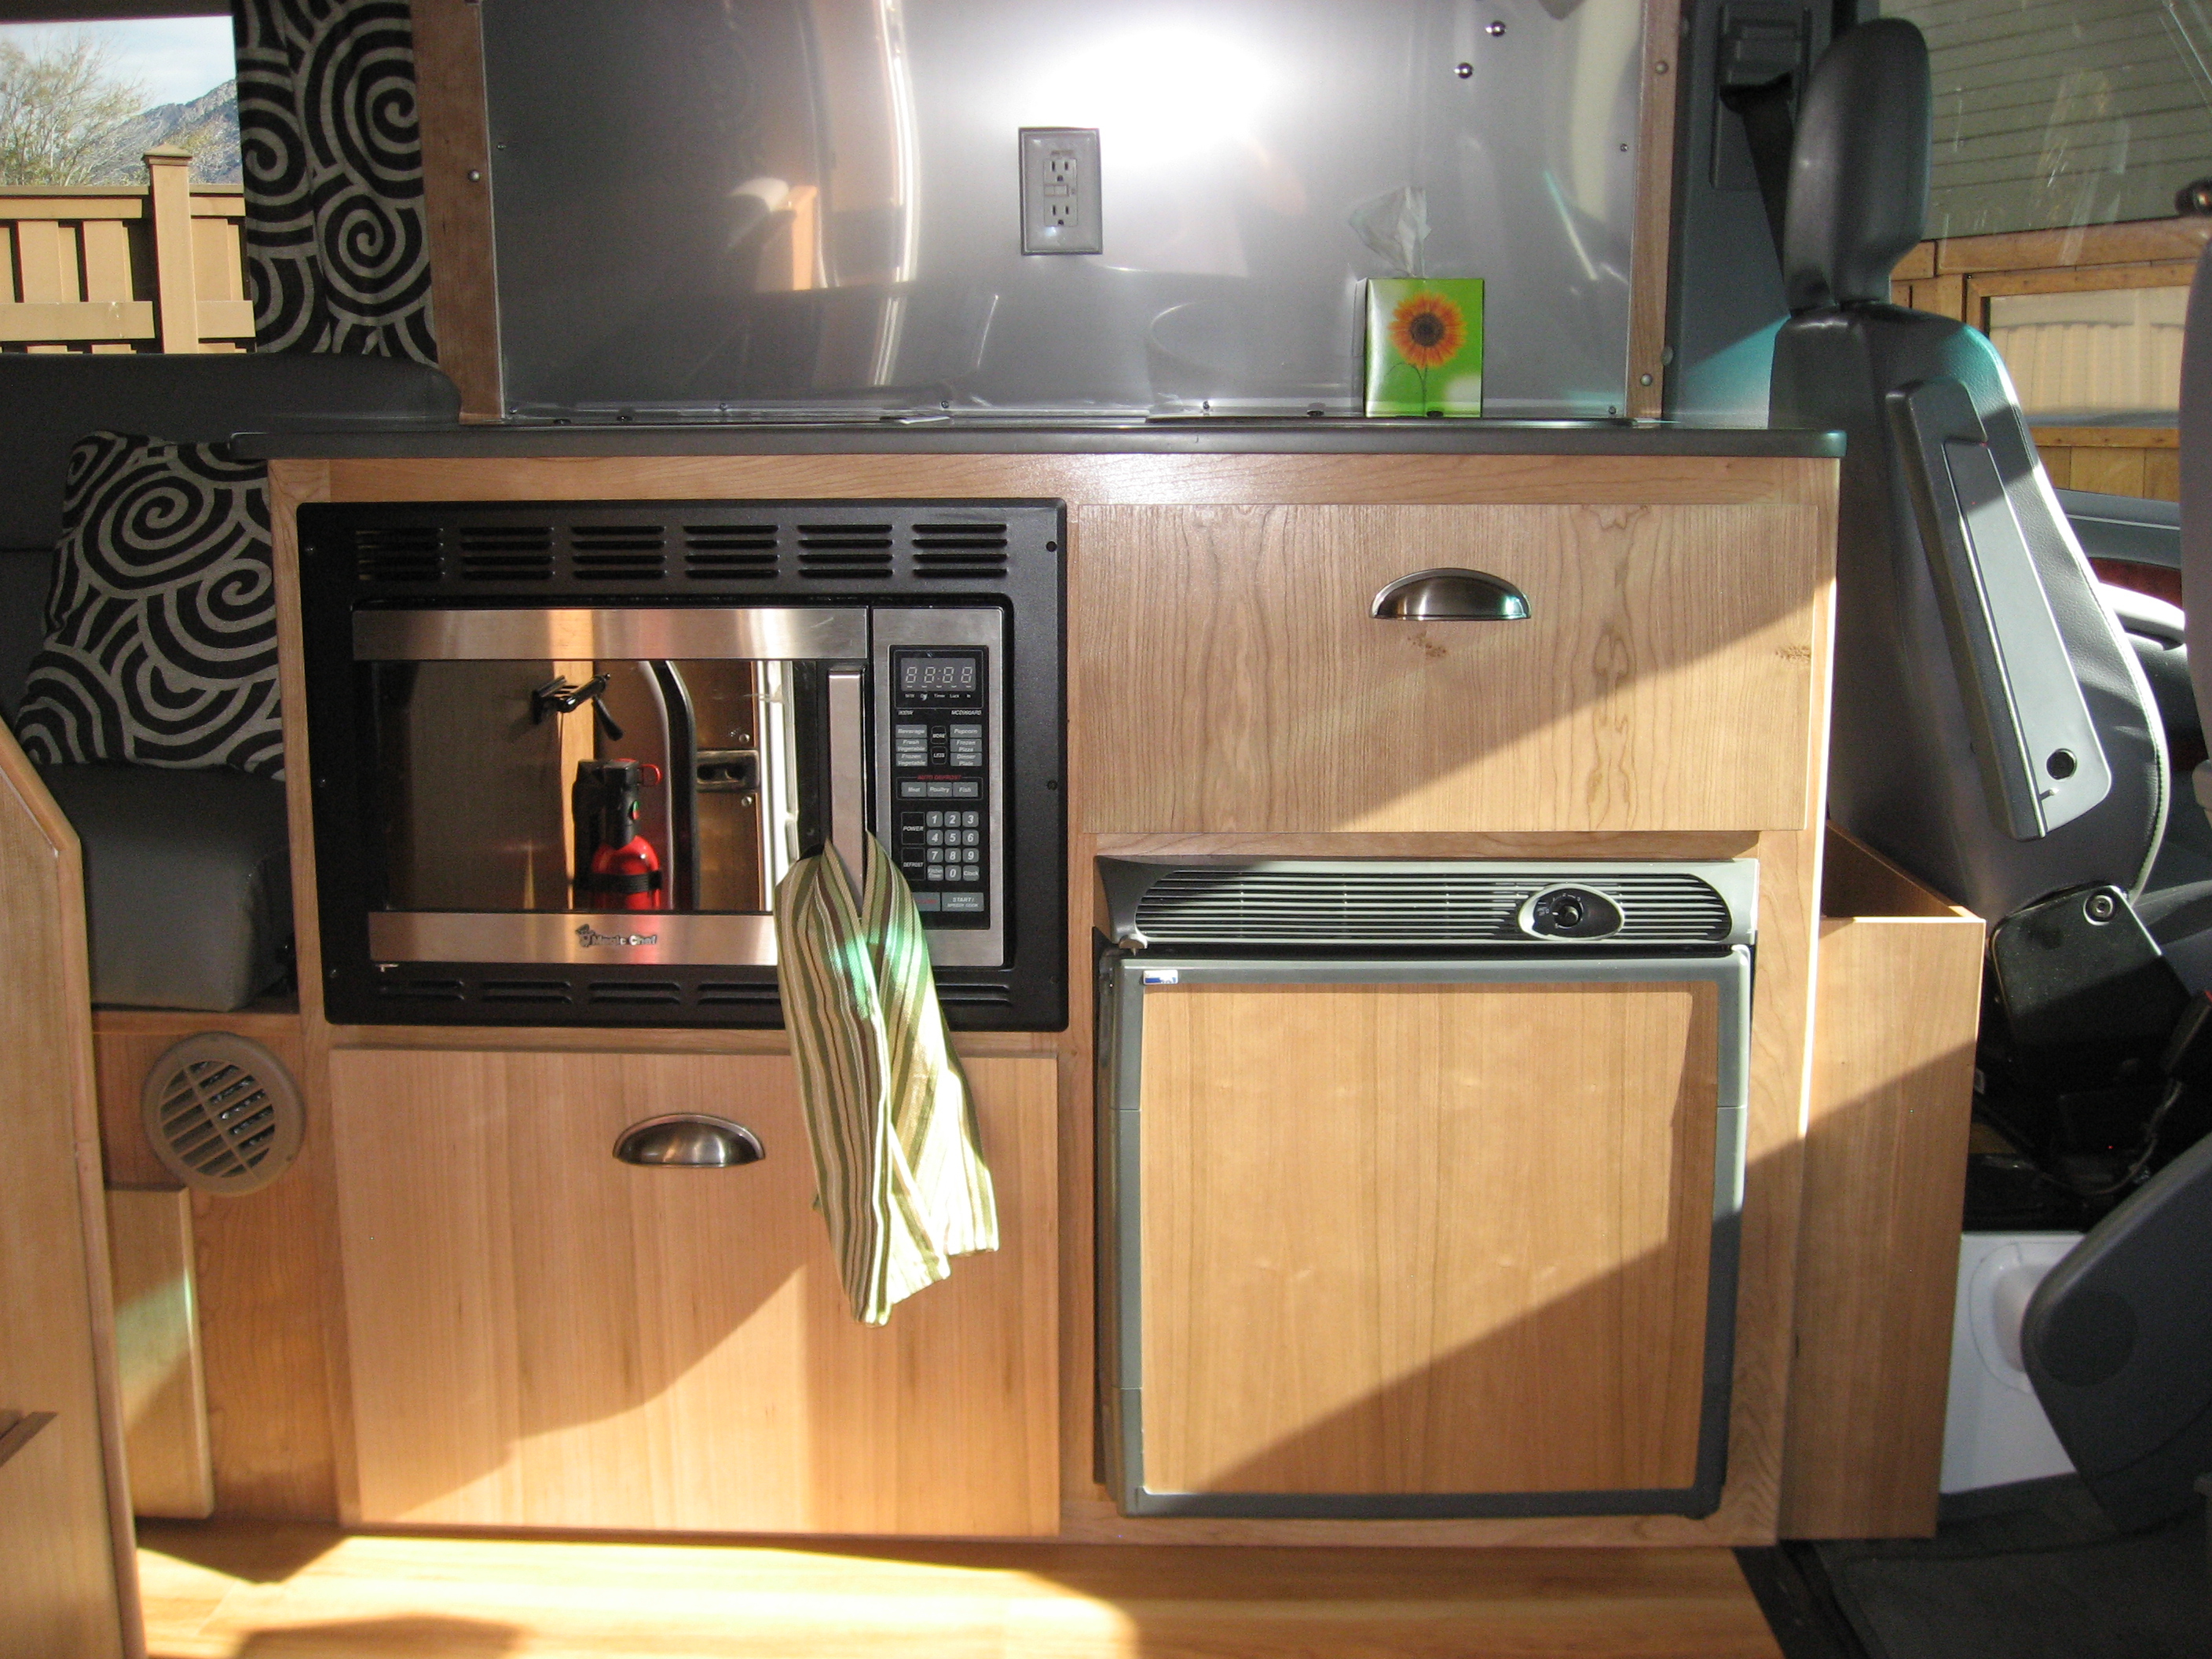
There we go. In the picture above, you can see the curtains and pillows that Stef’s mother made (THANK YOU!). You can also see just a bit of the forward vent I put in just below the couch. The latches are all those push-button kind that lie flush until you need a knob. Very clean looking I think. Except that someone (and I won’t mention her name but here’s a hint – I’m married to her) left one of them popped out and messed up the picture. Also replaced the microwave trim.
Looking toward the back in this one, you can see the new china toilet, and the LCD TV with DVD which we had actually replaced earlier. Also, you can see the dinette table which I covered in the same 430 stainless as the backsplash. My thinking there was if we ever wanted to have place mats or something, we could put magnets in them and they would stay put while driving. It’s a theory anyway.
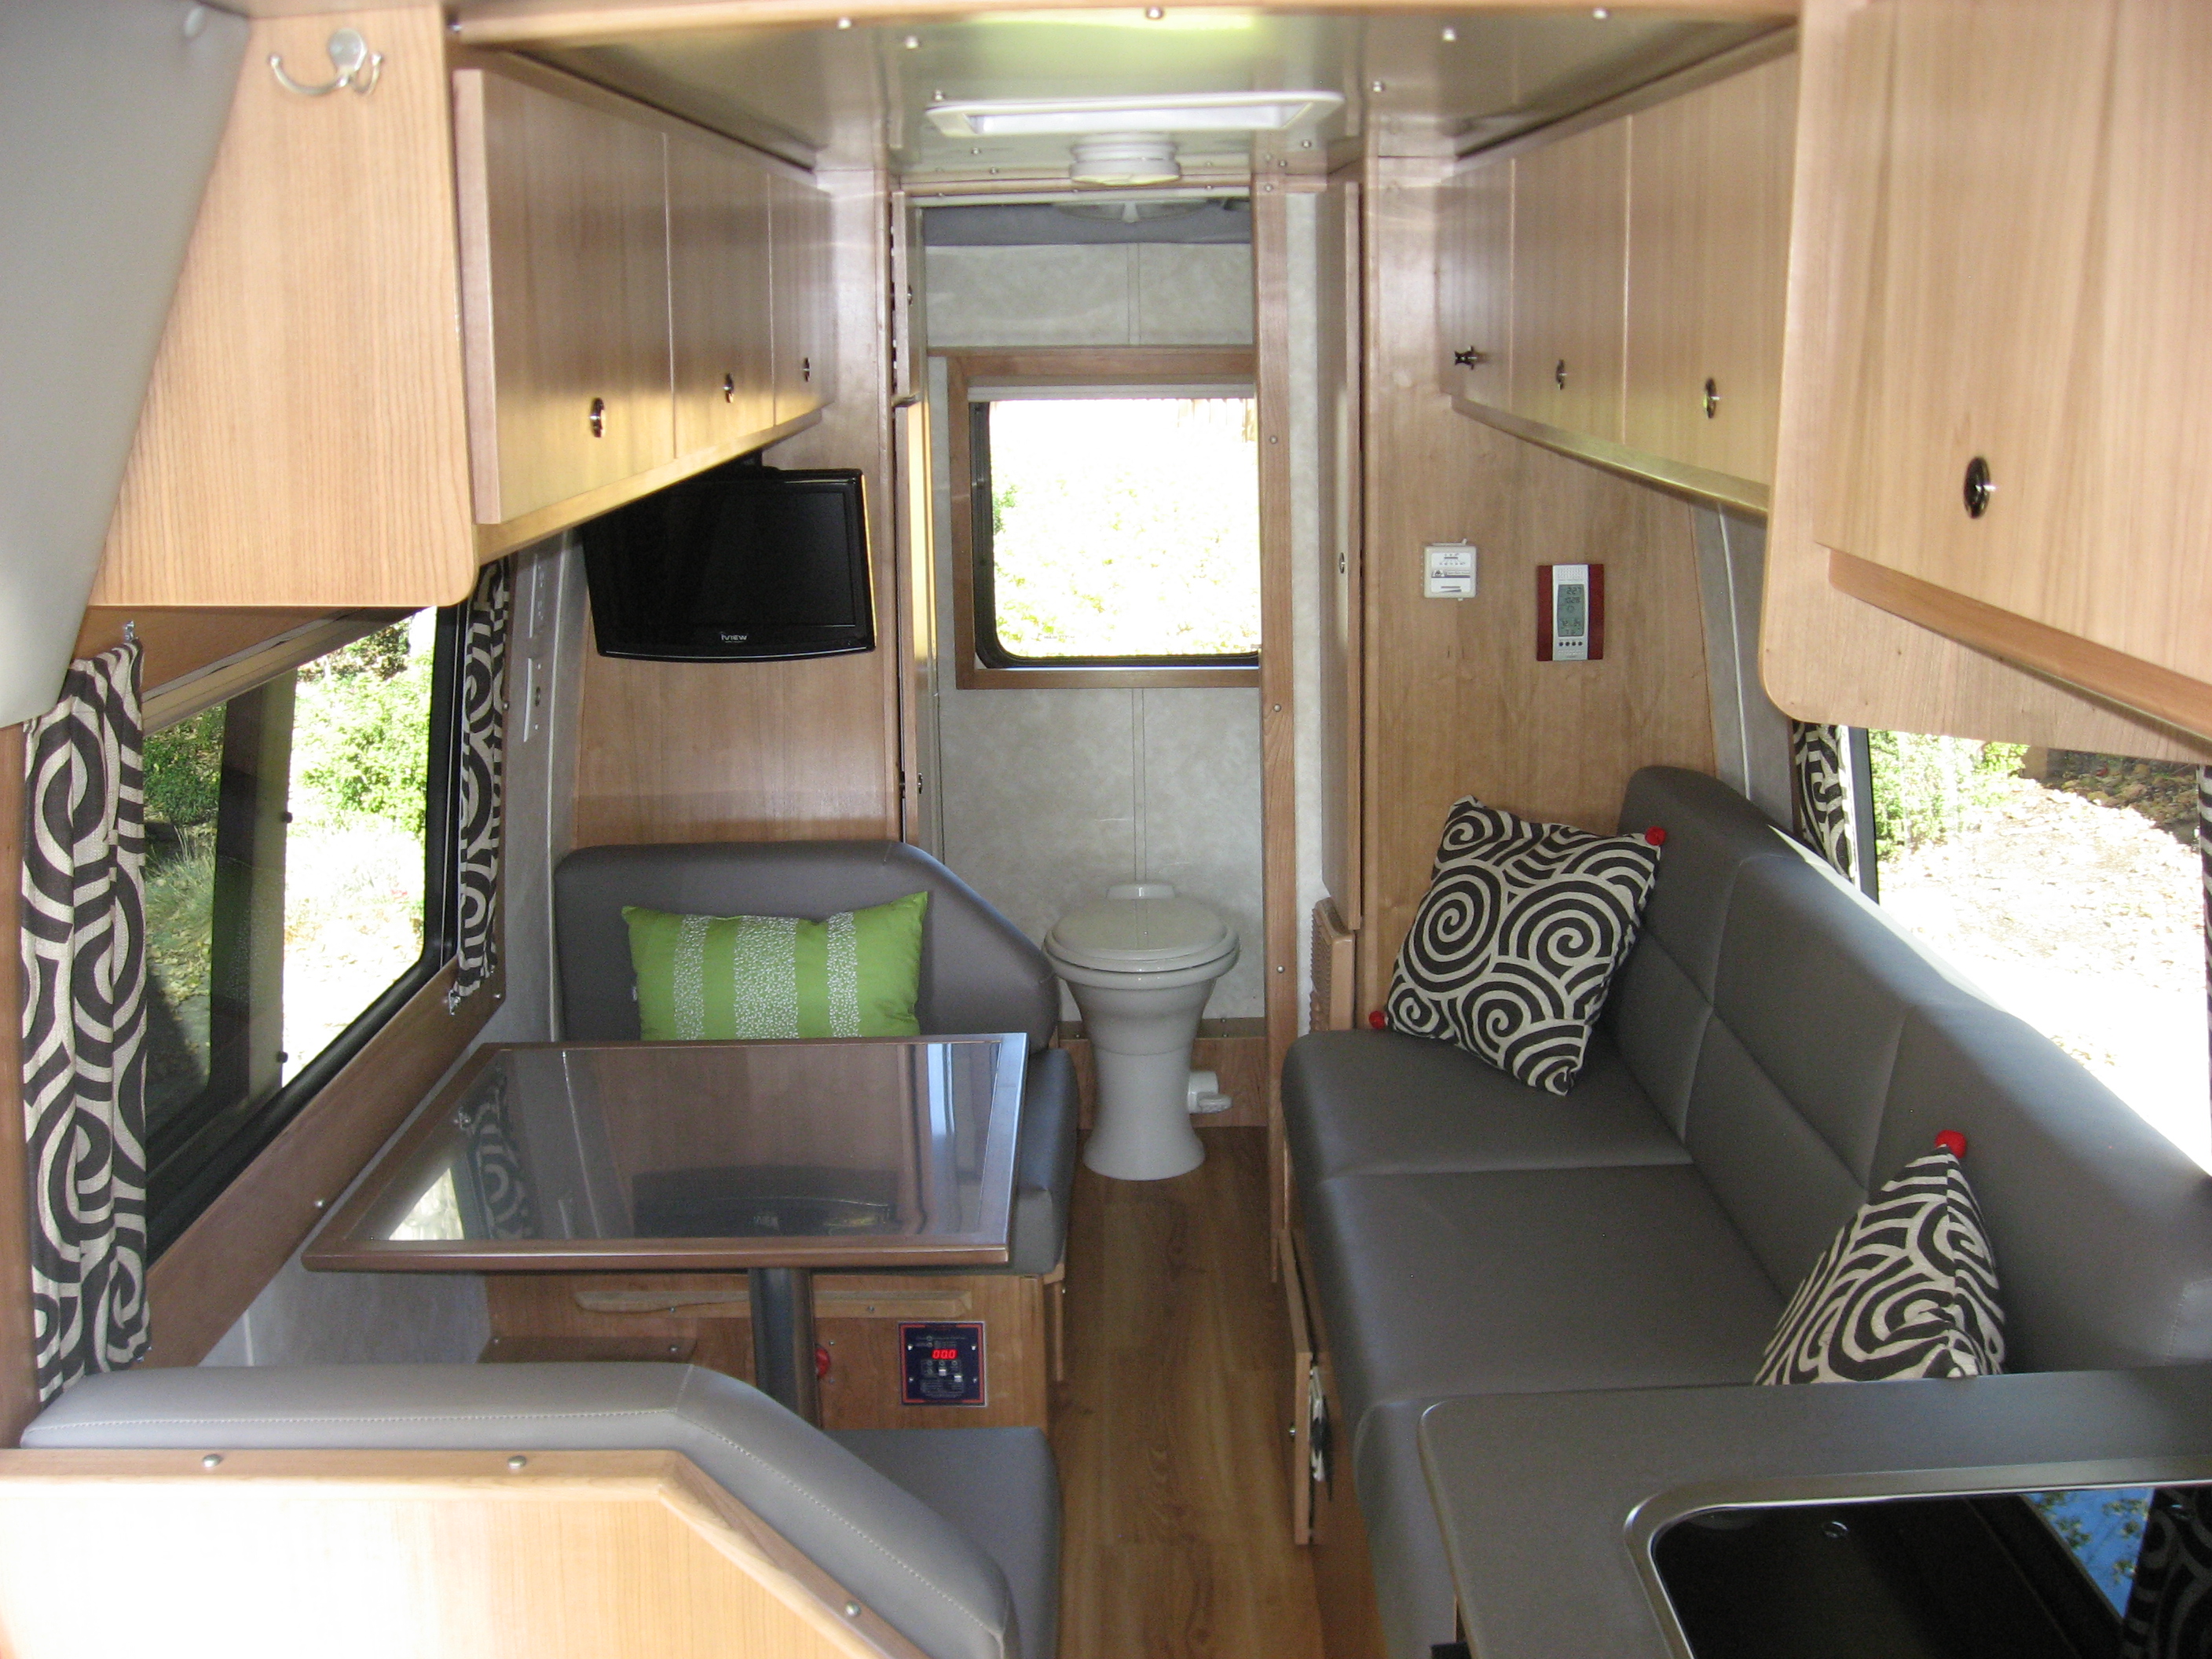
Oh. Also in that one above you can see the Trimetric battery monitor under the table there. It’s nice to not have to guess how much juice we’ve got left.
Another nice interior shot. I tried to keep the grain running vertically wherever I could. I hope, in some small way, this makes it seem a bit taller in there, and not so much like we’re, you know, living in a van. Also, the dinette cushions are velcroed in, we don’t have to try to cram them under a lip like the original design had.

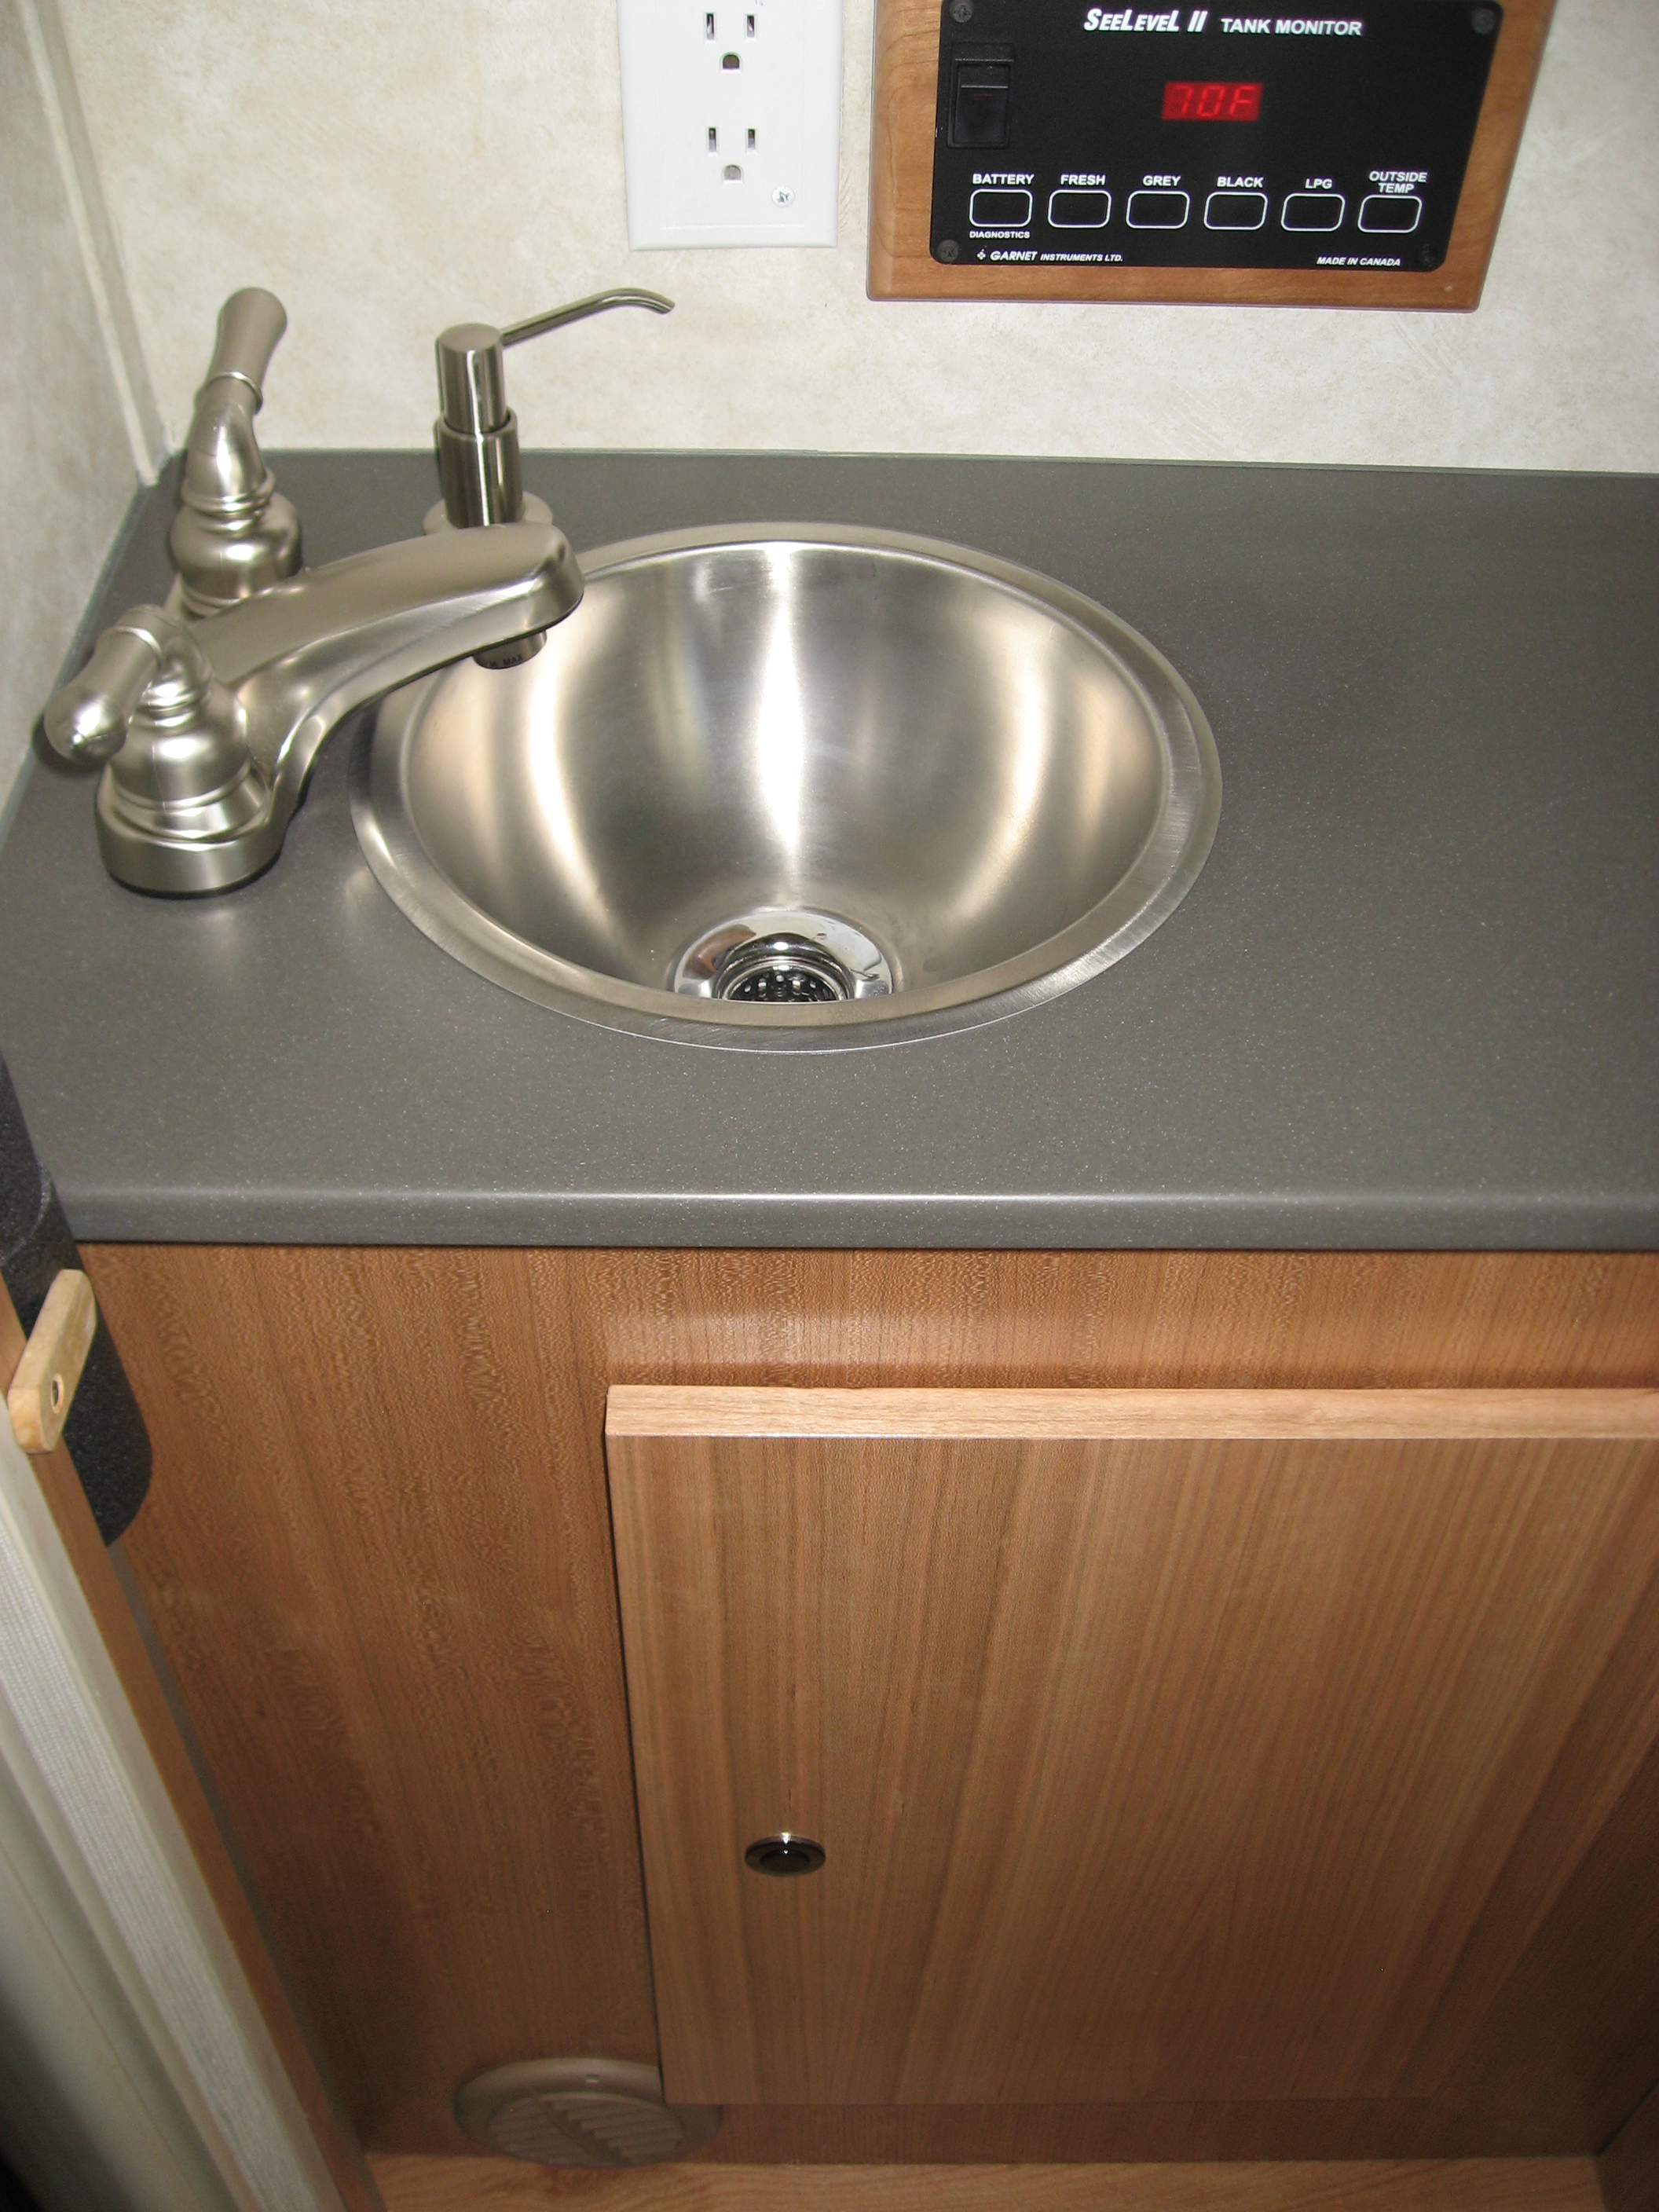
Here’s one of the completed vanity. I also added an under mount soap dispenser. And, down by the floor, is another heating vent. Since it took me like, 10 weeks to finish, it’s cooled off quite a bit. I swear, the temperature read 110 those first couple weeks in August.
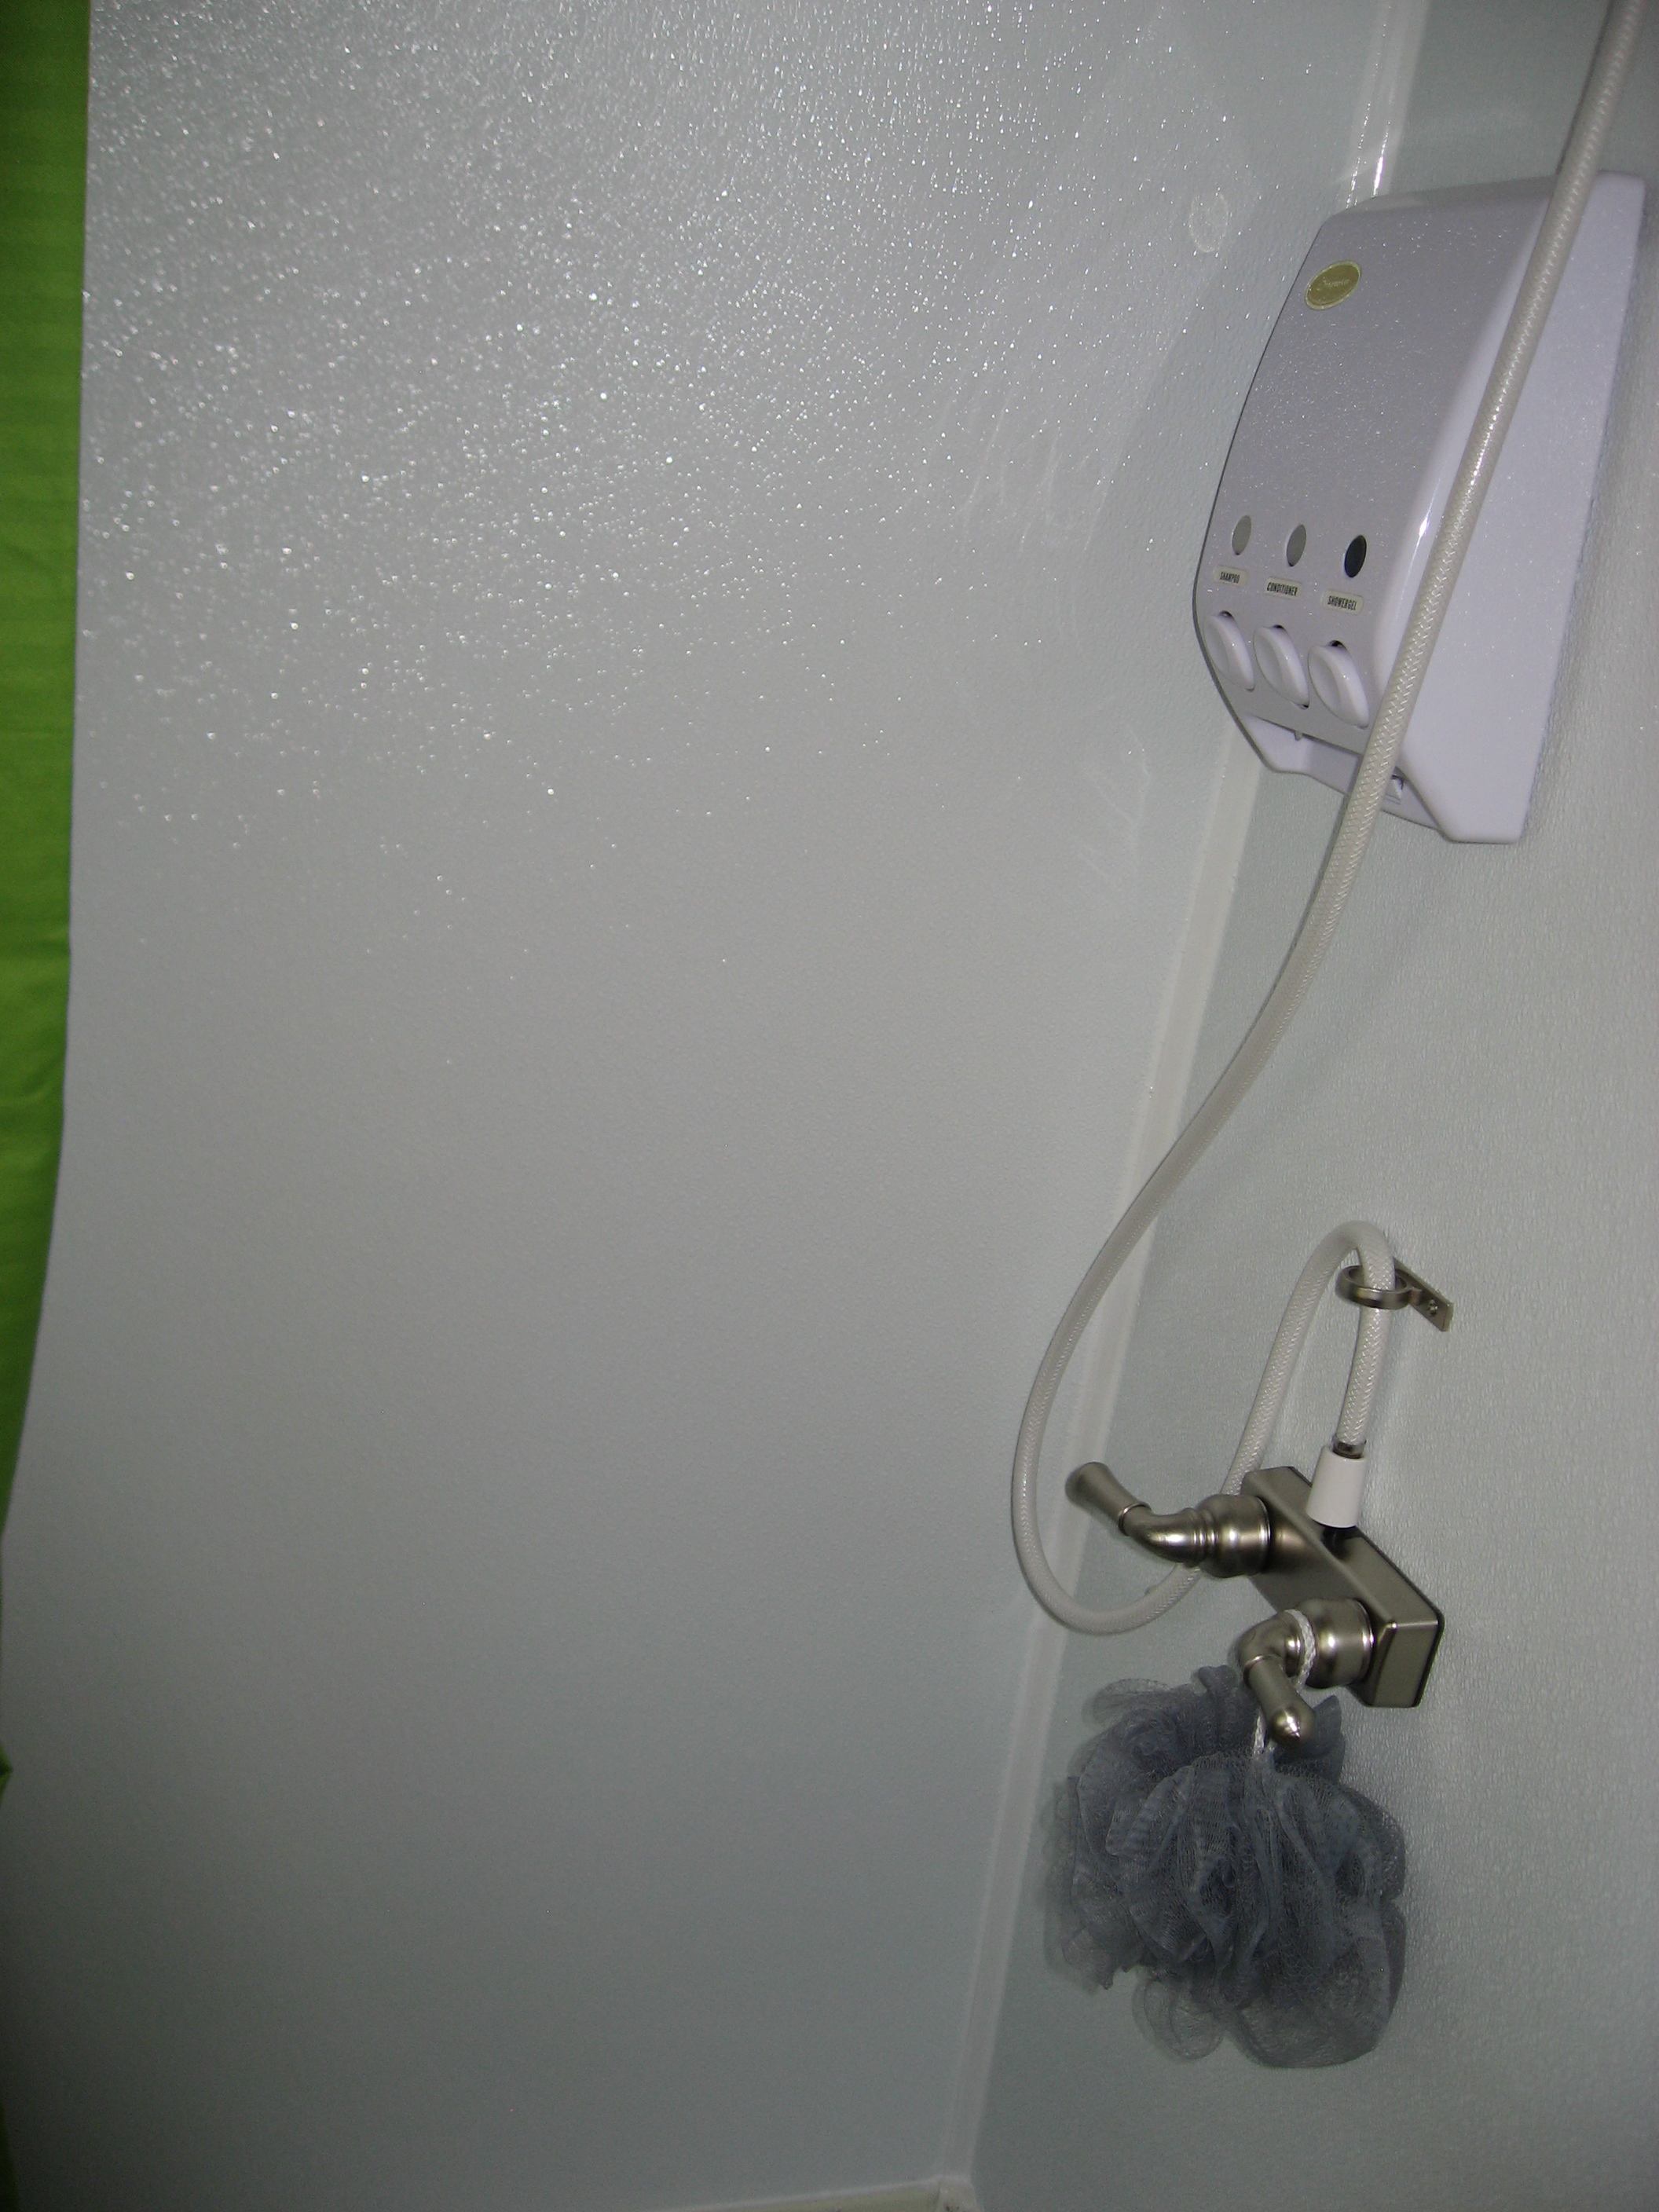
There’s not a ton of room in there, so getting back far enough to take a picture is tough, but here’s the best I could manage of the revamped shower.
Looking from the back to the front in this next one. You can get a little sense of the overall size. Took this one from back by the toilet.
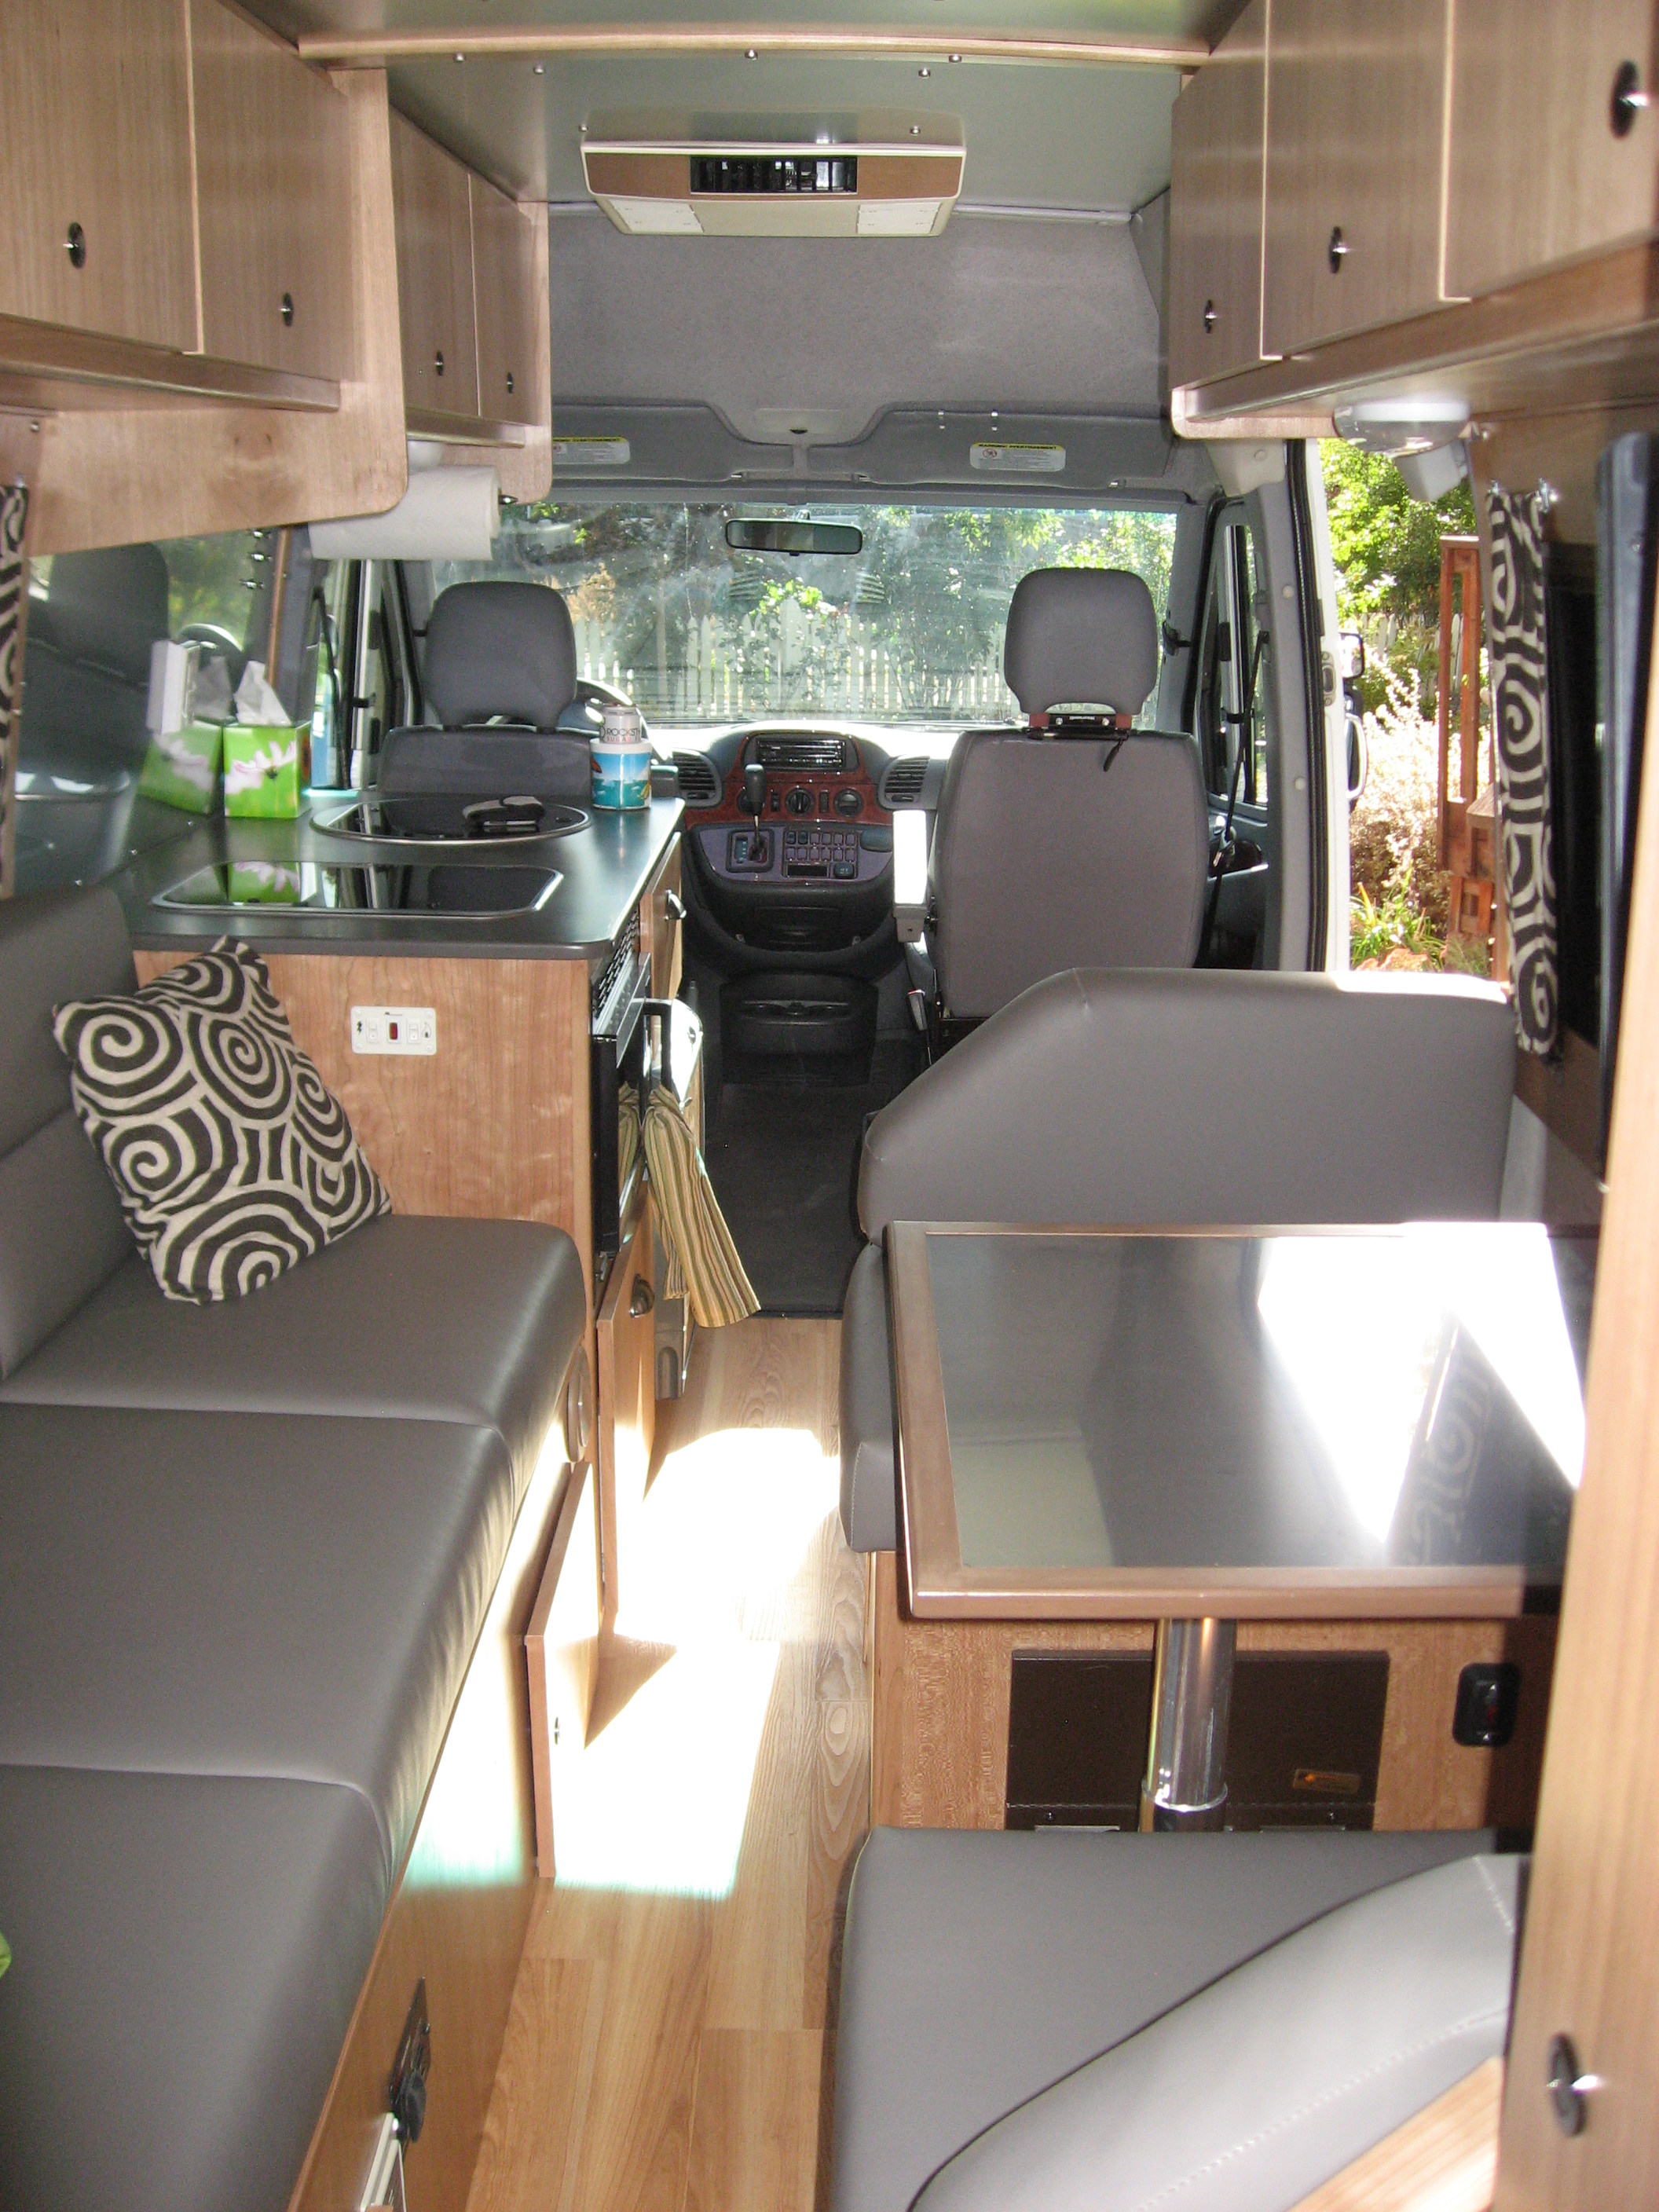
Here’s a decent shot of the marine pedestal table. It raises and lowers when you loosen that knob. No more of those poles rolling about on the floor. If you’re not familiar with this floorplan, the dinette table becomes one part of the bed with the seats, and the sofa backrest folds over to make one largish bed.
Completed galley. I added a waste basket behind the driver’s seat – mounted in the same holes as that black metal thing was. Also, the two spaces that were formerly cabinets are now drawers on full extension slides. You can also see the plywood front that I put on the fridge. That was actually harder than it looks. The panel can’t be more than a few millimeters thick, and the thinnest plywood I could get was quarter inch. I had to run it through the drum sander until it was thin enough to fit.
Sink next. That sink is DEEP. The non-standard faucet takes some getting used to, but once you figure it out, it’s pretty neat.
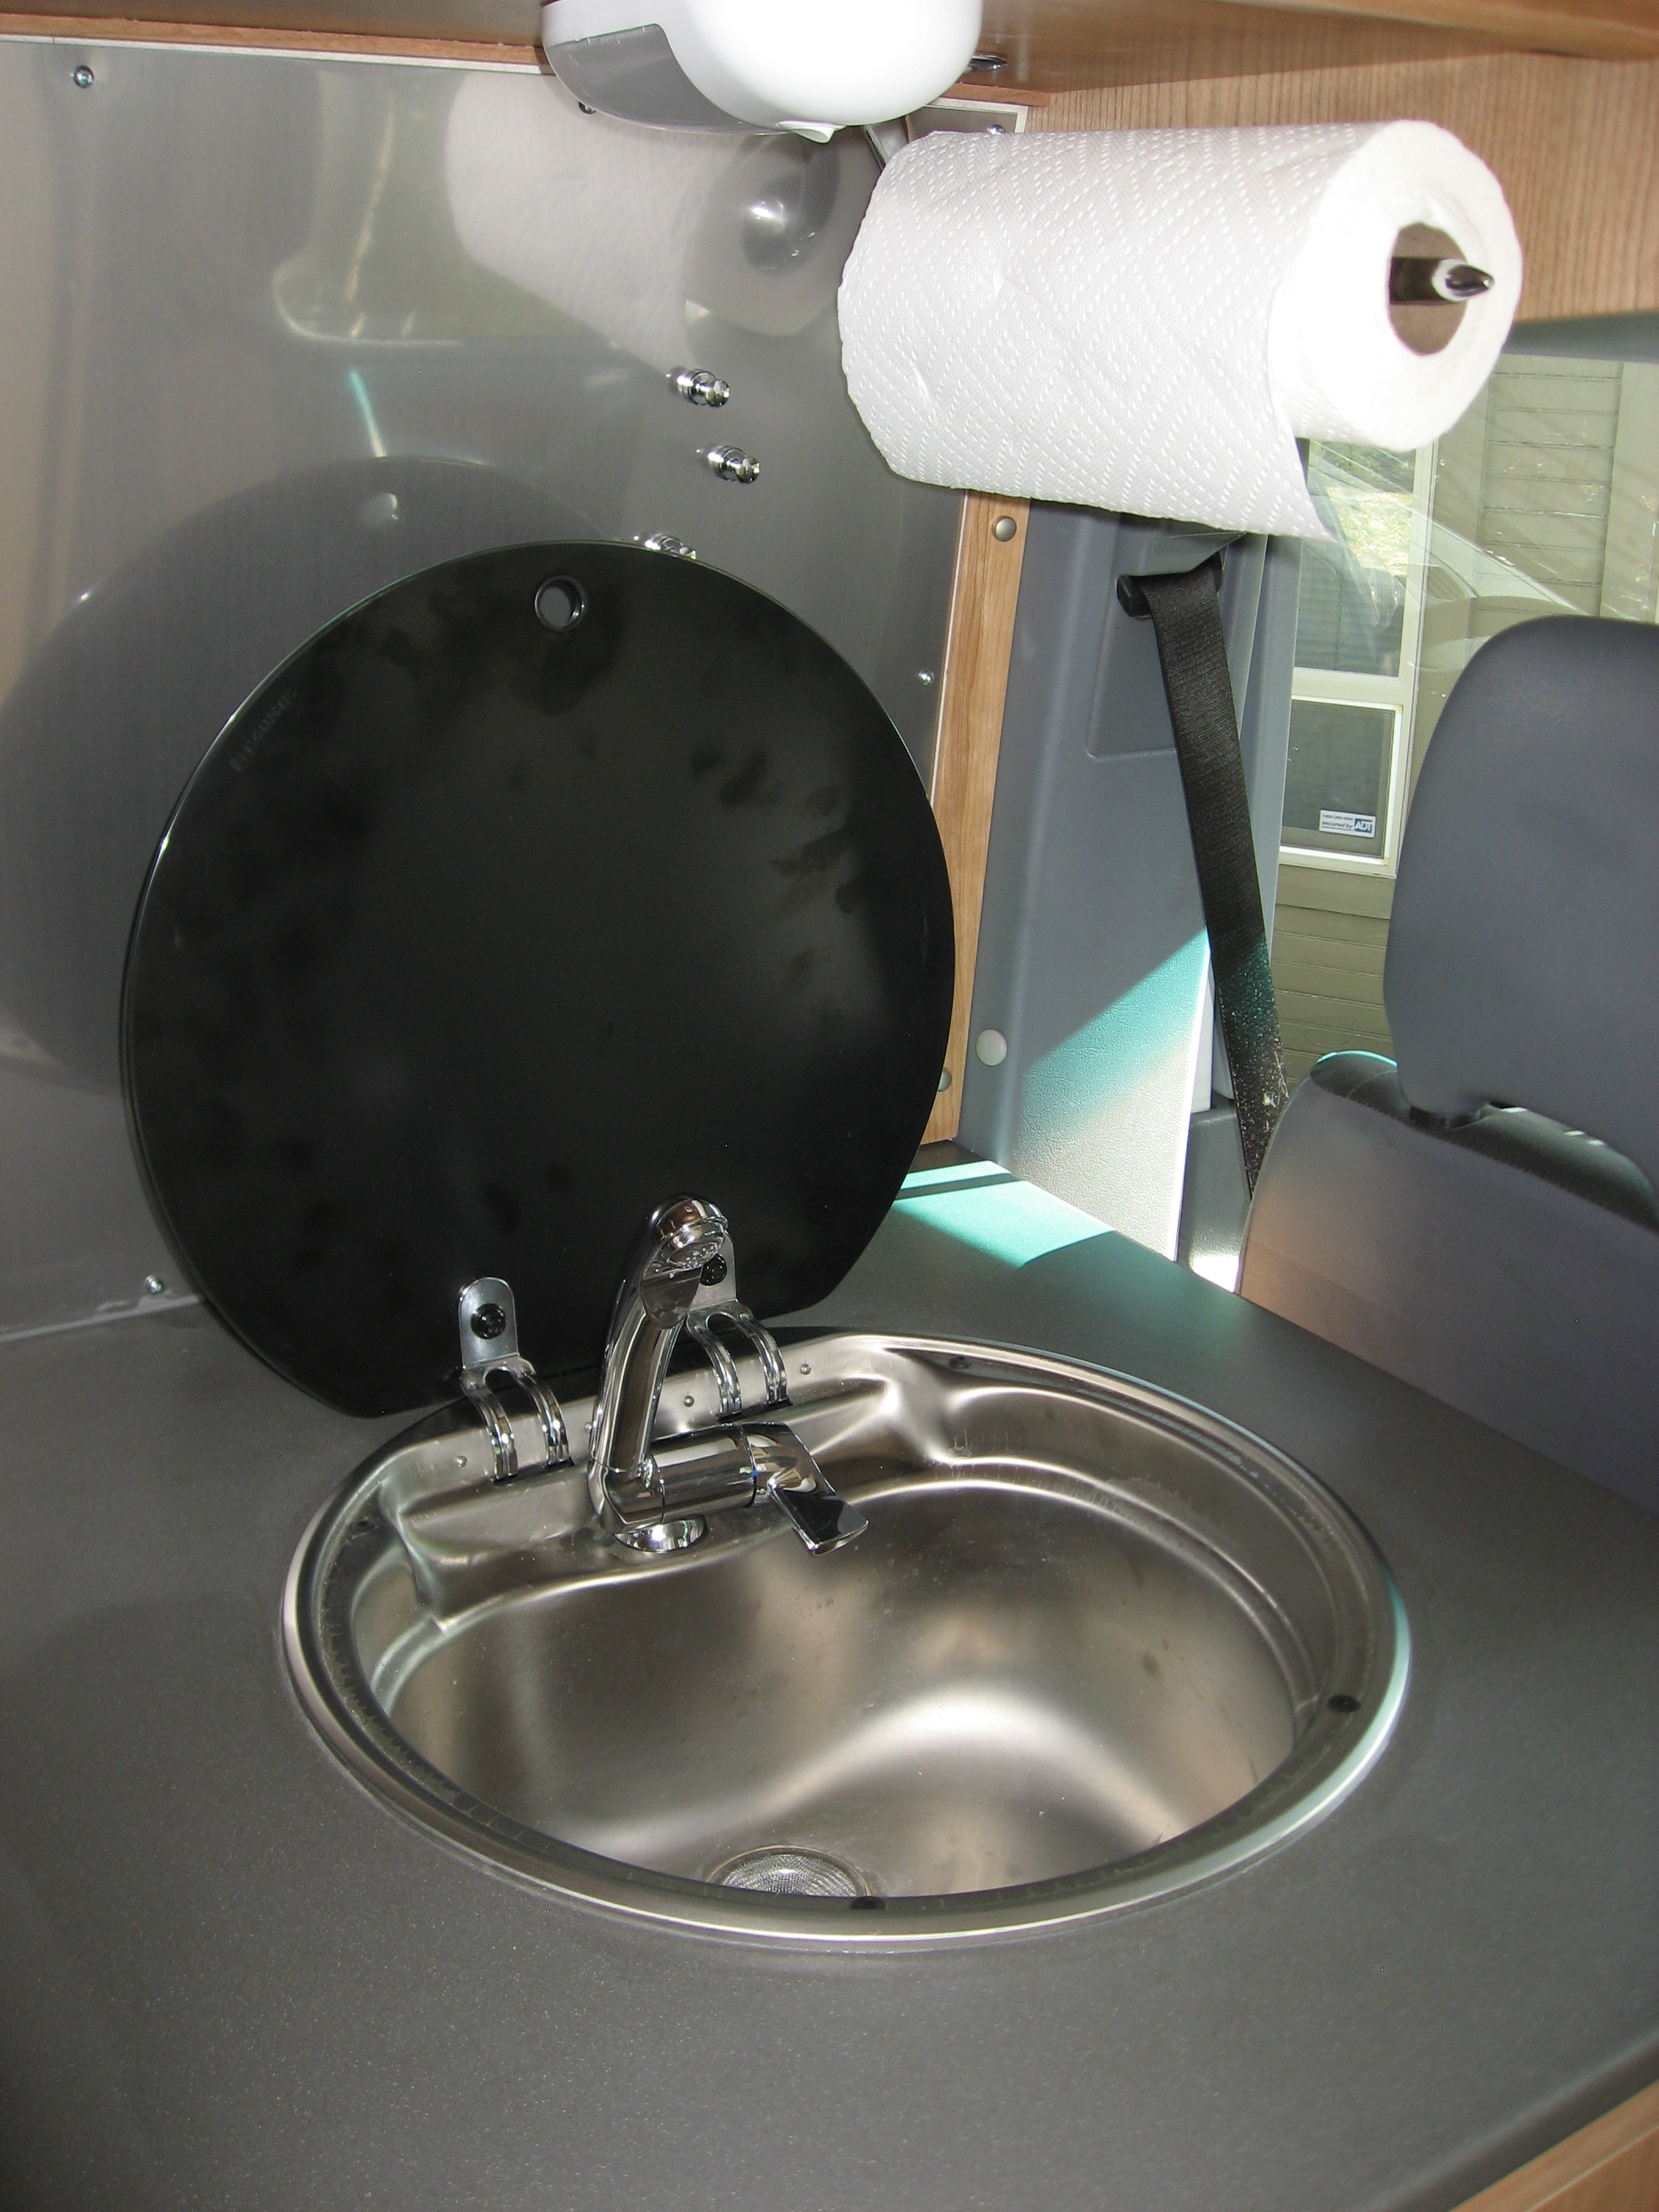
Another thing to note (and I did this everywhere I could) – do you see where the paper towel holder is mounted underneath the upper cabinet? Where it mounts, rather than just mount to plywood – there are solid wood blocks inside the cabinet bottom to provide a solid mounting surface. Nobody would notice this if I didn’t point it out. Did the same for all the lights, and anything you see mounted to a wall.
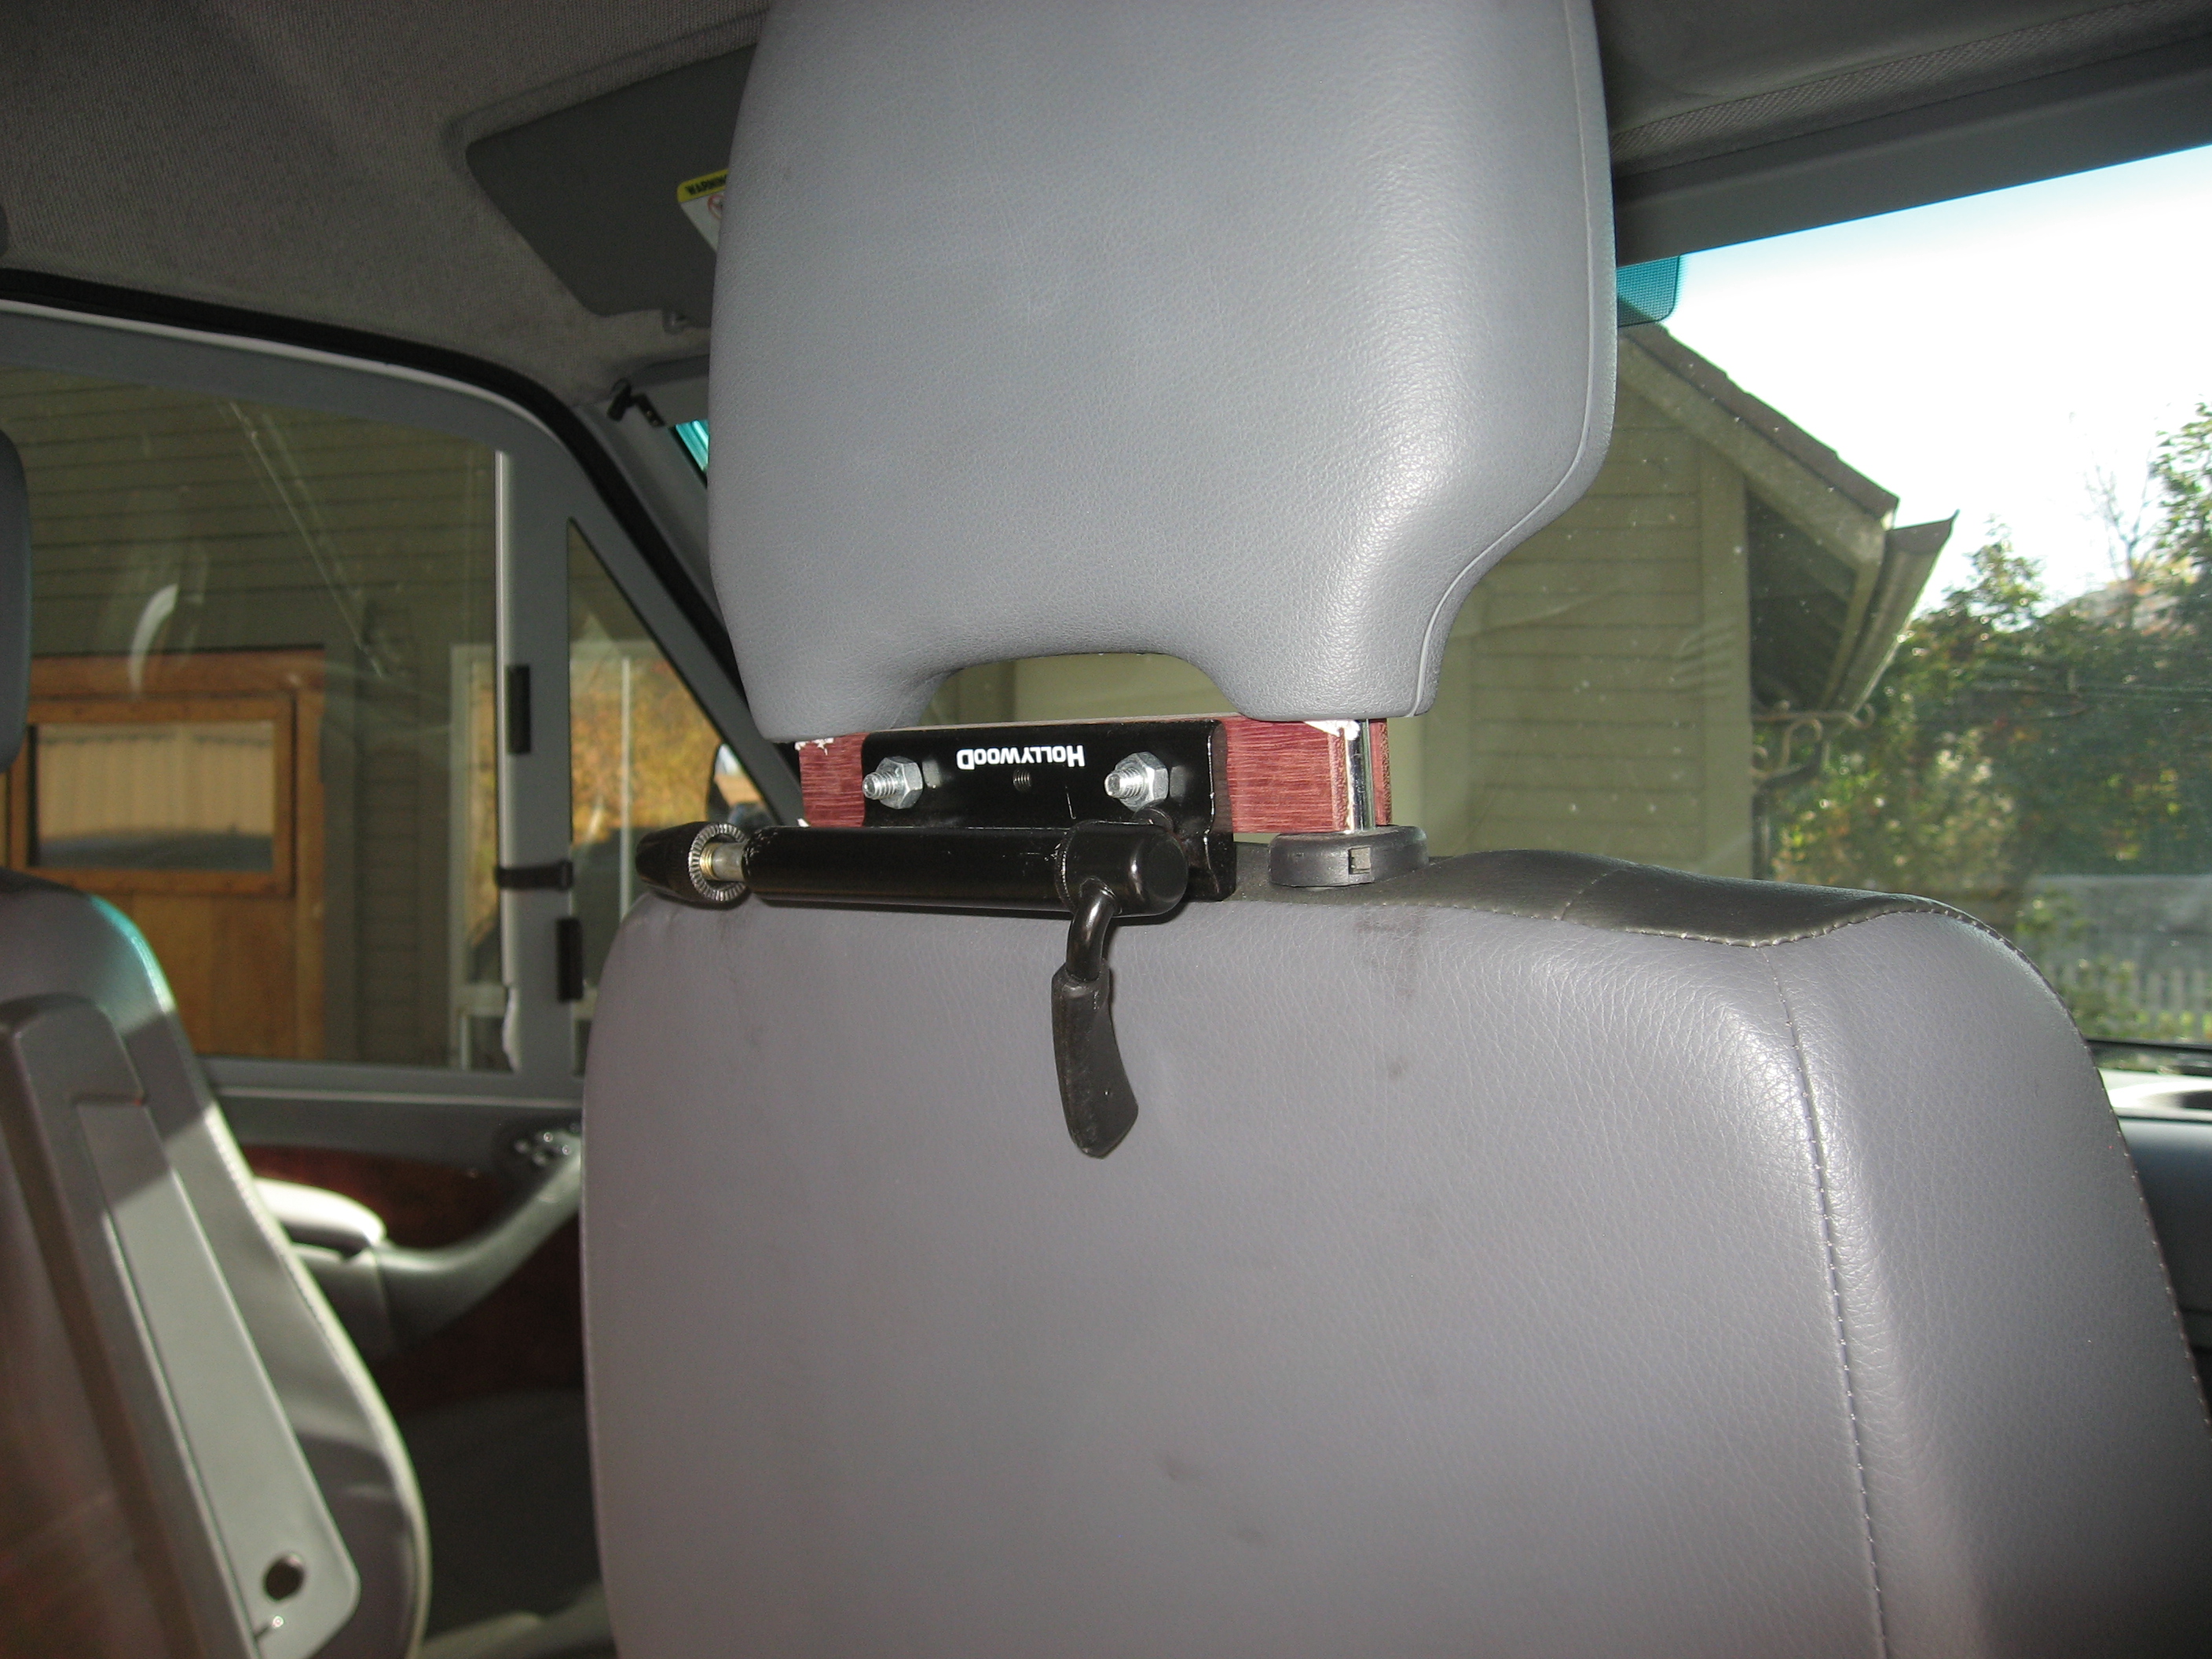
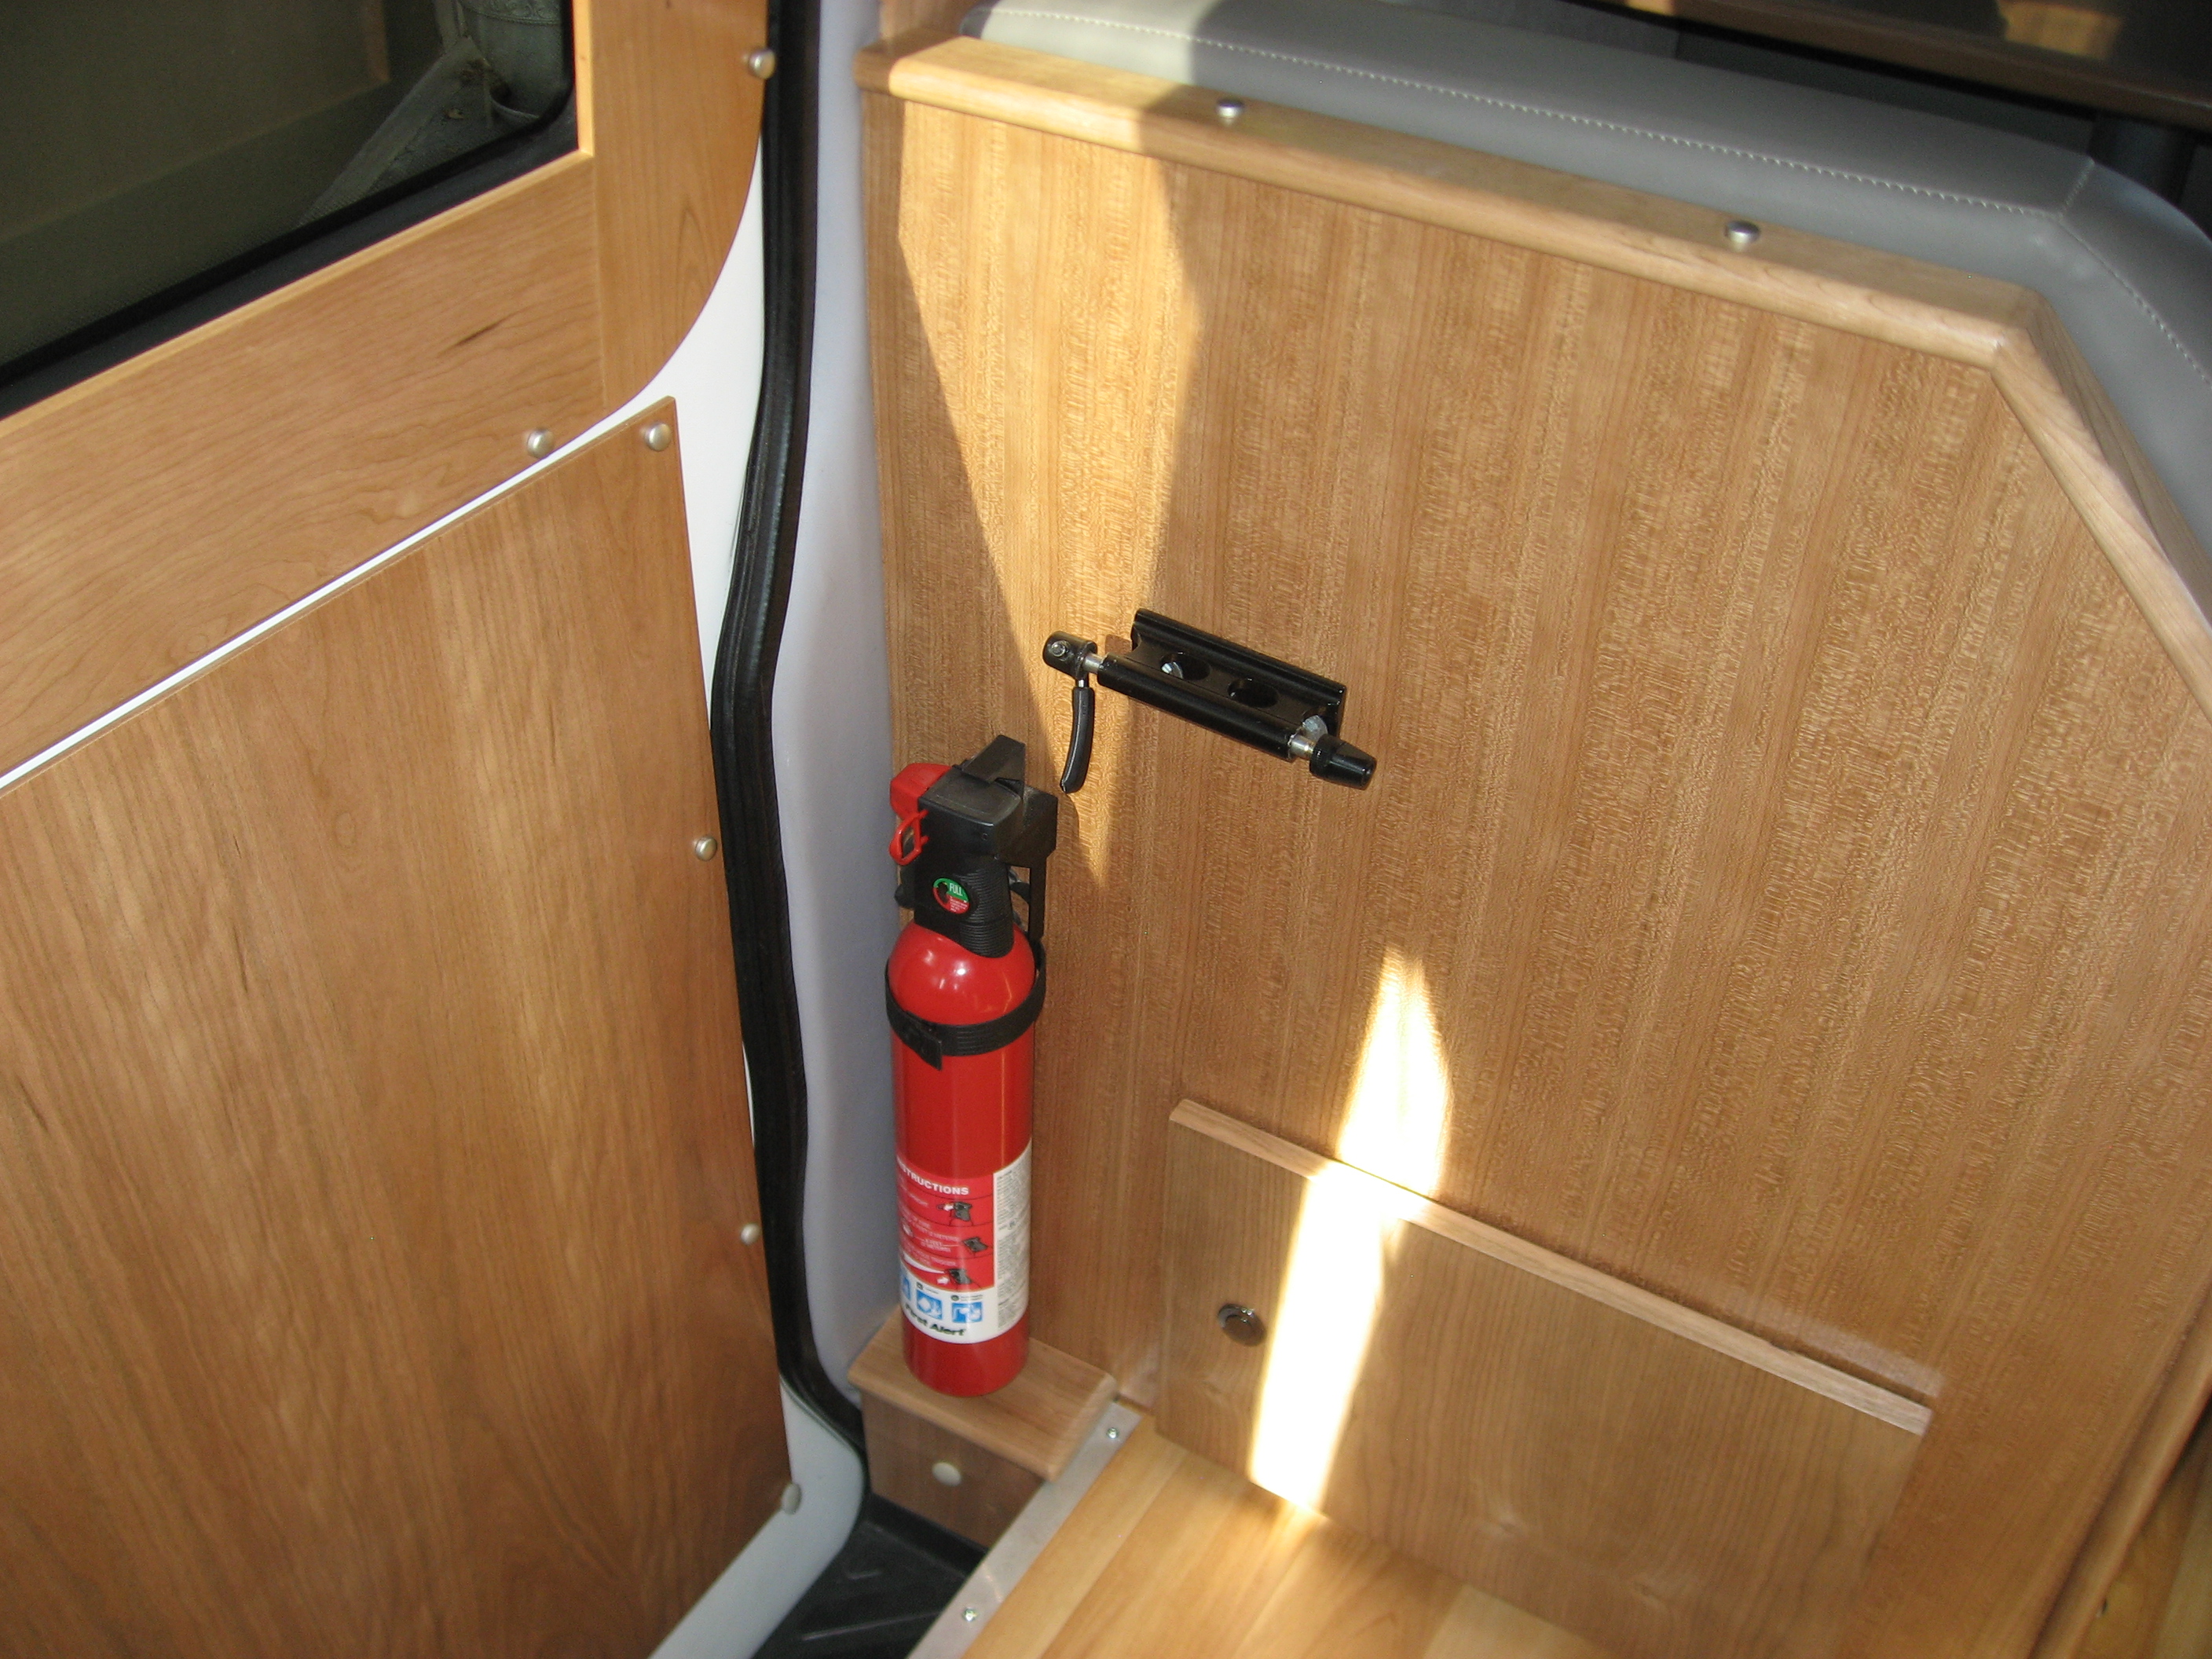
So I mentioned bike races. By that, I mean bicycles, and not motorcycles. Well, these are expensive bicycles I’m talking about, so leaving them out on a rack is out of the question. So I came up with this way to haul and store two bicycles in the cab of the vehicle, without interfering with any other function of the RV (except getting in and out the sliding door). There are two fork mounts, and one of the bikes gets mounted behind the passengers seat headrest, pointing up, with its back wheel on the floor. The other bike sits with its rear wheel in the footwell of the slider, and its fork mounted behind the dinette on another fork mount. Here are the mounts:
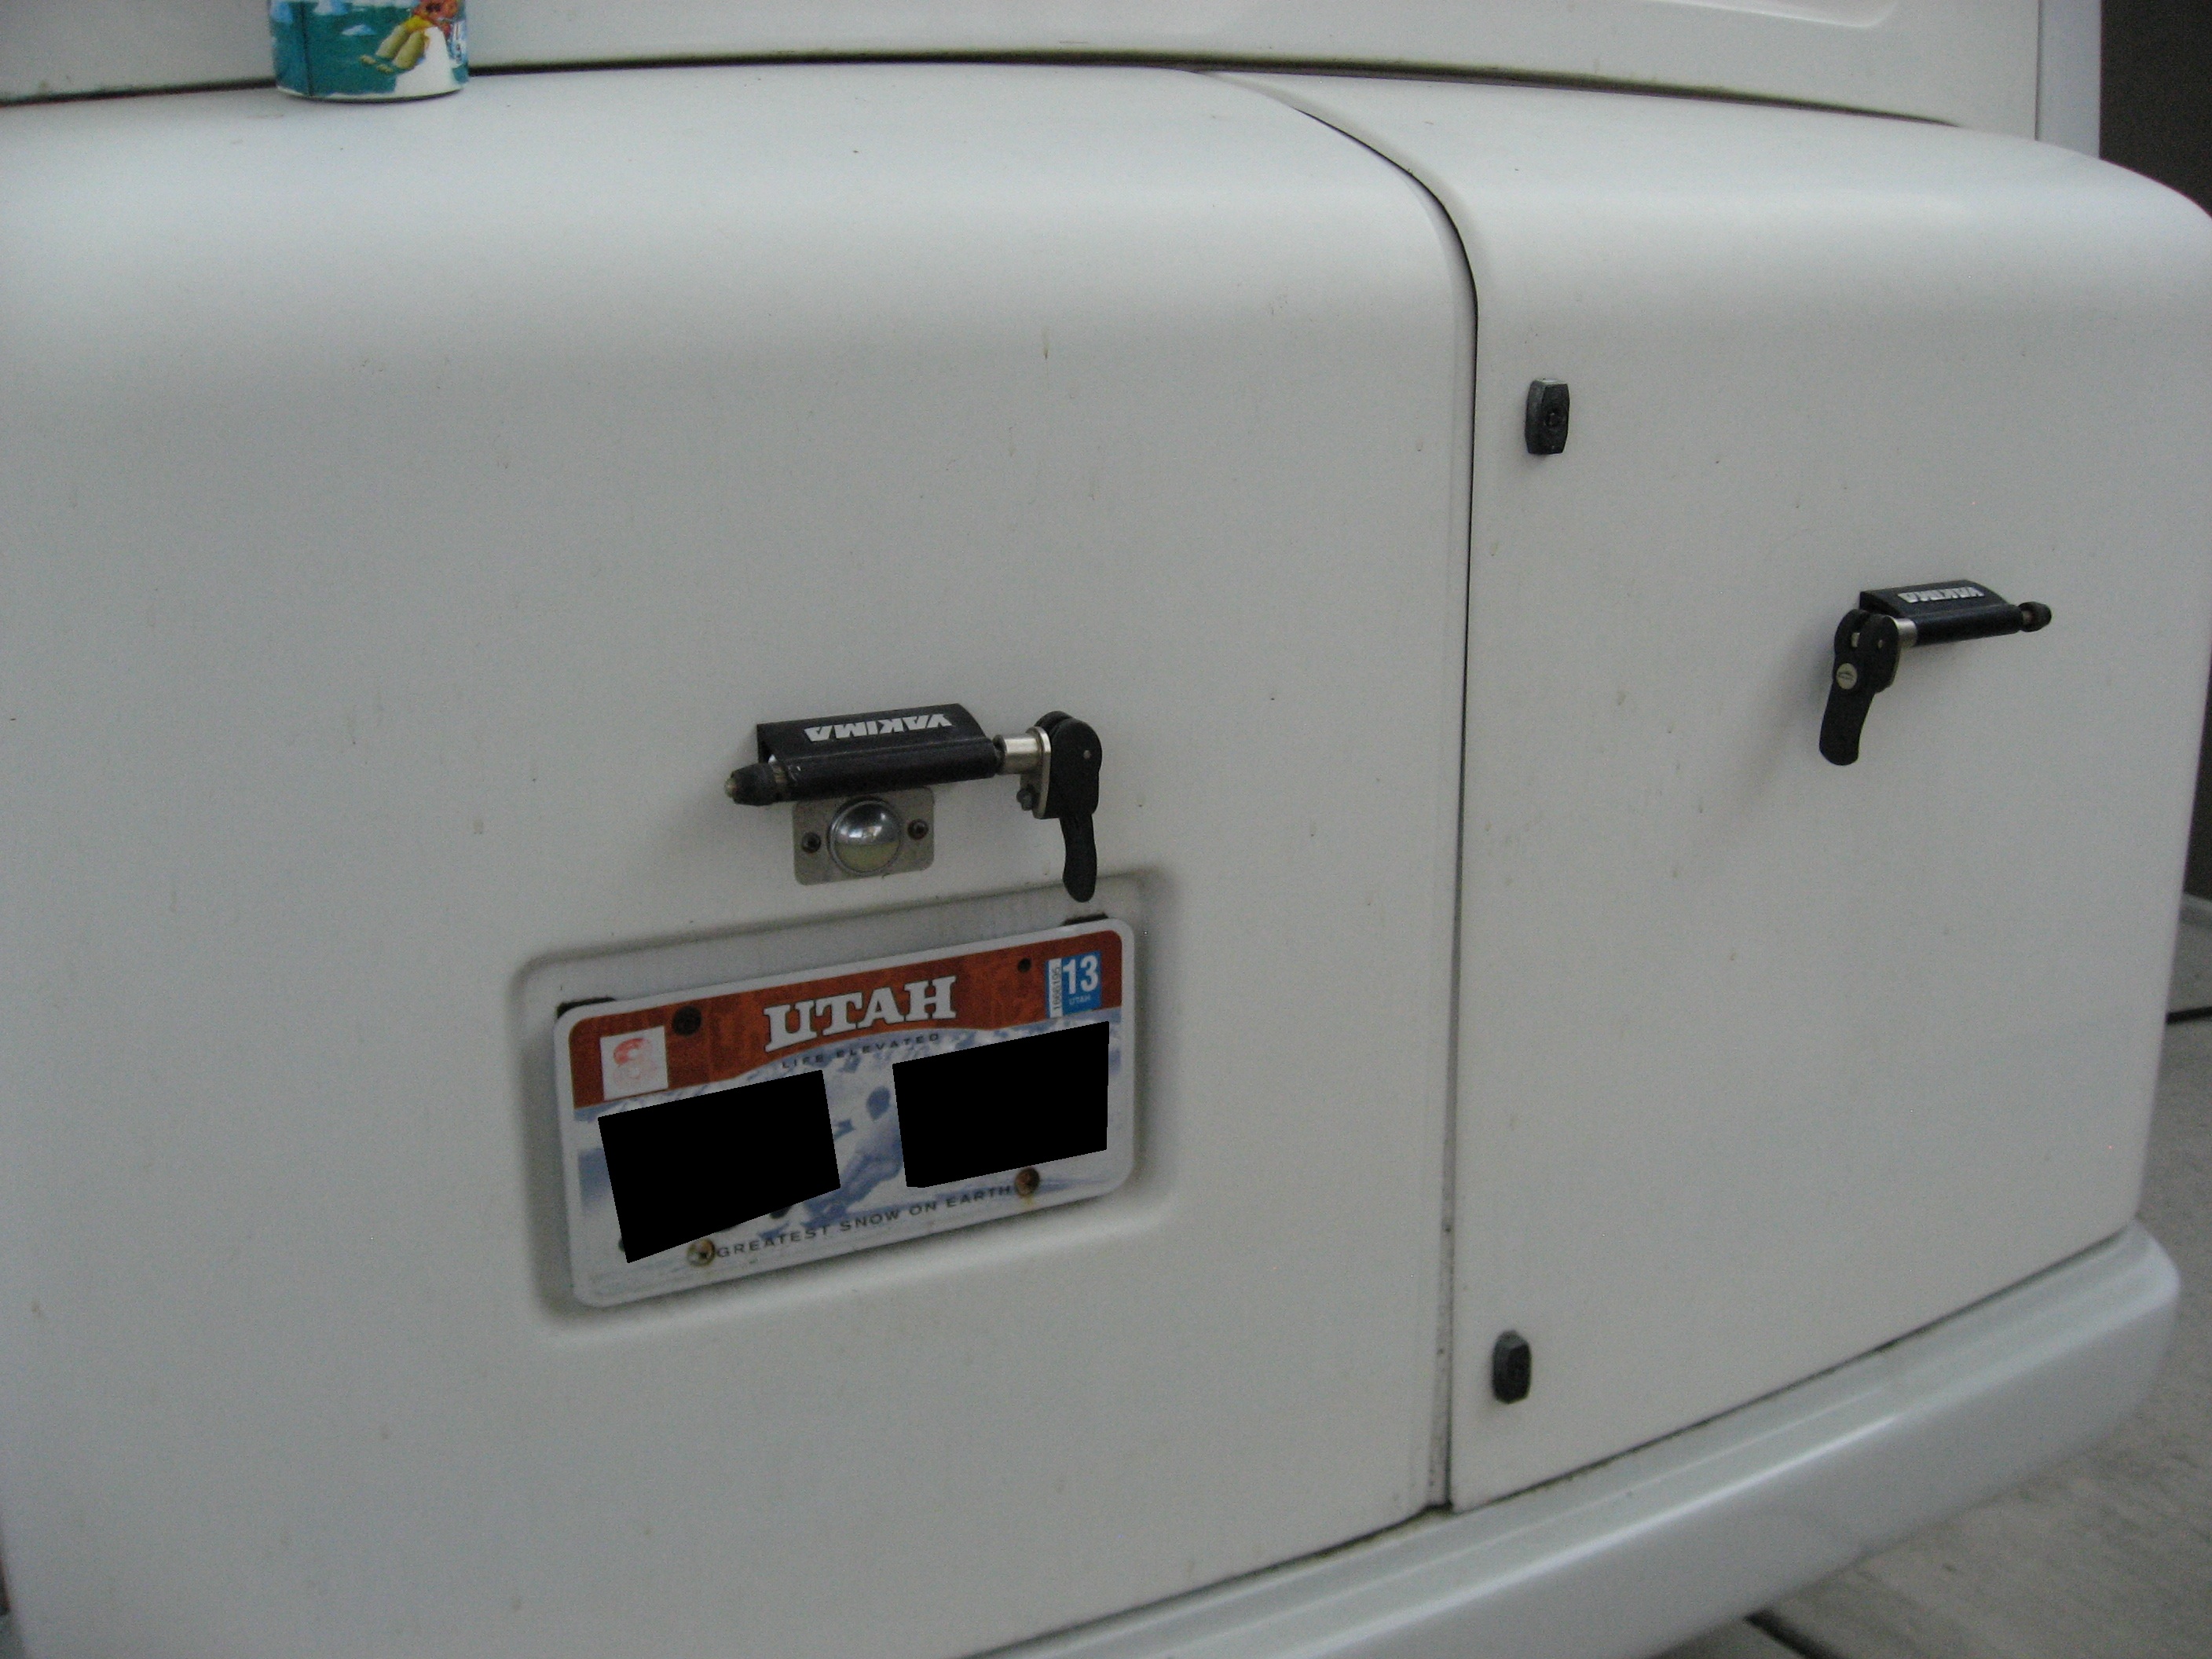
And here are some bike mounts on the outside. We obviously don’t travel with them there, but if we want some extra room in the van, it’s nice to be able to lock the bikes to something outside.
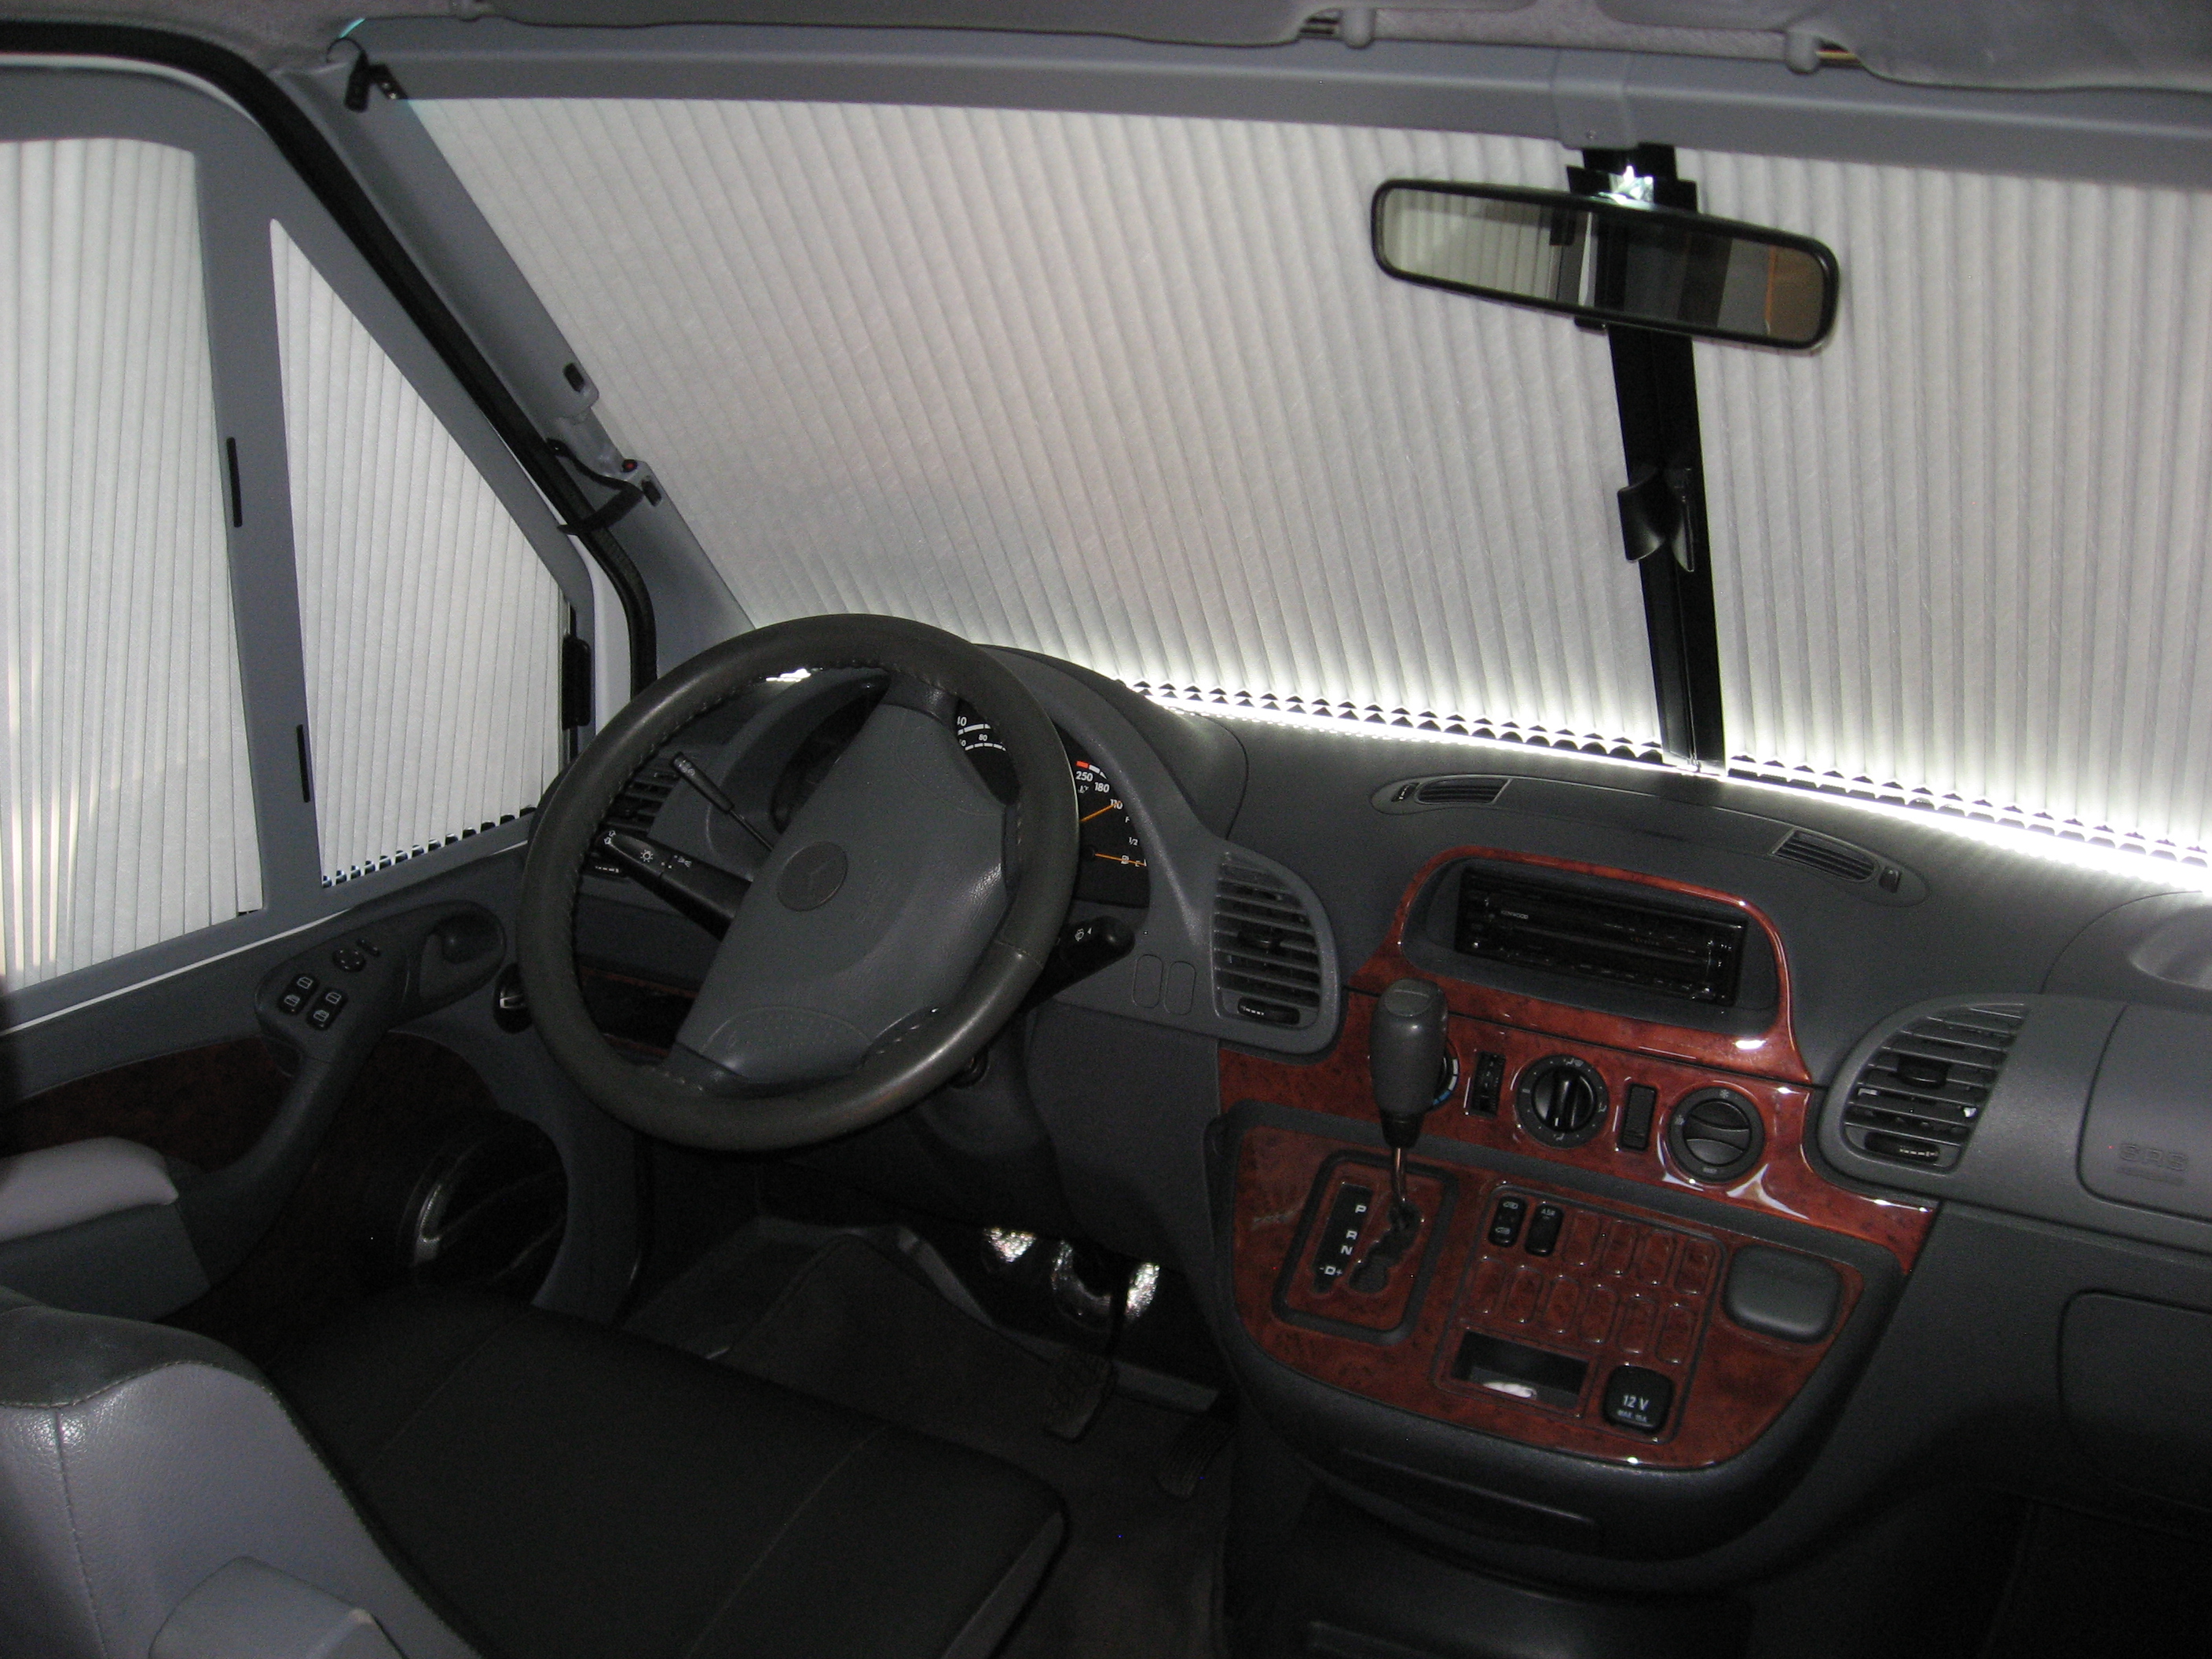
Finally there’s this coolness. Installed those REMI pleated shades in the cab. They’re expensive, but look better to me than drapes, or sunscreens, or whatever. Also installed wood trim dash kit, wrapped the steering wheel in leather, and added a padded armrest for the driver’s side.
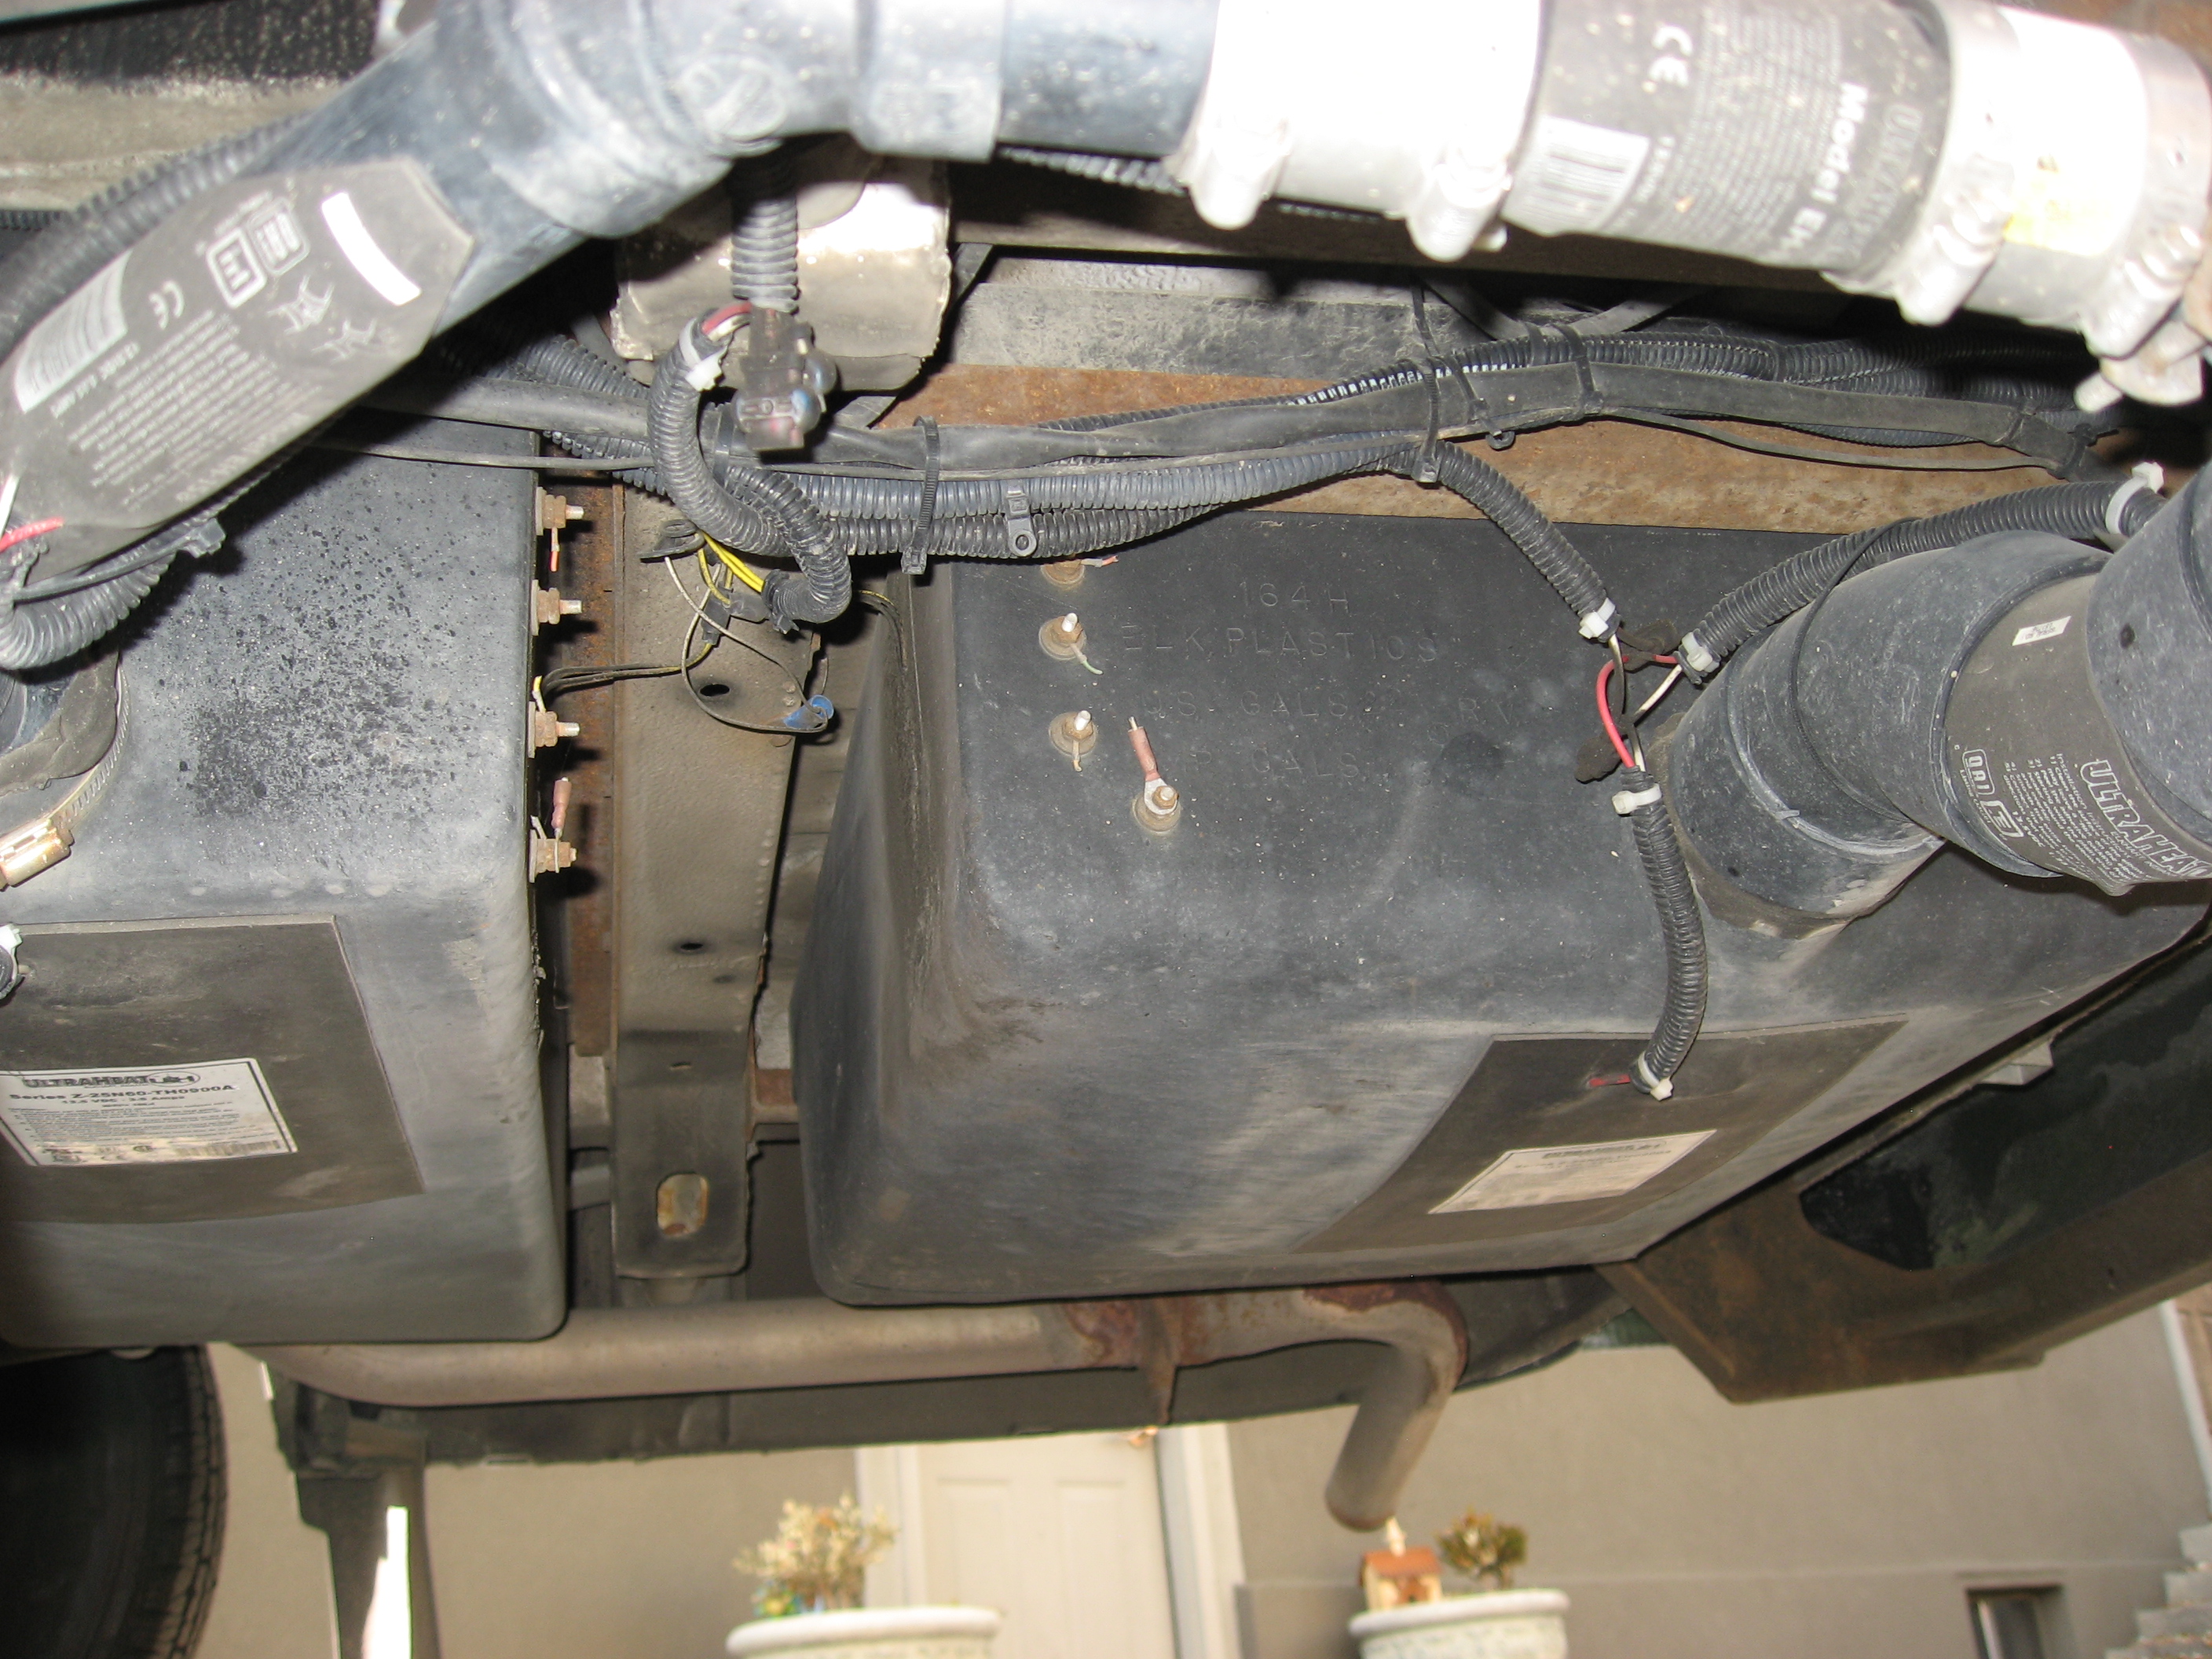
Though not strictly a part of this remodel, I did also install Ultraheat tank heaters on the grey and black tanks, and a See-Level monitoring system on all the tanks. Here’s an underside shot of the tanks/heaters/monitors.
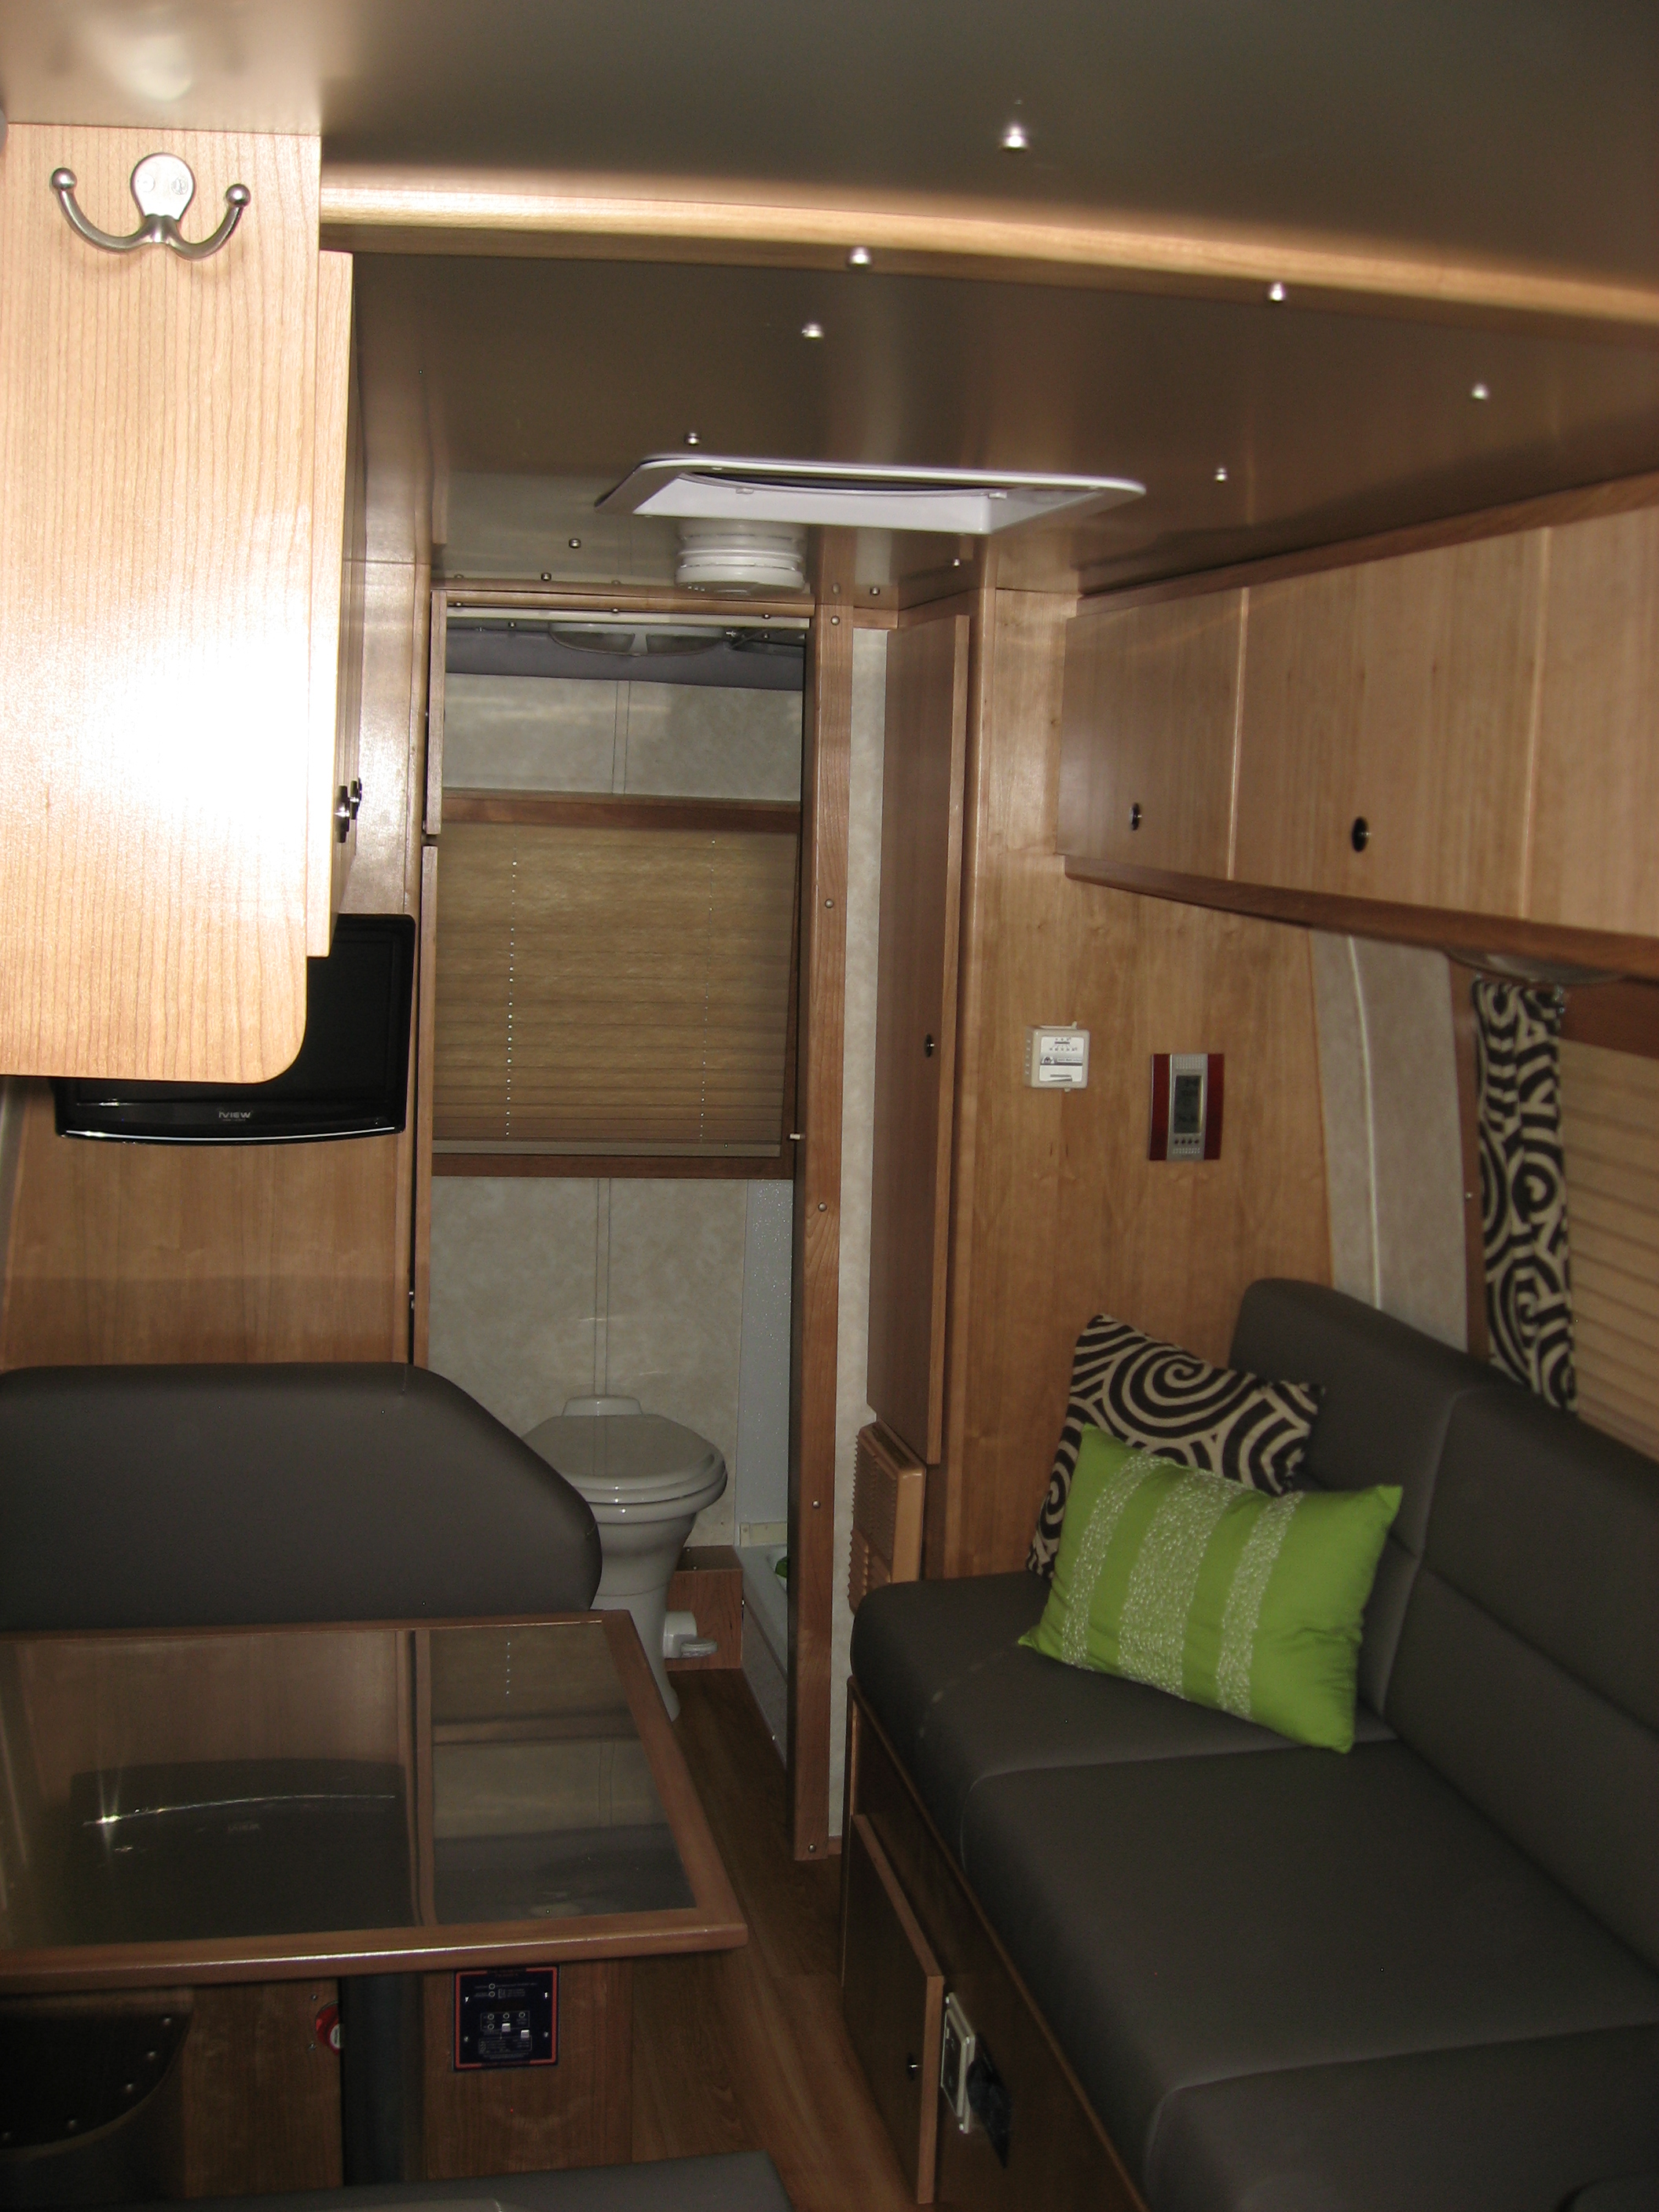
And now, so I don’t sign off with a picture of a poop tank, here’s one last shot of the completed interior. Closed the pleated shades for this one.
Well, that’s about it. Thanks for sticking through it. What follows is a complete list of everything I did during the remodel that I could remember. Cheers!
Electrical –
- Replaced battery with new Lifeline AGM batteries for 220 AH capacity – Though not strictly required for AGM batteries, I kept them in a vented battery box.
- Installed new 55amp three-stage converter.
- Installed battery cut off switch
- Installed Trimetric Battery Monitor and shunt
- Replaced cheap circuit breaker connecting vehicle and coach electrical systems with Blue Sea 60 Amp heavy duty breaker.
Tanks –
- Installed Ultraheat Tank Heaters for Grey and Black water tanks and for piping.
- Replaced monitor with SeeLevel external mounted tank monitors for grey, black, fresh, and propane.
Entertainment –
- Replaced CRT TV with 12 volt 15” LCD television with DVD player.
- Installed new Kenwood receiver with Garmin GPS and Sirius XM radio, Bluetooth, etc.
- The cab stereo install includes component speakers in doors and a sub under passenger seat
Exterior –
- Replaced the rattling sliders with new CR Lawrence tinted windows. This does mean we gave up the screens, but the silence is worth it.
- Added a lock onto the propane compartment and replace the propane tank (Manchester 6812) which was rusting badly.
Plumbing –
- Filled and insulated the opening for shower trap. Besides the wheel well, this seemed to be the biggest culprit for letting tons of cold air into the compartment under the sofa.
- Replaced the traps on both sinks with flexible P-traps on sinks. (Rubber ones, not the bellows kind.) The thinking is that this should give a little extra protection in case I forget to put anti freeze in the traps.
- Insulated all water lines
- Replaced original pump with Jabsco VSD pump.
- Replaced the shower walls with FRP panels
- Line-X on shower pan.
- Added support under shower pan to prevent flexing
- Added a quick drain ball valve to the water heater.
- Replaced yellowed plastic faucets in bathroom sink and shower with new Dura models.
- Replaced yellowed plastic toilet with china bowl Dometic 310
General –
- Changed all lighting to LED
- Added upper cabinet over vanity with lights underneath (for makeup or whatever) with sliding doors (frosted plexiglas)
- Dynamat and insulation on wheel wells
- Dynamat and insulation on Cab floor and cab roof.
- Dynamat on doors
- Installed passenger seat swivel
- Replaced both the Fantastic fan and vent with Maxx Air remote control fans
- Fan openings sealed up with Eternabond tape
- Replaced roof vents with “360 siphon” vents
- Replaced stupid posts under the table with marine post for table / sealed the old floor openings. Now, there are no posts to remove and store when raising or lowering the table.
- Replaced sagging vinyl headliner with anodized aluminum ceiling.
- Replaced stupid vinyl window surrounds with solid cherry .
- Added pleated shades.
- Installed vinyl plank flooring to replace dingy carpet.
- Added a digital safe under the furnace (still keeping more than adequate clearance)
- Ducted heat to front of Coach and around behind shower to bathroom cabinet. (mainly to keep pipes from freezing).
- New Corian countertops for galley and vanity.
- Replaced bathroom sink with stainless round sink.
- Replaced burners with SMEV 2 burner cooktop
- Replaced sink with SMEV deep sink with folding faucet
- Added undermount soap dispenser in bathroom.
- Added backsplash of 430 stainless steel in galley (it’s magnetic!)
- Installed replacement wood panel for front of refrigerator
- Two fork bike mounts inside and two on the back
- Completely replaced all cabinets with new, solid cherry and cherry ply cabinetry.
- Knobs are Flush mount – “push to get a knob” hardware on all doors.
- Reduced the volume of that carpeted box over the wheel well by about half and replaced it with curved, anodized aluminum.
- Installed side curtains on main coach windows.
- Replaced separate smoke and carbon monoxide detectors with single combo unit.
- Replaced dining table with one covered in 430 stainless (again, it’s magnetic) and trimmed in wood.
- Recovered seats in cab.
- Recovered cushions in coach. The bench was shot. Replaced foam and put plywood underneath (I like a firm bed).
- Reduced size of carped covered thing behind toilet and replaced with Cherry.
- Added a waste bin to the galley where the black mounting thing was behind drivers seat.
- Up front, added carpeted floor mats and wood dash kit.
- Added drawers in galley cabinets instead of doors/cabinets.
- Added REMI pleated cab shades.
- Wrapped steering wheel in matching leather
- I added a cushion to the driver’s side door to rest my elbow on.
- Installed Timbren SES front suspension kit
- Installed Rear Spring Assist Kit from Upscale Automotive


This is awesome. My husband and I bought an 1983 dodge van/camper. our dream was to remodel it and travel, He passed away a few months ago. I am sorry our dream didn’t come true, but your work is incredible.
Sorry to hear that you and your husband never got to try out your dream.
If you were motivated to try it out on your own, there’s still time.
Whatever your path, we wish you happiness.
Hope you are well. Thanks for all you do to help RVers. I continue trying to fix this 2005 MB cruiser that I discovered had roof leaks at the fans and skylight. When you replaced the fans in your rebuild did you build up the roof with butyl tape between the ribs or do something else? I bought PVC roof adapters, but maybe there is a better option. Because this is an older van, I tried to custom cut these adapters myself to fit the van roof curves and ribs and was going to attach them with 3M 4200, but since not a great fit, not sure if going back to butyl tape would be better? This is also further complicated by the interior steel frame around the openings and trying to avoid screwing the roof metal into the frame. I have put PVC shims in the gap between the frames and roof. I am stuck. I can post a link to photos. Do you do phone or email consults? Happy to pay for your time and help.
When I did the roof vents, I actually did just stack up butyl tape to get things level.
Then, ON TOP OF EVERYTHING, I installed a nice even, flat, wide layer of Eternabond tape. Never had a leak.
This is the stuff I used: https://amzn.to/3upTupb
Thanks for the help! So much appreciate it. So you just used Eternabond tape, not the eternabond tape over a lap sealant? Did you trim back the excess butyl tape too?
Just butyl tape and Eternabond. No lap sealant.
Hope you’re doing well. Thanks again for all your help. Could you please share why you decided to leave the thin plywood walls in the Dasbus, vs installing new ones or painting them.
If curious, my rebuild is becoming much more involved. Found leaks in the back along the roof seams, fan, shower skylight, so now to fix the roof and replacing the entire inside ceiling, cabinets, and probably will keep snowballing. Thanks for the inspiration. Have pictures taped up in the van for inspiration to keep on going.
In our case, there was nothing wrong with the plywood, and I couldn’t think of how I would do anything different, so I must left it. Sourcing, cutting and installing that many odd-shaped pieces of luan just didn’t seem fun for the little extra benefit I might have gotten.
Bummer that you’re dealing with leaks. At least I didn’t have that problem.
Good Luck!
Thanks so much for your help! Starting to remodel the same Forest River RV. The stator is shot on the old generator. Looks like the AC and microwave won’t work without a generator. Would you recommend getting a totally new generator or trying to go with solar or do both?
Also what big things would you have done differently in your remodel if you were to do it over again?
That rig was made to work with a generator. Unless you’re going to load up on batteries, don’t count on solar to do the job alone.
Biggest thing I would probably do differently is that I would go with some kind of sheet flooring instead of plank. The planks change size with changes in temperature.
In a home, that’s not such a big deal, as the temperature doesn’t swing that much, but in an RV you’ll get gaps or buckling.
Thanks so much for the quick input. Sounds like I should bite the bullet and buy a new generator? Wasn’t sure since generators were low on your list for your new rig. I am brand new to RVs so have no idea. Really appreciate your help.
Unless you want to redesign all the power systems on the coach (which would be far more expensive than a new generator), then yes, just get a new generator. I don’t know if the new, super-quiet Onan 2800i is available in a propane powered version, but that would be where I’d start.
Love the work you have done to your RV! I’m in the middle of a remodel myself. I wanted to know where you got the Corian countertops from? Thanks for any help.
That was easy!
I just went to a local countertop company and looked through their off-cuts and remnants!
Not only was it easy, it was cheap, too.
Hi James, Thanks for all the help and making this public. I just bought a MB Cruiser 2004 version site unseen in similar condition as when you bought yours. There is a slight mildew smell. Did you find any places prone to mold or mildew or suggestions on how to get ride of it? More, importantly I am wondering if I should throw in the towel. Knowing what you know now, would you do the same thing over by renovating it or just buy a more up-to-date van? Thank you!
We didn’t really find any places that were prone to mildew. I think that’s just the nature of a 16 year old camper van. If you got rid of all the carpet and foam bits, I think the smell would probably go away. But first, I’d tear it all out and see if the wood bits underneath show signs of rot, or if they punctured a screw through the shell at some point. Then you could make a better decision on what to do.
hi where did you get the telescopic table leg from and how much regards lionel
There is a link in the article, on this very page.
“Replaced stupid posts under the table with marine post for table / sealed the old floor openings. Now, there are no posts to remove and store when raising or lowering the table.”
James, I realize you have moved on past this older camper van but I was wondering if you could give some more detail or point me to a source on replacement of the Manchester Tank. I have a badly rusted Manchester Tank #68125 in a Leisure Travel Free Spirit 210a and am wondering what a total replacement would entail. Things like best place to special order and what all is actually needed etc. Tank and connections – valves, gauges, hoses, remote fill etc. Can you comment?
Believe it or not, I just ordered the tank online. I may have even used amazon. If not, then Manchester may be able to guide you.
As to replacing it – in my case, I was going with an exact replacement. This meant all the mounting and bracketry stayed the same. So it was a pretty straight forward swap.
I went to an RV dealer, because I wanted a tech with a propane certification to do it (I don’t have one).
The swap took only about a half an hour, and they ran a propane leak down test before I left as well.
It wasn’t that big a deal once I sourced the tank.
Gonadotropins!!!!
I really love everything about your conversion great job! The RV looks amazing and shows the hard work put into it. . If you want to give your RV roof some additional protection, instead of looking at an expensive replacement, consider using RV Roof Magic.
can you tel me where you got your galley from?
What part of the galley did you mean? The appliances? (Sink and stove)
Did you guys ever have to replace any of the stock parts from the dash area? I broke my dog house cover/extra glove box and can’t find any good sources for those kinds of parts. Thanks!!!…and thanks for all your info and pictures!! Dave
Never really replaced anything in the dash.
Well, we did have a stereo shop replace the stock radio with a GPS unit with NAV, but beyond that, nothing.
Also, we did add a trim kit to the dash, but that went fine as well.
We also replaced the A-pillar plastic parts with the REMIs shades – but again… not what you’re after.
I’d try a Mercedes or Freightliner dealer to see what they can get you.
Hello, This is the best remodel I’ve seen so far – Great Job! Can you tell me where to find the material for the curtains & pillows?
I’m pretty sure I just got them at Jo-Ann Fabric?
I did that remodel before I learned to sew. So we had Stef’s mother create them for us. I sent her the fabric though, and the only fabric store I knew of at the time was the one down the road. So it must have been there.
Great job on the redesign. Looks amazing! I’m new to the world of RVs. Have done a lot of large and small DIY home projects, but the inner workings of an RV is a complete mystery. I find I’m spending more time on you tube than working on the RV at this point just trying to figure everything out. Due to mass amount of water damage from roof to floor, I’m about to gut (inside and out) a ’94 Rockwood Viper 24′ C Class. Since it will be a total gut job and on my wish list is a queen bed instead of a full, I’m going to have to redesign the washroom that’s right next to the bed platform. Here’s where the first of many question comes in so that I can both budget properly for supplies and decide if I should try my hand at RV plumbing…what ‘show stoppers’ should I consider when attempting to move a toilet and reroute a shower drain? Any advice or other blogs is appreciated. Best regards
Moving a toilet will be pretty difficult. Besides the toilet that you see inside, there is a hole cut in the floor to allow the piping to pass, and also a black tank underneath with a hole in just the right place. Generally speaking, RV toilets are placed directly above these holes so that it’s a straight shot down. Moving any of them means moving all three. The shower drain would be similarly difficult, though there’s a little more flexibility there – but you’ll still have holes in the floor, holes in the tank, and you need to allow for the trap and proper slope of piping.
I’m not saying it absolutely can’t be done, but honestly, for just 6 extra inches of width on the bed, I wouldn’t do it (and I’m pretty good with this stuff).
I’d come up with some other way to just have the wider bed when you need it. Maybe a folding mattress or some sort of futon arrangement.
JUST AWESOME – SURE IT WAS WORTH ALL THE HARD WORK! GREAT INFORMATION AND BRILLIANT IDEAS FOR TWEAKING CUSTOM CHANGES THAT MAKE SO MUCH BETTER SENSE. IF YOU READ THIS, WONDERING WHAT BRAND OF MARINE PEDESTAL YOU GOT FOR THE TABLE? THANKS FOR ALL THE TIPS/INFO
The marine pedestal table is linked in the article, but here it is again: https://www.amazon.com/gp/product/B002IQX38K/ref=as_li_ss_tl?ie=UTF8&camp=1789&creative=390957&creativeASIN=B002IQX38K&linkCode=as2&tag=tfr0b-20
I’ll check the link and make sure it’s working.
GOT IT…DIDN’T SEE THE “SMOOTH” FINISH OPTION – AM LOOKING AT ALTERING THAT BIG HEAVY TABLE IN A 2005 WINN ASPECT…LOOKS LIKE AN ABSOLUTELY GREAT IDEA…JUST WONDERING ABOUT STABILITY?
THANKS SO MUCH FOR THE REPLY.
We haven’t had that table for several years now, but as remember the table being as stable as what it was mounted to. Through-bolting would be more stable than, say, simply screwing into a thin plywood floor. Good Luck!
Very nice job. Hard to believe the prices a sprinter camper went for, and you having to re-do crappy work. Hard to believe class A’s going for over 5 figures, and wooden beams in the roof too.
About the interior shot of the cabinets, and one latch being open, why not use the picture with a caption stating that latch is open on purpose to illustrate how they work, or some such. Picture becomes “as planned”, and the wife does not feel so bad- win win.
Actually, I think Stef takes a guilty pleasure in thwarting my drive towards uniformity… Trust me – she’s not feeling bad! 😉
I was looking into getting our RV remodeled soon as it’s looking old, weary, and dull. Your advice to make sure to do this in a cold or windy season is something I will be sure to do so. Working in an enclosed space with such unbearable heat is something I can’t simply put myself into. Honestly, I would try to do all the upgrades and renovation on my own, but I might need an upholstery service. Upholstery is simply something I can’t do which is why I’m going to leave it to the professionals. Hopefully, the remodeling would go well. Thanks!
Wow really nice remodel! Love the before and after photos. Great tips. I am currently remodeling my ’96 Gulfstream. Have the seats removed and table installed. My tip for saving money on remodeling your RV: I buy the $15 off of $50 coupon from https://myjibe.com/. Then I divide my purchases into $50 transactions. Use one coupon for each $50 transaction. This saves me 30% on my remodeling supplies. Love the blog!
Awesome job. WOW
Wow! Awesome job! Great article! I have a small camper I’ve remodeled. I didn’t rip everything out like you did, although I did remove my Dinette. I’m kind of the budget version of remodel LOL, but I have done a lot of things I haven’t seen anywhere else. I have step-by-step tutorials and lots of very unique ideas. Check it out http://WackyPup.blogspot.com
Holy smokes, James. I’m a pro woodworker of over 35 years, and I’m impressed with your skills. At age 62, I just bought my first RV. Mine is a 1997 26 foot travel trailer in very good shape, but that won’t stop me from doing my thing to it. I’m a remodel kinda guy. I love doing it to anything I get. Seeing the frame work, the way you did things, and the end result has inspired me. I just ripped back the rubber roof on mine, put and entire new section of plywood on a bad area, put the rubber back, used Eternabond tape on all the edges and cross seams, sealed the entire roof twice, and now I’m off to the races getting ready to re-vinyl stripes, paint the lower section (modernize the whole look), and start making my own counter tops with real wood bull nose rounded edges. replace carpet, put in new fake wood floors, and thinking about cabinet work. Thanks for the jump start and inspiration. By the way, from all the ladder and roof work, my back hurts, my feet hurt…..it’s not easy doing all this at my age, but that’ll never stop me!!
Welcome, Bruce!
It sounds like your RV is about to get a whole lot nicer. Best of luck on your remodel – I’m sure it will turn out awesome!
Fabulous .. what if any significant mechanical issues did you deal with and what guidance can you provide for newbie looking for the same model with the 5-cylinder TD? Tx!
I actually got off pretty easy on the mechanical side! I left the water heater, 12v and 120v panels as they were. I did remove and reinstall the furnace. That was challenging getting the sheet metal to line up inside and out. But other than that, the mechanicals were pretty sound.
I have a 2003 Forest River MB Cruiser I am refurbing. How the heck do you remove that fixed sofa base and “flipping” back?
On ours, the back and seat stayed connected to each other. That whole metal frame doesn’t come apart.
On either end of the sofa base, you will find an “L” bracket running front to back, with the bottom of the L along the top of the cabinet the sofa sits on.
There were three screws in each end of the sofa, straight down into the cabinet below, through the L bracket.
You may have to squish the sofa cushions towards the middle a bit to see them.
At least that’s how it was on ours. Hopefully yours is the same.
Good Luck!!
Hey James, can you tell us a bit more about the swivel seats for captains chairs. Poking around online is leaving me a bit confused about how to get them in my 2000 phoenix cruiser built on a Dodge ram 3500 van. I also liked how you stored the bikes inside where the’re safe being a cyclist myself i just dont like having them out back.
Yes, indoor bike storage is a must for the race bikes. (Mountain bikes live a less pampered life…)
We purchased the swivel seats from Eurocampers.com. I don’t know if they have anything available for a Dodge 3500. But you can poke around online and find something, I’m sure.
Hey!! I’m thinking about getting this same model but have balked because of what to do with the bikes. Just came across your page while searching online!!
Do you have pics of what the bikes look like mounted on the fork mounts both inside and outside?
Thanks so much! Great job
In the video on this page, you can see the bikes mounted up inside the RV. You can jump to about 6:50 if you want to skip ahead.
https://www.thefitrv.com/about-das-bus/
i found it in your video how the bikes are mounted, thanks!
hi james, thanks for your reply
i actually just discovered the video page and saw it there!!
thanks!!!
how much did you sell her for?
Hi, LOVE your remodel! We aren’t the handy types, so we purchased a new Pleasure-Way Lexor. We want to extend our travel season; what’s your opinion on the Ultra Heat tank and pipe heaters? We’re not interested in sub-zero travels, just mountain nights in the mid-twenties if we get caught. Thanks, and happy travels!
I had installed the Ultraheat tank and pipe heaters on our previous RV, Das Bus.
They were easy enough to install, and they worked without issue in a pretty harsh environment. I can confidently recommend them.
You will want to take note of how much current they draw – so you don’t wind up with a dead battery.
But if you size your system appropriately, you should be fine.
Thanks! Just to clarify, Das Bus was a class b with exterior tanks and pipes? Thanks
Das Bus was a Class B. The waste tanks were underneath, but all the fresh water tanks and piping were inside.
I love the upholstery work. We are building out a Sprinter van right now and I love the idea of using marine grade vinyl for durability for our cushions. We are in the Ogden area and I would love to know who you had do your cushions. Thanks!
Absolutely. I can recommend him with enthusiasm. Dale Hancock.
If you search for Dale Hancock Upholstery, you’ll find him. Great guy!
Best of luck on your build out.
Thank you so much for the name! Such a great job on your remodel! Have fun enjoying it!
May I ask, how did you fasten the stainless steel ceiling panels to the overhead? Did you use mechanical fasteners or only adhesive or both? If mechanical, can you describe the system you used? Nice job all around on the refit and we enjoy your channel and site. BZ 😉
It was anodized aluminum actually, not steel. But I used both – a bunch of adhesive (and boy was that messy and stressful), and screws for when the adhesive starts to fail. There was a full plywood ceiling already fastened to the ribs of the van. I just left that in place and screwed wherever I wanted to it (pre-drill first). Once I got past the adhesive part, it really wasn’t all that bad.
I should have read your description more carefully. The finished ceiling looked similar to the galley backsplash and I mistakenly thought they were the same material. Thanks for the explanation and the prompt reply. Cheers.
No worries! I’m up anyways.
If you do try to do the adhesive thing, have a partner to help. It’s no fun trying to wrestle a 4×8 floppy sheet of glue covered aluminum into place and line it up, and get all the cutouts in it to line up where they’re supposed to go – all without getting the rest of the rig covered in glue… Just sayin’!
Would it be intrusive to ask about cost breakdown? This looks great! We have a 31′ motorhome and am feeling a bit intimidated (both cost wise and work wise and marriage wise, haha!) to undertake it…
You could ask about the cost… but that doesn’t mean I remember!
Or could it be that I’m still trying to forget…
Seriously, it was a very involved project, but I don’t recall any exact costs. But I tend to go overboard when I do things. I got very specific with some of my choices – like quarter inch veneer core cherry plywood and such – that had to be special ordered. I’m sure there were ways to do it less expensively than I did. I think you could do it as big (or as small) as you wanted to.
You do excellent work James, great job!
Any idea how much weight your RV gained over the rehab?
Thanks for such an inclusive post of your remodel, once again great job!.
I was concerned about it, and so I weighed before and after. I don’t have the numbers anymore, but the change in weight was minimal. I think it gained less than 100 pounds overall.
To bad I didn’t run across all this before the Mrs decided RV’s aren’t for her. We have an 87 Mallard Sprinter that really needs redone and I was really looking forward to doing it, but she’s given up on it so now we’re looking for a buyer for the collection of rotting pressboard. The mechanics work great, but the interior looks just short of crap.. I love what you’ve done with it. Now I have RVenvy.. dammit!
You know you’ll be back… 😉
Just happen to come across your RV renovation while posting a question reference a seperate shower and toilet in sprinter vans. My wife and I like the sprinter vans but they all have wet baths. We are not fond of wet baths as these are too small and uncomfortable and require drying the toilet with a towel or rag after using the shower. Anyway, very nice job on your renovation. My wife and I are new to the RV scene as we just retired and will be renting RV’s to decide on whether to purchase one in the near future. Keep up the good work with your blogs as they are very informative. Happy trails,
Carlos
Glad to have you aboard Carlos!
Our travel trailor shower leaks where the surround meets the floor pan. I tried caulking and such but wont stop leak. Do they make a single piece instead of two pieces so it wont leak between where they sit on one another. Not wanting to rot my floor. Please advise.
Without knowing the size of your shower, it’s difficult to say. But if you look long enough, you may be able to find something. Even the two piece units though are usually constructed so the surround walls overlap the pan in a way that prevents leaks. If you’ve tried caulking and still aren’t able to stop a leak, I’d look elsewhere for the cause. Perhaps the shower pan or walls themselves are cracked?
Just came across your renovation. Nice work and great documentation.
What did you use for slides on your drawers?
Thanks!
The drawer slides weren’t anything special. I think I just got them from the local Woodcraft store. They are ball bearing slides, side mount, with a pretty good load rating.
There were actually only two drawers in the whole RV, so I didn’t go crazy looking for a special source for slides.
Beautiful job, on the RV and the blog. I am starting the same process on my 03 MB Cruiser. So much info and photos on exactly what I wanted to know!
Did you ever consider re-routing the black vent pipes in the closets? They eat up so much space! I think a 1″ tygon tube in the back corner would work just as well, or routing the 2″ pvc out the side around the belt line. I want to make more room on the roof for solar.
I never considered re-routing the vent pipes – although I did wind up cutting and re-seating one of them. There’s not much to them, so I think you could do it as long as you keep the same airflow.
Good Luck Stan!
this looks wonderful!
my boyfriend and i are looking at building something for the inside of our car. ideal it’d be a trunk sort of thing with drawers that folds out as a bed. we have been trying to research the best materials to use in order to keep the car light, any suggestions?
Personally, I’d go with wood. There are all kinds of light weight plywoods and stick woods. You just have to get good, quality wood that’s dry. (NOT 2x4s from the local home center!)
But I’m also a fairly competent woodworker, so I’m probably biased.
Others seem to really like working with 80/20 aluminum track and fittings. Never researched it much, but some folks really love it.
Awesome work!!!!
It’s the nicest RV remodel I’ve ever seen. Super nice quality!
Why, thank you!
what is the long term of the frp board it clearly says on the back of the panels not recommended for RVs or where the temp goes from extreme heat or cold did you use some type of adhesive that wont turn loose in the expanding and contracting
I used FRP adhesive. And while they may not recommend FRP at temperature extremes – I had no problem with it. Had the RV out in over 100, and under zero. No issues. I did NOT use the regular corner moldings you would use for FRP. I used silicone in the corners. That may have had enough give that there were never any problems.
Absolutely beautiful. Thank you for sharing.
We have typical carpeted ceiling. Gathers dust and almost impossible to clean. Searched for anodized aluminum. No luck. What is brand you bought and where do you get it? We live in Texas, so would like to know brand and what vendor you ordered from, so we can begin calling.
I considered the T&G knotty pine strips sold by Home Depot and Lowes for wall coverings; however they are very time-consuming. We did a family room in knotty cedar and luckily still married after all that labor. This strips do not behave like boards. Hard to keep together until nailed.
Vinyl auto headliner ceilings are possibility too, but most stink like a new car for months.
I interested in your overhead cabinets what it made solid or built like the old ones in pieces, two sides and two bottoms. Also haw does your bed fold out.
The back of the bed flipped over the top and landed in the middle of the aisle, it made a very large bed. You can see us flip it out in the video.
The overhead cabinets were made with face frames, and built in place. I did NOT make boxes and then secure them to the van. (Too much extra weight that way.) The bottoms of the cabinets are rabbeted into the face frame, and also into a cleat that was secured to the wall along the back. There are two bottoms, an inner and outer. The cabinet ends are secured to the face frames and the rear cleats with pocket screws.
Difficult to describe, but it all makes sense when you see it together.
Are the doors solid cherry wood
The doors are slab doors, so they’re cherry-faced veneer-core plywood. I was worried that solid wood slabs that large would warp, and I didn’t want the frame and panel look. So I went with ply.
Where did you get the LineX to coat the shower pan and how did you do it? I have a travel trailer with a sturdy shower pan, but it’s ugly, needs that coating. I have no idea where to buy that or have it done, google is no help. thanks!
I actually just used a local Line-X installer. I found them here, and they agreed to do a small job.
It really didn’t take them any time at all.
I don’t know where you’d find the stuff for DIY application. Sorry!
So impressed! Can you tell me where you purchase the table pedestal?
I linked it in the post (I just got it from Amazon). But here it is again: http://amzn.to/1M9k50v
Glad you liked it!
First-class workmanship. Well done! I’m impressed that you did all that in just ten weeks. Also impressed with the design and color coordination. We need more “do-it” guys like yourself.
It only took me ten weeks to do it, but I *thought* about it for half a year beforehand. By the time I got to certain construction details, I had already gone over it in my head a couple hundred times.
I think I got lucky on the colors – I’m no artist…
We are the second owners of an ’83, Lazy Daze, in original condition. Back bathroom. We have been looking at RV remodeling information on line. Your improvements and workmanship is the BEST we have seen. Great information and pictures. Beautiful results. Thank you so much for taking the time and effort to share. Ed
Glad you liked it. Hope it helps with your project in some small way.
Hi James,
I’m contemplating installing Dynamat in my 2005 Leisure Travel Van on the cab roof & doors. Did it really help in reducing the noise in the cab? Do you think it is worth the time & investment?
Thanks!
Lon
Hi Lon –
Yep, I do think it made a difference. I didn’t do before and after db measurements (which, if I did it again, I would), so I don’t have any objective data for you. But both Stef and I think it made conversations easier in the cab area.
Thanks for the tip, I’ll definitely make sure NOT to renovate my camper in the Summer! It looks like you did a great job, though. About how long did all of thes fix-ups take you to complete? I’ve been meaning to renovate my camper for a while now, and after reading your post, I definitely want to get those renovations done before the Summer heat kicks in.
Megan
This is a very helpful post and pictures, thank you. I appreciate the intestinal fortitude necessary to get this done! 🙂 Do you have dimensions of your dinette? It is rare to see one in a van and I am trying to figure out how to make one for mine. Would welcome the sharing of its dimensions if possible, thank you.
Glad you liked the post.
I didn’t change the basic layout of the RV, so the dimensions are unchanged from what Forest River had worked out. In this diagram, you can see that the overall dimensions of the dinette are 74×28 inches. It’s roughly divided into thirds, but the table top is a bit bigger than either of the two dinette seats. Without walking out there to measure it (I’m feeling lazy today), I’d say that each of the seats are about 24 inches long, and the table is about 26. All of the parts are the same 28 inches wide.
Hope that helps!
Thank you, very helpful and thanks for taking the time to post.
Wow, you did a beautiful job. Very impressive and meticulous.
Do you have a clone!!
Thanks! Unfortunately, I have no clone.
(Stef would tell you to be thankful for that! lol)
I didn’t catch your name but really liked your post on the remodel of your RV. I just bought my first one its a 1994 Coachman 28′ runs great had some water damage so just started the total remodel Man what a job! the reason for my comment is to say thank you so much for your step by step detailed reasoning for all that you did along with the pix’s. Really helps a green horn like me just starting out. I have tried to do as much research as I can but hands on seems to be the thing! lol started in the bed room tearing out and putting back insulation and boards along with the ceiling and floor!. Now all the leaks are covered no more leaks! time to make her new inside! So wish me luck wish you lived close to get more advice as needed. lol lol Thank you again.
Hands-on is about the only way to learn these things. I thought I knew how to build cabinets, but building them inside a vehicle is something else altogether – and you don’t realize that until you rip some out! I’m glad the remodel pictures are helpful to you. I might not live close to you (I’m in Utah), but if you have any questions you think I may be able to help with, fire away. Good luck – it’s a big project!
Gosh, I wrote a response but I guess it didn’t make it. So I’ll try again. With regard to the REMI side curtains, do you like them, had and issues, are they holding up well?
Whoops, i see that you’ve already posted a response – my bad.
No problem!
James, I’ve noticed that you installed the REMI front and side blinds in your remodel of das bus. Our “Stanley” (Winnebago ERA) came with the front blinds as standard equipment. I’ve recently purchased the REMI side blinds from EuroCampers. I’d like to know, how are the side blinds holding up? Have you had any issues with them? Do you like them? Do they interfere with the side mirrors? Thanks in advance.
David,
The side blinds are holding up just fine. Occasionally, we do get a little rattle out of them, so I took them out and reinstalled with some very thin foam gasketing all around. That helped.
Also, as you’ve guessed, they do interfere a very slight bit with being able to see out the side mirrors. Not so much that they’re unsafe, but you will have to be a little more deliberate when glancing at the mirrors.
But again, the durability is fine. Our still look new. Stef even smashed mosquitoes on one of them, and it cleaned right up. (Probably too much info there…)
Hope this helps.
Great remodeling job. It appears you did everything right and upgraded as much as possible. I like the idea of a safe to keep valuables in. But most of all I like the cab curtains. Those are specifically designed for your vehicle. Do you know if there is such a system for a Ford Econoline cab?
Looks great.
Thanks! I got those cab shades from eurocampers.com. They were made in Germany (I think). I don’t know if they have any for an Econoline, but you could always call them up and ask.
Can I have a man like you as a husband/ boyfriend? I could sure use a handy person like you!!! I’m female, and had to learn everything about carpentry by myself while redoing my Class C RV. I see you did some terrific carpentry work. I want to install a stainless sink in bathroom, so have to make a new countertop – slightly larger. I would love some advice – can send you photos and get some basic advice on wood countertop. I plan to paint it to look like pink marble when done. Please email me back. I just need some basic guidance about what wood to use, and how to finish it off and screw into place. I have a table saw, and lots of tools, but no router, no angle grinder yet.
Many thanks! Fantastic job on your remodel. I know how hard it is – since I’m doing it too.
Sorry! I’m taken!
But, for a wooden countertop, your best bet would be to get a piece of marine plywood (for water resistance) and then add some laminate on top of it. It’s really not that hard, and you can clean it up with an inexpensive trim router. You might be able to find laminate that looked like the pink marble you’re after. If you absolutely want to paint it, I would do something like a Gym Seal over the paint to really keep the water out. And as far as how you might attach it – that will depend entirely on what you’re attaching it to. If you really want to send me pictures, you can use the address on the “Contact Us” page.
You can use a heat gun to remove formica if sub struture is good
Hi
your renovations look awesome! what fabric did you use for the gray upholstery? is that leather or a faux leather? if faux what is it vinyl? we are selecting fabric for our camper hence the question. i was told that vinyl is prone to mildew in “wet/damp” environments.
thanks for any information that you provide.
The upholstery is actually a marine grade vinyl. I thought about going with ultra leather or something like that, but the price differential was pretty severe. I wound up using the stuff they use in boats. The plus side is that it’s super easy to clean. You may want to check into marine vinyl if your upholsterer offers it. I’ve never had any mildew issues – but then again, we live in Utah. Thanks for looking. Hope this helps!
James,
Thank you for sharing this and especially for including all the pictures. I bought an 89 Coachmen Catalina in May for weekend housing for a gig 80+ miles away. I’ve replaced 2/3’s of the cracked shower surround – not with FRP but something similar – a little lighter weight. The shower enclosure abuts the back corner and the the back of the trailer is not square (it curves outward.) After searching (futilely) for replacement corner molding strips, I gave up and tried to re-use the originals. Unfortunately, they’re warped and have cracked a bit. (The originals are plastic corner moldings, screwed into the thin plywood, and a plastic cover snaps into two small channels on the sides to hide {and seal?] the screw tops.) What did you use to seal the corners of your surround?
Alan – Interesting question, and that was one area where I tried several things as well. The back of Das Bus is curved on both walls. I tried several of the store-bought corner moldings, and even cut a relief slit in the back of one – lengthwise with a handheld razor, I was sure I was going to slice my thumb off. It didn’t work. I gave up on corner moldings after that.
The shower corners on Das Bus are just constructed to pretty tight tolerances. Then I just ran a good and consistent bead of silicone to seal up the corners. That’s actually it. I’ve looked under, and there’s no sign of leakage. If you’re doing something similar in the corners, you may want to reinforce behind the thin plywood to keep the walls from flexing too much. I couldn’t do that, because, if the tail light ever goes out, I have to cut open the shower to get to it!
Good Luck
Thanks for the info James. I used the demolished pieces as patterns for the replacements, and, let’s just say the “tolerances” are typical of 1989 RV construction. I don’t know how much I’ll ever actually use the shower, but, if you spend a lot of time in close quarters, you quickly get sick of looking at crappy stuff – at least I do! I’m a little disappointed you didn’t find some magic molding, but, I haven’t found any yet either. If any of you other Coachmen owner’s have had better luck, please chime in!
sorry again! I keep typing the r BEADBOARD
Robert – You’re killin’ me! LOL.
Beadboard is a good choice because it makes it easy to hide where panels meet. PVC is also smart as it won’t take any water damage. (A little different to paint though, so keep that in mind when you’re thinking of the final decor…)
FRP is good stuff, as long as you like the pebbled finish it has (maybe there are other finishes, but I never found one). You do need to be careful with cutting it because of the potential for fiberglass dust. But yes, awesome stuff, the adhesive for it is pretty tame, and you can bend it pretty tight.
Took the coach off the rails?? Wow. You’re deeper in than I got. I know what you mean about never giving up. That part of me hopes that that part of you wins out and you stick with it. Let me know how it goes. Wish I could help.
Restoring a 1983 Presidential Coachmen 33 foot class A. Outside looks fabulous if I do say so myself! Painted it myself graphics and all! Inside has proved to be a bit more challenging. I’m having a heck of a time getting the faux leather to
Stick to the dash. Bought professional spray adhesive but after a day just lifts right up..ugh! Anyone attempting this endeavor! I’d appreciate any suggestions.
When I used spray adhesive (for sticking insulation to the roof, for example), I used V-S Spray adhesive that I got from RAAMAudio. It has held up very well, and I have not had any sagging or falling off. I can’t say specifically how it would work on faux leather and dash plastic, but it might be worth a shot. If that doesn’t work, then the problem is likely in surface prep. If hyper-cleaning it doesn’t work (try a variety of solvents until you find something that hits it pretty hard, but doesn’t melt it), then kind of like a primer, you may need to find something that will stick to the dash – and that the adhesive will stick to. That’s all I can think of right now. Good luck with your remodel!
Use 3M78 spray adhesive. 3M folks said it takes high temperatures.
I know what you meant with your comment about wishing you had not started it.
I have completely taken my coach off the frame because of rust issues on the main frame.
Part of me wants to abandon the project and the other part has never abandoned anything.
I simply want to commend you on the work you have done to your motorhome and the excellent documentation of it.
This is one of the best remodels I have seen; and your post is very helpful as I try to figure out how to remodel my newly acquired 1977 class C.
Thanks very much!
Cheers,
David
Hey Thanks David! Do keep us posted as you progress with your remodel. It’s a big undertaking – wishing you the best of luck with it!
Very nice work!
I’m rehabbing a 1970 Gran Dee pull behind camper. I’d love to use the same system that you used to support your table, and to allow for the raising and lowering of it. What exactly are those parts, and where could I get some like that?
Thanks for a reply. -Happy Camping!
Hey Patty – I put the links for most of the products I used in the description below the article. But there are a lot of them to go through. You can get them from Amazon. The marine pedestal table base can be found here. It was pretty easy, but you do need to cut a hole in the floor if you want to let it go all the way down. (I got lucky when I installed ours, and the hole in the floor is over an enclosed area, so it doesn’t leak or draft.)
Thank you, James – I found the link after I posted – duh. I followed the link, and I think I will go with something else since that is a high-end item and I have a low-end camper. I’m trying to make the work on my repairs and remodels first class, while staying on a small, (re-cycle, re-use, or buy cheap) budget. So far…..frustrating, but moving ahead slowly.
Thanks for the photos, descriptions and links – very helpful.
Patty
I have a 1977 dodge sportsman motorhome 20 foot ,I am trying to add a shower to the small bathroom have any ideas I can use, all so where do you buy the cushions any ideas ,and I would like to add a bunk bed to the over cab.
Charles – I’m not familiar with the 77 Dodge Sportsman, but bathrooms in the class Bs are tough. I don’t know what your bathroom looks like now, but you’ll probably preserve the most space if you can make some kind of a wet bath. You’d have to completely waterproof the whole space, but the FRP panels make that do-able. You might need some kind of shower pan for the floor. You’d also have to cut a hole in the floor for the drain and trap – so it kind of depends on where your grey tank is too, since you need to stay higher than that. I had the cushions on our RV recovered by a local upholstery guy here in Salt Lake City – wasn’t cheap, but he did good work. I would just check out “upholstery” in your area and get some estimates. Be prepared – good foam is expensive. Good Luck!
Hi,
Need your advice (please). I have my bedding area wall paper off, as well as it’s plywood backing; and what I see now is lots of foam and insulation. question: I would like to replace the now gone plywood with materials that will not mold and apply new wallpaper to said material. any ideas ?
Thanks,
Patrick
2005 Dynaquest
Lancaster Pa
PS: Don’t ask why I had to tear all the wallpaper and plywood out.
Well, I’m going to guess that you had some water damage?…
Offhand, I can’t think of any other material that would replace the plywood and be cost effective. I believe Certainteed makes a PVC sheet material (like plywood). I’m sure it’s more expensive than plywood though – and it can’t be used structurally – only as a skin. There may also be expansion/contraction issues and I don’t know if wallpaper would stick to it. But maybe check that out.
A more conventional route to go would be to use marine plywood. That’s the stuff they use on houseboats for walls and floors, so it should be mold-resistant enough for an RV application. (Probably easier to find, too.)
Good Luck!
FRP is expensive but worth it because it is easy to work with and very bendable? Is that a word? (flexible)
No mold problems
If I may also ask you to share the length of the couch. Is it long enough to sleep on lengthwise.
Tx Den
Hey Den – Our Sprinter is a 2003, 159 inch wheelbase version. Long and tall. Overall, with the cargo bump-out on the back, it measures somewhere just under 23 feet. We don’t have many exterior shots of the van because we haven’t repainted that yet so it’s a little rough looking. The plan is to have her repainted over the winter.
Speaking of winter, we’ve had a snowstorm here in Salt Lake City, and the van is currently snowed in. So I can’t make it out there to measure the bed to be certain, but the original literature said the bed was 74 inches long. We re-used the frame, so the length has not changed. It is long enough for Stef (5 feet 5 inches) to sleep on it no problem. I’m 5 foot 10 inches. If I slept on my back or side, the bed would be long enough, but I sleep on my stomach. Even in our queen bed at home, I like to hang my arms and legs off the top and bottom of the bed. In the RV, I usually either sleep a little diagonally, or I just put my arms and feet over the ends in the “aisle” space.
Hi
Lovely refit, thanks for sharing. One of the nicest I have picked up on the net.
I may have missed it but what length Sprinter van do you have (we don’t have FedEx Sprinters over here)?
Do you have any exterior shots of the vehicle?
Once again many thanks.
Den Beech
Johannesburg, South Africa.
Just bought a passenger Sprinter and plan to outfit it as a conversion van/camper for swim meets. I’m looking for a Sprinter bathroom unit for a mid vehicle location. Also like the faux wood on the dash. Any ideas on where to get rv parts for these vans? Thanks, Dave.
The wife and I have never much liked the side bath models, so I’ve not researched them specifically. I would maybe start by contacting an RV manufacturer that has a wet bath layout you like and see if they will sell you one. Either that or just scour the internet.
As far as the dash kits, you can find those at many online retailers. I believe I got ours from eurocampers.com, but there are other sources.
A swim meet vehicle would be challenging – I would be concerned about water and moisture issues. Good Luck!!
The work you did looks absolutely beautiful. My wife and I have been looking at these older MB Cruisers because we want the rear bath floor plan. If you are going to be going to a larger RV and you wish to sell this one we would be very interested in talking to you about purchasing it.
Yeah, the closest you can find to the old MB Cruiser is the Leisure Travel Vans Free Spirit SS. It has a great rear bathroom, but won’t work for us. We are still trying to find the perfect RV, but the bike storage is our big hangup. If we ever sell Das Bus (and I hope we do get to graduate someday…), I will be sure to post it on the web site. A couple of you have been interested.
Thanks for taking the time to make this post. My husband and I are preparing to update our 30 yr old RV and your project has helped inspire me. I do a lot of basic woodworking projects but am not familiar with the FRP that you installed in shower. We may be installing small tub and will need new surround. Like the looks of FRP and am wondering – what is it, where do you get it, can it be cut with saws and is it installed with adhesive? Website would be helpful or the definition of FRP. Thanks, Chris
Hey Chris, no problem. FRP is “Fiber Reinforced Plastic”. You can buy it in 4×8 sheets at the Home Depot. In fact, at my local HD, the bathroom walls are covered in it. You can cut it with saws, but you need to use some kind of respirator when you do because the dust is harmful. It does go up with adhesive and a trowel. I found that the FRP Adhesives are cheaper to buy online.
Wow! That’s awesome. Looking at buying a used RV – and most of the ones in our budget would definitely need updating. I doubt we could ever match yours though.. great job! Wifey must be happy!
Thanks! You could probably do better than you think on a remodel. Or maybe I’m having selective amnesia and just not remembering how difficult it was! Stef loves it, but now she wants the outside as nice as the inside.
Been a cabinet maker and kitchen bath contractor for 28 years know what it took to pull this off! GREAT JOB! How’s the noise level now that you’ve tightened it up so well? I’ve got one mod I posted a while back under new counter and backsplash somewhere in the archives. Anyway excellent work, descriptions, pics, all of it!
Hey John – If you’ve been in the business for that long, then you KNOW I made some mistakes along the way! Nobody else notices, but the mistakes are all I see when I look at it – you know how that goes. But seriously – thanks! I appreciate the comments!.
I’m a little bit obsessive about rattles, so one of my goals was to reduce them. I wrapped and secured all wiring, used Dynamat on the backs of large resonant surfaces, those kinds of things. I improved things significantly from how it was to begin with. The extra insulation and sound deadening in the cab helped a lot as well. I’ll have to go back and dig through the archives to find your mod – there may be some inspiration there. (I’ve already started bugging Stef to approve a new RV purchase – which I would immediately start to modify…) Cheers!
I was in the same predicament, and ultimately went with very thin anodized aluminum. If you go with metal, you have to make sure it’s not going to tarnish from moisture, or rust or what have you, so that’s why the anodized aluminum instead of plain. Aluminum is also pretty light, which kept the weight down. I thought that was my best choice. I also considered wood, but I thought that would look strange with what I had planned down below. I thought about thin plastics, like the FRP panels you see in my shower, but thought that would look like a truck stop rest room. There may have been better plastic options, but I didn’t have any luck finding them. Maybe if you can find a plastics wholesaler they might have more choices. And finally, I also considered removing the fabric, and putting a thick wallpaper over the plywood, but ultimately decided against that too.
What’s best for you will depend on a few things. How capable are you to remove upper cabinets? It would be very difficult to get a solid material to fit around all the things on a typical RV ceiling, which would leave you stuck with fabrics, or maybe the wallpaper option that you could easily cut. What is your skill level with wood/metal/plastics? How long and wide is your RV ceiling? If your ceiling is wider than 8 feet, you will have a hard time finding common materials to fit. And finally, how do you feel about seams in your ceiling? I was OK with the wood pieces you see on my ceiling because I used them as kind of “visual room dividers” between the galley, living area, and bath. But if that won’t work for you, you may want to consider some kind of fabric again, since you can get it all in one piece (or again, the wallpaper option, since you can usually hide the seams).
Whatever you decide, good luck! And do come back and let us know what you decided on. Cheers!
We are full timers in a Bounder with fabric-type ceiling. It is now grungy but we cannot find any help on what we can do about the ceiling. Would love to replace it with non-fabric product. Any suggestions?
I found pvc breadboard in strips. It’s light and easy to work with and will look like it is one piece and then paint it.
sorry-I meant breadboard LOL