This post may contain affiliate links.
OK, so I’ve added additional insulation to our Travato. But how do I know if it did any good? Take a bunch of infrared pictures – that’s how!
I rolled in late last night from a trip to AM Solar in Springfield, Oregon (more on this in a later post). The temperatures were expected to dip down below freezing overnight, but it was too cold and dark (and I was too tired) to think about winterizing. So, I plugged in, set the Truma to keep the temperature at 68 degrees, turned on the tank heaters, and called it good.
When I woke up, I found out a couple things. First – the Truma had NO TROUBLE keeping the rig warm even on just the “Electric 1” setting. That’s good news. I also found out that the tank heaters ROCK the heat. (You’ll see that later.) And finally, I found out that taking IR pictures from the outside let me see where Lance was losing heat. I used a FLIR camera add-on for this. So without further ado – here we go:
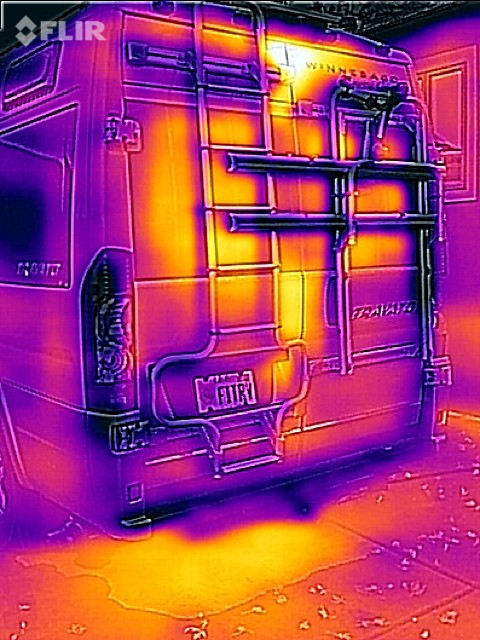
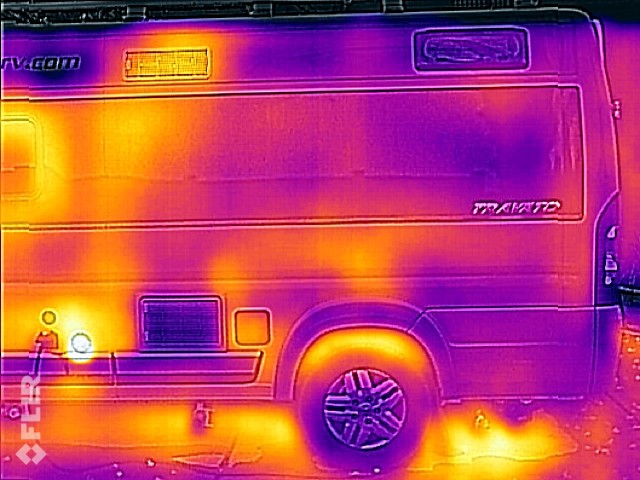
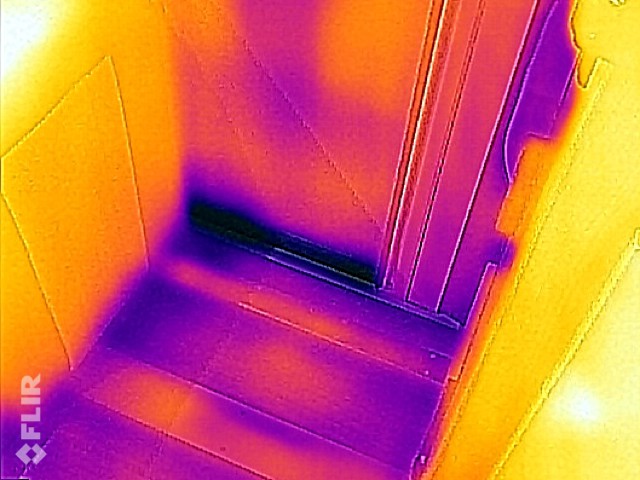
This first picture shows the back of our Travato. I had insulated the panels on the door, and those seem to be OK. Where I seem to be losing heat is where the two doors come together. There are no empty spaces to insulate there, so I don’t know what I can do to improve that, besides shove towels or something between them after I close the doors. Also, you can see that the windows are the big losers here. They’re single pane automotive windows, so I expect this, and I could cut something to fill the windows if it becomes a problem. Also, you can see that (for some reason) the bumper is very cold. This lines up with what I could see from the inside:
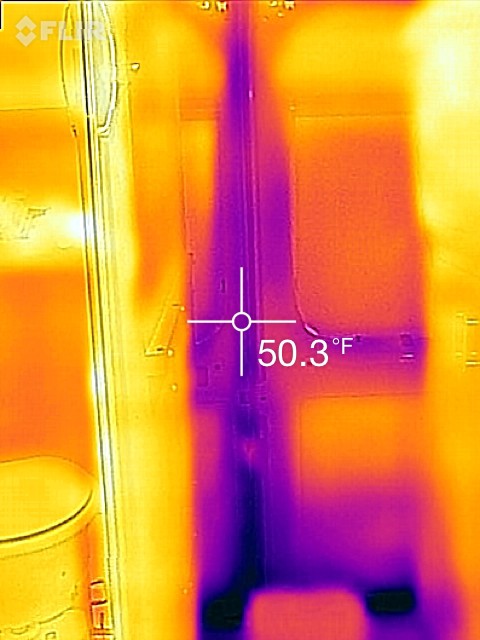
You can see in this picture that the bottom of the door is very cold. This is where the bumper on the outside is. The big thing I’m taking away from this picture is to not forget to winterize the external shower that sits back there.
Also, from that first picture, you can see a glow underneath the RV. That’s from the tank heaters.
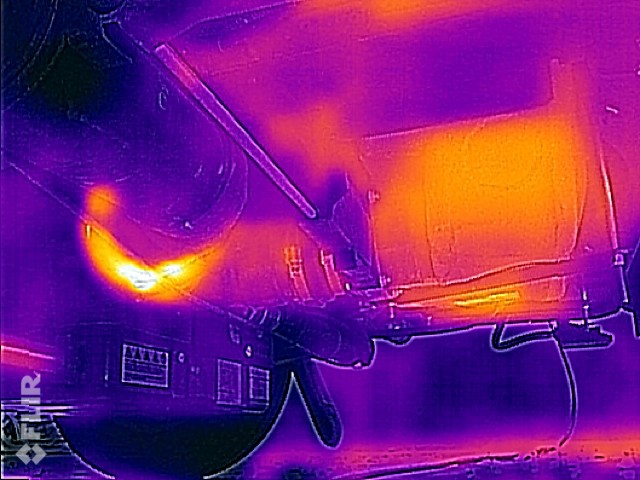
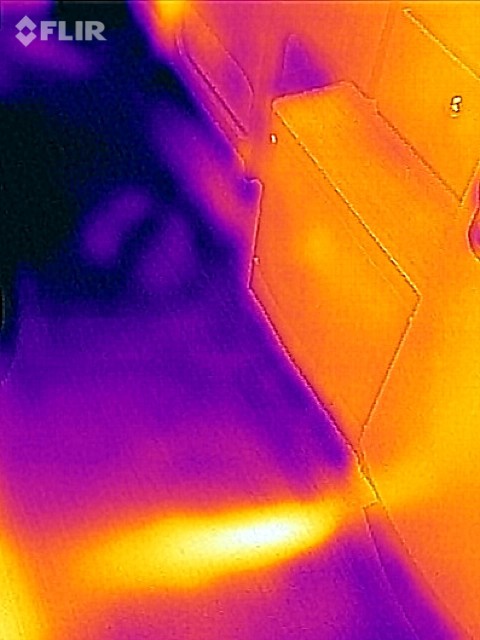
Here you can see the black tank, with its heater pad on, on the right. There is also a pipe heater pad cranking the heat towards the left of the picture. What I’m learning from this picture is that the pipe heaters are very localized, and the heat doesn’t spread far through them. The tank heaters do a better job of heating the whole tank contents, especially when the tanks contain liquid.
This picture shows the grey tank, with its heater cranking away. But the other thing I noticed in this picture was the floor. It seems to be quite warm, and if I had to pick some other part of the Travato to insulate, this would be it. Not sure what I can do to improve the insulation here now that it’s already built, but it’s something to think about.
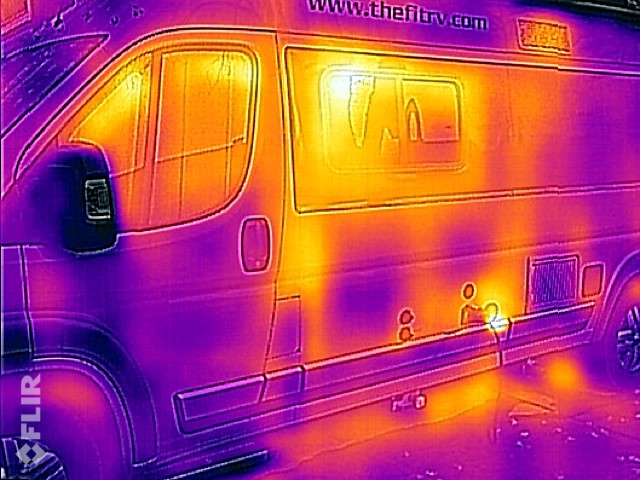
The first thing that jumped out at me on this one was the wheel well. THAT is something that is accessible and I can insulate. Also, you can tell that the Truma is hard at work – even though it’s exhaust is cool enough to touch, it’s glowing white hot in this shot. Also notice the high up Seitz window – it’s double-paned and doing a fantastic job of keeping the heat in.
Another thing I notice in these pictures is that I can slightly see the ribbing inside the ProMaster. I don’t know that there’s much I can do about this, but it’s interesting.
Moving forward we can see that the real heat loss is coming from the windows. Some of this was reflected from the sun (which had just started rising), but we’ll see the same kind of thing on the other side. The insulated shades provided by Winnebago for the cab do a better job than the MCD shade on the side window of keeping the heat in. Also – the refrigerator was NOT on, so I don’t know where that heat leak is coming from.

Here we can see that the windshield is actually not as bad as I might have thought. The insulated shades are doing a good job here, except for around the top where there is some leakage by the rear view mirror.
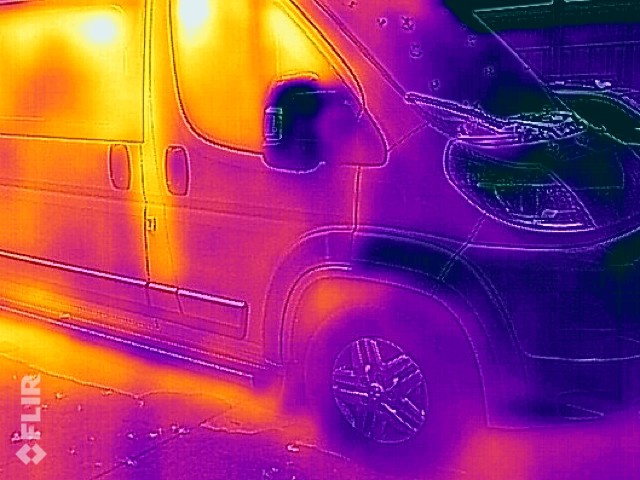
Front Passenger side. Here you can see, again, that the windows are the real culprits. The slider window seems to be a bit worse than the cab window. I attribute that again to the insulated cab shades vs. the cloth shade I have on the slider window. Also, you can see that the B-pillar seems to be quite warm. I’m not aware of a way to insulate that, but I could look into it.

Moving towards the rear on the passenger side, you can see the insulation I added to the sliding door seems to be holding its own, and the windows are the real culprits. You can see what appears to be a horizontal rib running back towards the bathroom. The bathroom itself seems to be fairly well insulated.
This is also the side of the vehicle with most of the water piping, so I’m particularly interested here. I had insulated underneath the galley where the pump is, and I don’t see much heat loss here. But just to be sure, I went inside and pulled the bottom drawer to get a look at what’s back there.
The water lines themselves seem to be warm enough, but where the floor peeks through, you can see that it’s quite cold. Again, I don’t know what to do yet about the floor. I suppose I could insulate under here from the inside. But then I also have to contend with things like this:
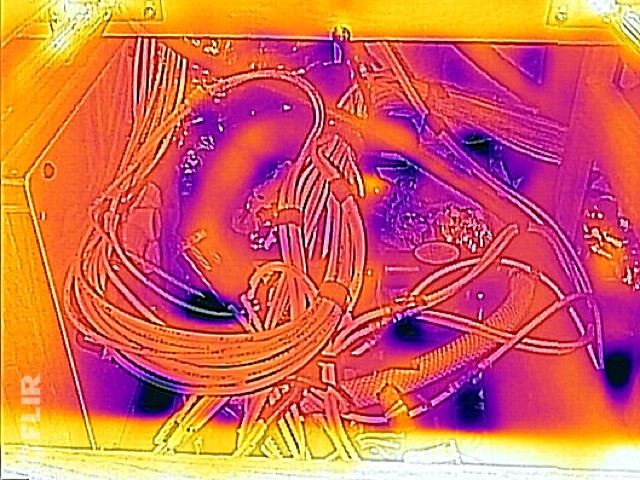
None of the rest of you will have this, but this is where the water lines run through the floor of our Travato. Right now, they don’t look like they’re in any danger of freezing up. But I can tell you, those metal cover plates felt COLD. I don’t think there’s room in those channels for insulation, so heat tape of some sort may be called for. The real cold spot in this picture though is the bottom part of the sliding door.
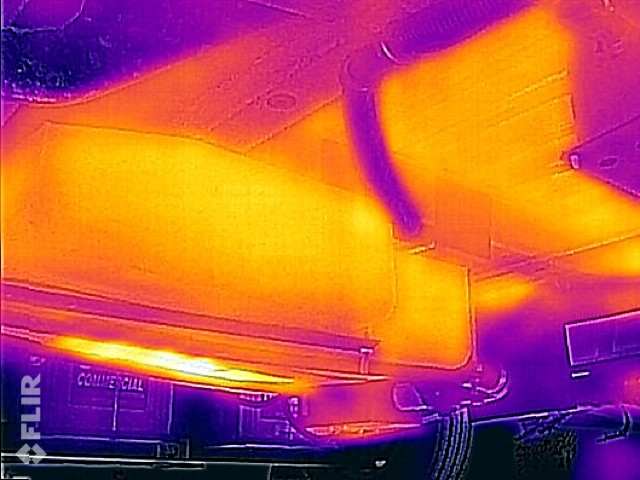
Other things I saw on the inside were interesting, but not really surprising. For example, you can really tell where the Truma system heater vents are.
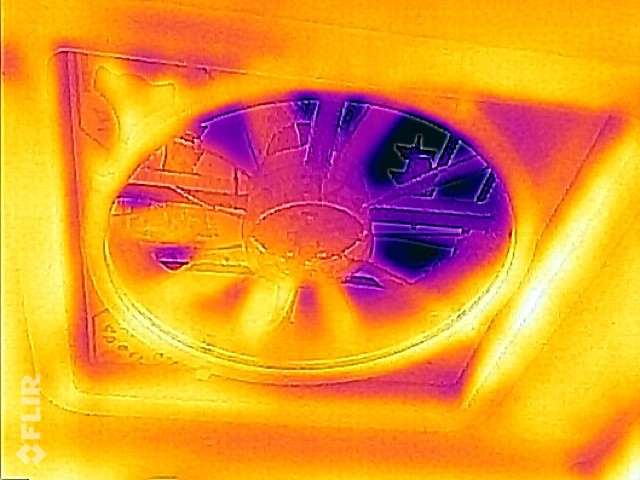
And I’m losing quite a bit through the vent fans
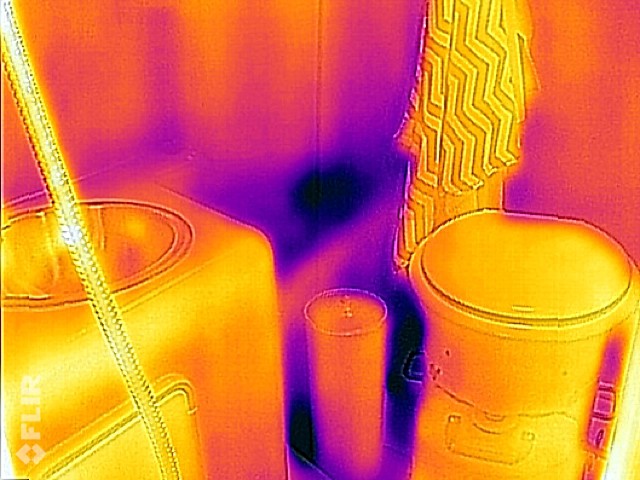
And from this last bathroom picture, the one thing I’m taking away – again – is to make sure to properly winterize the exterior shower – it looks to run right through that coldest part of the bathroom.
So there you have it.
This was my first attempt at doing this, so I’m sure my technique will improve as I get more familiar with my IR camera. From my initial look at these, the four main things I’m looking into are:
- Properly winterize the exterior shower, and possibly add a shut-off for wintertime use.
- Insulate the driver’s side rear wheel well, which seems to lose a lot of heat.
- Possibly add additional insulation (Polyiso boards?) to the windows.
- See what I can do about heat loss through the floor.
But, I guess the big question is – if the Truma can keep up with freezing temperatures with only 700 watts of input, and the pipes don’t freeze, does it matter how much more insulation I add? I mean, sure, the floor could be a little warmer, but that’s what we make socks for, right?
Interested to hear your thoughts.


Love this. Only tip i would add about FLIR imaging is take readings from many angle and as wide of a view as possible.
Glass and surfaces can reflect ambient thermal sources day and night. Ive spent days chasing leaks that turned out to be reflections from other sources. BTW I saw no examples of this in your photos so you either figured that out much faster than i did or picked really choice angles. i tape paper to windows when hunting leaks there to get much more accurate reads on glass.
The FLIR software will show high and low colors based on total scene. If you are shooting close to a surface hottest and coldest color ranges may have gone from 20 degrees delta to 2 degrees. i’ve had to play with my flir options to lock in the temp range from dynamic autoranging.. wide shots help if you cannot disable.
thanks for all you do.
Yeah – I made a mistake with that FLIR camera. It only worked with a certain model of iPhone. The iPhone died, and now the camera is useless. sigh.
When I pick up a new FLIR camera, I’ll remember this. Thanks for the tips!
(And yeah – I actually saw myself reflected in the side of the van, so I did figure that one out after a bit…)
The tank heaters do a better job of heating the whole tank contents, especially when the tanks contain liquid.
Jim, interesting stuff. I have just moved down to a class b, a 1987 Coachman in great shape that I came across(I’d send a pic but don’t see a way), the longest full-size Ford van of the time when I wasn’t even looking for one. I stepped down from. 35ft 5th wheel w 2 slides, so the space thing is an issue !! Now that you sew(or use glue) i was thinking that you could make some sort of insulation pads with magnets along the edges to put over the rear door seams or even over windows on the outside once u we’re parked.
Also, it would be relatively easy to install some sort of heated electric flooring or just use a heating pads under a fitted throw carpet.
However, you’ll keep sucking up battery power and with no generator…although w a Reese hitch you could always mount one simply enough on a luggage platform for extreme useage needs(and/or another battery).
I’m new here, is your van gas or diesel ?
We actually do have some cloth coverings for the windows that we bring along when it gets really cold. And I have plans to make a big ol’ blanket that snaps in place on the back of the van for sleeping in super-cold temps as well.
Our van is gas, and it originally came with a gas generator. We got rid of that and went all-electric. No plans to go back to having a generator. The floor does get cold, but in general, if you wear slippers, the Truma Combi keeps the interior of the van *plenty* warm enough.
James and Stephanie. I’m obsessed with your site.
I’m planning on dry camping NYC FOR ONE FULL YEAR with a Travato, an ERA or a Aktiv. (I need to work rent free for at least year to wipe away some huge grad school loans.) I am also Canadian, and love to ski. This RV will end up in the Canadian Rockies in the winters.
If you have any suggestions regarding dealers/RV’s I would appreciate it. I am a girl with a dog, and mostly concerned about not killing my pouch in extreme heat or cold.
Thanks for your response and any advice!
We don’t necessarily recommend particular dealers, but we have a good relationship with Lichtsinn, in Iowa.
You might try the “Travato Owner’s Group” on Facebook. People on the group there share their purchase experiences occasionally. You might get some useful opinions.
I wonder if you can get insulating components used to make refrigerated vans.
http://fleetco-specialty.com/services/insulated-cargo-vans/ram-promaster-insulated-vans/
The rear doors on this Fleetco promaster conversion look like they have custom fitted rubberized gaskets on the bottom where you got the cold spot.
I can’t tell from the pictures but they may have beefed up the insulating strips around the sliding door as well.
Interesting! I wonder if they would sell just their gasketing? Or if they want to do the work themselves.
Can’t hurt to ask.
I guess you could add a piece of reflectix (?) to the fan – attach with velcro or with some magnets. But looking at the ceiling fan photo – seems you are also losing a lot of heat from the surrounding ceiling. Any way to add insulation to ceiling in the Travato?
I don’t think the ceiling is that bad.
As far as the fan – I have this idea to make a cover with snaps – with half of the snap being the mounting screws that hold the fan on.
I’ll post about that if I ever get it worked out. It would work for anyone with a Maxx Air fan.
Oops. Read the colors backwards. My mistake.
When looking at the exterior photos, blue/purple is good, yellow/orange is bad.
When looking at the interior, it works opposite – blue/purple is bad (cold), yellow/orange is good (warm). Have I got that right now?
Also my mistake – thought you had a Fantastic Fan, not a MaxxAir. Still, close the bath vent up and I think the MaxxAir on high/reverse might pressurize Lance enough to find more exact locations of leaks with the FLIR.
Yep, you’ve got it right on the colors.
We’re going to be taking Lance out this weekend. We’ll see what opportunities I have for the pressurization test.
(Although I still think it will just find the composting toilet vent…)
I am truly impressed by the analysis you did. A few years ago during a conference on non-destructive testing, I remember seeing a demonstration of heat loss analysis on houses using FLIR equipment costing thousands of dollars. To think that an iPhone app can do this for less than $200… I’m speechless.
It would be interesting to know what heat loss may come from convection air leakage. In the demo I saw, they also slightly pressurized the building to establish where the leaks were using the camera. I’m not really sure it’s worth looking into, except for your scientific curiosity, but I’m sure you would find a way to try it if you’re interested. For example, the heat loss image at the junction of the two rear doors may be accentuated by leakage. If that is the case, maybe a better seal can do the job, since you can’t add insulation. The sealing of the roof vent would be another area.
Last week I had a chance to visit a Safari Condo Flex, as well as a Travato 59G (and 59k but we don’t like the layout). I’m still trying to balance the overall pros and cons of each, but the Seitz windows on the Safari Condo will go on the plus side if they perform like the Seitz on yours.
Interesting thought on the leakage. I’ve often wondered if there was a bit of an air leak at the bottom of that back door. Hmmmmm…
And you’re right. Those windows definitely rock. They’re quiet too!
Can you just close up all the windows and doors tight, turn the Fantastic Fan on high and reverse and pressurize it that way to find the leaks?
That’s not a bad idea. Although, in our case, most of the air would likely find its way out of the vent for the composting toilet…
We took Refletix, bought at Home Depot, and cut it to the size of the glass area of the windows with maybe a 1/4″ extra all around. The extra 1/4″ is enough to allow tension to keep it in the windows. We leave the back door windows and non opening parts of our side windows covered all the time. Makes a big difference in cold and heat.
Have seen some folks do the same and cover the Reflectix with a cloth covering and sew a few magnets in the covers to hold to the metal surrounds of the windows. Along with the MCD shades, this gives you 2 layers of insulation with an air space in between.
Maybe on the floor underneath, you can glue some kind of foam boards in the areas you can get to. Saw a video the other day where a guy foamed all the cross members through the access holes, and the foam board on the flat areas. He also foamed all the vertical ribs on the inside of his PM, which you obviously can’t do all of them now…
Interesting idea on the floor. I’d be worried that something would catch fire!
If you find the video, email me a link.
James,
Outstanding report!! Great insight!
I’m many steps behind you in considering making my ’14 Travato 59G into a 4-season RV, but I have done one thing.
I was feeling a draft from the windows, and knew they’d be bad news when the temps dropped below 60. On my rear doors, I have the WGO Privacy Curtains (thick, 2-ply, button-snap style) in place all of the time.
I went to HD, and bought a couple of sheets of foil-lined EPS rigid foam insulation.
I’m using 1-1/2″ on the back door windows, sandwiched between the glass and the curtain. I cut the panels to fill the “window recess,” and put them in black plastic trash bags to prevent having foam pellets all over the place. I used clear packing tape to seal and snug-up the bags. I also used one length of packing tape vertically, to keep the foam in place, since the doors get slammed around.
That’s staying in place year-round.
For the sliding windows on the left side of the van, I used 1″ material, prepared the same way. I’m using that only in colder weather. I took them out during the Summer months. I keep the roller shades down all of the time, and the Velcro at the base of the shade holds everything in place (most of the time).
I have not done anything at the sliding door window, as the 2-ply Privacy Curtain is pretty thick, and it’s further away from the cross-coach bed (if that’s used).
I have noticed that I don’t feel “the draft” from the rear windows (my feet stay warm; I sleep with my head by the fridge) anymore, and I don’t get that same drafty feeling from the side window.
Just enough to keep me a bit cozy, but I’m not out in sub-freezing temps intentionally. It’s still a 3-season RV, but I’ve cut down on some draftiness, at a low cost. Hope this helps!
Thanks again for a great report!
Glad you liked it, Steve!
I’ve thought about getting some polyiso or extruded polystyrene board to make some window covers. The foil facing would be a nice touch, as you could face the foil towards the inside in winter.
Did you add the tank heaters yourself or did they come standard with the RV?
They were not standard, but they are an easily added item.
Any RV dealer worth their Service Department ought to be able to pull it off.