This post may contain affiliate links.
If you’ve been reading our blog for a while, you probably remember our video of the Anderson Camper Levelers. While that particular product didn’t work out for us in our class B, it got me thinking about leveling, and I’ve become a little bit obsessed with getting our RV as level as possible. (This surprises no one.)
In my mind, there are actually two parts to getting your RV level. The first step is figuring out exactly how far out of level you are, and in what directions. The second step is doing something to correct it. So in this post, I’m going to take a look at three approaches to the first step. It turns out, in a class B, that’s the easier part of the process.
The Contestants
The first contestant is the old-school approach.
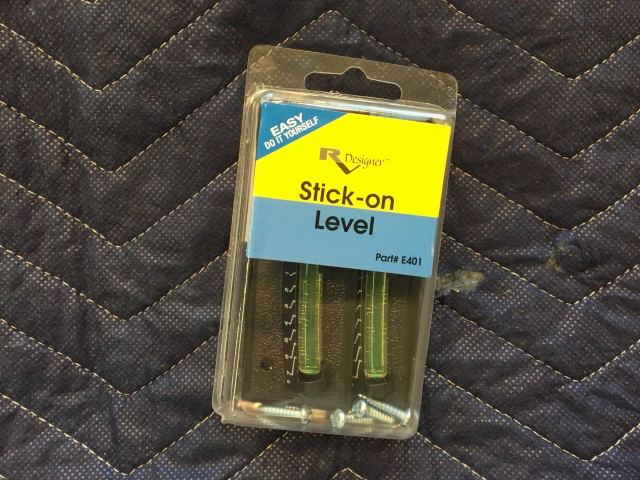
A pair of these guys will set you back a whopping $7 at your local Camping World store. They’re also available for a few dollars more on Amazon. (And they’ll get you some serious street cred with the typewriter and public library set.) Joking aside, these kinds of levels have been getting campers an even night’s sleep for decades. The best part about them is that – barring some natural disaster or serious problem with gravity – there’s nothing to break down with these levels. They’ll never leave you with a dead battery, or a flaky Bluetooth connection.
The second approach was based on something I developed during my Anderson Camper Leveler experiment. Using your smartphone for a level, a little knowledge of your vehicle’s dimensions, and some high-school trigonometry, you can calculate the amounts to raise or lower each wheel. In that video, I did this with a spreadsheet. But fortunately, there’s an app that will save you from trying to do trigonometry on the road. There’s probably more than one app, actually, but the one I tested is made by our friends at Truma.
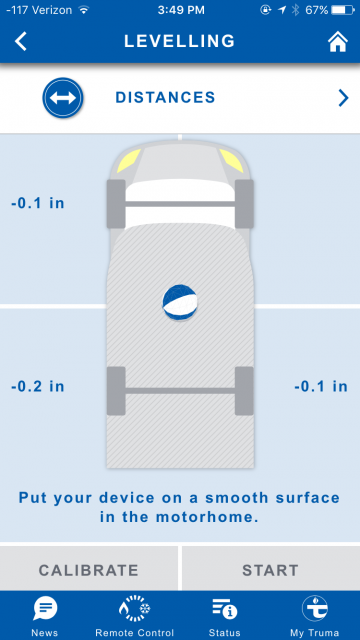
This app is free, so the price is hard to beat (provided you already own a smartphone). If you input the wheelbase and track of your vehicle, the app can tell you how much to raise or lower each specific wheel.
The third approach is using a piece of technology specifically developed to level RVs, the LevelMatePRO.
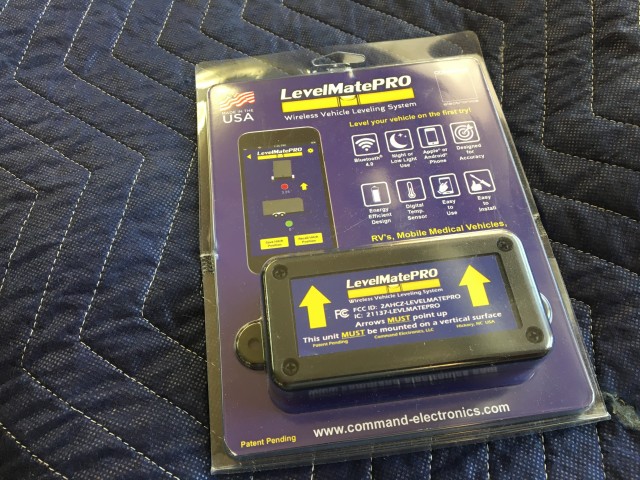
This box is installed in an out of the way location in your rig, and transmits information about the state of level via Bluetooth to an app running on your smartphone. At about $140, this product from Command Electronics is certainly not the least expensive option, but it promises temperature-corrected accuracy and ease of use. Originally made for towable RVs, the LevelMatePRO now works with driveable RVs, and has recently been enjoying a surge in popularity among Class A owners. I aimed to try it on our Class B camper van.
Initial Setup
The one thing that all three methods need to get started is a perfectly level RV. And the first difficulty I ran into was that, after years of being abused, the el-cheapo levels that I bought in college were crap. This provided me a fantastic excuse to head to the local home improvement store and pick up an assortment of brand new, swanky, non-crap levels.
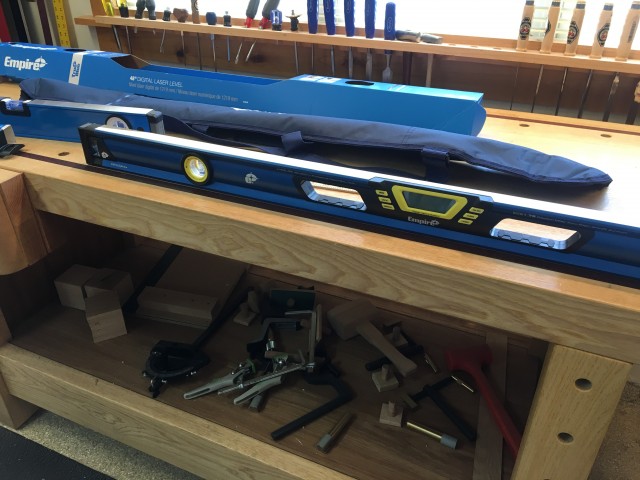
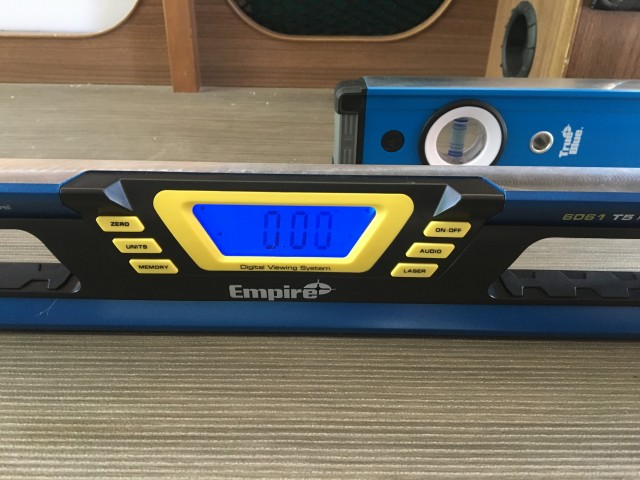
I actually took these out of their boxes in the store and did the turn-them-end-for-end thing to make sure they were accurate. The manufacturer claims that they are accurate to within .0005” per inch. If that’s true, then their accuracy is greater than a tenth of an inch over the entire wheelbase of my RV. And the larger, digital level is temperature compensated and has a feature to re-zero. With all that, I reasoned that these would be more accurate than the actual Ram ProMaster chassis itself, so I called it good.
Once I had accurate levels, I set to work getting our rig as level as possible. But on a Class B RV, without leveling jacks, that’s a lot more difficult to achieve than it sounds. You see, a Class B just rests on its suspension, not on a solid prop. So the act of getting into the vehicle to check the level actually affects the level. It’s the RV version of the “Observer Effect”.
My new super-cool level had a laser on the end of it. I at first attempted to compensate for the observer effect by standing up a yardstick at different points on the ground outside the RV, hitting it with the laser, and then measuring the deflection as I got in and out of the RV. It was interesting, but highly variable and I wasn’t able to use the information to compensate for level. But I DID learn that by moving to the back of the RV where the bed is, my weight lowers the rear end of the rig by 3/16”. So (note to self), I need to make sure that the rear of the RV is more than 3/16” HIGH, or else I’ll be sleeping with my head lower than my feet. (Not good.)
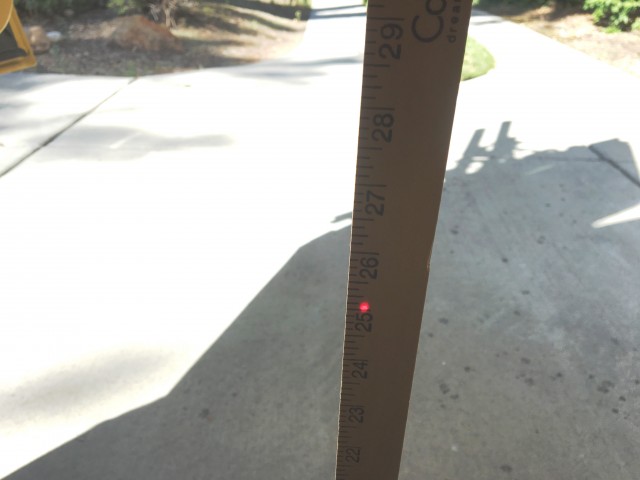
The laser drops from 25 1/4″ to 25 1/16″ when I get into the back of the van. As my wife is weightless, I didn’t ask her to climb in the RV with me for this test.
That was interesting, and good information, but I was still having a hard time getting a good level. Then I had this idea:
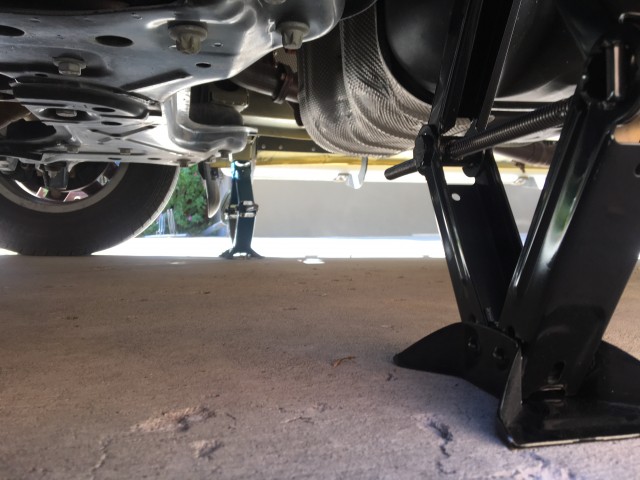
Taking a cue from towable rigs, I pilfered the scissor jacks from every vehicle in the driveway and put them on the jack points at all four corners. Once I had done that, movement from me getting in and out of the RV all but disappeared. This also allowed me to adjust the level in very fine increments. A half hour of tweaking jacks, and I finally had what I considered a pretty solid level. I was able to get a zero reading both front to back, and side to side, just about anywhere in the rig.
Other, more practical measures of level, like swinging the refrigerator door or spilling a puddle of water on the counter, also indicated I was extremely level. So with that done (and it really did take quite a while), I was able to perform the initial setup of all three leveling systems.
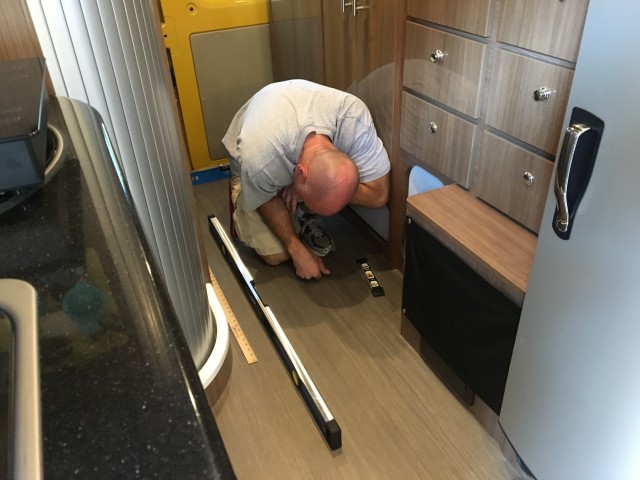
Installing the Bubble Levels
There are two of these levels. To install them, you just stick them to convenient vertical surfaces. If I knew I was going to keep them, I would have installed them permanently with screws. But for the time being, I used double sided tape to install them on un-used parts of the RV. One is installed to level side-to-side and one is installed to level front-to-back
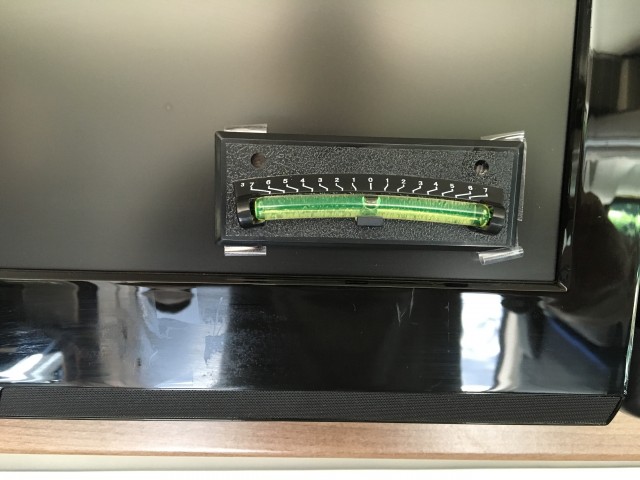
Ideally, you would mount them both where you could see from the driver’s seat, and not just tape them to the TV, but whatever. As long as they don’t move, and you get them installed with the bubble zeroed out, it’s all good. There is probably an additional calibration step you can figure out here where you use the numbers on the level and your wheelbase and track and more trigonometry to gauge how much height to add where. I declined to do that step. (No instructions were provided, I didn’t feel like figuring it out on my own, and I figured most people don’t do that anyway.)
Setting up the Truma App
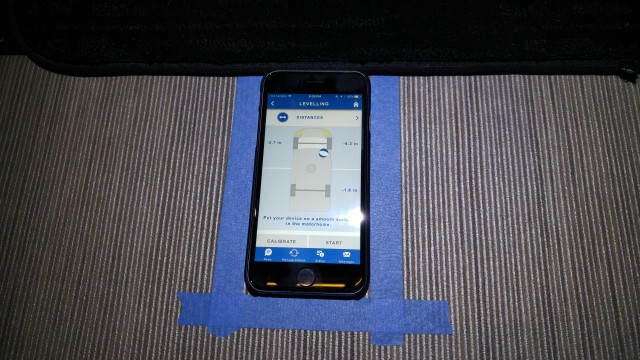
Thanks to my previous work with the Anderson Levelers, I knew exactly where to place my iPhone so that the Truma app would have the same level reading as the refrigerator. So I simply put my phone back in that same spot, and pressed “Calibrate” on the Truma app. This zeroes the app to read the current position as level.
So, I would have expected it to read all zeros. This is one of the limitations of the Truma app – as it relies on your phone’s instrumentation, the numbers change fast and frequently. It seems there should be a damping function in the app to somehow smooth things out. In any case, that’s pretty much all there is to setting up the Truma App – unless you count figuring out exactly where to set your phone, which I had done previously (more on that later).
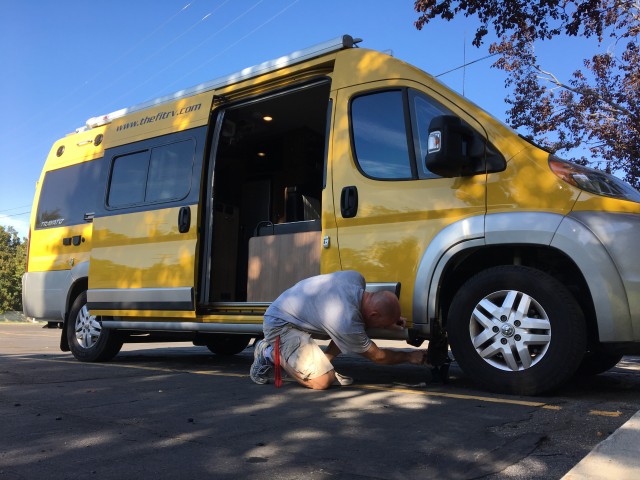
Installing the LevelMatePRO
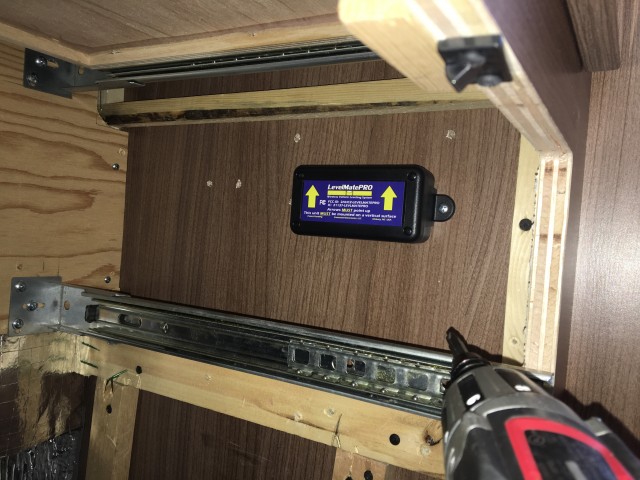
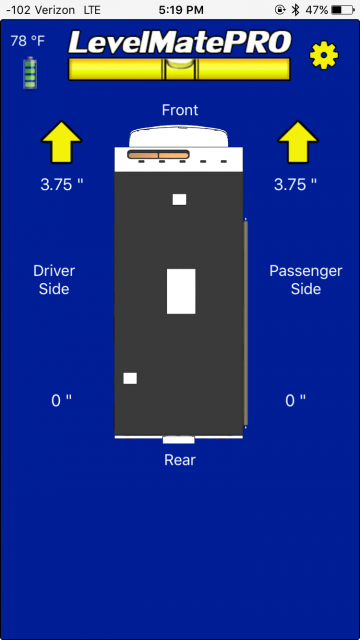
I was expecting this install to be more difficult than it actually was. The instructions were to first install the battery, and pair it with your smartphone. Once you’ve downloaded the LevelMatePRO app, it pretty much handles the pairing for you. (Just be sure there aren’t any other LevelMatePRO users close by.) Once you’ve paired it, you simply install the transmitter box on a vertical surface, more or less level, like this:
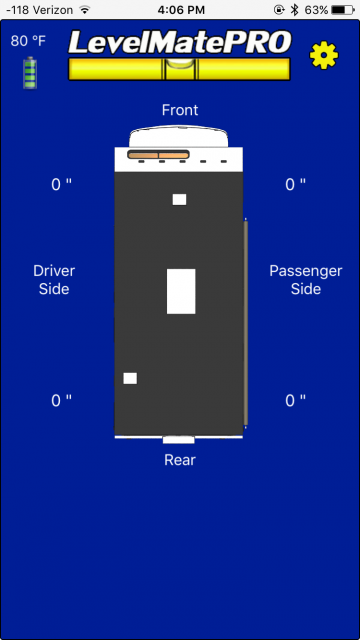
After that, you return to the app and input some basic information about its installation orientation, and the width and wheelbase of your vehicle. Then, much like the Truma app, you tell it to record the current position as level. Once you’ve done that, it should tell you what you already know – that you’re level!
And with that, all three leveling systems were set up. So it was time to leave the driveway and test them out.
Test Results
I drove to a nearby and reasonably flat parking lot and set about testing each leveling system twice. In the first test, I used the scissor jacks to level the vehicle to the best ability of the system, after which I measured with my new super accurate levels to see how close I got. That was interesting, but not a “real world” test. You see, most Class B rigs don’t travel around with 4 sets of scissor jacks. (I guess you could, if you really wanted to, but nobody seems to do this in real life – not even me.) So for the second test, I tried to level using our current set of Hosspads – which is all we typically travel with. Those only work in one inch increments, so some of the accuracy of these systems would be lost in that real-world scenario. Let’s see how they all did.
Stick On Level Results:
Pros:
- Will never have a technology failure or dead battery
- Everybody “gets it”
- If mounted visibly, can be used while driving to find a level spot
Cons:
- Doesn’t give information about how much lift to add, and where
- Have to keep going in and out of RV to check while adjusting level
- Cannot be re-zeroed (without more holes) if you want to alter the level setting (heads up to sleep, for example)
- Least accurate of the leveling methods
With the bubble levels, as with the others, I had an easier time when using the jacks versus driving up onto blocks. While using the jacks, and getting the bubbles as level as I could discern, I was able to reduce the out-of-level down to 0.15 degrees front to back, and 0.1 degrees side to side. That’s better than I had hoped.
My eyes can’t get it any more level than that.
One thing I did notice was that the rear of the RV was slightly less level, side to side, than the front was. The cross-coach bubble level was mounted toward the front, so that likely had something to do with it. But in any case, the bubble levels were acceptable when using jacks, and looking in at them every few turns to check progress. But they really fell down when trying to level the rig in another spot in the parking lot using just my regular leveling pads.
The biggest problem I had there was that the bubble levels did not give me any information on exactly which wheel to move, and by how much. I could tell which side was high or low, but not enough to know “one pad, or two?” Plus, when driving onto pads, you have to level both axes simultaneously, which also complicated matters. After three attempts, the best I was able to get was 0.35 degrees front to back, and 0.25 degrees side to side.
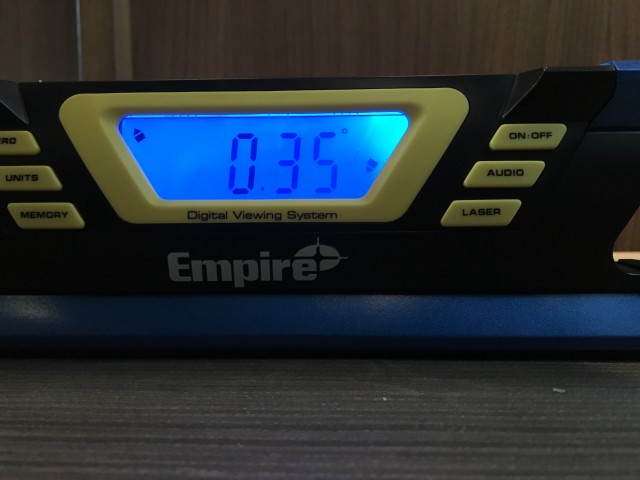
Those numbers don’t sound bad initially, and they’re not. But when you think about pulling in to a campsite at night and guessing several times in the dark while waking up your neighbors… the multiple attempts are a lot more annoying than the numbers indicate.
Truma App Results:
Pro:
- Cost of $0 is hard to beat
- Nothing extra to bring or install
- Good accuracy
- Can be re-zeroed
Cons:
- Accuracy is entirely dependent on setting your phone in exactly the right place
- Has to remain on the floor during use, which means you have to keep getting in and out of the rig
- Hyper-sensitivity (may be phone dependent)
The Truma App did well in leveling the coach when I attempted it using the jacks. But I did encounter two problems. The first is being able to set your phone down in exactly the same place, with the same orientation and rotation, and not having any grains of sand or stray debris alter the alignment of it. Having tried the app out a time or two previously, I knew about this limitation, and so I had taped down some alignment markings on the floor to help me line it up properly.
But if your traveling partner is anything like mine, you’re not allowed to decorate the floor of your rig with blue painter’s tape for long. So this was a temporary solution at best. The other frustration in using the Truma app is what appeared to be some hypersensitivity on my phone. For example, these three screen shots were taken mere moments apart, without moving the phone.
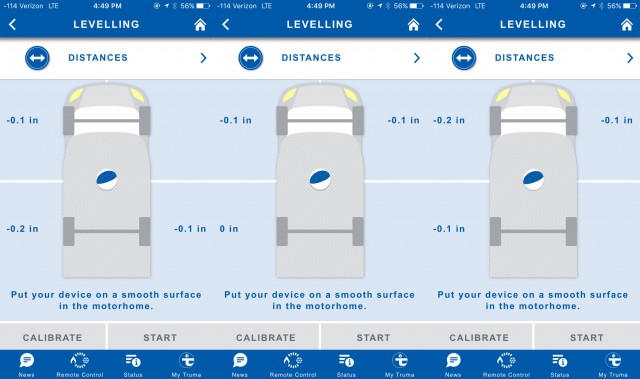
Of course, you could argue that random variations of .2 of an inch or less aren’t really very meaningful when trying to level a 21 foot motorhome. You’d be right. It doesn’t affect the accuracy in a material way. But these values change really rapidly and can be can be quite hard to read. Perhaps this was just a problem with my iPhone, and the Android version would be better? I didn’t test another phone to figure it out. But thinking back to that midnight arrival, anything that makes you come back inside the RV, squint at the floor, do a double-take, shake your head, and really try to figure it out is less convenient.
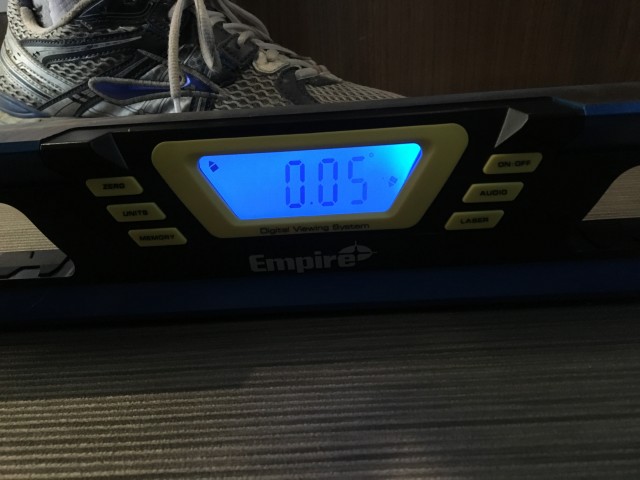
In the end though, when using the jacks, I was able to get it dialed down to those numbers you see above. When I tested it out with my levels, the Truma app produced a result that was level to within 0.05 of a degree front to back, and 0.10 of a degree side to side. In all honestly, it felt perfectly level, and the refrigerator door and other measures also looked good. I think the phone positioning variance is what led to the slightly less than perfect result. But thanks to the tape, I had it pretty darn close.
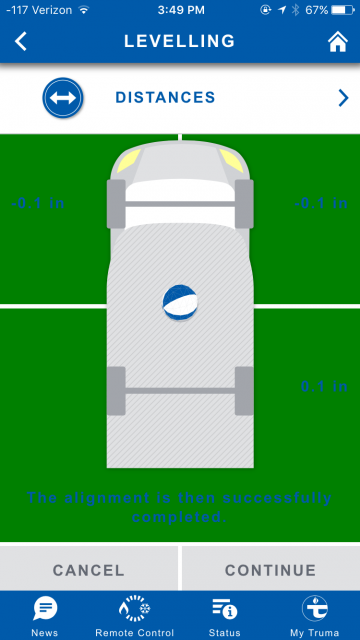
But in the “real world” test, when using just the leveling pads, I wasn’t able to get it that close. In fact, since I had the same rig, with the same four pads, in the same spot… the results were nearly identical to what I achieved with the bubble levels. But the difference was in how quickly I got to that result. You see, with the Truma app, you get a screen that looks something like this:
And, even though you can only really level in 1 inch increments, you pretty much know to put two pads under one wheel, one pad each under two others, and leave the last one alone. My Hosspads didn’t somehow become magic fractional-inch Hosspads, so the final level was the same. The real win for the Truma was in only having to drive onto the pads once.
LevelMatePRO Results:
Pros:
- Best accuracy of the methods tested
- Fastest to use of the methods tested
- No getting in and out of the rig – you can walk from wheel to wheel and still look at the app
- Can be re-zeroed
Cons:
- Most expensive of the methods tested
So I saved this one for last, thinking it would be the best of the bunch, and I wasn’t disappointed. The LevelMatePRO had all the advantages of the smartphone solution, PLUS, by being permanently mounted, it was more accurate. It only displays down to a resolution of .25″, so that might seem counter-intuitive. But that quarter inch resolution is a blessing when you actually use it. It eliminates the problem of showing you numbers that are too fine to adjust anyway, and that change every time a butterfly in China flaps its wings.
When using the jacks to level the rig, I could really understand why the towable RV crowd likes it so much. Just walk to each wheel with your phone, crank it up until the reading zeroes out, and move on to the next. Do that three times and you’re done. Dang! It was super fast and super easy. (Well, crawling under the rig to position the jacks wasn’t exactly fun, but everything after that was easy.) When I had it all zeroed out, I busted out the blue levels, and I had nailed it in both axes. Perfect zero level.
I’m just checking it, but it looks like I’m worshiping at the altar of Level or something. And perhaps I should have been, after getting a perfect reading.
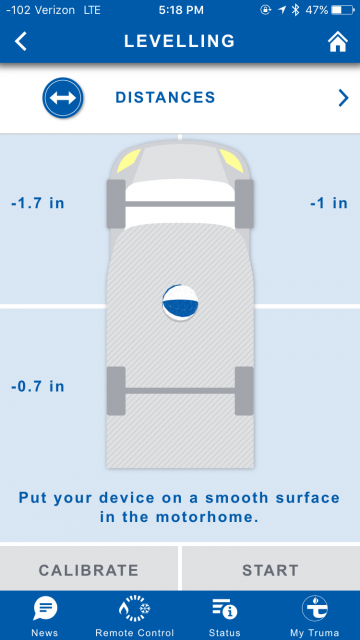
Now, in the “real world” test with the blocks, we didn’t wind up any more level than with the other methods due to the limitations of our pads. But I want to show you the before and after screenshots from the app. Here’s the before:
We don’t have leveling devices that will give us exactly 3.75 inches (yet). So on rolling up and seeing this, armed with only four 1 inch pads, you’d select to put two pads under each front wheel. You do that, roll up onto them once, and you get the following:
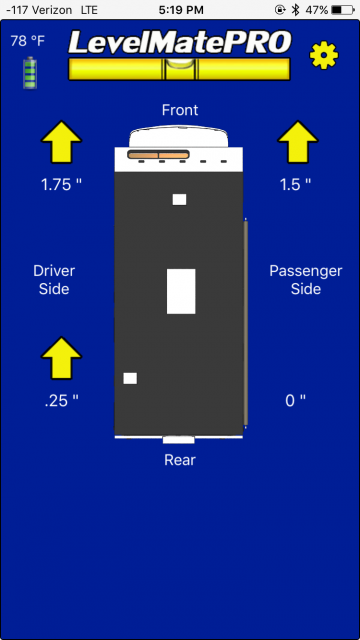
And, apart from a quarter inch shift, which could be from a divot in the pavement or a squished Hosspad, it’s what you’d expect. Our future campground neighbors will thank us (we always show up late).
Conclusion
Honestly, if you’ve got the time to spend, any of these systems will get you level. For us, in a Class B, the big differences are in the repeatability of the results, and the speed in attaining them.
The bubble levels, while retro, were analog, and just not as accurate as the digital solutions. Plus, they required getting in and out of the rig to check them. The Truma App is free, and for those with smartphones could be an option if you know the limitations. The main limitation with the smartphone app approach is that you have to get the phone in the same place, every time. And like the bubble levels, you have to get in and out of the rig to check it. The LevelMatePRO was the most accurate system I tested, and it had the advantages of more stable readings, and better repeatability due to being permanently mounted in the rig. Even though some of its accuracy was un-useable when leveling in one inch increments with pads in my “real world” test, it’s still a great system for leveling your Class B, and it’s what I’ll be rolling with going forward.
I’ll be scratching my head in the coming months trying to work out exactly how I can generate wheel lift, in quarter-inch increments, without having to bring a bunch of scissor jacks along. If I get that second part of the leveling problem figured out, you can bet I’ll write that up next.
Cheers!
Full Disclosure: Command Electronics provided me with a complimentary LevelMatePRO in exchange for my honest testing of this RV product. The test results are my own, and should be fully repeatable by anyone trying to duplicate the test.


I absolutely love this product. It’s one of my favorite trailer accessories. I did a video review on my channel. It’s a total game changer when combined with a set of leveling wedges!
We purchased the LevelMate Pro and levelled the floor using 2 bottle jacks while parked in our storage unit. We find the RV is a little lower on the driver side – presumably due to weight distribution.
We have levelling ramps and drive up onto them so that it is level according to LevelMate PRO, but we find that, try as we may, the RV rolls down the ramp to the next level down when we remove the power/footbrake – even with the handbrake on. What am I doing wrong?
Hmmm. I know RVs (and cars for that matter) will usually “settle in” a bit when you take your foot off the brake.
Usually, the handbrake will stop most of that.
Perhaps an inexpensive set of wheel chocks will solve the issue.
In the pictures you showed for the Truma app, it doesn’t look like you ever hit the start button at the bottom of the screen. If you press that button it makes an audible sound that changes when the bubble finds and stays in the center. That eliminates the need to go look at it. Just listen for the ‘level’ sound pattern.
I did “start” the Truma app, naturally.
Now that we have the automatic levelers from E&P, I wouldn’t dream of doing things any other way than with the Level Mate Pro.
James,
I always enjoy your reviews.
I have found an android app which I like better than the Truma app. It is “Camper Leveler-Free Edition by Eland. It allows six different locations for checking level including dashboard, chair, table, floor, and 2 unspecified locations. I have found it to work well in our Itasca Navion 24 motorhome. I have referenced the floor near my drivers seat and the countertop by the refrigerator for leveling. It reports both the angles of deviation for the motorhome length and width and adjustment needed for each tire. The angle is useful so I can make sure when parked that I am within the requirements of my refrigerator. I have found it to be reproducible at the floor and counter locations. I can check quickly at the floor location while driving into a camp site and then confirm at the countertop.
For some reason, it is no longer available on Google Play but can be downloaded from “http://downloadapk.net/Camper-Leveler-Free-Edition.html”.
I may upgrade o the LevelMate Pro sometime , but for now this seems to meet our needs well.
Regards,
Joe
Interesting.
Stef and I are an iOS household, so that one would have been off my radar.
I do like the idea of using multiple locations to check the level.
If scissor jacks can be used to level the rig and calibrate your level mate, why can’t the be mounted on the frame and always used to level?
They probably could. I had looked into this before we found and installed our E&P leveling system, which was our ultimate solution to the problem.
Travel trailers do this, of course, which is where I got the idea to use them in this post. But the trailers ride higher up than our rig, and I was concerned about ground clearance. Also, it’s difficult to find a jack that stores really small and expands really tall, which is what you want. Then there were the concerns about rust, etc. Then there was the question of… if I mount scissor jacks to the jack points, then what do I do when I want to actually jack the vehicle up? I could picture a tire shop not paying attention and snapping off one of the jacks. I had even gone as far as searching for appropriate jacks, but ultimately abandoned the idea.
James,
Maybe I’ve been going at this all wrong with our TT(s), but my understanding was that the ‘right’ approach was to level side to side with blocks/boards or something like the Andersen Levelers, level front to back with the tongue jack, and then run the stabilizer jacks down in the corners to solidify things and reduce wiggle/wobble. That is, the corner jacks are for *stabilizing* the rig, not adjusting level… especially with the newer ‘ultra-lite’ models with lighter weight – and more flexible – frames.
Obviously various people go about things differently, but I’ve seen the results of someone trying to ‘jack up’ one side of their trailer with the stabilizers (as in tires almost off the ground)… when the stabs eventually failed, the people inside weren’t happy campers.
OK. That probably would have been fun to watch. (I feel guilty saying that, lol.)
There are definitely some big differences in leveling a TT vs a motorhome. Obviously, my methods were geared towards a small motorhome, but I believe the LevelMate Pro, for example, would provide the same benefit for a TT owner. Meaning, the same reference to zero and inches out of level. What you do with that information would then be dependent on what sort of motorhome you had.
Andersen Camper Leveler 3604 should be infinitely variable.
Tried them a while back and came to the conclusion that they work OK for a trailer, but not so well on our rig. Here’s the complete write up.
Very complete and informative article James! I had wondered about all of this before seeing a levelmatepro article on the geeks website.
Your notes touched on many variables and the jack stands were genius (or perhaps, as my confidant sometimes says, anal). Thanks for going to all of that effort!
I jumped right on the levelmatepro last summer when I first heard about it. Yes, expensive, but I don’t like chasing eggs around the kitchen counter when I cook.
So, another variable here, how “level” are the various components of Lance? The floor, the kitchen countertop, the bed, the dinette, etc. Obviously we are talking about level in relation to each other. It appears you leveled the floor in Lance (interesting occupied bed component there).
I can say in our LTV corner bed, the dinette, floor, and countertop are not exactly level with each other. Close, but not exact. Which component do you want exactly level? We chose the kitchen countertop due to the rolling eggs or contents of a pan shifting to one side. This is definitely a personal choice for each individual.
How has the levelmate performed for the past 6 months?
First, the only down side I’ve experienced: The battery. Already dead after 4 months of use? Okay, but you don’t find this out until you try to pair it to your phone. It won’t pair and there is no low battery indication on the app at anytime. Purchase extra batteries, figure out how long your unit lasts, and replace before the battery times out.
The good stuff: My unit has worked like a champ. We’re traveling folk and have been know to spend short night in Walmart lots or rest stops. I enter the appropriate part of the Walmart lot, turn on the app, and drive around until I’m showing approximately level – with the head of the bed always level or slightly higher than the foot. It’s that simple. I would spend the money again for this unit now that I’ve seen the results.
Thanks again for your very thorough and well communicated testing James!
Hi Randy –
Glad you liked the write-up. As far as what to make level, most folks go with the refrigerator. Many of the absorption refrigerators won’t work properly if they’re off-level. Beyond that, I suppose it’s just your personal preference.
Our LevelMate has been fun to have, since writing the article. I did have the battery go dead once. They recently updated their software so that you can have a much shorter time-out before the unit goes to sleep. Having the unit sleep more readily saves on battery life. If you haven’t updated the app, do it and find the setting. Worth the few minutes to set it up.
See you out on the road (or in a Wal-Mart parking lot)!
Another app similar to Truma is iWoMoSet, after calibration it tells how much each corner needs to be elevated with nice graphic, costs $1.99 in AppStore. Don’t know if it has Android version.
I was hoping for a review of the Lippert Level Up systems vs Big Foot. Too many OEM’s are putting Lippert on and it has many problems…like many of Lippert products. Big Foot is less utilized by OEM’s but is available after market.
Any thoughts James…Btw, the best RV site ever!
I noticed Tuning kits for Pentastar engines have started appearing.
http://www.getoverkilled.ca/pentastar.html
http://www.diablosport.com/news/2015-2016-3-6l-v6-300-charger-and-challenger-tuners/
So far they only have programming for hot rods and you’d have to do a custom program for a Promaster Van.
My goal is <3 deg FTB and <6 deg STS for the (Dometic) fridge, although I believe even that is overkill, based on the manual which states (paraphrase), "If it's comfortable enough for sleeping, it's good enough."
I use a $20 Sears digital level and a trig derived table (retired engineer) to tell me how many 1" blocks to use if not within the above specs. 90+% of the time, no leveling is needed.
Takes me less than 60 seconds to check level, mostly to unzip and rezip the level case.
I guess it depends on how particular you are and how tired you are at bedtime.
Right now, I’m sitting nose-down 5 inches or more! I used all the blocks I had brought and that’s the best we could do.
It’s OK for sleeping because it’s head’s up. And the rain is running off nicely.
I just wish I could get the sink to drain right!
5 inches nose down, my “system” would tell me to find another site. I guess my camping style is more “sissified.”
Thanks for all your “interesting” endeavors,
We’re actually in an RV park at the moment…
:-\
Another vote for the Truma app. Honestly never noticed the numbers. When that little ball flops into the center position, we’re good! Interesting write-up. You were/are an engineer, right? Did IT support for NASA Mech Design engineers for 17 years. They would love stuff like this! 😉
Back in a previous life, I was an aerospace engineer, yes. Worked in Huntsville, Alabama for that life… 😉
James,
Great post. I appreciate your thoroughness.
Well at least someone does… Ahem… STEF.
I am considering the VB system for my 2015 ERA. It is a $7,500 option on the Airstream Interstate. It may stiffen the ride as it is a weight compensator. As I don’t carry a lot of passengers, cargo, or tow anything, it doesn’t seem worth it for me. Also, I never see anyone leveling a Sprinter unless it is a B plus or C.
We recommended the Truma app to you and we’ve talked it up with other Travato owners. But we use it on an iPad, not an iPhone, which might help some (given the larger footprint). We also put the iPad on the Dinette table, and while that’s not perfect for a number of reasons, we do get ourselves leveled up nicely without trouble. Yes, we’re a bit less anal than you, James, but still like our heads to not be downhill.
For a zero dollar solution, the Truma app is honestly tough to beat. Using it on a larger device like an iPad would probably smooth out some of the smaller irregularities that would throw off a smartphone.
Thanks for the workup. Since I have a pretty tolerant ballpark for what constitutes level, the iPhone solution has appeal. I’m a bit more relaxed and will just not lower the back of the sofa bed all the way if we are head down!
I realize most people are more tolerant and flexible than me. (about level, and honestly just about anything else, lol.)
Any of the solutions I reviewed will be able to get most people into the ball park if they’re not too picky.
Have you found any RV leveling jacking system that would fit the Travato? We’d like to go smaller than our 25″ Dynamax but it’s one of the smallest RV’s we’ve found with a HWH leveling system. We’d like to downsize to something like the Travato or Roadtrek Zion but not having to get out and mess with blocks to level has been really nice and would be hard to give up.
I’ve not found a leveling jack system that will fit the Travato. There are some that will fit Sprinter based RVs, but nothing for the Promaster yet. There are products like VB Air Suspenson, which use airbags, that could raise or lower the rear, but we haven’t tried them out obviously. Getting out to level is kind of a pain, yes. But with some of the solutions like LevelMatePRO, you at least only have to get out once.
How about airing down tires then airing back up with an onboard compressor? I’ve seen Vanagons do this sometimes. I guess it would be more work than leveling blocks unless you had an automatic air inflation system, but it could potentially be very accurate!
Interesting idea, and it would probably work. But…
Tires are rated for a particular load at certain pressures. I don’t know if those pressures are only intended when the vehicle is rolling, or if they also apply when standing still.
I’d hate to damage a tire by deflating it to 35psi when it needs 75 to support its load. Have to ask a tire manufacturer what would happen there I guess.
James,
I noticed in your latest video on upgrading Lance’s suspension that you now have leveling pads (a leveling jack system?)installed.
Please email me information about them .
I have a 2016 Trend 23L that I would like to upgrade with the system used by you in Lance.
Thanks,
Bob Walter , [email protected].
P.S. I was the guy with the recumbent bike on the Tues am bike ride@ 2017 GNR
Hi Bob!
There will be a post and video coming with more details, but ours is an E&P leveling system.
It was installed by Advanced RV.
You’d have to contact Advanced RV for pricing.
James, This post is in the running for one of your most OCD posts ever. I hesitate to congratulate you lest Stef thinks I’m encouraging you.