This post may contain affiliate links.
I’m embarrassed it took me 40,000 miles to figure this one out.
So how often do any of these happen to you?
- BANG! What was that back there?
- Is there something wrong with the trailer?
- That was a rough bump. Are my bikes on the rack still OK?
- How close is that jerk behind me anyway?
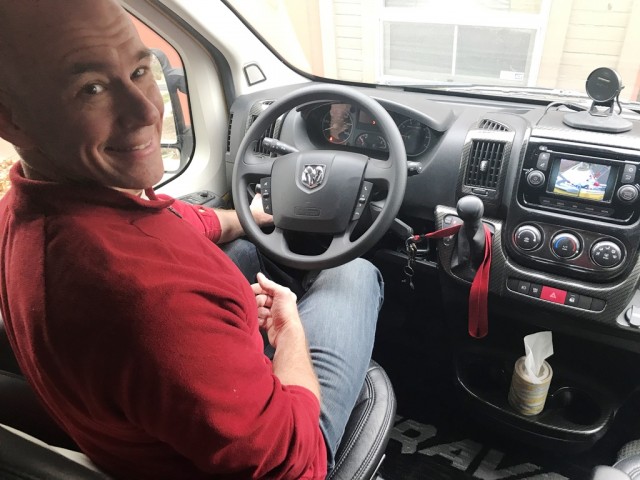
If you’re like most people, it happens about once every single trip you take in your ProMaster, whether it’s an RV or not. (Maybe it’s just me this stuff happens to, but I doubt it.) At times like these, it would be incredibly convenient to have a rear view camera on the van. But alas, the ProMaster doesn’t have one.
Oh no. Wait! IT DOES have one!
But for some reason, that camera only turns on when you’re IN REVERSE. There’s a very good reason for this – it’s because whoever designed the UConnect Camera interface is an idiot.
So what this means is, if you hear a loud noise coming from behind your van, you have to pull over, stop, and get out of the vehicle to check things out. That’s so much more efficient than flipping a switch and glancing at the rear view camera… NOT. Thanks, Fiat.
For over two years, this has bothered me. I took the van to a car stereo place to see if they could get the backup camera working on a switch… No dice.
I even ordered a Garmin Backup Camera that would wirelessly interface with our navigation unit, just so I could have a camera I could control. But pride got the better of me and I canceled the order. There HAD to be a way to make it work with the camera THAT WAS ALREADY THERE!
I’m happy to report, I’ve got it figured out and working. And now, you can too. It’s not even that hard. But before you start tearing apart your van, take note: Ours is a 2015 model year ProMaster. They (Fiat) have made some changes to the programming for the camera display since ours was made.
If your ProMaster is not a 2015, I’d suggest you try this out in a temporary way before tearing things up too badly. Perhaps have someone in the van open the rear door while you’re driving and see what happens. That will totally make sense when you’ve finished reading, but just make sure you’re safe, and nobody falls out of your van while it’s moving…
Not hard. But maybe a bit tedious.
The key to figuring it out came when I realized that the backup camera turns on if you have the rear doors open. This makes perfect sense when you remember that the designer is an idiot. Fiat’s reasoning goes like this: If you hear a loud noise, or just want to have a quick look out back, well then clearly you should be forced to pull over, come to a complete stop, exit the vehicle, and check it out. But if you’re flying down the highway WITH YOUR BACK DOORS HANGING OPEN, well that’s no big deal! No need to stop for that! The geniuses at Fiat will turn on the rear view camera so you can watch your stuff fall out the back of the van without even slowing down.
Eventually, I realized I could use this stupid behavior to my advantage. Let’s get into how I did it.
The first and hardest thing was figuring out what the signal was, and on which wire, that tells the UConnect module that the back doors are open. After lots of internet research, looking at wiring diagrams, and plain old experimenting, I had it confirmed. The wire you want to find is a white wire with a blue stripe. And you’ll find it in the wiring bundle that enters the vehicle from the passenger side rear door.
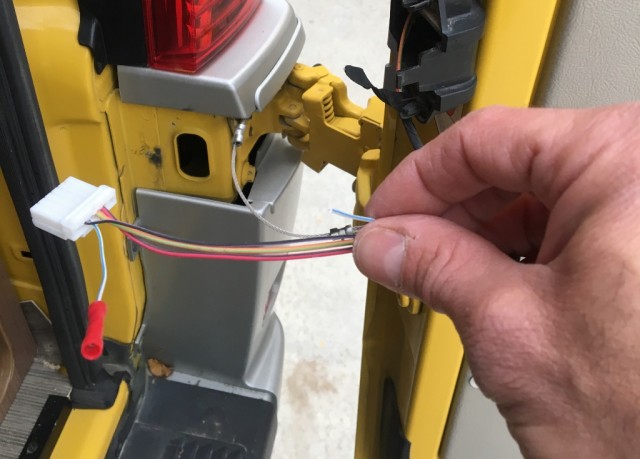
When this wire is grounded out, that’s the signal that the rear doors are open, and the camera turns on.
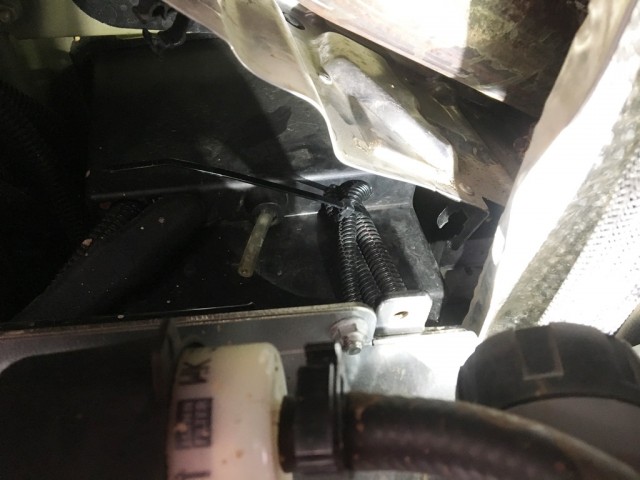
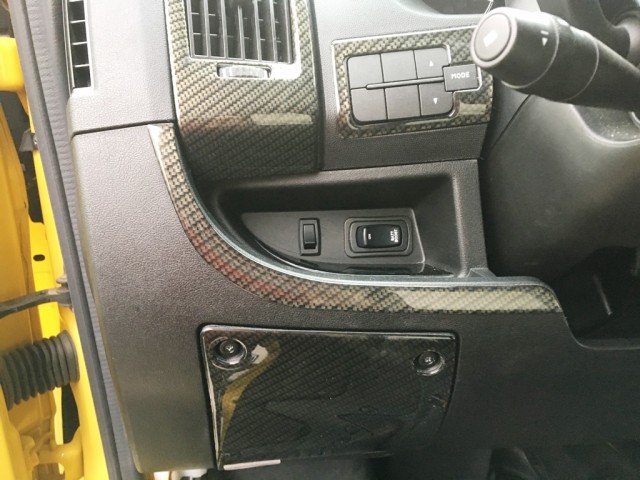
In that picture you can see that I’ve already cut the wire and started a splice. You’ll need to access the wire by removing the plastic piece attached to the van body so that you’ll have some slack in that wiring bundle. Then, you’ll need to reach inside by the tail light connections, bloody your knuckles, and unclip this piece from the multi-pin connector it’s attached to. Once you’ve done that, unwrap the wiring bundle, locate the white wire with the blue stripe, and cut it.
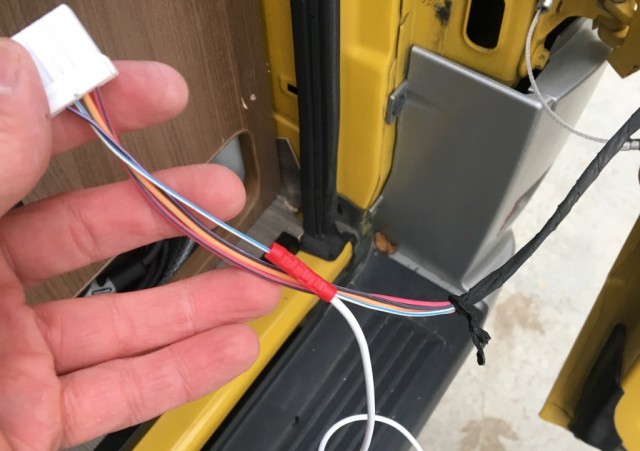
What you’re going to do is to attach another wire in parallel with the door switch. So in that picture, going upstream it’s just the white and blue wire. On the door side I spliced in some 16 gauge wire. You could use a smaller gauge – I just didn’t have enough on hand. Connecting things this way means that either the door being open OR the switch we’re about to install will signal that the rear doors are open. This is necessary to make sure you can still lock the doors. It will also preserve the original watch-your-cargo-spill-onto-the-highway function.
I just used a butt splice for that, but you could use whatever connector you like. Once you’ve got that done, re-wrap the bundle. It will be going in and out of the door, so you want to make sure it’s tidy. The only cloth tape I had on hand was white, so that’s what I did mine with.

That wire you just spliced in will have to make it all the way up to the front of the van where you’ll be driving. If you have an empty cargo van, that should be pretty easy. But I have a built-out RV. The easiest way for me to get a wire up front was by going underneath the van, so that’s what I did.
In order to get out of the space between the door and van, I ran the wire inside a piece of ¼ inch drip sprinkler tubing. It was smaller than the smallest split loom wire cover I had. There’s a small gap behind the doorway wiring guide that was initially removed, so run the wire back there, and down through the empty space behind and below the tail light.
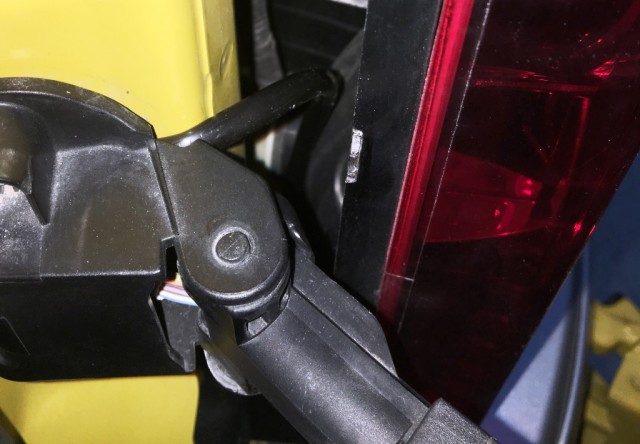
The gap behind that plastic connector is pretty tight, but it doesn’t move back and forth, so I’m hoping my sprinkler tubing holds up. If I ever can’t get the camera to turn off, this will be where I look first. From this location, it’s a straight shot down to get under the van.
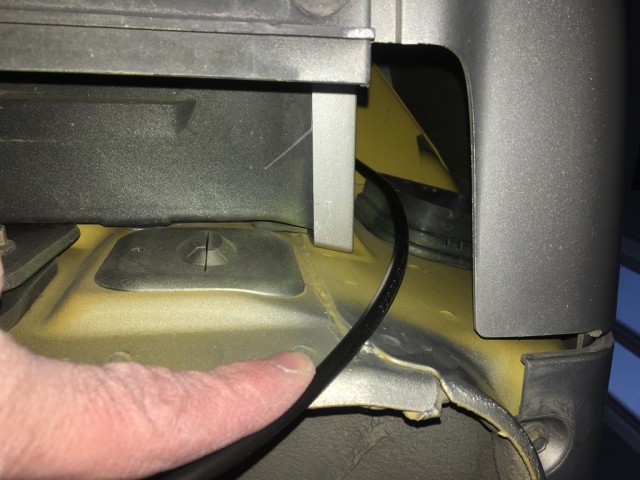
It might be hard to tell, but this picture is looking up from underneath the rear bumper near the tail light. There’s actually plenty of space in there.
From there, I ditched the sprinkler tubing, and went to regular split conduit. Run the wire towards the front of the van by any means necessary. Since I was working on a built-out RV, there were plenty of other wire runs I could attach on to.
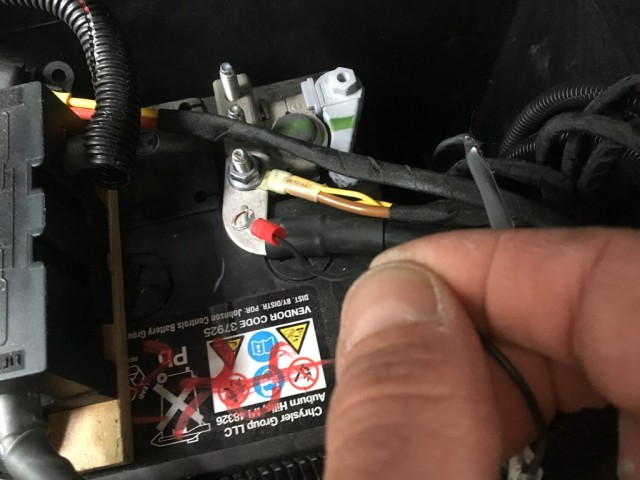
Be meticulous about it, keep your wire covered, and keep it zip-tied up and out of the way. When you get to the front of the van, you’re probably going to want to bring the wire up through the battery box. It’s the easiest place to do it, and it’s convenient to get from there up into the dash. You just have to get way up under the van to do it.
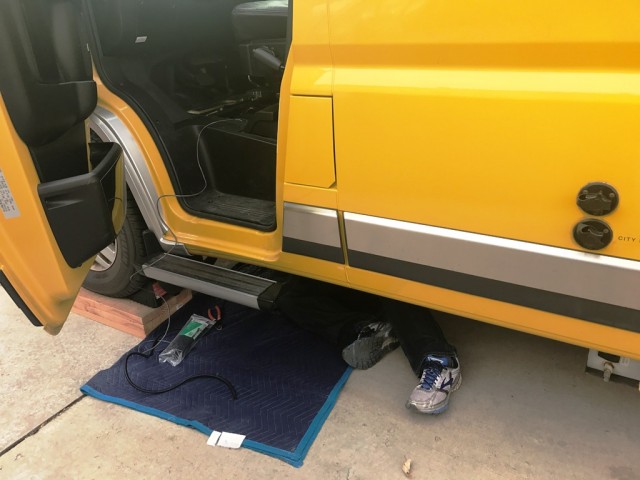
I’ve had a bunch of stuff installed in the van. Air suspension and leveling jacks, among other things. All of these things want to get directly to the battery, so there were plenty of holes in the bottom of the battery box to run a wire through.
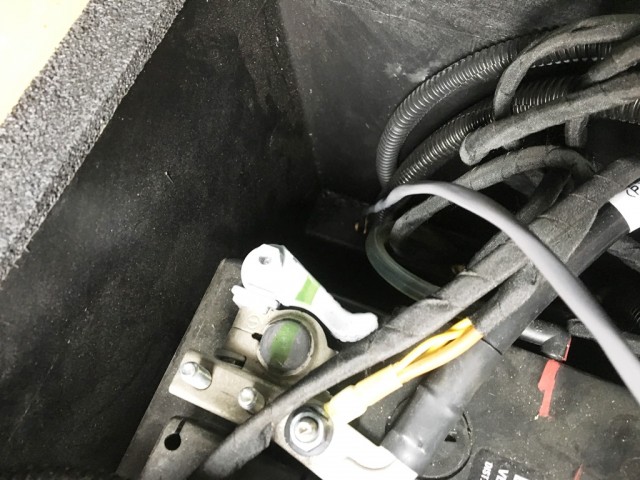
The wire I just ran is the grey one.
The bottom of the box is plastic, so drilling the hole is no big deal if you don’t already have one. Also, note that just outside the battery box, I switched from 16 gauge wire to 18 gauge, 2 conductor wire. You’ll need that second conductor in a bit. Just remember which of them you spliced the wire from the rear door to. This is what it looks like from underneath the van on the bottom of the battery box.
Yes, I did snip that extra bit of zip tie before I finished up.
So now you’ve got a wire from the rear door circuit all the way up into the battery box. You’ve also got an extra wire in the cable. What you need to do is split the casing and fish out that second wire. NOT the one connected to the rear door. When you’ve got that other wire out, cut it, and attach a ring connector to the side of the wire that you’re about to run up into the dash.
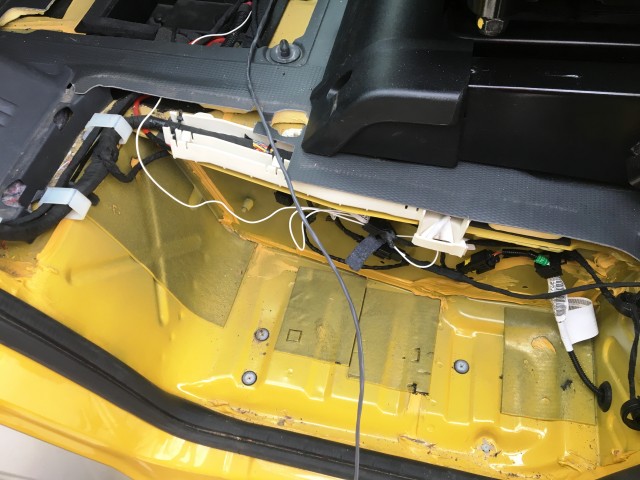
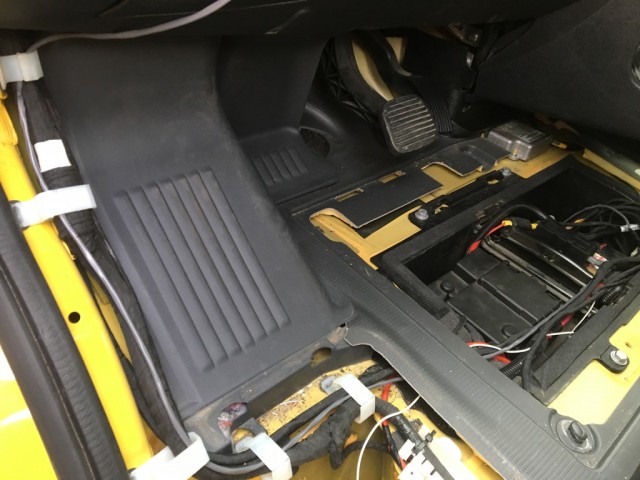
Attach that ring connector the negative terminal of the battery. This is how you are going to ground out the circuit. With that done, you need to get the pair of wires into the dash and attach a switch. You’ll need to remove some trim panels to do this. Like this one in the driver’s side step well. It’s attached with three screws you can see in the step area, and four screws you can’t see because they’re under some plastic tab covers.
Yeesh. While you’ve got the step well out, vacuum in there…
You’ll also need to remove a trim piece at the front bottom of the door opening. Just a few screws holding that one on. With those out of the way, it’s easy to run your wire out of the battery box, along the floor, and up into the dash area along the wheel well. Just thread your wire through the clips that are already there holding other wires. You can see my grey wire in this picture.
If you have some other location in mind for the switch, then do what you need to from this point on. I wanted to put my switch in this little cubby that sits to the left of the steering wheel.
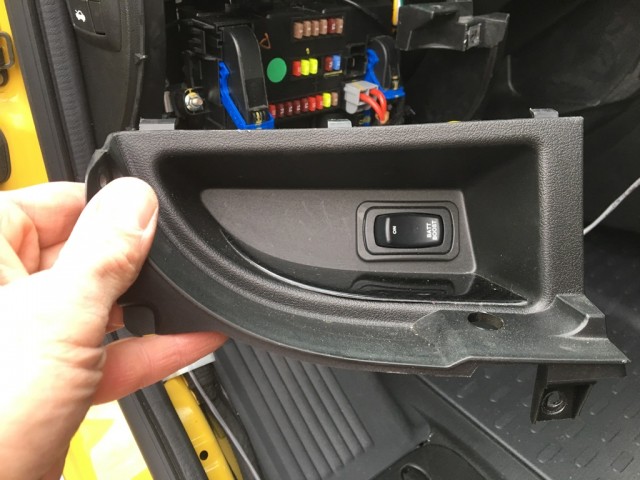
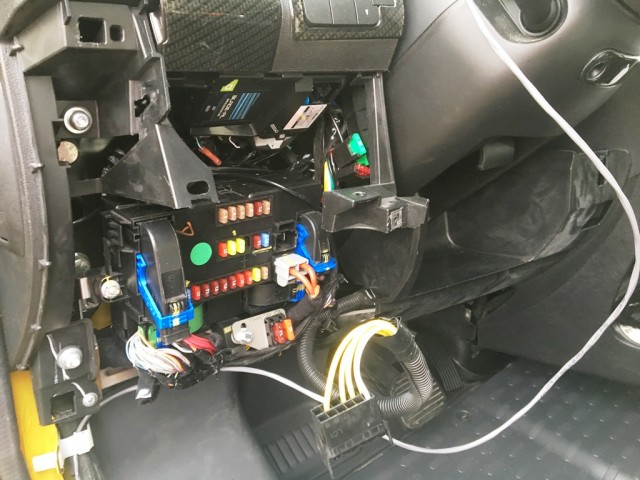
The easiest way to do that was to drop the lower part of the dash. It’s held on with just four screws. Once you’ve removed those, the whole part underneath the steering wheel rotates down and you can remove it. I had also removed the fuse panel cover, but that may not have been necessary. With it out of the way, things look like this.
I actually needed a Torx T-20 screwdriver to remove the final screw holding that cubby on. I don’t know if that screw was factory or not, so just be prepared. With the cubby removed, I could cut the hole for my switch.
The switch I used was just a SPST (Single Pole Single Throw) switch with a couple of quick connects. Any switch will do – all you want to do is complete the circuit. I needed to make an opening ½ inch by 1 inch in the cubby to mount the switch. The plastic is fairly soft, and it will cut with a utility knife, but you need to start somewhere. I started by drilling a half inch hole.
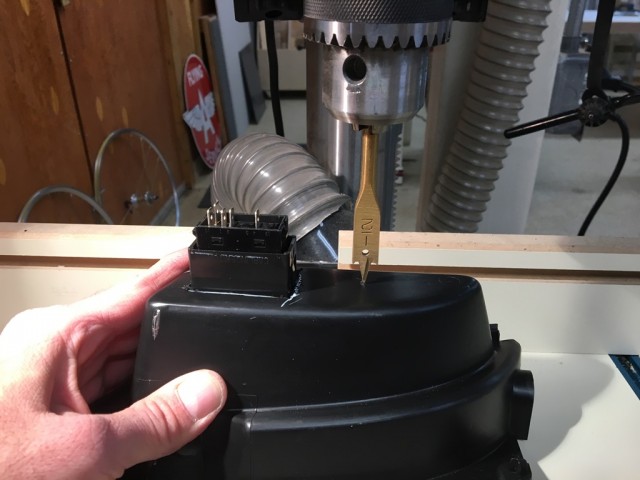
Here’s a pro tip for you. If you ever need to drill a hole into some chintzy plastic like this… ALWAYS USE A SPADE BIT. You’re way less likely to have the drill grab and thrash the workpiece around in your hands. Trust me on this – I have ruined waaaayyy too many pieces of plastic from trying to use just any old bit.
I got the hole drilled, and then finished out my rectangle with a utility knife. If you’re going to use a utility knife, please don’t slice your fingers off! You’ll have to apply a fair amount of pressure, and if your knife slips, it’s not my fault. You’ve been warned. Anyway, when it was all said and done, I got the switch installed and it looked like this
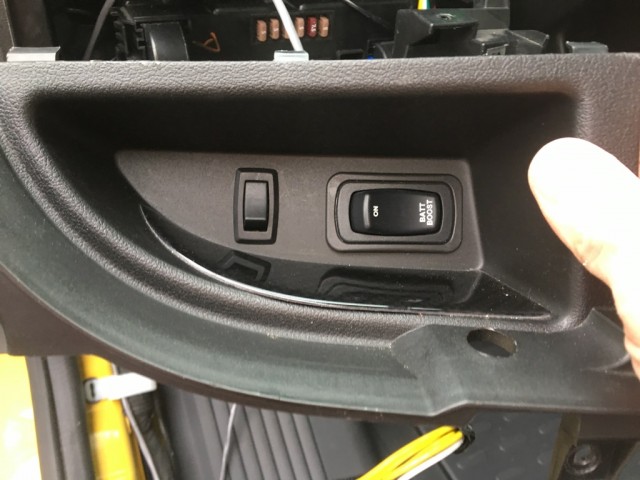
From there, it was just cutting the wire to length and attaching quick connects to the two conductors. Attach those quick connects to the back of the switch. When the switch is closed, it completes the circuit: the wire from the back door is grounded out to your battery, and the lights go on. Test it before you put everything back together.
And with that – you’re done! It works well. The only real drawback to this solution is that while the rear view camera is on via your switch, you’ll get an “open door” light on the dash, and a “Rear Door Open” message in the info center in your instrument cluster. You’ll also get a single chime when you turn it on, and if you slow to a stop. But it’s nothing like leaving a seat belt undone. Because remember, driving around with your rear doors hanging open is no big deal in Fiat’s UConnect land.
Thanks for reading. If you have any questions, you can find me contentedly checking on my bikes while driving.


cant you just tie a switch into the Acc. power wire behind the radio? Power only on with key ON
2020 has a factory switch
I just did this on my 2016 PM. Wiring is still the same for this year. Just look for that white connector, its hidden and attached to the passenger side rear.
Woo Hoo!
Glad to hear that this worked on a model year besides ours.
For those how want to do this hack a little bit easier, the white and blue strip wire goes into the BCM at the green connector pin 35 on my promaster 2500 2014. So i can install a switch very close to the splice.
Good to know!
From the comments here, it seems that they keep updating the programming with each year.
So to anyone who wants to try this… TEST IT OUT ON YOUR VAN before cutting any wires!
You’re right, even if i used the wiring diagram for the year of my van , it was not the same !
Do you need to be moving at a certain minimum speed for the camera to come on if the back door is open? I tried it parked, in gear, and then idling around my cul-de-sac, but the rear view will not activate. Mine is a 2017 Travato (ram 3500) so maybe they’ve changed it. I have not yet made this mod, was trying to verify the camera works with the back doors open before I cut any wires. Thanks
I don’t recall any minimum speed required. I was able to get the camera to come on just sitting still in the driveway.
Sounds like there have been programming changes in the head unit that might make this mod not work for you.
Did someone find where that white/blue wire goes in the dash ?
I spotted 2 wires down the B pillar with that color.
I would like to splice it at a connector
I only opened the dash as much as you see. Perhaps someone else?
Any idea how to get the humidity “fog” out of the camera ? We had a solid 2 weeks of rain and suddenly you can’t see anything but fog when the camera comes on. Possibly know somewhere to get a new / used one ?
We’ve not had that problem with ours, so it’s not something I’ve looked into.
(And we basically live in the desert, so I don’t anticipate too many humidity issues…)
James, really enjoy your site. It certainly helped us to have your detailed review of the 59k before we bought. We’ve had it for almost 2 years now and in spite of a rough start with a water system that had been assembled by a cretin, we really are enjoying the luxury. Our previous 10 years were spent camping out of the back of a Honda Element. We ended up with the diesel which I love. Same fuel economy as the Element! The Element had a hack which enabled the rear view camera at any time. I was hoping one existed for the promaster. You put a lot of effort into the wiring of the rear view camera switch. Have you considered the surround camera systems?
The link didn’t work, so I removed it.
We borrowed an Advanced RV for a while that hat a 360 camera system, and it was awesome.
Never thought much about adding one on Lance. I suppose it might work. Got a few other projects that would be higher up on the list right now though.
The tip newer than this one only shows “Forbidden” …. https://www.thefitrv.com/rv-tips/can-you-use-flushable-wipes-in-the-rv-septic-system/ so let me say that the youtube video is great. I can’t quite place who it is the kid reminds me of. LOL
Oh my goodness! Thank you Greg!
In the classic words of the software developer… “It worked from my machine!”
I’ve corrected the issue, and hopefully, everyone can see it now.
I really hope so, because I put a LOT of work into it!
You will be pleased to know on the 2018 promaster you can select rear view camera on u connect but it times out after about 30 seconds
Well THAT’S good news!
(Maybe they fired the original software designer…)
30 seconds is usually all I bother to look at it anyway. Is the menu option easy to get to? Or is it “buried” 6 menu actions down?
On my 2018 uconnect 5.0 nav, It’s 2 actions: press ‘more’ and then the rear camera is on the first screen that comes up. After the camera times out it returns to the same menu so easy to turn on again if you want.
I have a 2018 59G which is a 2017 PM. I installed the wire to the rear door and grounded the wire to a toggle as suggested and it only lets me turn on the camera once while in drive for a few seconds then it goes off, never will come back on until I put it in park and start over again! Any suggestions anyone?
John, PSL Florida
Hopefully someone with a more recent ProMaster model will chime in. They’ve obviously changed the programming for the rear camera display.
Before the dash gets broken open try this:
https://hackaday.com/2017/02/21/first-look-macchina-m2/
You can now do all the hacking you want and even get all your lights to go on and off with in sync with your radio (cool during X-mas time)!
Oh, and if you want I can forward your questions to the U-Connect team.
Just let me know.
Nice article!
Emile.
ernie bakker,
i would really appreciate your info on getting in touch with the U-connect people to see if they can help my rocket science team figure out how to make my camera stay on while my 2017 ram is in forward motion
thank-you
Hi Emile,
Yes, please ask U connect how we can get the rear camera to work permanently?
Or atleast stay on when the rear door is open without timing out!
John
i have a 2017,i spliced a wire into the white with blue stripe wire , ran that wire to a switch on the dash, the other side of the switch i ran another wire to ground,
the camera comes on with a flip of the switch yay!
in the garage! ,in the driveway, at a stop sign,but when the vehicle is in motion there is no camera. i dont mind the rear door is open message but i want to see behind me while i”m driving . wondering if i got your instructions wrong?maybe they changed the computer from 2015 to 2017? thinking of finding the reverse wire and installing a diode to try to fool the computer, any ideas about all that would be appreciated;
/
Ooooh. That’s a tough one.
Fiat changing the programming between your model year and mine is the best explanation I can offer.
It seems I remember someone somewhere saying that they found a menu option to turn the camera on while they were driving. Did you do a full check of your menus on the UConnect?
Sorry this didn’t work out for you! Let me know if you find a work around so we can post it for others!
thank-you for your reply. ill check my menu but if its there ill be lucky to find it as im from that generation that struggles with the smart phone!!??##%%$$
so i figured it had something to do with the back up lights.i wired a switch into a grey and green wire on the passenger side.but all that does is turn the passenger side backup l;ight on and off. idont want to install another camera and screen i am hopeful that someone smarter than myself has this issue figured out as more than two wires is too complicated for me. car toys wants $300 for some special diode thingy and another $250 to hook it allup. ihave my van back in one piece with everything working as it should.i guess i should be happy and live with it!its too easy to screw something up when you are following someones info from the internet, im going to stop hacking on my new van before i burn somethin up!
Well – sorry I couldn’t be more help.
As we say all the time in software… “it worked on my machine!”
My 2017 Travato’s (Ram 3500) Uconnect appears to have a non-salutary change in its software. It has a menu setting for “camera with rear door open: on/off”. AFAIK with open rear doors, the camera stays on only when the van is in park. You joked your 2015 Ram camera stays on in all gears when the back doors are open and I believe remaining on in drive is the key to your hack. Be careful your van’s character isn’t changed when serviced by a dealer; I read they may provide a free Uconnect upgrade. I failed googling to find evidence of a menu item that would do the trick in a newer van. Dagnabbit. Your mod is so neat. If anyone else has success, please post.
I did a UConnect update once and it completely killed my radio. If a dealer ever updated my UConnect, I’d have their head!
Yes, the camera staying on in drive is key. Without it, the mod won’t work.
Hi James,
I just tried to see if the camera would come on in drive with the back doors open. It would not. It only came on in reverse. I have a 2018 G. Maybe I am missing some important step.
Strange. That’s how I tested mine at first.
I’ve heard there are some programming changes in the UConnect on the 2018. Check deep in the menus and see if there is a way to turn on the camera in the software. That would be a lot easier than what I did!
Yet another thing I could do on my van James. Thanks, I think? The only reason I’m not rushing out to do this right now is that the rear camera and monitor are both a POS. The image is grainy and fuzzy at best, and in low light all but useless. All of our other vehicles have amazingly clear images. I already have a wireless backup camera that I may install as it’s view is much sharper. That said, thanks for yet another great mod discovery!
Apparently the newer ProMasters have this option in the software.
(Guess they got tired of me calling them idiots… 🙂 )
Very impressed. How much to do mine? : )
Considering the number of projects I have in my queue, my rates are pretty steep… 😉
It’s really not that bad though. You could do it!
Nice job, James. Living in the Netherlands, I am lucky to have a German Hymer, and it has standard a Waeco Twin lens camera, and a switch, so it uses the rear view camera in a different way while driving. Switching to backin somewhere it uses the maximum wide anggle camera. Thats also a nice extra feature we like.
Clever mod James. You would think Dodge would offer a switch option or just provide it as a standard feature.
It would certainly have been easier for them to do it than me!
This seems like a lot of effort is needed. One could hope that just a little underdash wiring would be sufficient. Is this approach needed because the camera is only powered during reverse (or when the rear door is open) and all the control is done via the CANbus, so there is no wire to tap under the dash?
Well, in theory, just a few lines of code could turn the camera on…
Running that wire was simpler, in my mind, than a fishing expedition in the dash. A fishing expedition which – as you point out – may have ultimately come up empty.
I love your posts!
Now that you have upgraded your rear camera, are you going to tackle blind spot monitoring?
I noticed that this safety feature is on most sprinters and is becoming almost standard on cars which have much smaller blind spots.
It would be great to see one installed on a promaster.
No plans here for a blind spot came system. That would be pretty involved. Like backup cameras though, I’m thinking it may one day be mandatory.
When I ordered my Sprinter van from Advanced RV, I knew I wanted / needed a full-time rearview camera. And I didn’t want to interrupt the Pioneer head unit screen. Their solution was a separate 5inch LCD screen on my dashboard, to the far left. I also specified the high mount camera, looking down from the roof, as opposed to the license plate mount. If I had bikes on the back, the low mount view would be obstructed.
This configuration, although perhaps a little pricey, has proved to be perfect. I can see directly behind me at all times, even with the rear window curtains up.
The only thing better would be the newer 360 degree system, which uses 4 cameras, one in each quadrant, around the vehicle.
We’ve driven one of the Advanced RVs with the seamless 360 camera system!
OMG! I WANT ONE! It’s SO cool.
When I saw the screen in the rig, I thought it was silly fluff. Until I drove with it. Pure awesome.
A rear view mirror is pretty much useless on a RV. When I drive my car I glance at my mirror often – more than side mirrors. Since not all of us drive trucks for a living, you would think RV manufacturers would include a rear view camera screen in place of the useless mirror. This would be IN ADDITION to the now standard back-up camera. As you point out – the wiring is already in place!
Both wired and wireless rear view cameras (with viewscreen) are available at RV and truck accessory stores. Heck, you could even use an old smartphone for a viewscreen – it even has wireless already built in.
Now that you can see what is right behind you, I wonder if you will add a long distance 2nd camera to more closely mimic the function of a rear view mirror.
Thanks for all your detailed RV analysis & engineering solutions. You make it fun.
I’ve gotten pretty good at using the side mirrors for things that are further back. By the time something is out of range of the rear view camera (or backup camera, or whatever we want to call it), I can typically see it through the side mirrors. I don’t think I’ll be adding a second camera. But you never know!
Wow your wry ironic sense of humor in this post had me laughing so loudly that I may be in trouble for waking up my wife upstairs! Seriously, great article (as always) and thanks for sharing (as always). I do have mine set for the 10 second delay after shifting out of reverse (took a while before I even discovered that option). But I haven’t yet gotten the nerve to do a quick (very quick) shift in and out of R while cruising down the road to turn the camera on for 10 seconds. Not that I probably ever will be foolhardy enough to try it, but I assume a modern electronically controlled transaxle would “disregard” that command anyway.
Actually now that I think about it, I wonder if the circuit that lets the camera know you are in reverse is a simple wire coming out of the shifter? If that were the case, and if it were accessible, it might be an even easier mod because the wire might be under the dash already. But I’m guessing you probably already thought of this…
Side note: The existing camera is really a “backup” camera and not a rear view mirror replacement, because of the angle that it is pointed at. IIRC the Trend has both a backup camera and a true rear view camera, but that was never quite clear to me from the model descriptions. One of the things I do love about the Travato is that it does have an actual partial view out the rear windows with the exiting mirror.
Thanks again, you and Stef do very interesting, informative and entertaining work on TheFitRV website, and it was really that which initially started us on the path toward Travato ownership.
Glad you liked the post! And glad we helped nudge you into RV ownership. 🙂
Back in the olden days, things were wired a lot more simply, and there may have been a “reverse wire” or something you could have looked to. But these days, “reverse” is likely just a signal in a circuit board somewhere. That’s another reason I went back to the door for the signal instead of hunting under the dash. Since a door is a physical thing – I knew there had to be a mechanical switch of some sort in there.
Genius! “It’s not even that hard” LOL, relative to you, yes.
Figuring it out was hard, but doing it actually wasn’t too bad. I bet you could handle it!
I LOVE that picture “Not hard. But maybe a bit tedious”!
That should be the cover and title of your next how to mod a class B book!!!!!!
Sorry we missed you at Pomona. The weekend you were there was just too hot for us beach kids!
Happy Trails,
Andy & Kim
We were looking for you at Pomona. But we totally understand – it was a billion degrees outside.
Stef keeps telling me I should write a book…
How did the door open indication get to the front dash to begin with? Could you have found that wire and spliced a switched ground connection?
Well, maybe I could have found the wire… if I wanted to tear apart the dash and look through the hundreds of wires for the other end of that one.
It didn’t seem a time-effective option. I was able to run wiring from the back to the front in a few hours. Plus, I had to get to a suitable ground anyway, and I knew the battery box would be a good entry point.
Hi James,
Guess I didn’t think of finding the wire using the brut-force gorilla method.
Ten minutes on the interweb reveled the wire located in the pillar.
Now I’m going to apply what you have done here and attempt to add a switch to my car.
Good Luck!
Hi James,
That’s a creative solution!
You can also activate this feature by installing any current Pioneer CarPlay capable head unit with a iDatalink Maestro ADS-MRR Interface Module. Just select “Rear View Camera” from the “AV” settings and you’re watching where you’ve been. You also keep all of the standard Uconnect features and gain some new ones.
Bob
Yes, replacing the head unit would certainly work.
We had a Kenwood head unit in our last RV, and we could turn on the rear view at will.
I was trying to avoid replacing the UConnect (and thereby losing our Sirius/XM subscription).
Our Winnebago Era has a rear view camera that you can turn on and off manually. Must not be illegal.
I didn’t think so!
From past experience with a “Rear View Safety” camera I installed on my travel trailer, I seem to remember reading a disclaimers that viewing the camera image in forward motion might be illegal in certain states. So I may assume the “idiot” at Fiat was probably following the rules or guidelines and may not have had much say in the matter. As a person who works with development teams for user interfaces in the power sports industry, I can tell you from first hand experience that it is a real pain in the butt (LOL) to comply with all 50 state laws as well as well as the international market.
That being said, you know I like to bug you about my Safari Condo features, SINCE YOU CAN’T BUY ONE IN THE USA…HaHa. I have a standard feature company installed switch on the dash that permits me to view the rear view camera in forward motion. I don’t know how they do it, but no door switch light stays on.
We’re not installing a screen that’s not already there, nor displaying anything on the screen that it doesn’t already display. I don’t know about in Canada, but the screens in the US will display the rear view camera for 10 seconds or so after you’re moving forward anyway. That’s enough time to get up to 60 mph or more.
You can find a summary of laws here: http://drivinglaws.aaa.com/tag/telematics/. I didn’t find anything in that list that would prohibit a safety camera. Most of the laws provide an exception such as “This does not apply to closed-circuit television receiving equipment exclusively for safety and maneuvering purposes.” Considering that, and that there are similar camera systems that are sold and installed in all 50 states without restriction (including some that Winnebago includes as standard equipment on some models), if it is a restriction handed down from their legal department, I’d say FCA needs to stop staffing their department with junior level paralegals.
Of course, none of this changes the fact that I’m jealous of your switch. 😉
I wonder if they would give me the details if I called them up? It would be nice to get rid of the door light.
Totally in agreement with you that it is mostly legal posturing on the part of FCA (to be polite …LOL). I sent an email to my local Safari Condo dealer asking him details. He’s a fellow enginneer from my alma mater, so I hope I made him curious. Worst case, I’ll contact the QA manager I met at the plant when I visited them building my RV.
I may have a partial answer, that wont help you. The typical Safari Condo setup does not have a Uconnect screen, but instead uses a Pioneer AV system and screen. In theory, I could have had the Uconnect if I had wanted it, but would the switch functionality have been available in that case? I’ll send you details when I get an answer.
Ahhh. Well, with a new head unit, the sky is the limit!
I really got nothing to say other than LOL!
Right?!? If any ProMaster engineers find this article (fingers crossed they don’t) I’d like to officially say the viewpoints shared within this article are those solely of the author himself and not of his website’s co-owner!!!
I know that “open door” light is going to bug James into eventually taking apart he whole dashboard. I think the “Stef” solution will be to cover the light with a small piece of black electrical tape when he isn’t looking.
Oh Ted, you get me! The “Stef RV Toolbox” pretty much has two things. 1) Electrical tape, and 2) Duct tape. What else does one need in life?