This post may contain affiliate links.
We really enjoy the great outdoors when there aren’t crowds around. For a lot of places like National Parks, that pretty much narrows things down to the winter, and that’s OK with us. Wintertime RVing is peaceful and quiet. So when we were looking for a new RV, Stef and I made a big deal about having the ability to RV in the winter. Not just drive the RV in the winter, but to have actual full use of the RV in the winter. There’s a big difference.
Well, we’ve had our Travato, Lance, for several months now. Winnebago did some things for us to make him more winter-friendly right out of the gate. And just by my own nature, I had to tinker with things even further. We recently went on a winter shakedown cruise of sorts, and so I thought I’d take this opportunity to share all of the things I’ve done to Lance (so far), and then let you know how those modifications worked.
There’s a lot to tell, so go get yourself a (warm) beverage and settle in…
Things Winnebago Did For Us
Any time I talk about these things, I have to remind people that our RV was a one-off experiment, for Winnebago and for us. They’ve not committed to make these modifications available on future Travatos, so please don’t start demanding them from your dealer. It was really just Winnebago and us wanting to see if it could be done. That said, here’s what they did for us in the winter-RVing department:
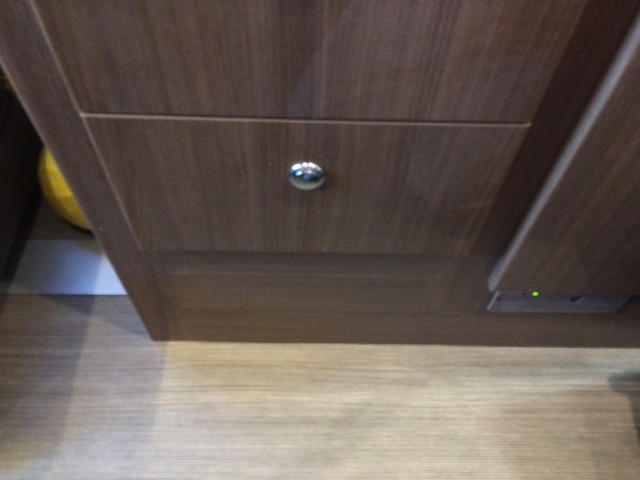
- The Fresh Water Tank – this is actually standard on the Travato 59G, but it’s such a big deal that I thought I’d call it out. The fresh water tank is inside the heated space of the van. This is so important, that I wouldn’t have considered making the rest of the modifications if this one thing wasn’t in place. With the tank inside, if it’s warm enough for you, it’s warm enough to keep the water from freezing, and you don’t have to do anything extra to get that benefit.
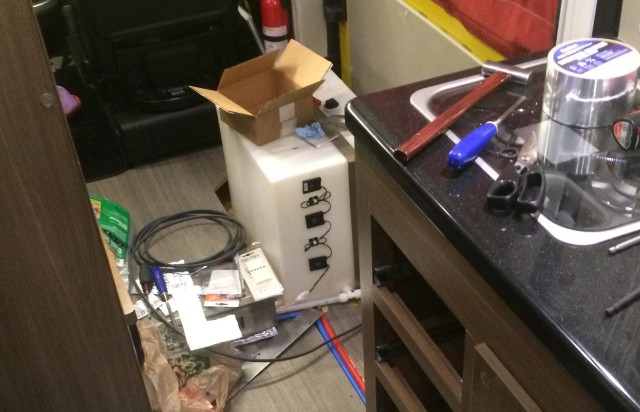
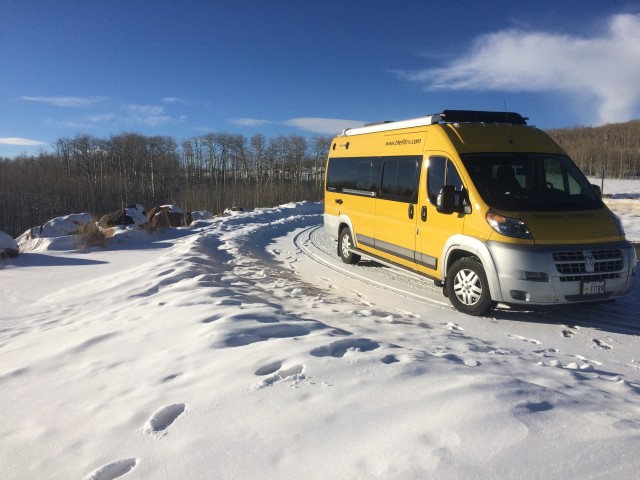
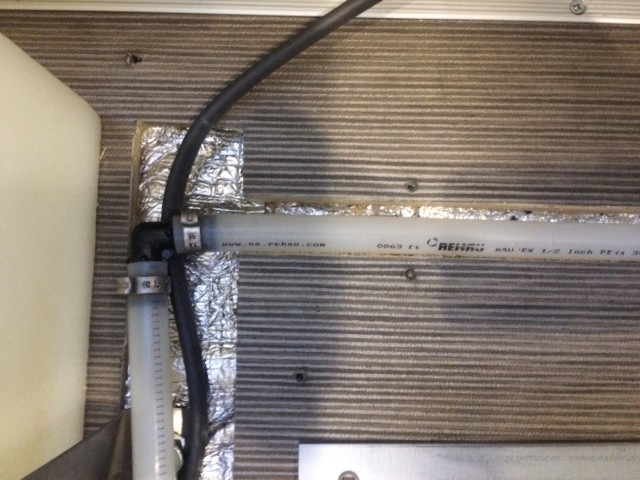
This is what our Travato looks like when I’m having fun. You can see the fresh water tank, and also some of the water lines running through the floor.
- The water lines are inside the heated space. This was the most major (and time consuming, I suspect) mod for them to make. In order to use the water system in winter, the lines need to be kept from freezing. This is a lot easier to do – and a lot less expensive from an energy management perspective – if those lines are on the inside of the van.
- There are tank heaters on the grey and black tanks, on the macerator pump that drains the grey tank, and on some key junctions in the waste water system. These can keep the contents from freezing, but they’re fairly expensive (in Amps) to run. When they’re on, they consume about 10 Amps of 12 volt electricity.
I already know what I’m looking at, but I tried to label it. The tank heater pads on the grey tank, and the macerator pump housing.
- The Seitz window. There is one window up in the “penthouse” area where we sleep. We’re fortunate that Winnebago provided us a double-paned acrylic window (by Seitz) in that space. This is more important than you think, because I’m sleeping basically right up against it. If it was too cold, I’d have a very hard time sleeping. A while back when I examined our Travato with an infrared camera, it was extremely obvious that this Seitz window was superior to the standard single pane glass windows when it came to keeping hot and cold areas separate.
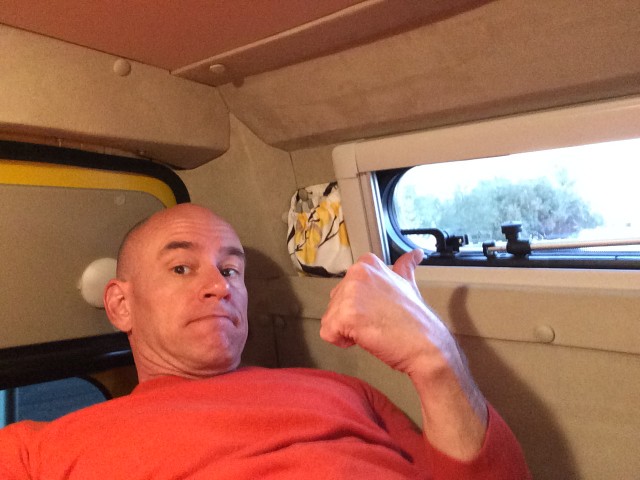
This is pretty much exactly where I sleep. I think it’s also the only “selfie” I’ve ever taken without Stef forcing me to.
- The Composting Toilet – Yes. The toilet. Winnebago installed an Airhead Composting Toilet in our RV. And while we have a love/hate relationship with the toilet, it was a key component in our winter RVing strategy. Why? Because it takes no water. Even if all the water lines in the RV froze and the pump exploded, we could still use the toilet. When it’s zero degrees in the middle of the night, and most of the campground facilities are closed anyway, having a functional toilet is a big deal! And in addition to the fail-safe nature of the composting toilet, there was the added bonus that there are no water lines running to or from it to worry about.
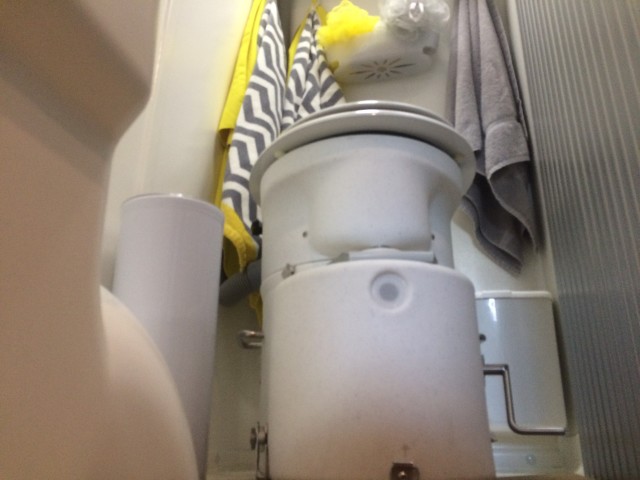
I tried to make it look impressive in this picture, but it’s really just a bucket of poo.
And that’s where Winnebago got us. It was a good start. But as I got to know Lance, and started tinkering and taking things apart, I thought I could do even more.
Further Modifications I Made
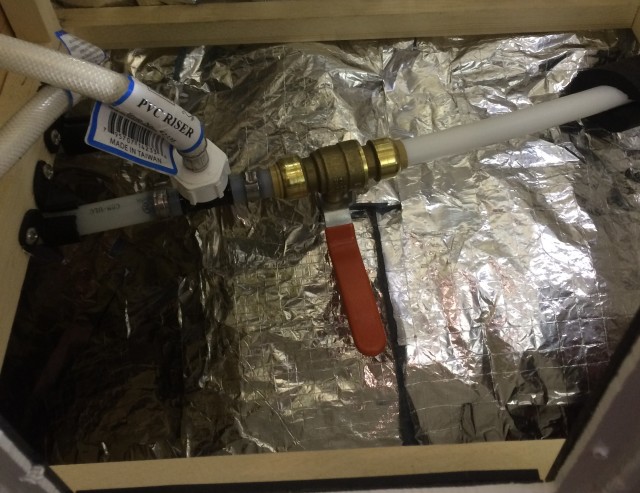
1.I Installed shut-off valves for the external fill ports.
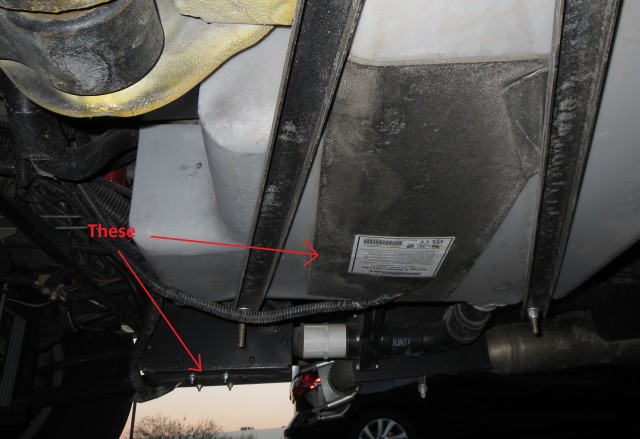
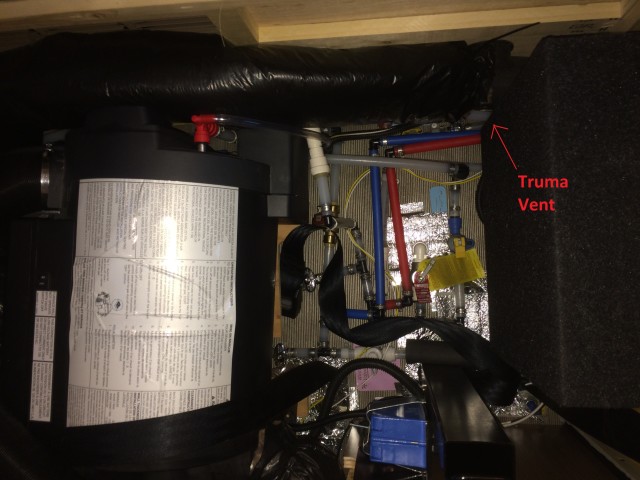
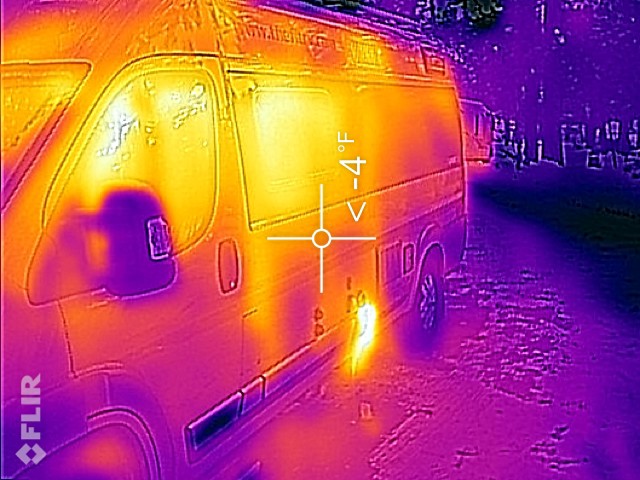
Have a look at the picture below. It’s the side of our Travato at something-below-zero. Those two ports I’m pointing at are the tank fill and city water inlet ports. When you look at this picture, it’s rather obvious you don’t want any water there in the winter. So I installed shutoff valves for each of them. (You shouldn’t be using these ports in the winter anyway.)
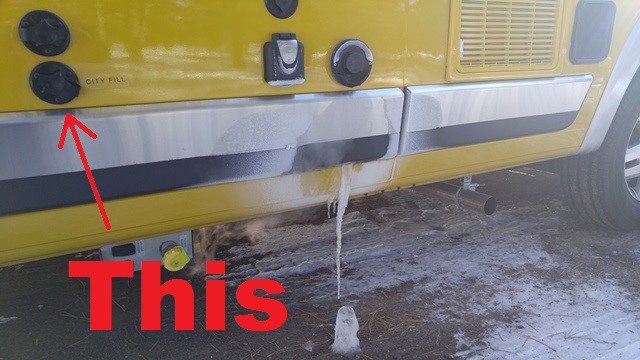
Besides the labeled water ports, check out the Truma! It’s a condensing furnace. It’s OK – as long as the ice doesn’t block those vents.
This was pretty simple to do. Both of these lines enter the van and run underneath the dinette seat where they join into the water system. I cut out small sections of both of these lines a foot or more inside the body of the van. I then installed Shark Bite (push to connect) ball valves in each of them. So now, when winter rolls around, I purge those lines once and shut the valves. Water doesn’t get within a foot of those ports until I open the valves again in Spring.
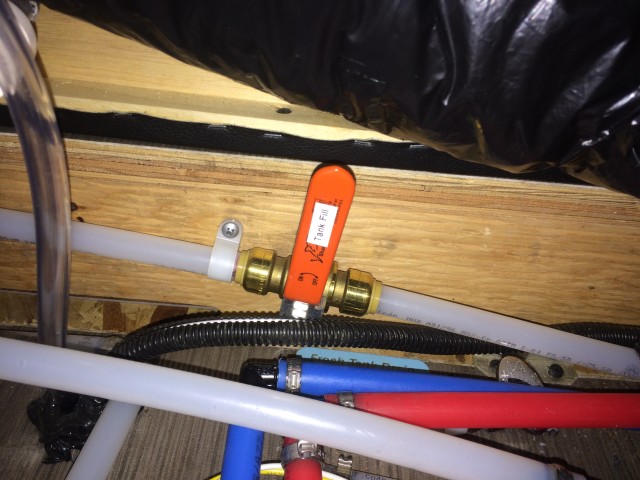
This is the ball valve that shuts off the tank fill port on the outside. Yes, I have a label maker and it brings me inner peace to use it.
2. I Installed a shut off for the rear hose.
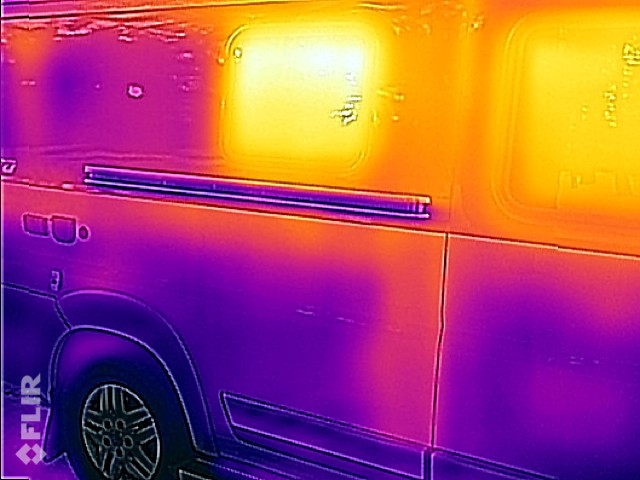
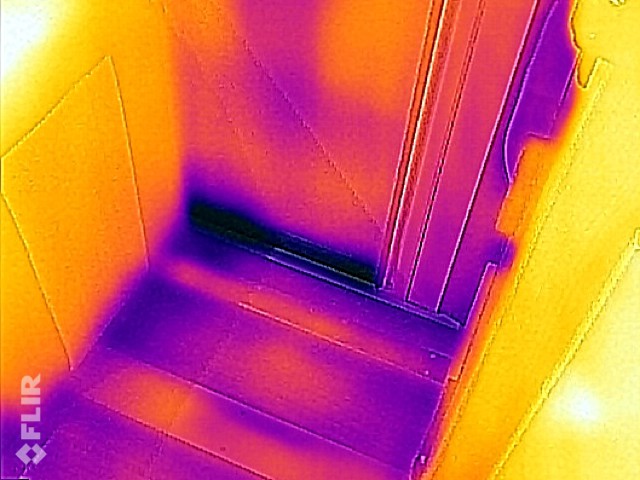
When I took those infrared pictures of our Travato, one of the coldest spots I found was about thigh-high, along the outside wall of the bathroom. This is also the area that the water line for the exterior hose runs through. We rarely use that exterior hose in the summer, and we certainly won’t be using it in the winter.
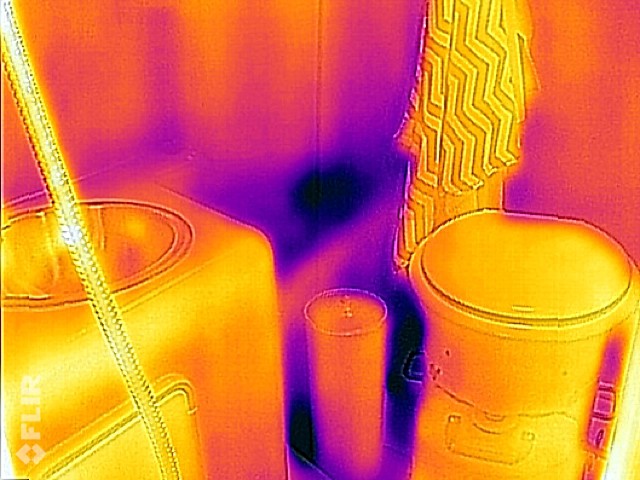
Dark purple = really cold!
To me, this spelled trouble, so I wanted to install a cutoff for it as well. But to do this, I had to open up the bathroom cabinet. Once I got access to the line, I installed another Shark Bite quarter-turn ball valve. This is another one that I purge once in the fall, and then won’t use again until Spring (if I even do that).
Shutoff valve for the exterior hose installed behind the bathroom cubby holes. Valve is in the off position for winter. With sufficient determination and pain, I CAN reach it from under the galley without removing the bathroom cubbies again.
3. I re-routed some plumbing lines of my own.
Yep. Not fun or easy, but I did it. Some of the plumbing lines – particularly those under the galley and those leading to the bathroom – were pressed pretty closely to the metal skin of the van. That metal skin would act like a giant superconductor of cold, and would suck the heat right out of anything it touched. I reasoned I needed to move these further to the interior of the van. This involved cutting sections out of perfectly good lines (scary!) and moving them around a bit and then reassembling (with a lot more Shark Bite fittings).
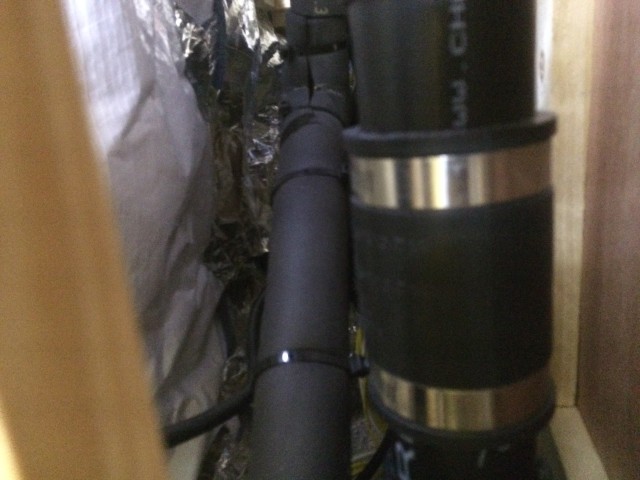
It’s tough to get a camera back there, but the water lines you see (insulated) in this picture used to be up against the outer skin of the van.
Like I said, this wasn’t fun or easy, but when I was done, all the water lines were at least 6 inches inside the heated space, and none of them were touching the skin of the van anywhere.
4. Insulation – I went nuts.
This is something I obviously couldn’t do to the entire van without disassembling it (no thanks). But anywhere I could, I added extra insulation to any bare metal surface I found. I opened every cabinet, removed every drawer, and even removed a few panels they probably didn’t intend for me to remove. If you’ve seen my post on insulating the doors, you probably know the drill here.
Another cabinet that’s hard to photograph. It’s aft of the refrigerator. You can see all the insulation and some of the cables running to and from the inverter.
First, I installed a layer of acoustic damping material (Fatmat). This stuff also has some limited thermal insulating properties, but not much. Then, after that, I installed a foil backed denim insulation material, with the foil side facing the heated space. I installed as much of this as I could, and tried as best as I could to foil tape the seams. In some places, I also installed some foil backed closed cell foam as well (basically, places where there wasn’t room to allow the denim any “loft”).
Tangent Alert!
One product I did NOT use – and one that you’ll hear just about every other RVer say they DO use – is Reflectix. If you don’t know what it is, it’s basically bubble wrap between two layers of tin foil. The very small air space in the film doesn’t count for much, and so most of the claimed R-value for this stuff is from its effect as a radiant barrier. Well, even the Federal Government knows that, in order to be effective, the reflective surface of a radiant barrier must face an air space. Yet time after time, if you search for “RV Insulation”, you’ll find people using this Reflectix stuff in direct contact with other surfaces (usually up against glass). Money wasted. And besides that, radiant barriers work better in hot climates than cold anyway – and cold is what I’m worried about.
I’m sure I’m going to get lots of comments about the Reflectix because RVers seem to love it so much. That’s fine. Use it if you want to. Most reputable insulation contractors have stopped using the stuff. And I haven’t heard of any RV manufacturer actually using Reflectix either. That told me something, and so I didn’t use it. Anywhere.
But back on task…
In addition to insulating the spaces and metal walls themselves, I also added insulation to the pipes. Even if the cabinets do get below freezing, the pipe insulation would provide some added protection. This was just standard home center stuff.
I even insulated the lines running to and from the water filter.
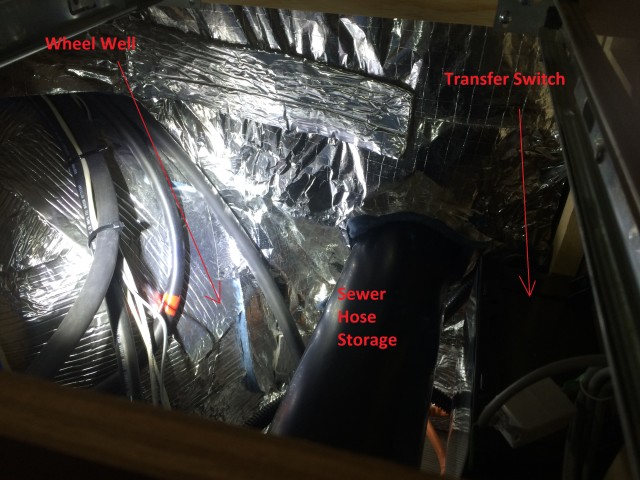
5. I modified the Truma venting.
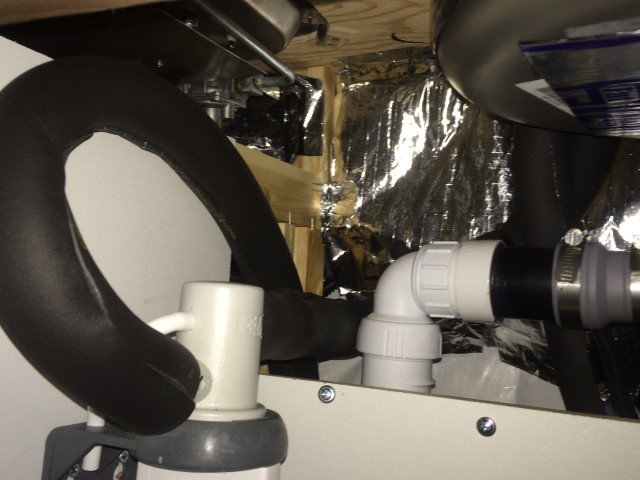
Our Travato has a Truma Combi heating system. It distributes warm air through three vents. One of these vents is on the underside of the dinette seat. This is convenient, because there are a lot of water lines closed up in that space. To wit:
All of these lines needed to be protected.
I need to keep those water lines above freezing. Yes, they’re inside, but they’re right on the floor, and there’s a big bit of exterior wall just on the other side of the Truma boiler. This cabinet can get cold when it’s closed up in the winter.
One solution was to run heating cable along all those lines. I could certainly have done that, but it would have been difficult, expensive, and would actually take quite a bit of electricity to keep them running. (I still have the standard batteries, so my electric “budget” is only about 100 Amp-hours a night.) So my thinking here was to try to use passive heating wherever possible. This is why it was so fortuitous to have a Truma vent in the same cabinet.
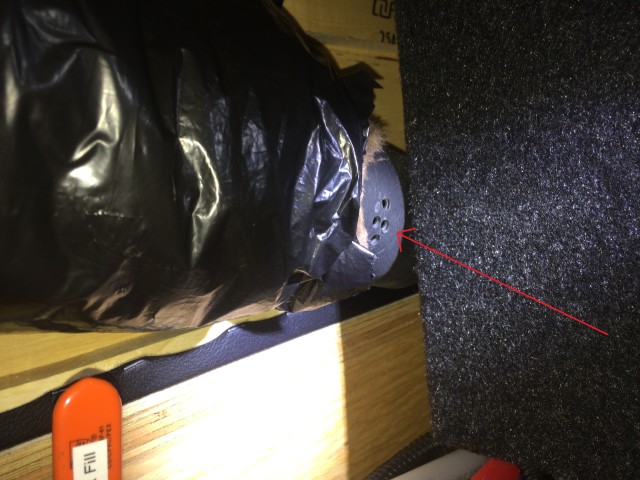
Hopefully these holes will do the trick.
Don’t tell the engineers at Truma, but I simply drilled four, ¼ inch holes in the back side of that Truma vent. (The one for the heated air – NOT the one for the combustion air intake/exhaust!) With the Truma running, this leaks just a little bit of warm air into this cabinet. I don’t need a lot, just enough to keep it at 33 degrees or better. Hopefully, this would do the trick.
6. I installed a vent in the raised floor.
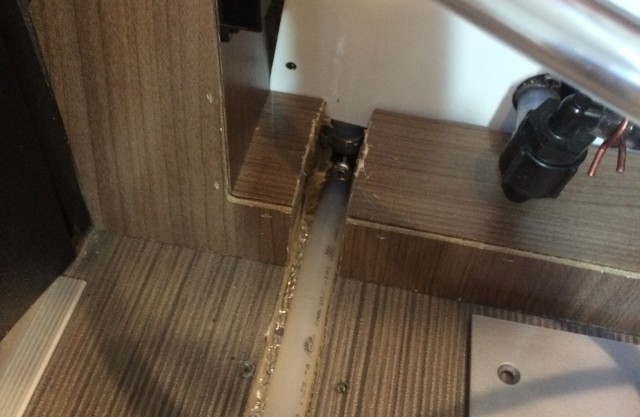
This is a continuation of the “passive heating” line of thinking. In our Travato, there are water lines that run right through the raised area of the floor near the cab. These are not in a heated space, so I needed to get some heat to them. I elected to do this by cutting a 2 inch by 10 inch hole in the step, and placing a vent cover on it. There’s no powered ventilation at work here, I’m just allowing enough air mixing to occur to keep the interior of that space above 33 degrees.
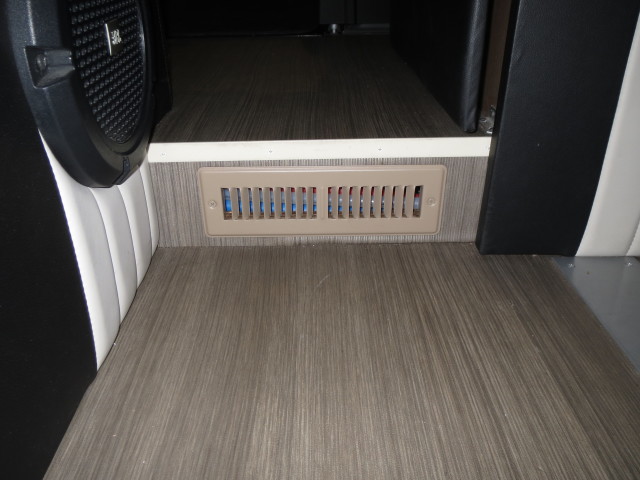
The venting I added to the step-up. You can actually see the water lines behind it in this lighting, but you can’t see them if you’re standing normally in the RV.
This sounded like an easy enough idea, but it wasn’t so easy to implement. First, I had to seal off that space on the back side. I don’t want to heat the whole underneath of the step – just the little bit where the water lines are. So I cut some wood blocking, and then installed some insulation along the channel where the water pipes are. But cutting that hole was difficult! I was cutting blind into an area where I knew there were water lines. Obviously, I didn’t want to cut or nick the water lines.
So I did this by hand with a three inch saw blade.
For two hours.
Watching my progress on the inside with a camera scope.
It was very uncomfortable.
But I got it done. It looks pretty good (once I dyed the cut to approximate the flooring color).
7. I installed heat tape.
This was probably the hardest part of the whole process. There are two channels in our floor where water lines run across the sliding door opening/walkway. But when I did my initial cold weather /infrared evaluation, these channels and their covers were some of the coldest parts of the van. I couldn’t leave water lines there and expect them to not freeze.
Basically, these channels were just grooves cut in the plywood subfloor, and the lines were laid down in them. But the lines were lying directly on the metal skin of the van. The “super conductor of cold” metal skin of the van. Not good. So the first thing I did was to get some insulation between them and the metal floor of the van. For this, I used some of the reflective backed closed-cell foam. I didn’t really care about the reflective bit here, I just needed something that I could squeeze in that space that would still have some insulating value when compressed. This stuff seemed to fit the bill.
The water lines now rest on a bed of insulation instead of the bare metal floor of the van.
But when I added the insulation, it actually took up a lot of the free space in the channels. The heat tape wouldn’t fit! So I had to actually widen the channels. I did this using a Fein multi tool and a plunge cut blade and every ounce of patience I could muster. Several hours later – wider channels.
In addition to widening this channel, I had to create an opening in the bottom of the antifreeze pickup compartment.
The heat tape I purchased came from OEM Heaters. It’s a lot thicker than you realize when you buy it. Especially when you are trying to cram it into narrow openings and bend it around corners. It doesn’t much like that. We had words, the heat tape and I, and it tried to slice my index finger off, but I’m happy to report that it eventually saw things my way. I got the tape laid down, and was ready to get power to it.
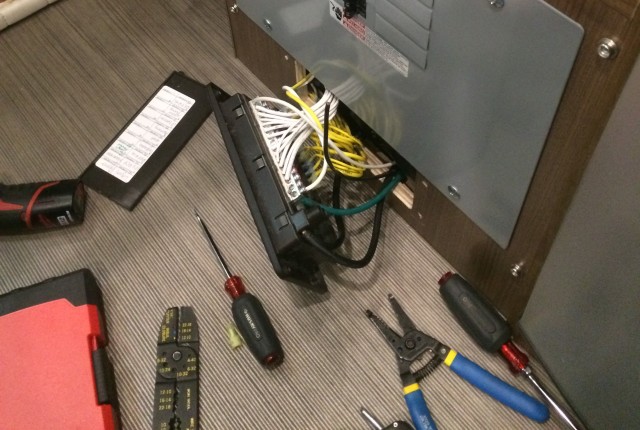
It might look a mess, but adding circuits to the Travato fuse panel is actually pretty straightforward.
This stuff claims to use 3.5 watts per foot, at 50 degrees. I had purchased 15 feet, but I only used 6. Even so, just to be safe, I sized everything for 20 amps. Our rig does not have awning lights, so that switch location was just covered with a plug. I bought an appropriate 20 amp switch that would fit in the panel. That was easy. I had to run power all the way from the fuse panel under the refrigerator and pantry, through the dinette seat, through the raised floor, through the channel, and up into the galley for the switch, but that was more time consuming and annoying than actually difficult. Anyway, when all was said and done, I got it wired up, turned it on, and…

Here you can see the water lines in their channels, the heat tape running between or beside them, and the white and black power wires coming in as well. It was a tight fit, but I got it all in there.
I was actually underwhelmed. The heat tape was only drawing about 1.5 Amps when the RV is at a livable temperature. Yet, it seemed to be working. I didn’t completely trust it, but I wasn’t about to tear it out either. It would have to do.
8. I installed vent covers!
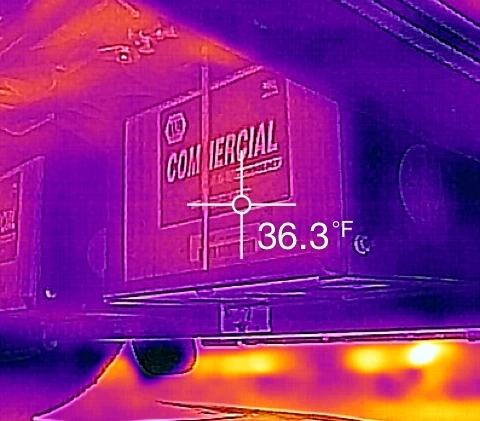
Another thing I noticed from my IR pictures was that the Maxx Air fan was letting out a lot of heat (or letting in a lot of cold, as in this picture). I knew the Truma could keep up, but why waste energy, right?
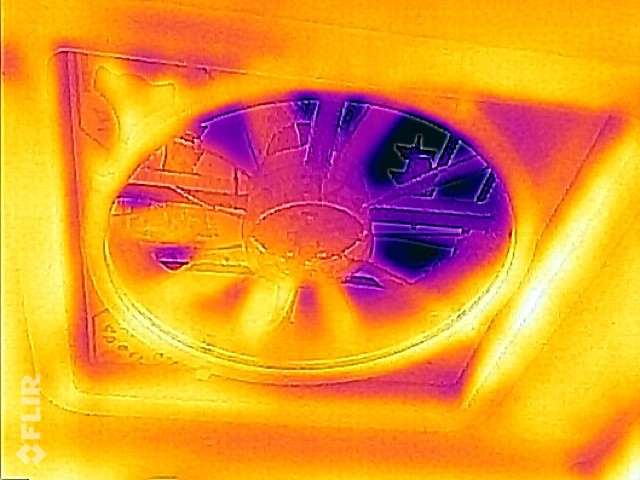
Remember, the dark colors = cold. The plastic cover on the Maxx Air doesn’t provide much in the way of insulation.
I had remembered seeing an ingenious cover for the Maxx Air fans in an Advanced-RV. I called them up and ordered one, and now I have an insulated fan cover of my own.
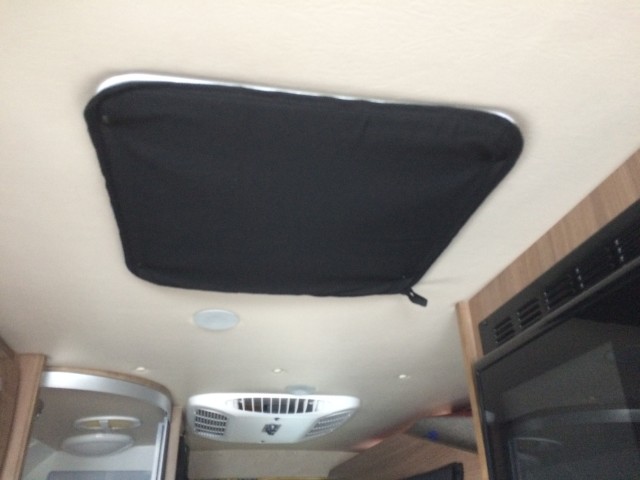
This vent cover solution is so obvious once you see it!
This is so smart I wonder why Maxx Air doesn’t sell them as an accessory. It’s that perfect. You simply replace the mounting screws on the Maxx Air internal cover plate with snaps, and the cover snaps in place. Brilliant!
And, from the “every little bit helps” department, I hacked together this for the bathroom vent as well. Scissors, foam, and 2 minutes.
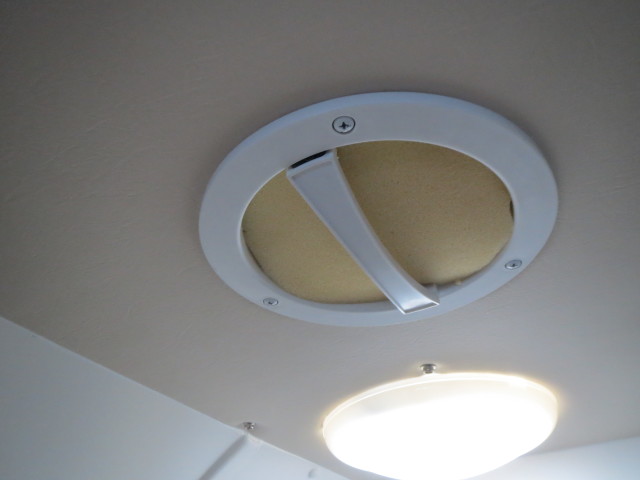
Not as pretty, but hopefully just as effective.
9. I insulated the shower drain.
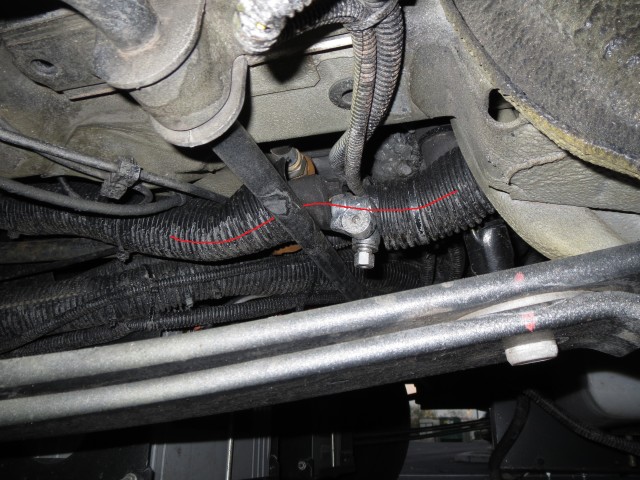
This is the only water line that runs outside. It punches straight down out of the shower drain, then forward about two feet, then back up to the pump underneath the sink. Initially, I couldn’t think of any way to get this inside the heated space. (Maybe I wasn’t thinking hard enough?)
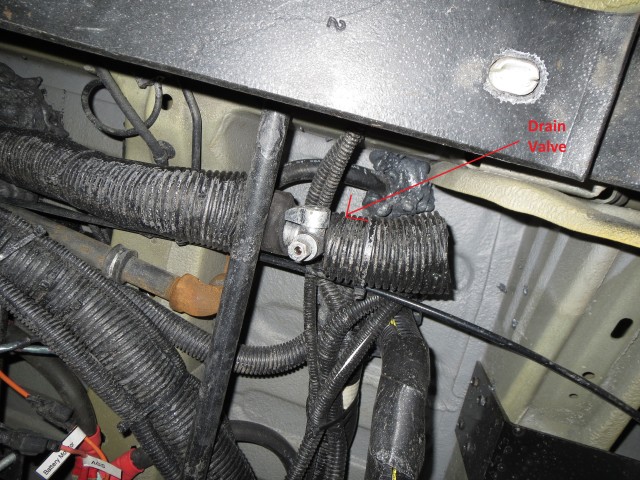
This is the end of the line that’s right where it goes up into the galley cabinet.
I didn’t really want to run heat tape to this line either, as it would involve drilling holes in the floor of the van. So I kind of took it easy on this one. Here’s what I did.
I cut a small section out of the line, and installed a (Shark bite) drain valve inline. My thinking was that after showering, we could run antifreeze through the line (note to self: Bring antifreeze and funnel). And then, after sucking as much of the antifreeze through the pump as we could, I could drain the line of anything left. (If there’s nothing there, it can’t freeze, right?) In tests in the driveway, this led to about a tablespoon of liquid being drained from the line.
Then, I insulated the line and valve, and put some protective tubing around it. I was fully aware of the double-edged sword the insulation might prove to be. What I mean is, insulation can help keep lines from freezing – but if they do freeze, it also helps keep them from warming back up! But my thinking was – with NOTHING in the line, I don’t care how cold it gets – it shouldn’t freeze. And any shower would be with (hopefully) warm water that wouldn’t be in the line long enough to freeze.
So that was all the physical modifications to the RV. In addition to those mods, there were also a couple procedures that we needed to follow to keep things working in the winter.
Winter Operational Procedures
- The heat tape would be left on any time the outside temperature was below freezing. At only one to two amps, I figure we can handle that kind of draw.
- The Truma thermostat is to be set no lower than 62 degrees during the day.
- At night, when it starts getting really cold, the thermostat would be set to 68 degrees. I can probably reduce this somewhat in the future, but until I had some experience with the setup, I didn’t want to take chances just yet.
- As mentioned earlier, after taking a shower, purge the shower line with antifreeze through a funnel. When all that is sucked out, someone has to go outside, crawl under the van, and drain the line. Stef was not too enthused about this, so I figured it would be me.
- At 10 Amps, the tank heaters were a larger draw. We would leave these off when dry camping. But they could be on in freezing temperatures when either driving, or camping with hookups. Fortunately, our waste tanks fill very slowly. Since we have the composting toilet, the black tank only fills if we take showers. And the grey tank only fills from hand and dish washing.
- When draining the tanks in cold weather, run antifreeze through each tank and its pump until you could verify antifreeze at the dump site. This also had the effect of “seeding” the tanks with antifreeze.
And having thought all that through as best as I could, it was time for a test…
Winter Camping: Go Big or Go Home!
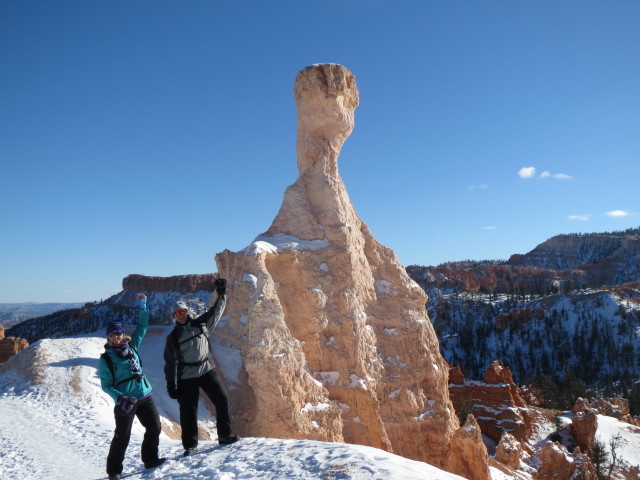
Night 1 – Bryce
Bryce Canyon National Park, in southern Utah, sits at over 8000 feet, and is known for its fantastic winter scenery. It’s also known for being really cold, and the week after Christmas, it was supposed to get down to 13 below zero…
Perfect! Let’s go!
And Stef agreed. So during our week plus RV trip, we decided to stay at least one night at Bryce. The campground there has no hookups, so there was no safety net – we were unplugged and dry camping. The weather channel said it was supposed to get to -13 (Fahrenheit), and that’s realistically, as cold as I’d ever really want to go RVing. (We don’t mind RVing in the cold, but we want to be able to exit the RV as well…) Really, I was hoping for something more like zero or single digits, but -13 was what I got, so that would have to do. We got our indoor/outdoor thermometer, and a couple of data logging temperature probes and headed out to the campground for a night of hopefully not freezing ourselves silly.
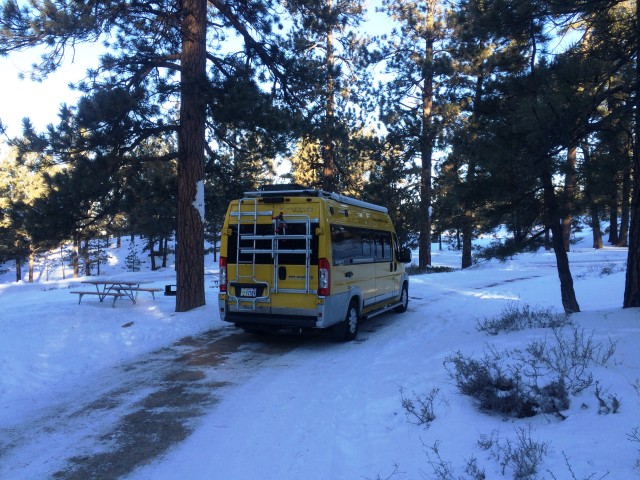
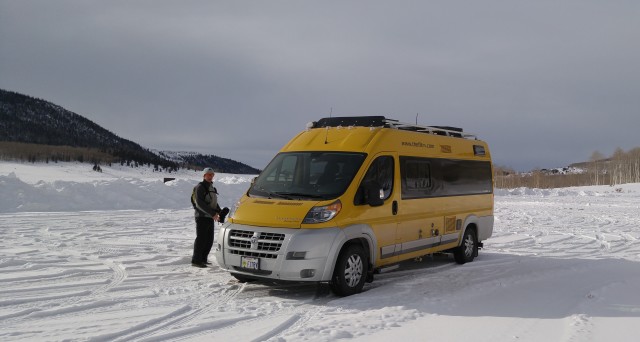
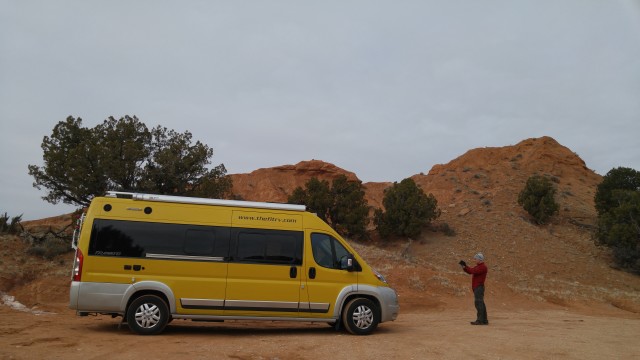
Here’s Lance, settled in among the pines for his first sub-zero camping experience.
And it mostly worked.
The very first thing I did when I got up was to turn on the water. Success! Both hot and cold water were running after all night in well-below-zero temperatures. Our outdoor thermometer was reading -6 here, but it was just sitting on the running board and probably picking up heat from the van. Weather.com gave us a -13, so that’s what we’re going with.
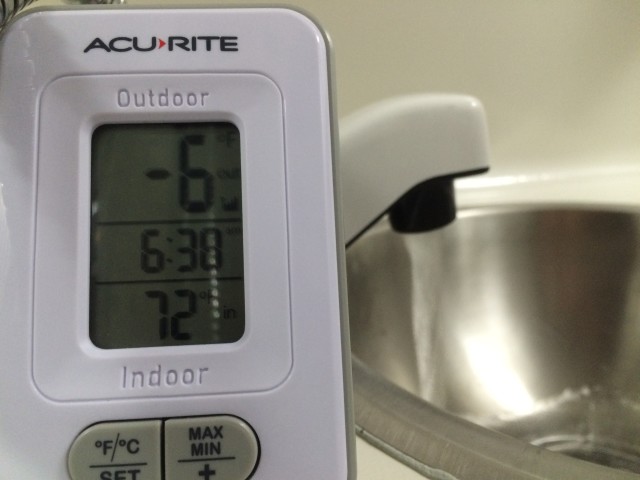
MInus 6 (at least) and running water in the morning. Success!
I had placed the temperature probes 1) underneath the dinette seat and 2) under the galley cabinet. When I downloaded the data, it looked like this. (This data is for three days – more on that later – Bryce is the first night)

Data for three nights
So, when it gets down to -10 or so outside, the interior of the galley cabinet can get below freezing. So why then, did the water pipes not freeze when exposed to that for several hours? The pipe insulation, I suspect. I don’t know how much longer it would have held out, but I think we were probably right on the edge of what we could endure.
The cabinet under the dinette seat had a much warmer tale to tell. The heat leakage I created from the Truma seemed to keep that cabinet nice and (relatively) toasty. It wasn’t hot in there or anything, so I don’t think I overdid it. Just nicely above freezing for the duration.
You’ll notice though that the thermometer in the picture is indicating an interior temperature of 72 degrees. This is because we kept it up in bed with us, and we basically sleep on the ceiling so all the warm air eventually makes it up there. We did NOT have the Truma set to 72. That would be insane. We would like to decrease the temperature while sleeping though, so I’ll be using this information to figure out a better night time temperature setting than 68.
The shower drain was another matter. Despite being what I thought was empty; and even though the only thing that could have been in the line anyway was antifreeze… it froze up. Naturally, I didn’t notice this until I was naked and wet, and watching the water start to pool around my ankles. It wasn’t my best moment. We had to bail the water out of the shower into the grey tank (credit to Stef there), and then dry off and go outside and investigate (Stef was no help at all crawling under the van in sub-zero temperatures). At -6 degrees and angry, I didn’t learn a whole lot that night. For the remainder of the trip, showers were restricted to non-freezing hours only. That kinda stunk.
Night 2 – Kodachrome Basin
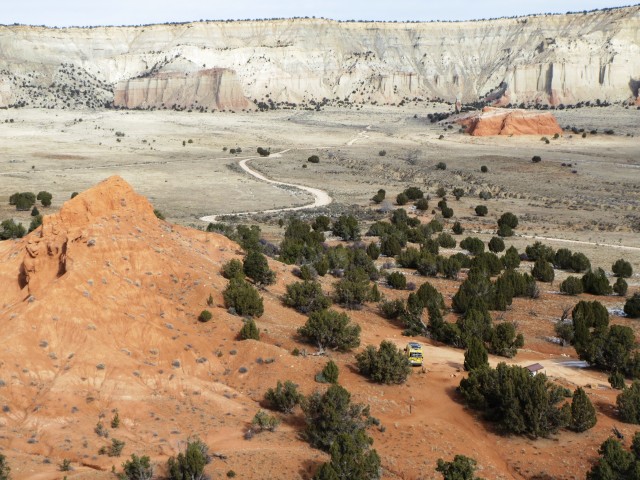
Kodachrome Basin State Park, Utah. Despite what Stef says about the hiking, this place is awesome.
Apart from the shower mishap, after the first night in Bryce, we were feeling pretty confident, so we traveled on to Kodachrome Basin State Park. Temperatures that evening got down into the low twenties. Pfffffffft! Please. We ran the Truma only on electric (they had working hookups) and it still had us sweating at 68 degrees. We also ran the tank heaters all night (since we had the hookups), and drained them the next morning and re-purged the pumps with antifreeze. No problems.
Night 3 – 9000 Feet at the Lake
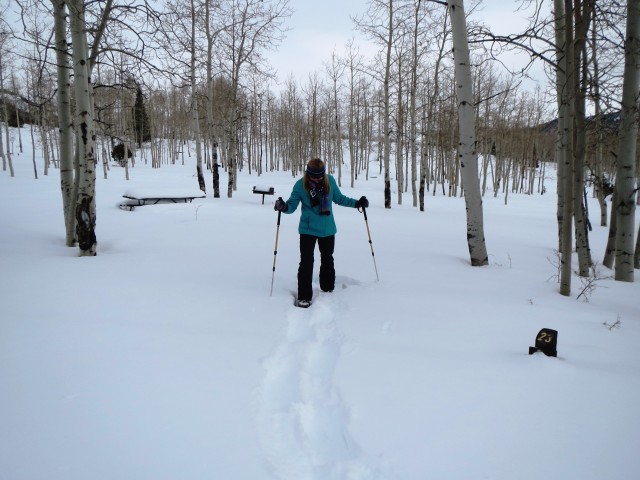
We had some difficulty pulling into Site 23 at the campground…
The third night in the graph, we dry camped at 9000 feet at Fish Lake in the (aptly named) Fishlake National Forest. We were right on the shores of a mountain lake just outside a campground that was closed for the season. It was perfect, and another night of testing Lance’s winter mettle with no hookups. Temperatures that night got down to the single digits (6 or so, according to our thermometer), and we experienced no problems – nor did the cabinet interior temperatures dip below freezing at any point.
Areas for improvement.
So all in all, I’m calling the winter camping a success. But there’s always room for improvement. Here are the areas I’ll be looking into in the future.
1. Warming the galley cabinet
Given that It got below 32 degrees under the galley, I think I need to do something to warm the inside of that cabinet. I could run heat tape along all the water lines and the pumps, but that would be energy-expensive. Instead, I think I’ll cut another 2” x 10” vent opening inside the bottom of the cabinet under the drawers. That should allow enough heat to leak into the cabinet to keep it above freezing in the coldest temperatures we’re likely to encounter.
Imagine another one of those vents in the bottom of this cabinet.
Also, the infrared pictures I took in Bryce seemed to indicate a fair amount of heat leakage from what I’ll call the “C-Pillar” at the rear of the sliding door – right by the galley. I may try to add some insulation if I can get into it somehow. But once I’ve done this, I think the fresh water system should be good to go.
Notice the glow at the rear of the sliding door? In fact, there seem to be leakages anywhere there are metal ribs inside the van.
2. The shower drain
This is another story. When I was no longer angry, naked, or wet, I took another look at the shower drain. There seemed to be a small rise in the drain hose where it went over a metal part of the van chassis. I think that bump in the line allowed something to pool at the low points in the hose. (Yes, that should have only been antifreeze and it shouldn’t have frozen anyway, but it did.) And also, let’s face it, at -13, things do freeze pretty quickly.
I think this bump in the line led to some pooling liquid and our freezing problem.
So, I think I have a couple options here. The first is to bring the line inside the heated space entirely. This actually might be easier than it sounds. Sealing off the existing drain would be easy enough. Then, I could punch the line through the aft side of the galley cabinet, and put some sort of hose connection underneath the cubby hole in the shower (something like what you see on the outside of the Travato for tank fill and city fill). When we wanted to shower, we would just attach a short length of hose to that port, and drape it into the shower pan to pick up the water. Kind of ugly, but totally functional and nearly freeze-proof. The big question in my mind would be – can the drain pump for the shower lift the water high enough for that to work? Is that kind of thing even listed in the pump specs? Because I’d hate to get it done, only to find out it doesn’t work… More research needed on this option.
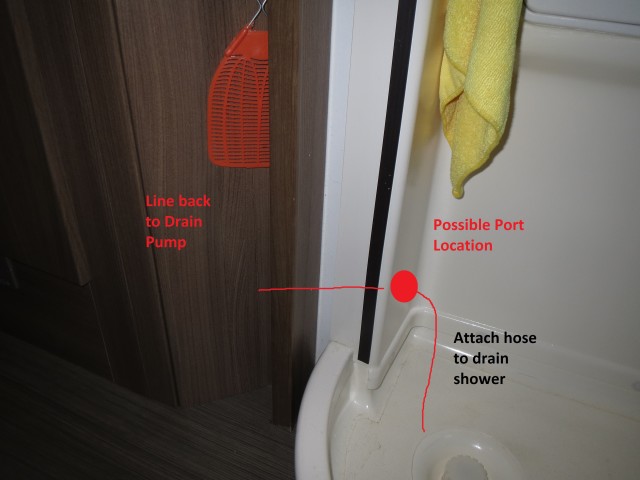
This hideously bad graphic represents my best guess at how to bring the shower line inside.
The other option is to work with the existing setup. First, I need to remove the insulation from that drain line underneath the van. Two reasons for that: 1) I needed to be able to see what was causing the blockage, and with the insulation on, I couldn’t. and 2) Because, even if it froze, I would have liked to be able to thaw it with a hair dryer or something. Once the insulation is off, the next thing to do would be to modify the line to have a more regular slope to avoid any low spots, and to put my drain at the absolute low point. This is the less invasive and easier to do option, so I’ll likely start here and try again.
3. Improve window coverings
Take a look at this picture and it’s immediately obvious that the single pane windows in the van are a huge heat-liability.
The windows are the weak link in this picture – except for the Seitz window in the back!
But even if we didn’t have an infrared camera, the problem with the windows was painfully obvious (and cold) just from sitting next to them. They were like mini-refrigerators to sit near. The one exception to this, of course, was the Seitz window up in the penthouse, which preformed like a double-paned heavyweight. So, we need to do something about the windows.
One option here would be to replace the stock windows with Seitz windows. This might not be practical due to mounting restrictions, window sizes, etc. But it’s worth looking into. The one place where I think it’s most likely to work would be on the sliding door. The stock window there is just mounted into the sheet metal of the van, so I could work on it without tearing too much stuff apart. I don’t know about the sizes available, and whether or not it would work without banging into the van when sliding the door open, so more research is required.
The easier option here is to just have some new insulated window shades made. The MCD shades are quick to draw, and they work great in summer, but they’re practically worthless against the cold. So, using the cloth shades Winnebago provided as a pattern, we’ll likely have some new ones made with a layer or three of Thinsulate, or some other insulating material inside of them. We’d still have them attach with magnets – they’d just have some serious R-value to them (and be a cool color or pattern or something).
4. Warm the Floors
The floors in our Travato got COLD. They were better towards the back, but from the galley forward to the step-up and the sliding door the floors were uncomfortable to walk on. Besides “wear slippers” (which is what I kept telling Stef), we need some sort of solution here.
Notice the difference in temperature between the floor and the adjacent cabinets.
I’d rather not spend any energy on the floor, so any kind of electric floor heating mat is out. But I might consider adding a 4th duct to the Truma to have it blow across that space, if that’s even an option.
Of course, the real solution would be to add some insulation to the floor, but that’s easier said than done now that the van is already built out. I may be able to add spray foam in a few places underneath. But every time I think of that I have nightmares about being stuck under the Travato with “Great Stuff” foam dripping down onto my face and expanding onto the tailpipe and catching fire. No thanks. I’d have to find a professional to handle that for me. So if anyone knows of one, I’m listening.
5. Increase Battery Capacity
If I ran the tank heaters all night long, they would basically use up most of my (useable) battery capacity. With the 2 stock 100AH batteries, and trying not to drain them more than half way, that’s about the best I can do. This limitation is what led to the decision to not run the tank heaters unless we had hookups, or were driving. That worked out OK for us on this trip, but if we were not going to drive or have hookups – and we needed to drain, this could be a problem. We would like the ability to run the tank heaters for at least one night on battery power. That means, basically, we’ll need to double our usable battery capacity.
The stock batteries. Cold, but not too cold. Batteries generate some heat as they discharge. Also, we have a battery temperature sensor on them that we can read from inside.
The short answer to that is lithium batteries. In addition to saving weight, we’ll get twice the capacity in the same amount of space.
Of course, switching to lithium batteries is a whole topic in itself. I won’t go into details here, but one of my concerns – particularly since we’re talking about cold weather camping –is that lithium batteries do NOT like to be charged below freezing. But then if I add heating pads to the batteries – will that wipe out any gains from switching to lithium batteries in the first place? Again – more research required.
6. Humidity
I moved to Utah to escape the humidity of the Deep South, so I wouldn’t be bringing this up unless it was a real problem… But MY OH MY WAS IT DRY in our Toasty little Travato. My fleece pajama pants were making visible sparks in the night as I rolled over. It’s true! After our week in Lance with the Truma running basically non-stop, my knuckles were so dry they were just randomly bleeding! We had virtually no condensation on our windows – even at below zero temperatures – because there was no moisture in the air to condense. Utah is dry enough already, and the Truma just cooked the remaining moisture right out of the air.
I know most people are trying to keep moisture out of their RVs, but I may have to investigate adding a humidifier to the Truma. I don’t know how to do this safely, but as a last resort, we could always hang a damp towel on our laundry line overnight or something. Or maybe bring along a portable humidifier like they used to run in my room when I was a kid and got sick? Something needs to be done, because if we had stayed out any longer, it would have been painful.
James and Lance – the bromance continues…
So there you have it. That’s what I did to make our Travato, Lance, winter ready. I’d say I’m about 80% of the way there, and I’ve got some ideas on where to get that remaining 20%. If you’re considering doing something like this to your RV, I hope I’ve given you some food for thought. I’m not saying this is the only way to go about things, but it’s the way we did it, and it’s working out so far.
Thanks for reading. Cheers!


Hi James, I have followed a lot of your advice in building out our ford transit camper van and am currently doing some winterization and purchased OEM heater cable for a nylon braided water line. I had a simple question on the install for 12v self regulating cable, on the two copper bus lines at the end of the cable do I just connect both to the positive of the 12v power feed ? I have connected the termination kit per instructions.
take care, Neal
Oh wow. I honestly don’t remember.
But thinking about it logically, if you simply connect both of the leads to a positive, nothing will flow and nothing will happen, right?
Or am I not picturing your installation correctly?
Thanks James, I was over thinking it and you are correct one end pos and one end neg and it will work. take care, Neal
James, Thanks for a great article! I’m curious after reading your reply to some of the other comments, do you have a source i can go to to compare various years of Travato G’s or GL’s? I’m wondering what have been the progressive benefits Winnie has done for each new season’s G or GL? I noted in the comments that in 2018, Winnie brought the pipes inside, which helped for winter. Any other info like this will help my decision as to what year Travato to buy.
Thanks much, Jon
I believe you could get that information from the Travato Owner’s and Wannabes group over on Facebook. Thousands of owners over there.
If they haven’t already compiled a list, there are owners of every year and model who you could just ask. Good luck!
Hi guys,
We just watched the “Don’t Freeze!! Our Top 9 Winter RVing Tips” video and at minute 14:45 there is a shot of the inside of the cab, what is the setup? is that a black out/energy curtain with the hex pattern? how is it secured? does it go all the way to the floor or just on the dash?
Thanks,
Yoly
It’s a home-made thing. I wrote up the full details a while ago.
You can find the details and plans here: It’s Curtains for the ProMaster
Fantastic, thank you!
HI James,
good post, I have a 2015 59G and put Far Infrared Flooring on the entire floor then let the van sit plugged in and the floors hold 75 degrees when its 20 outside. I will let you know whats frozen and cant imagine much will be if the floor holds 75 degrees and I run the propane furnace all night?
I have never showered in there and my tanks were empty. this will be an amazing experiment. I sell the paper thin Far Infrared mats and the van draws 430 watts per hour to hold this temp. This can be installed over existing linoleum.
Hi – I know this article is several years old, but as winter is near, I thought I’d add a new winter question. Is yours diesel and did you have any issues starting the engine with fuel gelling in the well below zero temperatures?
Our ProMaster is gasoline powered, so no help there.
We did previously have a Sprinter, and never had any issues with the fuel in cold temperatures. We did use it in sub-zero temperatures on occasion.
James & Steff: thank you! Your posts and videos have been most helpful as I research my next rig, seriously contemplating 59G.
Want to ask about the Seitz acrylic window, have you noticed if it scratches easily? Thinking of those wayward branches on forest service roads that slap against you on way in Or when backing out of sites. Seems Winnebago is using them them in the Travato now in the living area. I had an A frame TT years ago with acrylic bubble windows and after a few years of sun and branch encounters, they fogged, scratched and were difficult to maintain. My current rig, a Bigfoot trailer, has double pane glass windows which are a breeze to maintain and offer good insulation. Want to avoid dragging out polisher and Novus to maintain acrylic if possible. Your thoughts appreciated, thanks in advance. Tekel
Well, we’ve had ours for several years now, and I haven’t seen any scratches.
Pretty much all the RVs in Europe have them, so I haven’t worried about it too much.
We just take care when washing ours, and haven’t had any issues.
Double pane glass would be awesome. Kind of the best of both worlds.
I know it’s clunky, but I went thru the “worst South Dakota winter in a hundred years” in 1996 in a 20 ft camping trailer. Stacked hay bales around the base. Used the propane furnace and two electric space heaters. The windows were my worst heat loss too. I used 1 inch un-faced foam bead board (yes It’s a fire hazard) cut to press fit in every window (triple in the ceiling vent). Worked great. Of course another help was 8 feet of snow on the roof blocking the wind.
Hi James,
Thank you for making awesome content. I’m really envious of your time to tinker!
Since it’s about winter time again, and you’ve done two Lithium Travato reviews, I thought you might have ideas on this.
I want to live in a Travato KL, off grid, all winter. In Bavaria, Germany. I would spend 4 nights a week there, and three at my home (working far from home, keep RV at work with me and the dog during the week).
I would have access to water, but no shore power. (Though I could drive home on the weekend and hook up to 220v home power)
Do you think those three days away during icy Winters (below freezing consistently) would be a no go?
How about those days when I’m occupying it?
Could I still keep water in the system or would it have to be winterized?
Thank you so much for your time and making great videos!
OK well first, I’m a little jealous of the Bavarian Winter plan…
Bear in mind, my thoughts here are all 100% guesses based on what I know.
With that in mind, I think as long as you leave the rig “on” and heated up, the lithium system should be fine in those temperatures.
You’ll want to keep the rig topped off with propane though, to avoid the heat shutting off.
The tanks for the KL are all outside – and though the fresh tank has some passive heating, the grey and black do not.
You might find that things freeze up on you in those temperatures. Tank heaters are an option, but they draw a good bit of power, and you mentioned leaving the rig alone for three days. I’d be concerned.
If it were me, I would count on the lithium and heat, but use tips from my article over on winnebagolife.com for the water system… just to be safe.
You can find that article here: https://winnebagolife.com/2016/01/winter-rving-tips-anyone-can-use
You’re awesome. That is exactly what I needed to know. Thank you so much, and I hope you keep making the great content!
One thing I’m sure winnebago did not help you with (or me) is rust from road salt. The cover to the box where my solenoid sits rusted off and so did it. My battery box looks like it’s about to drop. Many hangers, bolts, and screws have failed. Already a recall on propane tank regulator. What’s next?
Otto, 2014 travato, 70k miles
I’ve done a little undercoating on my own, but not too much. Mostly, any time I’ve cut or modified something underneath, I take the extra step with some sort of undercoating or rustproofing.
Thermostat on the cummins went bad, probably salt as well. I put an electrical box over my propane fill valve for security and painted it with epoxy. No rust after 3 seasons although it looks a little bizarre. Thought of using the plastic trim from the Zion/Promaster. Light and attractive.
Thanks for the article BTW
I’ve seen folks covering their propane fill valves. Good to hear that it holds up even after 3 seasons.
Roll on!!
Hi I have a trailer or truck what I need to have soler Earcondaiton for my trailer
I’d start by looking at this post I wrote:
How Much Solar Do I Need On My RV
Hi James – Useful as always. I have a 2017 Coachmen Galleria – you know, the one with the great cabinetry, but not so great plumbing. I’m looking at making it more “winter worthy” by installing Ultraheat tank heaters and heat taping and wrapping the waste, water lines, and macerator housing. What’s your thoughts on my approach, and what did you do for the macerator hose? Many thanks!
John
Hi John –
First off, your plan sounds sane: wrapping the external water components with Ultraheat. The thing you will need to be careful of is the electrical draw. I doubt you could put all the Ultraheat on a single switch. It might take a couple to carry all the load. Also, you’ll probably only want to run them when the engine is on or you are plugged in – to avoid draining the battery. If I remember correctly, the pre-lithium Gallerias didn’t have a whole lot of battery capacity.
Finally, on the macerator hose – as long as you empty it fully before putting it away, it shouldn’t need any special attention in the cold. It might be tough to un-coil when it gets cold though.
I was wondering what type of fridge you have? Is it an absorption? If so how did it deal with the extreme cold?
We have a compressor fridge now, but had an absorption fridge when I wrote this post.
It never had any problems with extreme cold. (Unless you count frozen lettuce – we had that problem year round!)
Great stuff James and Steff…We’ve been trying to figure out how and when to move from a TT to a ClassB or small ClassC. Lots of questions but in regards to this post, have you seen that for 2018 Winnebago says they have moved the water lines inside as well as the shower now requires you to turn on a drain pump.
Obviously the water lines inside are per your original request but you also added the heat tape…have you looked at what Winnebago did in moving the lines internally and any opinion?
I was curious on the shower drain pump but now reading your post, it seems like that this may be the reason? Not sure if you were in communications with Winnebago on this issue…
Any other insight into what they might have done in 2018 to turn this into a 4 season coach? Assuming you are in communications with Winnebago…
Thanks and keep up the info coming…
Jeff
When they moved the water lines inside on their production rigs, they did it the same way they did it the same way that Lance is done. So if I were getting a new rig today, I would still consider heat tape, depending on my 4-season needs. For milder, non-extreme, winter camping, you’d probably be OK as is.
Our shower drain also uses a pump, and routes below the van. This is the same as current rigs. No changes.
I don’t think Winnebago is advertising the Travato as a 4 season coach – but rather an extended-3-season rig.
James & Stef – thank you for the extensive information you post & record for us to share, it really is appreciated.
A theoretical question please, as Lance is set up now to have his primary energy source from electricity, how would you manage a “snowed in day” in the van & the PV cells are also getting snowed in – a broom or a heat source ?
Theoretical because I live in Australia & the chances of being snowed in are pretty remote.
Kind Regards
Peter
If we were snowed in, we still have propane for heat, so we’d rely on that for heating the interior.
As far as electrical for cooking, etc. We could go several days (longer than the propane would last anyway).
If that failed and we needed more electricity, we could start the engine on the ProMaster and the second alternator would charge the battery pretty quickly.
Thanks for checking us out from all the way down there! (And I agree – snowed in seems unlikely.)
Hello! Your site and information is fantastic! I am purchasing a Travato in two months. One question, on your travels, did you run into any issues with clearance? When I went to examine the Travato it seemed not to have much clearance and it would be the generator and the exhaust pipes that take most of the hits? Thank you.
The short answer is no – we’ve never had any clearance issues. This is a common question from potential Travato buyers. It’s only a concern until you have one, then you realize it isn’t.
Three posts you may want to look at – if you haven’t already:
Installing Sumo Springs will get you an extra inch in the rear.
I checked the departure angle of the Travato. Surprise – the generator isn’t what hits first.
Our Nebraska National Forest post has some pictures of some of the roads we’ve been successfully able to navigate with our Travato.
Finally, if you don’t believe us, you can join the Travato Owner’s Group on Facebook and ask other owners what their experience has been.
See you on the road (hopefully)!
I have an Oakland 5th wheel, built in Canada and marketed as a 4 season RV. I ordered it with inside storm windows and while they are not as efficient as sealed double pane windows, they are better than single pane.
Nice option!
Sorry to resurrect the comments section:) this is an amazing resource. Thanks for all of the work you put into sharing your projects and learnings!
We are close to purchasing a 2017 Travato 59G (thanks in large part to the info you provide!). While we want to use it occasionally for ski lot camping, I’d like to avoid the more major mods you did to winterize it if possible. Do you have any idea what temp range a stock Travato can survive for a night, without the water lines freezing? Curious if the lines can get enough radiant heat from the vehicle interior being kept warm down to a certain outside temp that is <32F.
I'm also curious to understand better just what all is involved with bringing the lines inside. I know Winnebago did it for you but if push came to shove and I were to either take it on our find a capable shop to do it… would be great to understand it in a little more detail! thank you!
First off, welcome!
Next – it might be possible to do what you want to do without any mods at all. I wrote an article on Winnebagolife.com of winter camping tips anyone can use. Check that out first before you start tearing things up. It may get you where you need to be.
As far as what temperature a standard Travato can stand… I’m not the one to ask, because ours is anything but standard! Maybe the Travato Owners Group on Facebook would have some experience you can use.
Bringing the water lines inside is difficult. One of the more difficult RV modifications you could make. To say much more would get too long for a comment like this. Your best bet would be get an estimate from an RV service center and go over it with them. Sorry I can’t be more help there, but I’d be typing all night!
Hello James and Stef!
I am definitely enjoying all your write ups! Lots of useful info.. my husband and i just completed converting our 2014 ProMaster into our full-time home. I saw that you purchased a interior cover for your MaxxAir fan, would you share with me where you purchased it from? We are looking for ways to prepare for winter as our home state in Wisconsin.
Thank you and I look forward to reading more!
Live Simply by Simply Living!
Dawn
You can contact the good folks at Advanced-RV and see if they would sell you one!
James,
I saw your thermal images and discussion around the standard single pane sliding windows on the Travato. What about approaching Winnebago to make your rIg a beta test for Seitz windows all around. Seems like your editor was able to do that on his Navion 24j and they’re now offered as an option. I don’t even know if you can change the windows once the RV leaves the factory, but I wanted to put it out there for consideration. Keep up the great work with all of your fabulous mods that serve as constant inspiration and guidance for the rest of us!
Don Cohen (GoLife’s editor – not here on the fit RV, but a nice guy anyway) does have the windows on his Navion. It turns out, those windows are really made for walls that are an inch or more thick. That’s easy to accommodate on a Class C where the walls are built up. But on a van, you’ve just got the metal skin. We had originally asked for Seitz-type windows all around. But it’s difficult to build up frames to mount them to the skin of the van. We probably could have come up with something given enough time, but we had a deadline. We’re happy with the one we have for now. But I agree – they would be a desirable option in any coach.
I would also like to own a four season class b RV. Does any manufacturer build one winter ready without owner modifications?
We found the Canadian RVs often are 4 season…
Hi James,
Very impressive work, I like all the changes you have made! You mentioned thinking about lithium as an option. One thing I have wondered about (as a prospective Travato purchaser) is if there is any room on the inside for something like one of the Smart batteries (http://www.lithiumion-batteries.com/products/12v-100ah-lithium-ion-battery/) – perhaps under the dinette seat or in a custom enclosure below the table?
If there were then it with a few changes it would be possible to configure the unit to use a dual battery bank (with separate charge profiles to accommodate lithium and AGM). Zamp sells a solar charge controller that can manage this type of configuration (it is the next model up from the one installed by default in the Travato), and Magnum Dimensions has inverter / charger units that can manage this setup as well.
The benefit of this setup would be having the AGM batteries available immediately for a ‘cold start’ situation (unattended & unheated RV), but once the RV was warm and occupied there would be an extra 80 A/hr of capacity (at max 20% DOD for lithium). It would also avoid the problem of being unable to charge anything in the winter.
The big question is if lithium batteries can be safely mounted in an unvented container in the RV, or if there is a danger of a Dreamliner-style combustion event.
If you were just looking for a place inside to store a lithium battery, then I believe yes, you could find room.
The dual battery bank would be an interesting option. Not sure if I would want that, but I do understand the benefits you’re pointing out.
As far as the fire danger – I believe that was mostly an overcharging problem with an older lithium chemistry. The new lithium-iron-phosphate batteries shouldn’t have those issues. Pleasure-Way, for example, stores their lithium batteries in the living space.
I have 2015 Travato 59 G. Problem with refrigerator door: The plastic piece of the hinge on the top is broken. Now fridge door will fall off. Is there any option for repair other than a new door?
Thank you!
If the hinge pin attachment itself is broken, you probably do need a new door. Sorry!
If it’s just the plastic that’s broken around the hinge pin (but the hinge itself is fine) you could try cutting it down like I did.
Hi guys!
That’s it! We are done watching! Its time to buy! But help! We like either the Travato 59k or the Trend 23D for the gas powered engine. Saw the Fuse 23A but know nothing about diesel, gas prices, service, first year model debut and bugs, etc. Like nimble, pick up and go feel of the Travato, 21ft, get in/out and park on any street in any town, USA vibe. Truma-combi love. Like the racks for our 7yr old “crap bikes” and easy access to solar. Don’t like the 13 gal black tank, no spare, no exterior storage. Raise the back like in Europe already Winnebago! CMON! The Trend is obviously bigger all around, tanks, interior storage, slide. But at 24 ft do you think Trend is more limited as far as parking on city/ town streets, boon docking, camp sites, going into town for dinner or shopping etc. Which do you think would be easier to winterize and be most efficient (no nothing about the mechanics but willing to learn and spend)? We plan on mostly shoulder season traveling to start with a lot of weekend travel in between to gain experience to leading up to much longer trips. Hopefully we can eventually do some winter trips too to Utah and beyond. Most of the Trends I see have single pane windows. I could order one but the dealers keep trying to talk me out of the euro windows that you really like. Thoughts on why? All things considered and knowing the pros and cons each unit has and based on your couple’s experience and insight, which one would you lean toward buying if you were newbies like us and can? Thanks guys!
Well, we like the Trend, but obviously, for us, we like the Travato more! Let me try to answer some of your specific questions.
1. Don’t worry about not having a spare. The tire size on the Travato is like the second or third most popular truck tire size in North America. You’ll have roadside assistance, and you’ll always be able to find a tire.
2. The Trend is still pretty nimble, but not as much as the Travato. We’ve taken our Travato (and our Sprinter, before that) to places where I would not take a larger motor home. Downtown Dallas, for example. No problem. Bigger would have been an issue.
3. Either the Trend or the Travato would be just as easy to winterize. No difference there.
4. On longer trips (longer than a couple weeks), you might appreciate the extra room. Particularly if this is your first RV. Although, some do full time in the Travato and are quite comfortable with it.
5. In my opinion, the only reason one would recommend single pane windows is ignorance. Dealers, and the US RV market in general, are very slow to change. Perhaps a dealer would think that a unit with single pane windows would be easier to sell if you backed out of the transaction? Then they wouldn’t have to educate an inexperienced buyer on “new-fangled European plastic windows”. But really, single pane glass? Come on.
6. What I always counsel people to do is to think about how they envision using the motorhome. Are you going to want to go to one place, stay there a while, and take shorter trips out? Staying on the road for 6 months? A larger motorhome makes more sense there. Or do you envision driving as far from RV parks as you can get, and driving someplace else the next day? Want to bring your RV onto the streets of NYC and have lunch in it while you people-watch? Smaller motorhome makes sense. Don’t get too hung up on which motorhome has which features. In fact, don’t start your search with Motorhome models at all. Start with you. Build your use-case. The plethora of models will be much more manageable after that.
(You know, I get asked similar questions like this often enough, maybe I should expand my answer and make a whole post about it… Hmmmm….)
Hope I’ve helped!
I wonder if a recirculating pump on the hot and cold lines might help. There are setups made for home use that use a pump to move water from the hot water line into the cold water line under a bathroom sink. The idea is you press a button to move cold water in the hot line into the cold line, thereby not wasting the water, but getting heat.
What I’m envisioning here is using such a setup, but leaving the pump running during the cold nights. It’d mean warm water from the cold side if you used the sink with it running, but the lines under the sink would then be hot, heated by the Truma all night and bringing more warmth into that part of the camper. The energy cost would be for a small pump doing the recirculating. You’d want to be able to turn it off in the morning to again get cold water.
If there are check valves in the system in the wrong places, this whole idea becomes problematic, though.
Interesting idea.
I suppose it might work, but I think it would be at a higher energy cost than my heat tape. The heat tape was the only part of the setup (for fresh water) that uses power. With all the insulation, I only need to use it if it’s well below freezing.
But your point on check valves is a good one. I’m thinking of installing a check valve on the hot water line underneath the sink (to prevent the blast of cold water while showering and turning off the shower-head). That would dictate where such a system would have to connect.
Like I said, interesting idea, but I’ll stick with what I’ve got!
Hi,
Can you confirm if the Trauma Combi on your Travato is a 14300 BTU model? Looking at the Safari Condo specs, the standard heater is a 7950 BTU unit. The optional 13000 BTU unit cost $2600 CDN more. I would prefer not to spend the additional $ unless it’s really needed.
One nice thing I like is that the heater is a Webasco that uses the vehicle’s gasoline as fuel. So the propane only goes to cooking and water heating (optional on demand).
The Travato has the Truma Combi Eco Plus, which has a 14.300 BTU/h (4.2 kw)thermal input rate.
You can always boil some water and will but humidity in your rv my mom does that when it’s dry in hear house
Put humidity not but humid
Hi James,
Your site is so I formative. My family and I are considering getting a Travato 59G. Can you tell me if the Truma Combi water heater is an on demand hot water system?
Hi there. Glad you’ve found our site useful!
The Truma Combi is NOT an on-demand hot water system. It has a small tank.
We’re OK with that – here’s why: all on-demand systems for RVs run om propane. That means you have to use up your propane for hot water, even when you’re at a full-hookup campground. The Truma Combi lets you heat your water using the campground’s electricity instead.
Thanks for reading!
James,
We spoke by email while you were at the RV show. I was worried about traveling up to Provo Utah in late November. As it turns out, it worked out fine. The radiant heat from the engine worked fine during the day time. I also kept the Truma set at 54 during the daytime. That kept anything from freezing while parked. At night, I set the Truma to 67 and at no time did I have any freeze issues with the cold. My propane lasted over 5 days with room to spare. The heat generated by the Truma seems to radiate in and under the coach and kept anything from freezing or blocking up. I drained my tanks before dark and that seems to help too. I admit it got pretty cool at night, but I was experimenting, trying to conserve propane to see how long it would last. My next cold weather trip to Utah I’ll just refill propane at day 3, crank it up to 72 at night and not worry about conservation. I’d love to change my windows out to Seitz. If you do, let us know, I’d like to know the cost and hassle factor.
Hi Michael – Glad to hear that your trip to Utah was uneventful (well, at least as far as things freezing goes).
I’ve done some preliminary research into the Seitz windows. The door is a no-go. Winnebago maximized the window area in the door. That doesn’t leave much room for modifications. If I wanted to replace the window in the door, I’d actually have to get a new door… Not completely out of the question, but a bit extreme considering we did OK at -13 with the stock windows. I’ll probably just continue with my idea for insulated covers. Same problem on the back windows – I’d have to replace the rear doors – also not worth it. For us, that leaves just the galley and dinette windows. Of those two, the dinette window would be my first choice – we sit there and it does get cold. But there’s that plastic molding against the wall to contend with….
Office too dry? Try using a travel-size humidifier at work
Thought this might help with winter dryness
Hey Tom – The link was broken, so I removed it, but it was a link to a story on travel humidifiers. Not a bad idea!
It was from the WSJ. Sorry it was broken.
maybe this will work http://www.wsj.com/articles/office-too-dry-try-a-travel-size-humidifier-1453232996
You could probably fashion your own humidifier and mount it in front of one of the heater vents. Just create a perforated plastic box with a small water well on the bottom and cut an standard humidifier filter to fit into it to wick water from the well. You could just leave it in place at night, then remove it during the day so it’s out of the way.
I’ve been wondering if some sort of transparent insulating window cover could be fashioned to be put in place when parked at a winter campsite either inside or outside the van. Lexan multiwall panels seem to max out with an R value of 1.98 and the air spaces seem to be open on both ends of the panel. I’m guessing the Seitz windows are better since they have argon sealed between the sheets. Perhaps one of these Bencore sandwich panels might perform better since they look thicker and have sealed air spaces. http://www.archiexpo.com/architecture-design-manufacturer/sandwich-panel-2958.html
-13 degrees is pretty hardcore. I’d worry about running out of propane during the night. Have you considered carrying extra tanks for these trips? Would there be a way to hook them into the existing fuel lines?
Cool looking panels there! Although, at this point, I’ve decided the easiest thing to do is just make some insulated window coverings for night-time. We wouldn’t need to use them in summer – just when it’s super cold.
I had thought about the humidifier. Would be even cooler if it was out of the way somewhere. Someone said Truma makes a bunch of accessories in Europe. I wonder if they have something like that?
But I COMPLETELY FORGOT TO TALK ABOUT PROPANE!! Thanks for the reminder. The propane gauge in the Travato is notoriously inaccurate. After the first night in Bryce, it said 1/4 tank, and it showed empty shortly thereafter. Yet, we continued to use the coach normally for almost two days. When it came time to head to the lake, I really wanted to fill – since I had no idea how much propane we really had. We did fill, and it took 3.3 gallons. (Out of a possible max of 4.8 or so.) So, I don’t think we would have made it through the night at the lake all on the one tank. But I truly had no idea at the time and was really nervous until I filled up. So – another area for improvement is accurate propane tank monitoring!
And yeah – -13 is colder than we usually like to do, but it made for a great test! I’ve already added the vent under the galley cabinet.
Hello James,
My 2 favorite prospects for a futur RV are the Travato and the Safari Condo Promaster XL Flex. If you can spare a few minutes to look at this site that I found, there is a photo gallery of the Flex in which there are a lot of pictures of the building process. I would like your thoughts on the insulation based on what you can see in the pictures. The windows are Seitz if I remember correctly, so that a plus.
https://centrelab.smugmug.com/PERSO-GL/XLFLEXsafaricondocom/n-MNSpq/
I’ve never seen a Safari Condo in person.
However, in the pictures on that page, the only insulation I can see them using is the one product I specifically called out that I do not use because it is ineffective.
Please read the link above on the US Government report on reflective barrier insulation. Sandwiching that stuff inside walls is not a good insulation technique.
Wish I could help more, best of luck in your hunt.
Thanks for taking the time. I was pretty sure it was the type of insulation that you did not recommend. I’ll have to set-up a spread sheet like you to to balance the pros and cons of both models.
I just read the article you mentioned. I would like to discuss the statement “the reflective surface must face an air space to be effective”. Assuming there is no other insulation in the RV and also assuming the reflective material is applied directly to the van wall. There probably would be an air space between the reflective surface and the interior walls, etc. The reflective material would then do it’s job in reducing the radiant heat transfer from the interior of the RV to the exterior in cold weather. Assuming the material is reflective on both sides, it would not have a air space on the outside surface if it was stuck to the van wall, and based on the article, it would not do it’s job in reducing exterior heat radiation from entering the RV in hot weather. My observations are only referring to the radiant properties of the exterior reflective surface and not about the theoretical conductive insulation properties of the air pockets within the Reflectrix.
So there is probably no advantage for the summer but some advantage for winter (although how much is up for debate). The best is a product that does both.
Without knowing what else is inside the walls, I’d say that hypothetically, you’re correct, and there would be some reduction in radiant heat transfer from the interior walls to the van skin.
But I agree that a product that addressed radiant, conductive, and convective heat transfer would be a better solution.
Hi James,
I’ve been following your website and youtube channel for a bit as I’ve been stashing away funds to invest in a class b. My question for you is whether the wet bath has worked out okay for you both. I’ve mostly been looking at the 70C because of its dry bath, but the 59G is seemingly a lot more functional in the areas I am interested in (external racks, good sleeping arrangement that does not require a slide-out, solar, etc)… my issue is that I have a lot of reservations about the wet bath, and after reading your old shopping list before you got lance it seems like you guys, at one time, shared the same reservations and yet here you are with a wet bath! Anyway, somewhat rambley, but thanks for your posts and information they are very interesting.
Hi David –
Actually, we’ve gotten quite used to the wet bath. One of the things that makes the bath in the 59G agreeable to us is that it’s so LARGE!
When we were ranting against other wet baths, we were thinking of the typical Sprinter floorplan where the bathroom is about 8 square feet on the side of the van – and you can’t even stand up straight. Something like that would be a complete no-go for us. The very large wet bath we have now is actually a bit more useful to us than our old dry bath. You can find more commentary on our wet bath here.
Oh my! I have to come back and fully read this.
I spy a JBL speaker 😀
You do…
James, you’ve been dropping teasers all fall about your “love-hate relationship” with the composting toilet.
I know I’m not the only one following your blog that can’t wait to get the juicy details (pun intended).
When are you going to come clean? (Couldn’t help myself , LOL)
We have started filming that video. The storyboard is a bit long, and there are lots of pieces. It will take a while to complete. Honestly, we probably won’t be able to really finish it until it warms up outside. No commitment on dates.
However – I do appreciate your liberal use of humorous wordplay! Keep it coming! 😉
Thanks Alain for asking for info on the composting toilet. I’ve been looking on Lance’s page and just now, here, for that info. James, if there will be a long delay in getting the video out, maybe you could give us a spoiler? Would you do it again (install a composting toilet)? Does it extend your boondocking time enough to make the “love/hate” challenges worth it?
I will be ordering a Travato, planning to take delivery in Sept/Oct. It’s very tempting to ask Winnebago if would install a composting toilet. Unless it’s more trouble than it’s worth????
We plan to have a video about the composting toilet out in the Spring. Whether or not we would install it again would depend on the type of use we foresaw for the RV. If we ever went full-time, for example, a composting toilet would absolutely not be an option for us. More to come.
As far as Winnebago installing the toilet for you, I wouldn’t hold my breath on that one. You could always ask, but I don’t think it was their all-time favorite project. It’s easy enough as a DIY.
We live in WI and travel with our dogs a lot. In the winter the SUV can get cold pretty fast when the engine/heater isn’t running. A couple things that are quick and easy that make a big difference. For floor insulation we use those interlocking foam tiles that people put under gym equipment … or for a little more money there are brightly colored ones for kids’ playrooms. 5/8″ of foam underfoot/dog makes a big difference. You could place them in select spaces in Lance … wouldn’t need to fully carpet. Second, for the windows we use pieces of foil covered bubble insulation. Fast to fit to each window .. we hold them in place with velcro … small to store …. cheap … and make a big difference in both winter and summer.
Yes James, that was me, sending you those pictures 😉
Here in Europe were the Fiat Ducato, is by far, the number one in the Motorhome Scene, are very many and interessting extra’s available.
When your interessted I could send you links to the websites.
Perhaps for not only you, but for more RAM Promaster owners, very important to know:
Left and right, in the black plastc, beneath the windshield are two holes. Attached two hoses, with the purpose to drain the water running down the windshield, during rain. They must be controlled on a regular base, since wenn they are obstructed by sand, leafsrests etc, he water runs over the edge and over the engine and more important over the electric box at the driverside!
At the time Fiat introduced this model in 2006, they had at that point an very bad solution for the running water, namely NON. At that time the first dieselengines had also no plastic cover, and so the injectors, rusted and failed, the distributionbelt even, could (and actually did) fail while freezing times, since iceparticels did it “jump” and the timing went wrong, with the result of a wrecked motor!!
It iss’nt that bad anymore and I do not know how the gasengine in the RAM is placed, but the 3ltr diesel wil be almost the same. But a regular checking by blowing the holes and tubes with air is necessary.
By, Daniel
Interesting. I’ll go look for those holes today!
Absolutely amazing work. The manufacturer should be very pleased that they have you on side with them.
Wow -so much work you did! More than I’d want to do, for certain.
Think the answer to your floor situation is just custom fit rugs. Like they have in boats – cut to fit so they don’t slide around. That is probably the easiest way to get some insulation value, or at least comfort for bare feet. You can take them out to clean or for the warm months.
For the windows, you could try to emulate dual panes. Remove the screens and apply heat shrink clear plastic. You’d do that seasonally. Another option would be removable plexiglass pieces to cover the windows. With the air gap between the glass and plexi/wrap, I think you’d get a big improvement in heat retention.
Hey thanks, Ron.
I had thought about the shrink wrap. But I hadn’t thought about trying to make my own second pane. Food for thought.
I’m hesitant on the rugs just because I don’t know how much heat the lines in the floor are getting from the heated space above.
But a big ol’ shag rug in Lance might be just the ticket. Avocado green, anyone?!
James,
You’re a real nut, why don’t you guys “winter” in the sun belt- that’s the whole rv mentality. Great job on all the mods though, it pays to be a rocket scientist sometimes…nice pictures and illustrations too.
Glad you liked the write-up!
I’m not opposed to searching out some warmer weather with the RV. But there’s a lot of fun to be had in the snowy months – and they’re SO QUIET!
Wow! Amazing job James.
To insulate underside, it would be better if you can get spray foam insulation and get the Travato on a hoist. There are diy kits, and I know it runs against your nature, but it might be best to find an insulation contractor to do this. It would only take a few minutes once started.
Also, if you still need to drain the shower, how about a solenoid valve? At least you wouldn’t have to get under.
And last, do you have room to carry a skirt? Keeping breezes from getting under would be a big help.
Someone else suggested a skirt as well. (That may have just been in an email.) I appreciate how much the skirt would help, but that’s more “set-up” than Stef and I want to endure. We rarely stay in one place for more than an evening, and so setting up a skirt would be tough for us. Plus – like you thought – storage space…
If I can find a nearby spray foam contractor with a hoist, I’ll certainly investigate. I think that’s the best way to go about it.
Outstanding article James! I applaud your efforts to “winter-proof” Lance. Anxious to read about any further steps or improvements you make.
BTW- ever been diagnosed for OCD? 😉
Only by people who are frustrated at how organized I am! (Stef)
OCD??? James???? Noooo, not at all. (on opposite day)
Hi James,
About your cold feet …. There exist “electric heated rugs” here in the Netherlands, I suppose there will be also in the USA. Low on energy consumption, and still very comfortable keeping your feet warm 😉
Another possibility would be making an extra floor, one inch above the existing floor of the Travato, and blowing some warm air from your Truma through that space and even with the small amount of air that goes through there you would be surprised how effectfull this can be! A friend had done this for years and it worked fine. You have to be some skillfull …. But that won’t be a problem for you ,-))
Bye, Daniel
I’ll look into the heated rug – but they’ll probably use more power than I want to spare.
I I were to build an RV from scratch – the raised floor is a fantastic idea. I don’t know if it’s worth it with this one – that’s a very expensive solution to “cold feet”!
We may just wear slippers in the winter…
Yes you’re right, but as I looked at the floorplan of your Travato 59G, the sitting area is in the front. Only making a double floor there, were you sit still and getting cold feet, would be possible I think. Another advantage is perhaps extra heat going into the colder front area of the Van.
As we have a Hymer T698CL, also with the Fiat Ducato drivercabin, we are very familiar with the cold spots that can occur there …. ;-((
But in very cold situations a big outside insolation put over the front is very, very helpfull. We have one that came standard with the RV, was included in the ALDE-Artic Package. But even wenn its not that cold double side alu insolation only a few milimeter thick, with cissors tailored, fixed against the windshield, and two for the side windows, will make already a great difference.
And as you mentioned, it would be better wenn all of your windows would be double paned, like the Seitz, or the Polyplastcs.
Bye, Daniel
Thanks, Daniel! Someone emailed me pictures of skirts and window covers. Was that you?
Hi Jim,
I loved your wintering article and the mods accomplished. You did mention a
lack of moisture inside causing dry skin and such. We had the same problem in our home so I asked my plumber dad whet would be the easiest way to correct this problem. dad told me you have forced hot air heat right? I said yes and with that he said place a coffee can (small can) where the warm air can flow over it. he said as the air flows over the water the water should evaporate into the warmed air. With that he said it’s a quick fix but some sort of humidifier electric or battery maybe solar is needed.
So with that why not try a small pan ( maybe a dogs water bowel) filled with water placed in front of or next to where your forced hot air can blow across the water. If it works for you it’s an easy cheap fix and that might correct the winter camping dry problems?
I had thought of that – a nice low-tech, low-cost solution. I’d worry we might knock it over, but it could work. The one night we did NOT have problems with dryness was the night when I did laundry in our Scrubba, and the wet clothes were hanging on our clothesline in the bathroom. So even just hanging up a wet washcloth might be enough to do the trick.
It was mentioned earlier, but RV antifreeze will freeze if mixed with water, and it will get real thick, slushy at 10 degrees and below.
What we do on our ERA when we know it’s going to get cold at night is just open up the galley drawers and door. That keeps the internal galley temps close to the interior temp all night. Your idea of a small humidifier for extreme cold moisture addition is a good idea, but you’ll have to be careful with that. In 2013, early October, we camped in Bryce one night at 24 degrees and had all the windows froze up with condensation next morning. No cooking or showering involved, just our hot breath.
The more I hear about that Truma, the more I think it a revolution….!
I think relying on the antifreeze was where my plan fell apart last time.
I thought about just opening doors and drawers in the galley – but we jump down from the bed in that area! That would be an accident waiting to happen.
Getting the moisture right will take some learning – or a humidistat!
How about adding this article to the documents in the Travato Collaborative section started on the FB page?
Sure – go ahead and link to it!
You are a genius.
And you are my new favorite commenter.
Great blog James. All the things I learn from you are making my head spin. I’m starting to wonder if a custom build will be less trouble than trying to winterize a commercial unit. Of course a lot more work but fun as well.
From past experience doing cold drop testing on snowmobile fuel tanks, I found that many brands of anti freeze will slush-up considerably. Since we needed to check for leaks following the drop, we needed anti-freeze that remained more fluid. I wonder if the anti-freeze in your shower froze to a thick slush consistency that effectively blocked your shower drain? If I remember correctly, we ended up using one of the better grades of winter windshield washer fluid for this test instead of anti freeze.
That’s exactly what I think happened. Either I need to get some better antifreeze, get rid of the dips in the line, or both, or something altogether different.
Never thought of using windshield washer fluid. But that stuff froze too! (Tried to use it coming out of Bryce and it was frozen up.)
I can’t recall the brand of washer fluid but we were testing at -40 and we had some that did not slush. Most washer fluid we have up here in the winter are rated -40 and some -50 and we never have issues with it flowing. It will flash freeze on a very cold windshield until the surface warms up but never flow issues.Are you sure you had winter washer fluid or could it have mixed with some left over summer mixture already in the Travato?
If its just slushing of the anti freeze you might try dumping a TBD quantity of boiling water in the shower drain before before taking a shower. Or putting a heating cable but just turning it on a few minutes before the shower. If it’s not always on, the energy consumption should not be too bad.
I had picked up some extra RV antifreeze before this trip. It said “protects to -50”, but it was just Wal-Mart antifreeze. Nothing special.
I had the idea about boiling water, AFTER lukewarm water was pooling in my shower…
And that might work – but my whole idea is to use the RV more or less normally. Boiling water to take a shower – and even flushing the line with antifreeze – seems like work. The more I think about it, the more I might lean towards the interior drain line option.
James,
Shower drain and bilge pumps made for boats are designed to self prime and pull water from low in a boat up 5 or more feet above the waterline and out through a thru-hull. Most of the pumps on our boat are rated for up to a 10 foot lift capability. They should work perfect for your shower drain design.
Well then the 6 inches I need shouldn’t be a big deal at all. It’s a more fool proof solution – but also more work.
Great write-up, thanks. Can you estimate how much propane the Truma used during the cold nights?
Ted
This is just a total guess, but I’d say that a full winter evening at -13 used up about 2 gallons of propane. That’s heat, hot water, refrigerator, cooktop.
How does the Travato handle snowy and icy roads? Do you have chains or need to use them? I don’t have much winter experience with Class B’s so I’m curious.
Looks like a great time tho!
I actually do have snow tires, but I haven’t put them on. We were in Tucson this past weekend and I figured I wouldn’t need them there.
But thus far – and in the pictures you saw – Lance did just fine with the stock tires.
It’s not an AWD vehicle or anything but the Travato handles predictably in the snow.
Can you confirm the tire size and rating required? I’ve called a couple of local tire companies and they seem to be in disagreement about which ones to use… Thanks! -J.
Well, with the stock wheel size, the tires you want are LT225/75R16. Load Range E.
That’s what we have – on both sets of rims.
It’s good to be cautious using spray foam insulation. One of the refrigerated van companies have pictures of of panel distortion caused by the pressure of expanding foam.
http://www.reefervan.net/#!about-reefervan-insulation-ua-/cttw
Don’t want to end up walking on a lumpy floor. Perhaps a small rug or foam mat might work out instead of wearing slippers.
I wonder if adding an aftermarket defroster to warm up the windows a bit would add too much of a power drain to be practical.
http://www.frostfighter.com/clear-view-defrosters-about.htm
It wouldn’t hurt to send them a note and ask.
We didn’t really have a frost problem. There was very little moisture! I think heating up the windows would just cause us to bleed out heat all the more.
We had thought about rugs. That would work most places – but I don’t want to cover up the water lines that are under the cover plates. I think they might be getting some heat from above. Rugs would work everywhere else though.
Hi James,
Just did read the hole story you wrote.
Impressiv! All the things you already did, and since your test in Bryce was at that low temps, almost were 100% succesfull. Perhaps you could use the Truma even more to heat up the hidden and cold spots in your RV.
Truma has many extra parts to extend the exsisting heating tubes, and there are even thinn tubes with little wholes every 10 inches (i think) which are especially used for those situations, keeping cold spots from freezing.
Even special tubes with insolation for outside the van use, exsist!
Bringing in more tubes will be perhaps difficult, but the heat will be more spread.
Wishing you much succes and keep up your interesting blogs and youtubes.
Bye, Daniel
I never checked out the Truma accessories catalog (but I know who to call!). That might not be a bad idea. Thanks for the suggestion!