This post may contain affiliate links.
Hello from Lake Havasu State Park! As beautiful as it is here, I was compelled to bust out the TRX this morning, because with a perfect tree like this down by the water’s edge, how could I not?

My workout today was all about holds. I like to switch things up and challenge my muscles in different ways, and today I was feeling in the mood for isometrics…or being “like a statue” as one of my young trainees likes to call it. But really, static poses aren’t just for the young whippersnappers. We Summer Chickens need them too.
Here’s one of the joys of aging: if we aren’t exercising regularly, age-related muscle loss can actually start in our 30s. And I’m not just talking about simply losing what might have been your toned, youthful appearance. I’m also referring to your joint stability, range-of-motion, and your sense of balance.
Blame your hormones. When hormone production wanes as we age, our bodies aren’t as efficient at digesting the amino acids needed for muscle repair and growth. So without exercise, our muscles responsible for stabilizing our joints begin to deteriorate, and we lose some of that natural strength and coordination we had in our younger years.
The good news is we can reverse that age-related muscle loss! A GREAT way to re-build muscle stability is by doing isometric exercises: which is basically holding still in an uncomfortable pose that taxes your muscles in some way. Research has shown that when you hold a muscle contraction for a period of time, the reduced blood flow allows numerous growth factors to remain in the muscle tissue longer and they actually stimulate muscle growth.
Which brings us to the exercises below. Each exercise requires holding the pose and will not only improve your stability & strength, they’ll also work your balance and build your endurance. They’re all inspired by various yoga poses, since yoga is an excellent way to build stability and strength through isometric training. An added bonus: as with any isometric routine, you end up getting a great workout in much less time! And by the way, if you don’t have a TRX yet, why not?!? They’re SO much fun and a great way to stay fit and get exercise on the road!
You can buy one HERE through our Amazon link and if you do I promise to send you good vibes and happy thoughts!
Directions:
First, find a super cool tree and attach your TRX…hopefully your tree is as awesome as mine:
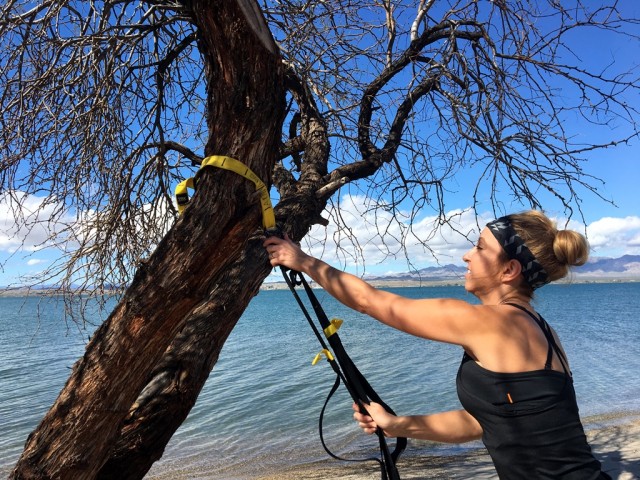
For each exercise hold the pose according to your ability level. Beginners can start with 10 seconds hold, and intermediates shoot for 1 minute. Circuit through all the poses and then repeat the routine 3 times through.
Stef’s TRX Isometric Stability Workout:
Pose #1: Eagles
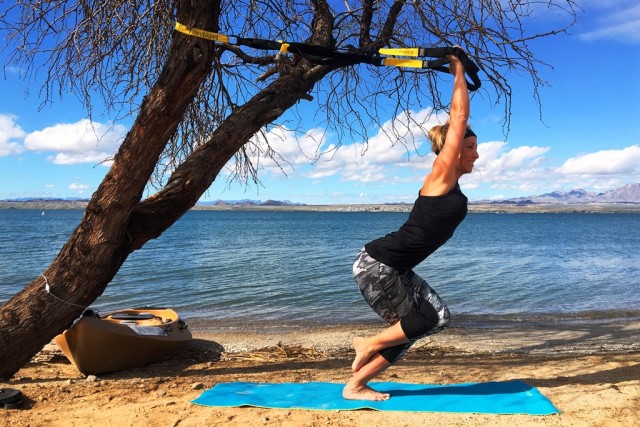
Face away from the TRX and grasp the handles in an overhand grip. Hold them overhead and lean forward into them. Place your feet behind the TRX handles enough so that you are forced to lean forward and put your bodyweight into the handles. Cross one leg over the other, drive your hips down and back, and try to tuck your toes behind the calf of the planted leg if you can. Keep the heel of your planted foot firmly down. Remain squatted and hold the pose an equal amount of time on each leg.
Pose #2: Warrior III
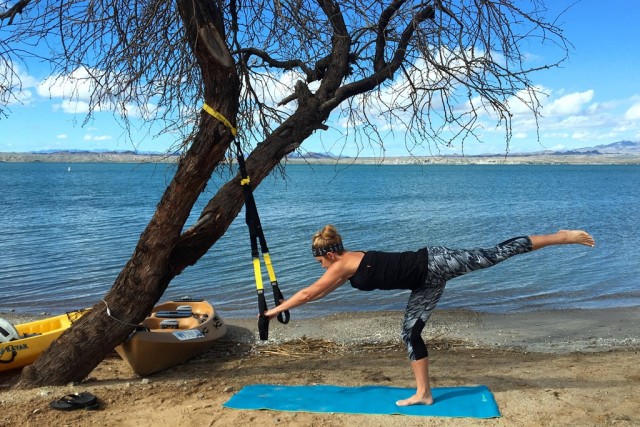
Set the TRX handles at knee height. Face handles and place your hands on the handles and push down. Keep your palms flat and open. Step far enough away from the handles that you have to reach forward with straight arms to press them down, and so you have to hinge enough at the hip that your back is flat. Lift your left leg straight behind you as high as you can. Make sure you slightly bend your planted knee. Hold the pose an equal amount of time on each leg.
Pose #3: Locust
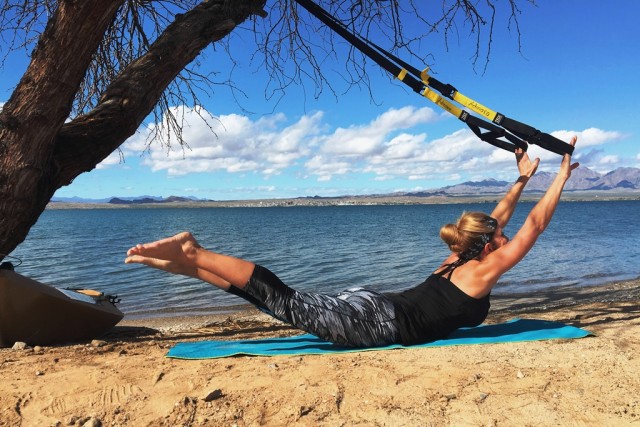
Set the handles long. Lie on your stomach under the TRX attachment. Set yourself up so that once your hands are in the foot cradles pressing down with straight arms, you feel enough of a stretch to be challenged, but without overdoing it. If the stretch is too much, schootch yourself backwards to make it less intense. Scoot forward for more of an arch. Once you have your arms in position, lift your legs keeping them straight as high as you can.
Pose #4: Half Moon
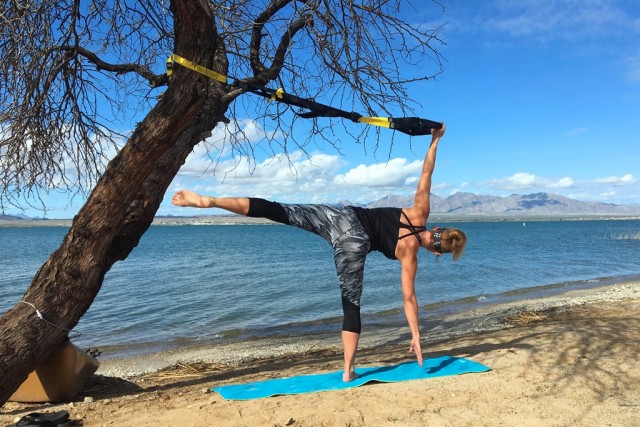
Stand sideways to the TRX. Grasp the TRX in one hand with an underhand grip. Tip over to the side trying to touch the ground while bringing opposite leg up straight as high as you can. Your planted leg is straight, but the knee should not be locked, it should be slightly flexed. Very important, this move is to the SIDE. Newbies tend to make this easier by doing this diagonal to the front…don’t do that! Your top hip should be up to the sky, not forward.
Pose #5: Handstand Pikes
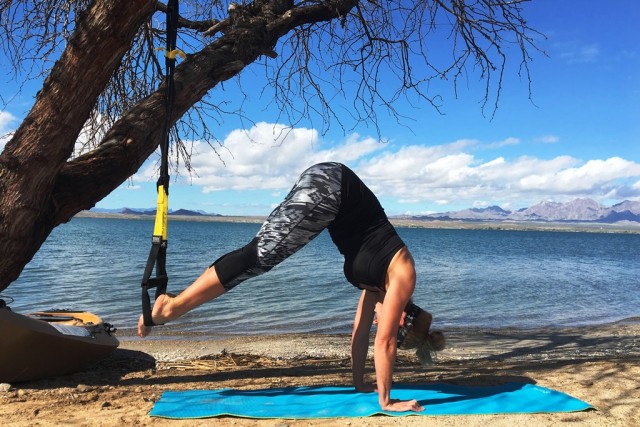
Begin in a suspended plank position with your feet in the TRX loops, toes facing down and wrists directly underneath your shoulders. Drive your hips up to the sky so you’re in an upside-down “V” position. Try your best not to round your back, try to keep your back as straight as you can.
So there you are! I’m always telling people there’s about a million things you can do with a TRX with a little creativity, here’s 5 more ways…so I’m that much closer to proving that million-things-with-TRX point. As always, love to hear from you! Leave me your thoughts below!
xoxo,
Stef




Terrific poses and loved the trx video as well, thanks!. You make it look easy and inspiring. have always wanted a trx system as you can take it anywhere and attach it to a door (or tree!). namaste’, rachel
Stephanie I just discovered your videos and your blog and I am in total awe of you. I am truly inspired. May I ask if you don’t mind how old you are? Do you think there’s truly hope for an out of shape mid 50s women to regain fitness ? I’ve been watching your video with resistance band exercises and that seems pretty accessible. I also have a TRX and I appreciated this article very much
Hi Diane! Funny you should ask that question, if there is hope, because I was just talking about that. I just got done with a cycling event not even an hour ago, 60 miles of fun! Along the route, an older gentleman cheering along the side of the road yelled out to me and my riding buddy…”I’m so jealous of you!” As we rolled away, I told my friend I wish we had time to stop so I could tell him not to be jealous! And instead I’d encourage him to challenge himelf to become a biker too! It is absolutely never too late. The body is always ready and willing to work with you. It will adapt and grow as you push it. But just wanting it isn’t enough. You have to put the work in, create huge changes in your daily habits, and stick to it. I’m glad you found some inspiration in me, Diane! It is incredibly humbling. Also I’m 46! Do keep me posted on your fitness journey. Rooting for you! xoxo
Very serene setting. I wonder if you could produce an ASMR video. Apparently there are bunch of people making money on YouTube doing this sort of thing.
http://www.cnbc.com/2017/02/17/youtube-asmr-videos-what-are.html
The downside is you’d probably have to club James a few times to stop him from chuckling from behind the camera.
Oh Ted. Thanks to your post James and I spend way too much time last night YouTube-surfing ASMR videos…I mean come on, the Manly ASMR??? Cracking a beer? Whispering with a crowbar? We both were scratching our heads. But then his videos get millions of hits and ours don’t, so maybe I SHOULD start whispering!!! xoxo