This post may contain affiliate links.
Categorizing exercises by movement patterns rather than by muscle groups is a smart way to train. In our daily lives, our muscles aren’t working in isolation. Instead, we’ve got lots of various parts cooperating to complete whatever task we’re trying to do. So when you sit down, for example, your body’s “sitting down” motor program kicks in.
Think of it like a software program on a computer. Your brain (the computer) recognizes what you’re trying to do, and it recruits all the parts involved in that program to get you down in your chair.
That’s what makes functional fitness training so important. It trains the entire motor program, which includes all the movements that get linked together to do a task (along with the central nervous system that triggers the task), instead of training just one muscle group like traditional workouts do.
Remember the ‘Fab 5’ movement patterns from Part One of this series?
- Hip Dominant Movements
- Knee Bends
- Push
- Pull
- Locomotion
Functional movement patterns are all initiated by those motor programs. When you train functional movement patterns, your body gets more efficient at doing them in their natural settings. You move better, tasks take less effort, and you’re more protected from injury.
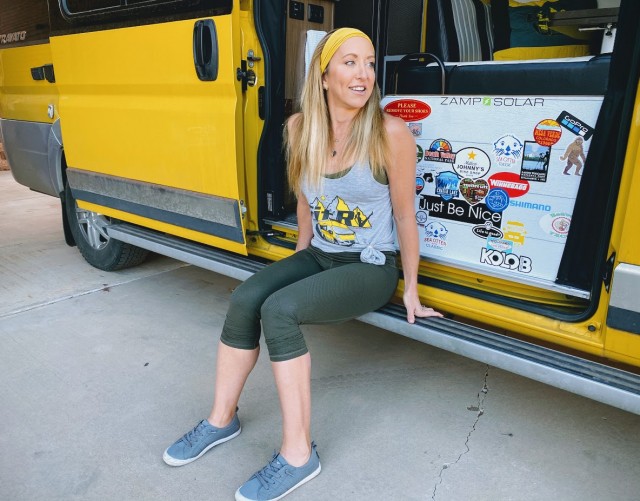
Last time I wrote, I covered the Hip Dominant Movement Pattern, so make sure you check that out too. Now, we’re moving on to the Knee Bends Movement Pattern, which includes all the various ways we squat.
On any given day, we sit down and stand back up a lot. Meals, computer chairs, campfires, vehicles, thrones (of the porcelain kind), etc. Climbing stairs, while it could also fall under the ‘locomotion’ movement pattern, is also a version of a single-leg squat. So, as many knee bends and squats as we do in a day, it’s quite important we’re able to perform this pattern well. But that’s the problem. Even the fittest of us are likely not squatting efficiently. We’ll get to that.
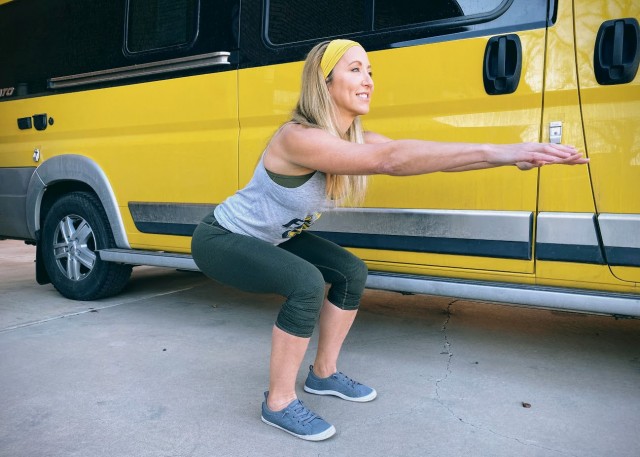
How To Squat Like A Boss:
When squatting, it’s important to keep your weight on your heels and bend your knees as you drive your hips backwards at the same rate, while maintaining a neutral spine. Squat depth occurs through hip flexion and ankle dorsiflexion, and not from rounding your spine. You’ll only be able to go as far as your range-of-motion allows with good form. If you attempt to go lower, your body will end up doing something weird to compensate, and that’s not good. You’ll be compromising your lumbar stability and increasing your risk of injuries.
Also! It’s important to avoid allowing your knees to collapse in (knock-knee). If you notice they’re doing so, it’s likely from either tight hips or poor ankle flexibility. Which brings us to this:
Flexibility and Mobility Training Must Come First.
Most problems with squatting can be blamed on mobility issues with our ankles and hips. This isn’t just a ‘beginners’ problem, either. Even the biggest gym rats have issues too, and probably don’t even know it.
Stabilization and Balance Come Next.
After flexibility and mobility, we’ve got one more step before we’re ready to be rock star squatters. We need to amp up our ability to stabilize and balance. So, for example, you might be able to stand on one leg all the live long day, BUT! Can you do it while remaining still as a statue without any noticeable ankle wobble? That wobble is a sign of instability and impacts the quality of your knee bend movement pattern. We need to get that in tip top shape before progressing to advanced squat training.
Progressions to Improve the Quality of your Knee Bends and Squats:
The exercises below are some of my favorites for resetting how we knee bend and squat. Even if you’re already a regular exerciser, there’s always room for improvement. Put down the dumbbells and give these a try!
Lying Single Knee Hug:
This stretch is great for getting both your hips and your knees in their full range of motion. And since you’re lying down, your back is more protected, allowing you to challenge your joint range of motion without making you vulnerable to injuries.
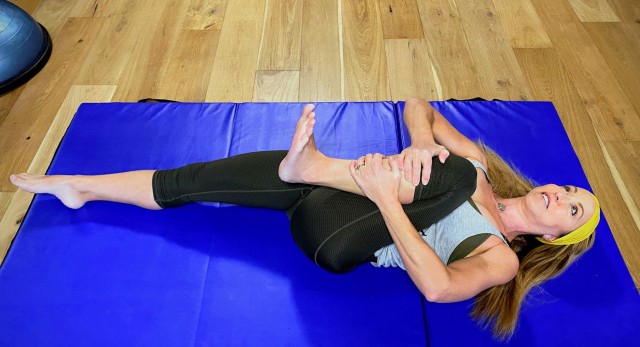
Lie on your back and hug one leg into your chest. Grab it with both hands below your knee and use pressure to challenge the range of motion. Dorsiflex the ankle (pull your toes up towards your shin). The non-working leg should be flat down to deepen the hip stretch. Hold it for around 30 seconds to 1 minute before switching to the other side.
TOO INTENSE? Grab a towel or belt or strap of some form. Hold the ends in both hands and place it on the shin of the leg you’re hugging. Use the towel to pull your leg in as far as you can without causing any pain.
Child’s Pose (with toes tucked and knees out):
This is another great way to get your hips and knees in a fully flexed position. Plus, when you tuck your toes under, you’re getting the added bonus of stretching your ankle range of motion too. Turning your knees out will allow you to keep your back more neutral. Since we’re doing this to improve squat form, stretching with a neutral spine is more effective, which is why the knees turning out is important.
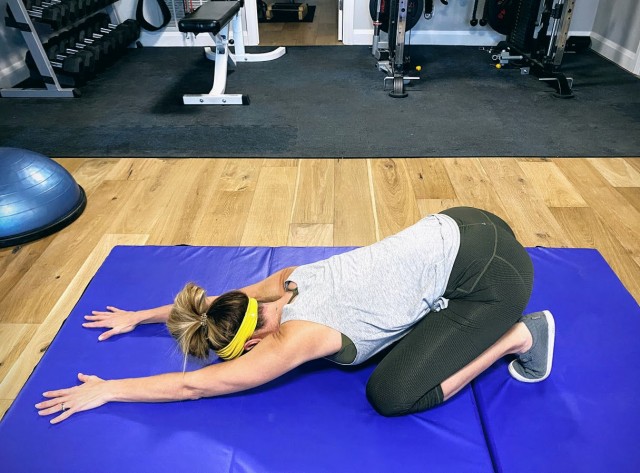
Start on your knees. Sit back on your heels, tuck your toes under, and bend at the hips to place your forehead on the ground. Make sure your knees are turned slightly out. Hold for 30 seconds to a minute.
TOO INTENSE? Beginners, you can do this by getting on all 4’s on your bed. Drive your hips back a little so your hips are hovering over your heels (your weight is shifted slightly back) without sitting all the way on your heels. Either hold it for 30 seconds, or you can turn it into dynamic repetitions by flowing from up on all 4’s to driving hips backwards.
Dragon Pose (variation):
This is one of my favorite stretches for lots of reasons, but when it comes to squats I especially love this one for its ankle flexibility effectiveness. You’re using your own bodyweight to deepen your ankle dorsiflexion on the front leg, while at the same time you’re in full-on knee flexion and your hips are being challenged in both full flexion (front leg) and extension (back leg). As a trainer of mostly middle-aged and older clients, ankle flexibility (or lack of) seems to be a common issue as we age. Do this stretch often and tell Father Time to stick it!
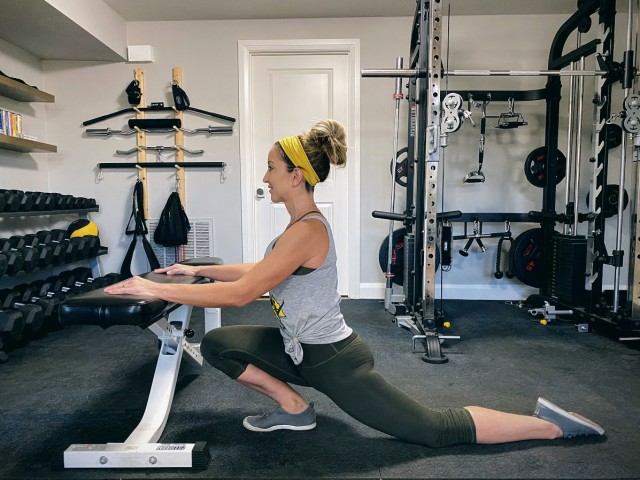
Face a chair or bench or countertop… anything sturdy. Using the chair as support, kneel down on your back knee, with the foot of your front leg flat on the floor. Shift your weight forward for two reasons: 1) To lengthen your back leg, and 2) to lower your glutes (on the front leg) to as close to the back of your ankle as you can get. Open your chest and use the chair to help you hold an upright posture. Hold the pose for 30 seconds to a minute. Repeat on the other side.
TOO INTENSE? Beginners, you can get similar benefits by standing facing a wall. Get in a lunge with your hands braced on a wall and hold it.
Foam Roller Ankle Work:
If you don’t have a foam roller, I highly recommend you get one. While the exact mechanisms at play are debatable, research does consistently show foam rolling loosens tight muscles and increases joint range of motion over the short-term. When it comes to squats, foam rolling can especially be effective at improving your ankle mobility.
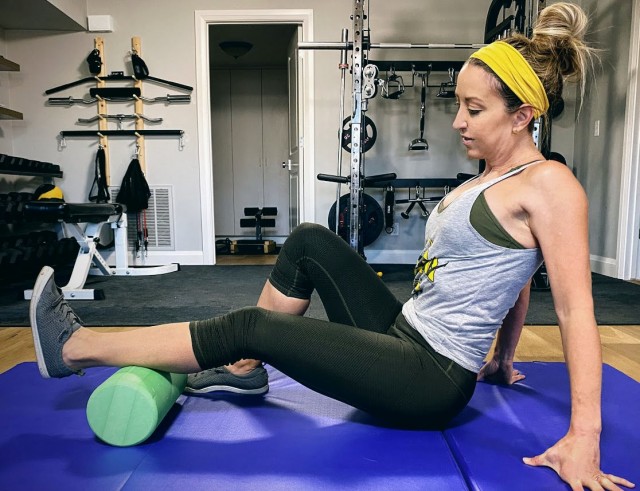
Sit on the floor with your hands braced slightly behind you and the lower part of one of your calves resting across the roller. While slightly pressing the leg into the roller, do 10 slow ankle circles clockwise, and then 10 counter-clockwise. Then, move your toes side to side 10 times. Next, dorsiflex and point your toes 10 times. Finish with rolling out the backside of your lower leg, adding a little rotation so you can roll out the inner and outer part of the calf muscles, too. Repeat on the other side.
TOO INTENSE? Sit on the front edge of a chair with your feet flat on the floor. Start with your right foot and do a) ankle circles, b)toe lifts with heel down, c) heel lifts with toes down, and d) toes side to side (keeping heel down and holding your knee so that it doesn’t move in and out). Repeat on the left foot. No foam roller needed!
Lying Wall Squat:
This stretch improves the bottom phase of the squat pattern. You’re in a full range-of-motion squat position without the weight-bearing that can limit how deeply you can bend your joints. The lying position doesn’t allow you to round your back, either, so you’re able to challenge your joint range of motion without making your spine vulnerable. The hardest part is getting in position! You want to get your glutes as close to the wall as possible. It’s tricky, and takes some wiggling and finagling. Try it anyways, it’s worth it!
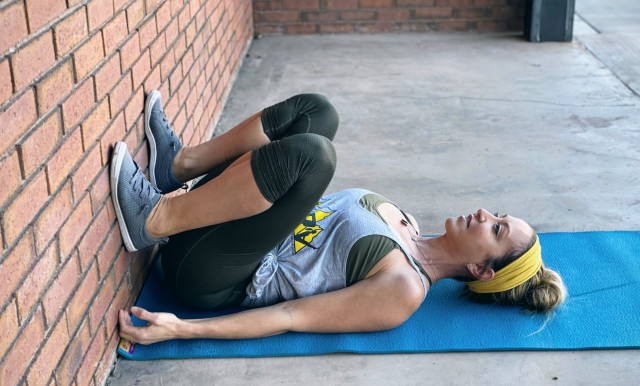
Lie on your back with your glutes as close as possible to a wall. Use your hands to help you plant your feet flat on the wall a little lower than comfortable. Feet should be hip-width or slightly wider with your toes turned up to the sky, or ever so slightly turned out. Once you’re in position, slowly move your knees in and out to add some hip rotation. This will work your hip mobility even more by clearing space in the hip joint for rotation while in a flexed position. Stay in position, and continue moving the knees around, for about one minute.
TOO INTENSE? You could lie on your bed and hug both knees in while dorsiflexing your ankles. From there, use your hands to move your knees in and out.
Pull Squat (with calf raise):
These seem to be a favorite of my trainees. I totally get it. The pulling motion extends and decompresses the spine and feels oh so nice. But that’s not why we’re doing these! A pull squat is a form of assisted squat that lets you get deeper into a squat without full-on weight bearing. But since there is still some weight bearing, unlike the lying squats you just did, these will deepen your squatting range of motion while still protecting your back, which is most vulnerable at the bottom phase of a squat.

If you don’t have a horizontal bar or railing no problem. Go grab onto your kitchen sink, it works just as well. Grasp your bar (or sink), and then simultaneously drive your hips back and bend your knees. Make sure your weight is loaded on your heels. Your arms are straightening and pulling on the bar as you go back. Imagine you’re trying to pull the bar to you, if that helps. Once you’re in as deep a squat as you feel is safe for you, do a form check. Ensure your heels are still down, and that your knees and hips are bent about equally, and your arms are straight and still pulling backwards. Stay like that for about 5 seconds before coming back up and raising up to your tippy toes, using your arms to assist you get even higher on your toes and more range in your ankle ‘plantar flexion’ (the term for pointing your toes). Hold that for a second or two before placing your feet flat and dropping back into the squat again. Continue repeating for about 10-15 reps.
TOO INTENSE? Do the exact same motion, only don’t go so deep into your squat. Discomfort is expected, but if it’s painful, don’t do it.
Deep Squat Hold
When we do traditional squats in the gym, we’re only training a portion of our range-of-motion. So, when the time comes in our lives when we have to squat extra deep for whatever reason, we’re more prone to break positioning… maybe rounding our backs, letting our knees cave in, rolling our ankles… whatever weird thing it is we do to compensate for our lack of training in bending that deeply. The deep squat is an excellent way to improve our squatting mobility and strength. It’ll also tell you a lot about your body. Can you get your heels down? If not, you’ve got some issues with ankle flexibility. Is your back rounding? Then you’ve got hip mobility issues. Is it too hard to get in the full squat position? It’s likely you need to build your strength up. So, not only is the deep squat a great exercise, it’s also an effective self-measurement tool.
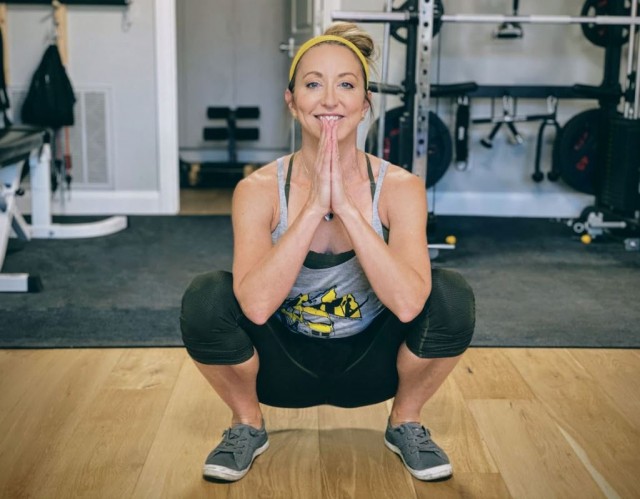
If you’re new to deep squats, start by holding on to something sturdy so you don’t fall backwards. And don’t be discouraged, it takes a little practice to get used to executing these properly. Set your feet a titch wider than hip-width and pointed pretty much straight ahead with a very slight turn-out. Drop all the way down so that your hamstrings come in contact with your calves. Your heels stay flat on the ground, with your weight evenly distributed throughout the feet and toes. If you cannot get your heels down, place something under them for support (like a book or a weight plate). Keep your spine neutral and try to avoid any rounding. Don’t let your knees cave in. My favorite way to hold a deep squat is by using my elbows to turn my knees out with my hands in prayer pose to deepen the hip stretch. Hold this for 30 seconds to start, and try to build to longer durations as you get stronger.
TOO INTENSE? Find a railing, or go back to your kitchen sink again! Hold on and drop into as low of a squat as you can handle. Hold it for 30 seconds or as long as you can.
Step-Ups:
Unless you’re fanatical about escalators and elevators, climbing steps on the regular is pretty much inevitable. Even if you don’t have any in your home, steps just seem to be everywhere. Going into your RV, stepping up on a curb, climbing some rock steps on a hike… those are just a few examples of steps I climbed in the past couple days. This exercise here is an important unilateral knee bend exercise to strengthen and improve your stepping-up motor patterns.
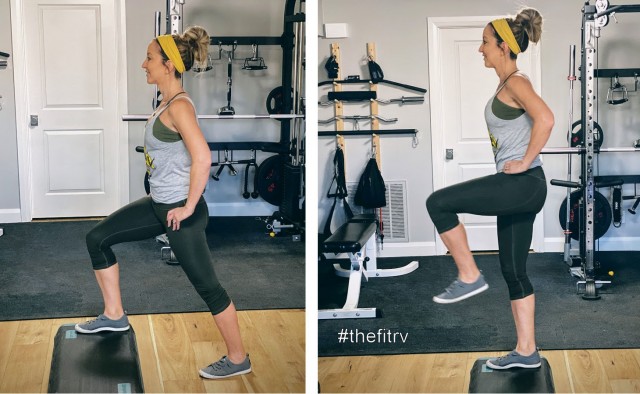
Start by stepping onto the step with your right foot. Straighten your right knee to stand on the step while lifting your left leg so the thigh is about parallel with the ground. Keeping your right foot planted, bend your right knee to lower back down. Your left foot taps the floor without putting your weight onto your left foot. Repeat this 10-15 times before switching sides.
TOO INTENSE? First off, hold on to a wall or railing for stability, that alone makes a huge difference. Then, instead of lifting your knee at the top, simply step up with both feet on the top of the step.
Eagle Pose:
I couldn’t leave without throwing in a balance exercise, because balance is directly tied to your ability to stabilize yourself when doing knee bends and squats. This is something we have naturally during our younger years, but it tends to decline with age… and it declines very sneakily. You may not even notice you’ve lost some of it until you’ve lost a lot of it. So, don’t neglect your balance practice! This particular pose, at its core, mimics a single-leg squat, making it an excellent balance exercise to help improve the knee bends movement pattern.
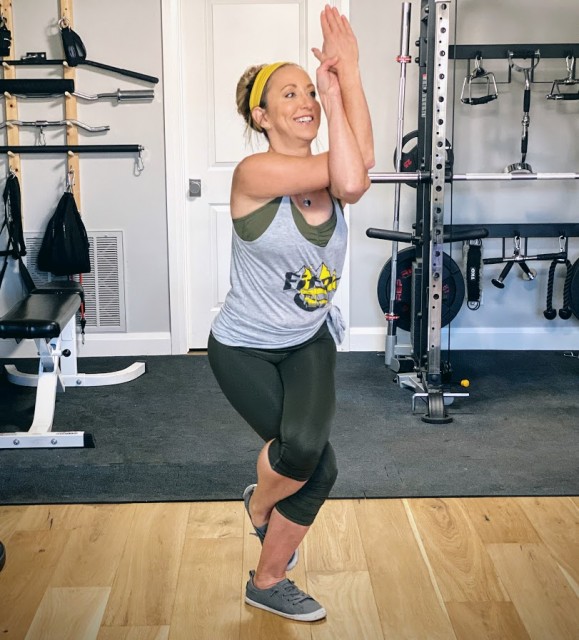
Balancing on your right foot, cross your left thigh over the right. Hook the top of your left foot behind your right calf, or, you can omit the foot hook and just keep the leg crossed there. As for your arms, you could just keep it simple and place your hands in prayer pose. Or if you’re up for the challenge, wrap your arms and hands so that one arm is crossed above the other arm with the top arm tucked into the elbow crook of the bottom arm. Press your palms together (or as close as you can get them). Lift your elbows and reach your fingertips toward the ceiling. Keep your shoulder blades pressing down your back, toward your waist. Hold for around 30 seconds to 1 minute, or if it’s difficult, just hold for as long as you can. Do both sides!
TOO INTENSE? Hold on to a wall. Start by practicing a basic single leg balance. From there, try to bend your planted leg a little and hold it. Once you’ve got that down, cross your non-working thigh over the working leg without trying to tuck the toe. Hold for bouts of 10 seconds and then rest before repeating a few times.
AND THAT’S IT!!!!
Do these exercises a couple of times a week for about a month. After that, continue to incorporate them occasionally into your regular workout plans.
Do each exercise for 3 sets. If everything’s feeling good after consistently training for a month, then you’re ready to progress to some more intermediate squats and knee bend exercises. I’ll be sharing those in a future section of my Functional Fitness series, so stay tuned!
Master your knee bends and squats with proper form so you’ll move through life like a boss!
Once you train this movement pattern enough, you’ll eventually start using it on auto-pilot in your daily activities. Your movements will be more efficient, will feel easier, and you’ll be less prone to injuries. YOU FOR THE WIN!
Ba dee ba dee, that’s all, folks! Let me know your questions, comments, or just feel free to continue the conversation down below!
Stay strong gang! You, and Future You, are so worth it!
Love,
Trainer Stef


Thank you, thank you, Stephanie, for all the advice and photos! (Careful, your educator background is showing. )
It’s been hard to get a good overall workout with gyms closed during Covid and the walking and biking I’ve been doing isn’t hitting most muscle groups.
Looking forward to working these in!
Lorrie
Yes, indeed workouts are yet another challenging part of Covid times. I’m glad this gave you some ideas! Stay safe and healthy, Lorrie… and keep exercising! xoxo
This is an awesome series! I plan to start adding these to my warmups before Pilates and Bodypump.
Get it, girl! xo 😎
Great form for the stretches and exercises! Question regarding the foam rollers. Which density do you recommend for a female? I am 5’ 3” , 125 1lbs. age 60.
Thanks to you Steph I stay in shape with stretching, hot yoga, biking and walking.
Thanks for demonstrating the stretching and offering advice.
Tracy Rowley
Hi Tracy! I recommend a firm density foam roller, one that won’t lose its shape… and if you’re only getting one, get the smooth, not knobby surface ones. The firm may sound harsh, but you can control the intensity by how much bodyweight you allow on it. The softer ones may sound gentler, but they have issues with rolling once you start to squish your bodyweight into them, and they tend to wear out faster too.
Here’s the long one I recommend (and it’s made in USA!) which comes in either black or… PINK!!! (get the pink! 🙂 ) https://amzn.to/2Om5qFF
The longer ones provide more stability and give you more options, but in the picture I’m using a short roller. I like the portability of the short one so that we can easily travel with it in the campervan. If space and portability is an issue, the shorter ones work great!
Here’s the short one I recommend (also USA made!): https://amzn.to/3b9T90O
Way to stay active, Tracy! Keep going, and stay strong! xo
I found these articles on building upper body strength fascinating. Who knew? Technique with a pull up bar beats machines, go Marines!.
https://elemental.medium.com/your-inability-to-do-pullups-is-all-in-your-head-191278c2f5aa
https://www.usatoday.com/story/news/nation-now/2016/02/13/women-pullup-training/80336088/
Ah yes, good ole pullups. The king of all pulling motions, which I’ll be covering next in my Functional Fitness series. Personally, I have a love/hate relationship with them!
Stefany. Thank you for the RV fitness band workout. I know it’s an older video, but I’m older!!! It suits me just fine, with two artificial knees, and just the right amount of time. Thank you