This post may contain affiliate links.
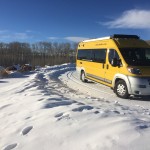
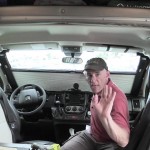
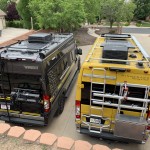
Lance is the most heavily modified Travato out there. That’s not really bragging, that’s just how things have turned out.
It won’t surprise you that I’ve kept a spreadsheet of mods I’ve done over the years, and honestly, without the spreadsheet, I’m sure I’d forget many of them. Some of Lance’s mods have caused design changes at Winnebago, and they’ve become standard equipment now. Some of the mods are things Lance pioneered that nowadays, pretty much everyone does to their Travatos. Some of the mods are things I tried, and then later decided we didn’t like and so we’ve reversed them (or in some cases re-worked them 3 times!). And some of the mods were just for fun. They’ve all come together to make Lance Lance, and we wouldn’t have him any other way. (And if he was some other way, we’d probably make the mod to change it.)
We’ll be celebrating our 5 year anniversary with Lance this summer, so I thought it might be fun to look back at all the things we’ve done, and put them in one place. Even though this got crazy long, I’m hoping it might be useful for anyone looking for inspiration for their own mods. SO without any further ado, let’s jump in! Let me know if you guys remember any that I’ve forgotten or left off this list.
Mods that Winnebago Made For Us
Way back when Winnebago was building Lance, we negotiated a few mods with them. These were things that Winnebago was willing to try, or to learn from, or to gauge demand for future Travato development. Some of these have become standard-issue Travato features now, but Lance was the first one to have them.
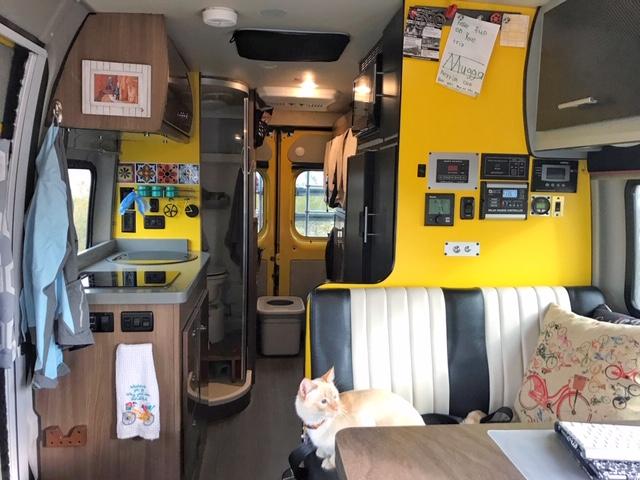
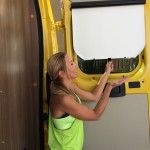
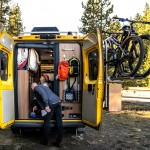
 Raised the Bed for Bikes
The bed in Lance is a full 40 inches off the floor. We asked for this one specifically so that we could keep our bikes inside the rig and still be able to sleep. This was probably the biggest departure from a “standard” Travato that Winnebago made for us. It also involved designing a completely different cabinet configuration around the bed. You can read all about the design of this cabinet in this pre-Lance post.
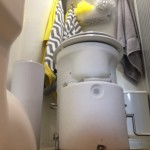 Installed a Composting Toilet
We could have done this ourselves, but Winnebago agreed to do it for us. We decided to go with an Airhead composting toilet for Lance. We didn’t have any experience with composting toilets at the time, so this was a bold move for us. How did we wind up liking the composting toilet? You can hear on that subject from us in our video: The Straight Poop on Our Composting Toilet.
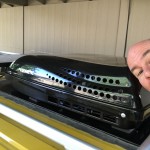
 Subwoofer and JBL Sound System
This was one Winnebago wanted to try, and we certainly didn’t object. They installed a JBL Subwoofer and JBL speakers in Lance – hooked up to the cab radio. They sounded awesome! Unfortunately, a software update to the RAM UConnect disabled the ability to use the external amp needed to drive these properly. So we only got to enjoy it for about a month. Eventually, I removed the Jensen subwoofer, and now we use the JBL for the Jensen system, so it wasn’t all for naught. More reading here!
 Installed WeBoost Drive 4GX
I always knew I’d be working from the road, and nothing helps with that more than our WeBoost Drive 4GX. Winnebago installed this for us from the beginning. Come to think of it, when they installed it, I don’t even think there was normally a cabinet opening in that location! So you more recent Travato buyers can thank Lance for that one. I’ve since rebuilt the cabinet when I removed the TV, but I kept the WeBoost in the same location.
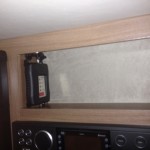
 Porthole Window by Bed
Since Lance is the only Travato with the high bed, he’s also the only Travato with a window up there. We were worried that it might feel closed up when we were in the bed, so we asked for a window. Winnebago used it as an opportunity to experiment with dual pane acrylic windows. Acrylic windows are now a regular option in new Travatos, so… you’re welcome!
 Galley Window
If you’ve only looked at Travatos recently, you might not realize that for the longest time, the galley in the G floor plan was pretty closed-in. Nowadays, there’s a window there. For that, you can thank Stef. She asked for a window over the galley and Winnebago tried one out. The one they went with in the end is a bit smaller than the prototype in Lance.
 Water Lines Inside
Winnebago had to move a few things around, but they got all our water lines inside. This is one I insisted on, and nowadays, this is standard on not only Travatos, but all new small coaches from Winnebago. The rest of the industry has picked up on this as well! I don’t know why this wasn’t an industry standard before, but now it is – at least for most better class B coaches.
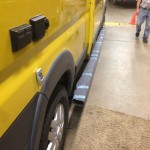 Running Board
If you’ve only looked at the Travato recently, you might not realize that they once came ONLY with motorized steps. That all started to change with Lance. Nowadays, I don’t see them coming from Winnebago with anything other than running boards. They’ve been through a couple iterations now, but Lance was the first Travato to have running boards.
Mods That We’ve Made to Lance
So those few initial mods got us into Lance, and excited about the adventures to come. But that’s certainly not the end of Lance’s mod history. It’s more like the beginning. I’d estimate that by now, Lance has spent almost as much time in some state of disassembly as he has on the road (and with over 60,000 miles on him, that’s saying something!). So, in more-or-less chronological order here are the mods that we’ve made to Lance. Many of these were Travato firsts.
 Fixed the Toilet Smell – Added 360 Siphon Vent
The composting toilet in Lance was the first one Winnebago had ever installed. It was also the first one we had ever used. It shouldn’t surprise anyone that there were some “learnings” along the way. One of these learnings had to do with pressure in a standard RV vent cap while driving. Long story short – we got some toilet smell in the rig. I fixed this by adding a 360 Siphon vent cover to Lance. I later went back and added one to the grey tank as well. I had used them before, and it’s served us well ever since. I highly recommend them!
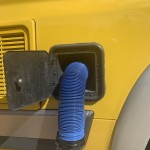 Silicone Around Inside of Sewer Hose Storage
So Lance doesn’t have a black tank or black water, but we still carry a sewer hose to dump the grey tanks. The Travato doesn’t have any outside storage, and the sewer hose is stored in a tube cut into the driver’s side wall. That’s fine, but I became concerned that it might leak inside the RV. I never saw it happen, but I worried it might – so I ran a thick bead of silicone all around the inside end of the hose where the end cap is to make doubly sure there were no leaks. This mod requires long arms!
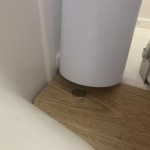 Secure Toilet Paper Holder with Magnet In Floor
This is probably a mod that won’t help anyone but us, but we love it. We got a toilet paper holder for the wet bath. It worked fine, but kept tipping over as we drove. I solved that by tossing a magnet in the bottom of the holder and recessing a magnet in the platform that supports our composting toilet.
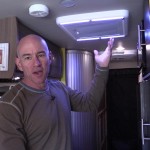
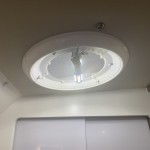 Replaced Incandescent Bulb in Bathroom with LED
These days, I think everyone that has a Travato does this. The Travato comes with LED lighting throughout… except for the bulb in the bathroom. There’s a reason Winnebago can’t put an LED fixture there, and it has something to do with RVIA codes or some such. It took us only about 2 weeks before we had located a replacement and replaced the bulb with a much more efficient LED one. This is the bulb I used, and it comes in a pack of 2.
 Added 3M Crystalline Film to Windows
I’ve previously done detailed testing on 3M Crystalline Window Film. We had it installed on our last RV, Das Bus. Nothing had changed to make me think it stopped working, so shortly after getting Lance home, we added the Crystalline film to his windows. No regrets – and no sweating on long, sunny drives out West.
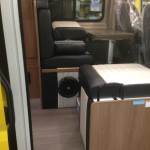
 Additional 12 Volt Outlet by Dinette
Initially, Lance was not a lithium-powered coach. But I still needed to work while we were on the road – and I didn’t want to run the generator. To keep my laptop charged, I used a portable inverter (this one in fact). I wanted a way to keep that inverter running while I was working at the dinette, so I installed an additional 12 volt cigarette lighter outlet at the dinette to make that happen.
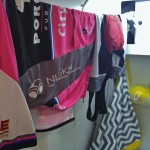 Added Retractable Clothes Line
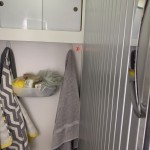
This seems like a small thing, but it comes in SO handy. I added a retractable clothes line in Lance’s bathroom. It’s a great way to let our towels or clothes dry so they don’t get… funky smelling. We’ve used this going way back to our earliest races with Lance, and we’ve put it on our RV accessories list because we feel like it’s that much of a must-have.
 Made Cell Phone Pockets by the Bed
I can’t take credit for this one. We convinced Stef’s mom to make us a couple of pockets to sit up by the bed to hold cell phones. She made them and sent them, and I installed them. It’s been years now, and we’ve never looked back. This was back before I learned to sew.
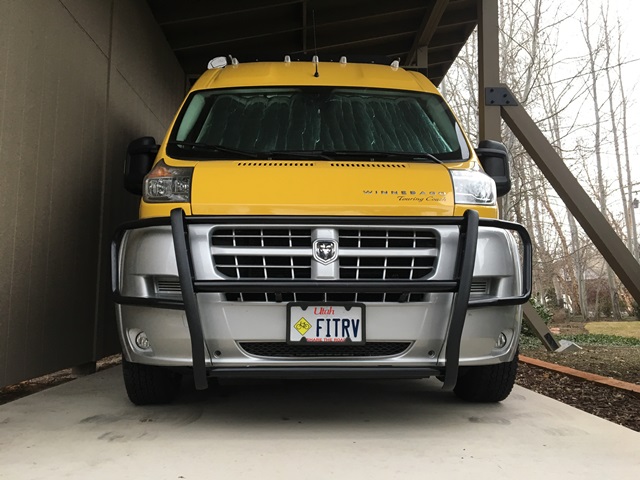
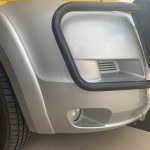 Clear Bra New Bumper
If I had it all to do over again, I think I would go with the standard black unpainted bumpers for Lance. But as it is now, Lance has painted bumpers across the front. The silver paint is cool, but it can chip. That’s why I had the front bumper (and hood!) covered in Clear Bra. We did this pretty early on, and I haven’t regretted it. Still kind of wish for the black bumpers though…
 Dynamat Doors (front, side, rear) and Add Insulation
Nobody likes riding around in a noisy RV. One of the earlier mods I made to Lance was to add Hush Mat (similar to Dynamat) to the inside of the doors to quiet things down. I posted about that process here. The good news is… it’s worked. Lance is the quietest ProMaster RV I’ve ever been inside of (and that’s a lot of them). And while I tackled a lot of the winterproofing projects later, I did use the opportunity to add insulation inside the doors. I even made a video about how to remove the cab door panels.
 Installed Sumo Springs
These days, pretty much everyone who gets a ProMaster RV – Travato or otherwise – installs Sumo Springs to raise the rear and help handling. I believe I was the first to install them and write about it – back in September of 2015! Since that time, Sumo Springs have developed a cult following among Travato owners. The Sumo Springs worked well, but we’ve since removed them to install an even more high-tech suspension system. (More on that further down the list!) But for performance-per-dollar, you still can’t beat the Sumo Springs.
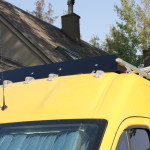 Developed Wind Fairing for Front Roof
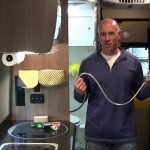
The Travato does not come with a roof fairing – even though most of them have racks installed. There are several reasons to install one: Noise and protection from bugs being among them. I tried to install commercially available fairings to Lance’s roof rack, but they just didn’t quite work. So… I developed my own! You can read all about that, and follow along, in this post.
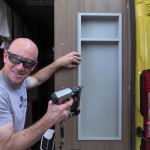
 Initial Pantry Conversion
The Travato G floor plan has a rather large cabinet behind the dinette seats – across the aisle from the galley. There’s a hanging rod in it, in case you want to hang clothes there. For me, not having any clothes that hang is part of the whole reason to get in the RV in the first place. Since I wasn’t planning on bringing too many suits along, we decided to convert this space into a pantry with drawers. The whole cabinet was redone later when I replaced the fridge.
 Acrylic Mirror for Stef Inside Pantry
No sooner had I completed the pantry conversion than Stef told me she needed a longer dressing mirror somewhere in the rig. The back of the pantry door seemed like a good place to put it. I was worried a bit about things hitting the mirror and breaking it, so the mirror I installed is an acrylic mirror that won’t shatter if hit by a can of beans.
 MCD Shades for Rear Windows
We loved the convenience and speed of the MCD shades that were installed elsewhere in the coach by Winnebago (like at the dinette). We wanted that same convenience for the back windows. So, I contacted the folks at MCD, and we developed a shade pattern for the back windows. You can see the windows in this video post from back in October of 2015. There’s even an order template for you. We don’t use these any longer, but they worked well while we had them.
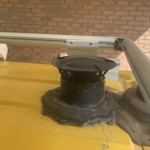
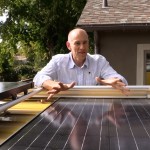 Added Third Solar Panel
Before we did our lithium battery conversion, we wanted as much solar power as possible so that we could keep our batteries charged. Fortunately, Winnebago made it easy to add additional solar panels to the roof with a combiner box and roof rack. You can watch me add a third panel to our roof in this video post from the WinnebagoLife blog.
 Installed Cup Holder in Dinette Table
Sometimes, it’s the little things that make a big difference. Installing a cup holder in our dinette table was one of them. It makes it so much easier to keep track of a water bottle or other beverage while underway. (Yes, I do sometimes work back there while Stef drives.) Back in October of 2015 I installed this one – and all you have to do to install it is drill a hole.
 Added Storage Under Floor
The Travato K floor plan has always had storage in the floor where it’s raised up near the cab. The Travato G does now… but it didn’t always. Lance was the first Travato G floor plan to have storage up under the floor in that area.
 First Pass: Storage on Back Wall
The rear wall of the Travato G (or K for that matter) is a popular place to store accessories that’s both convenient and out of the way. I’ve redone that area three times now. Our first attempt was the simplest, and just consisted of adding accessories from our friends at Organized Obie. You can see the our first round of accessories, and learn more about Organized Obie, in this video post from December of 2015. If you want accessories from Organized Obie, don’t forget to follow our links for 5% off!
 The Winterproof Travato – Insulation and Venting Mods
This is THE post I point people to when they ask me questions about how to get a rig ready for winter camping. I had already done some insulation, but in this post, I get into a little bit of everything. Insulation. Pipe insulation. Water shut-off valves. Venting concerns. Heat tape. Operational procedures. It’s all on the table in this data-driven post (we’ve got temperature graphs from the insides of cabinets, for crying out loud!). Lots of mods and worth a read if you’re into winter RVing.
 Added Traps to Both Sinks
The original design of the Travato comes with waterless traps. Generally speaking, I like these, because they work, and because you don’t have to have any water in them (which makes them easier to winterize). But somewhere along the way, our waterless traps got damaged. At least that’s what I assume, because I started to notice odors coming back up from the grey tank. So I went retro and installed Fernco Flexible Traps under both sinks. I left the waterless traps in place, so now I’m double-trapped. (Double-Trapped? Is that even a thing?) Anyway, the new traps are rubber(ish), so they will flex should I happen to forget and leave water in there over the winter.
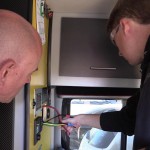
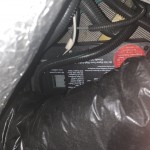 Hardwired Surge Protector
Tough to get a picture of this one, but it’s down there! Before Lance’s big lithium upgrade, I had some work done at AM Solar up in Oregon. One of the things they did was to install a permanent, hard-wired surge protector in Lance. Some of the other work they did has been removed since, but this Progressive Industries 30 Amp surge protector is still in Lance today. Since it’s wired in right at the shore power plug, it protects all the wiring in Lance.
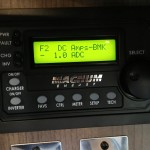 First Large Inverter Install
Fun fact: The Xantrex Freedom SW 3012 inverter in Lance right now was NOT his original high-capacity inverter. That honor goes to a Magnum 2812 inverter which was installed by the folks at AM Solar. That inverter is gone now, replaced by a Xantrex. But while it was there, I did use its control panel to figure out a run-down of all the 12 volt loads operating on our Travato.
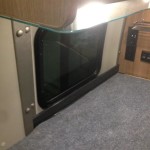
 Cut Down Refrigerator Door
This project was both terrifying and super fun at the same time. Nowadays, all Travatos come with compressor refrigerators, but that wasn’t always the case. Lance originally had a 3-way refrigerator with a clear design flaw covering up the controls. Eventually, I had enough of it, and took a hacksaw to our refrigerator door so that I could expose the controls. You can read all about that effort in this post. Long story short… it worked like a champ!
 Fixed Plumbing for Shower to Eliminate Cold Blast
If you’ve taken the typical “RV Shower”, then you know that when you turn the water off and back on, you either get scalded or (more likely) frozen with each turn of the tap. Either that, or your “shut off” doesn’t work and drips cold water down your back while you lather up. Finally, I had enough. I located a shut off valve that actually shut things off, and installed some check valves to finally fix the cold water blast. I run through the whole process in this post.
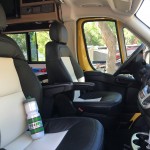 Added Leather Seats
These days, leather seats are an option on the Travato. Back in the day, they weren’t. The reason why had to do with the airbags in the sides of the seats. Personally, I love leather seats. Mainly this has to do with not getting a static shock every time I get out of the vehicle. I finally decided to take matters into my own hands and ordered a leather seat kit off the internet. I got the leather seats I wanted, but it didn’t go exactly as I had planned. You can read all about it in this post.
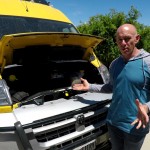
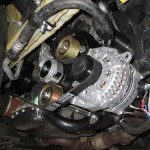 Second Alternator Install
The process of turning Lance into an all-electric coach took a while. The first step of that was to install a second alternator from Nations Alternator. It wasn’t hooked up to anything besides the engine initially. I had the install done at our local RAM dealer, but that didn’t all go according to plan. You can read all about exactly what happened in this post on the conversion to a lithium-powered rig.
 Lithium Battery and Xantrex Inverter Install
This was the completion of Lance’s conversion to an all-electric coach. It also meant I got to remove the generator (woo hoo)! This was actually a separate operation, separated by more than a month from the alternator install. This was long before there were lithium Travato models. Our system was an inspiration, but is different from the final GL or KL systems. The completed system we installed in Lance was a prototype for what eventually became Xantrex’s Freedom eGen system, which is available on production coaches today. The back story is in the same post as the alternator install.
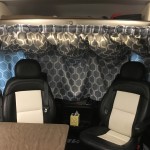 Installed Curtains in Cab and Slider
We were never quite happy with storing cab shades (still aren’t, but that’s another story). So sometime after I learned to sew, I decided to make a “harem tent” like curtain to cover up the cab windows. That’s still in Lance today – but the matching curtain I made for the slider door has since been removed and replaced with a product from Vanmade Shades. You can read about the curtains, and even get a pattern, in this post.
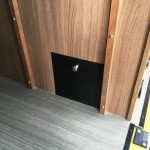 Carved Out Storage Under Toilet
In the Travato G floor plan, there is a bit of space underneath the toilet that’s kind of “dead space” Since we have a composting toilet with no drain plumbing, we have more space under there than most. I decided to take advantage of that space and opened it up. You can read all the details of how I did that in this post.
 Bull Bar – First Iteration
Somewhere along the way, I decided that Lance needed to look more “aggressive” up front. I went looking for bull bars, brush guards, whatever, and eventually wound up on a site in Romania. (They have Fiat Ducato over there that are basically the same body.) I sent away my money and waited for months. Just as I decided the money was gone, the bar showed up and we mounted it in Lance. Never wrote up anything about this one. Just did it.
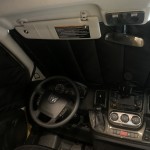
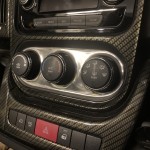 Installed Carbon Fiber Dash Kit
This is another mod I did and just didn’t write about it. Many people were bothered by the shiny trim around various dash elements in the older Travatos. I decided to do something about it and replace it with darker trim to reduce the reflections. Since Stef and I are cyclists, I went with carbon fiber! Dash trim kit installed and looking good to this day.
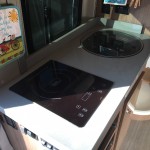 Installed Induction Cooktop and New Countertop
Once the big conversion to a lithium-powered RV was complete, it didn’t take long before we wanted to remove as many propane-burning appliances as we could. When we tested an induction cooktop vs propane in a “boil water” test, that pretty much sealed the deal. This required having a new countertop made to fit the induction cooktop. It looks great now and works even better. I doubt we would ever want to go back.
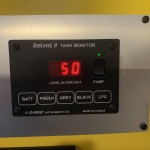 Replaced Tank Monitors with See Level
We didn’t write anything up on this one, because it got kind of involved with the electrical connections. The fact that we didn’t have a generator any longer made it possible to remove the entire original control and monitor panel, which I did. I then replaced the “guess gauges” with a SeeLevel tank monitoring system. I love the SeeLevel system, and will likely put it on every RV I ever own.
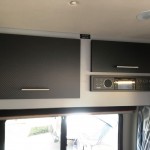 Removed TV and Build New Cabinet
Sometimes, you just want to change something. That was certainly the case here. I removed the TV from Lance – completely. Then I replaced that entire upper cabinet with one slightly bigger, deeper, and with better storage. You can read all the gory details in this post that I wrote. That TV was dead weight anyways…
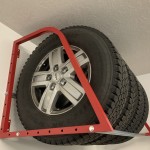 Purchased Second Set of Wheels for Snow Tires
One of our top tips for winter RVing is to make sure you can actually get where you’re going. For us, that means snow tires. Rather than swap tires over onto the rims each winter and spring, we decided to purchase a second set of rims to mount our snow tires on. These are those rims in storage in the garage.
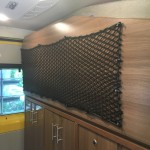 Net Bag for Underside of Bed
As he came from Winnebago, Lance had a mesh “envelope style” bag underneath the bed. We tried to use it for dirty clothes, but the Velcro on it was so aggressive, I kept getting cut. Seriously – Velcro cuts! My first attempt to fix this was to install a large mesh bag underneath the bed. This was later removed when I made our final laundry bags for this space, but it worked for a while. I kept the mesh bag, and have been cutting it into pieces and using it for smaller projects ever since.
 Replaced Cabinet Door with Mesh In Penthouse Cabinet
You know how I just said 40 words ago that I was using the uninstalled mesh bag for other projects? This was one of them. There is a narrow cabinet over the bed in Lance. It came from Winnebago with a door. But since our bed is so high, and the bed folds up, the door was almost always blocked. So I remove the door and replaced it with mesh so we can at least throw our pajamas up there without having to lower the bed.
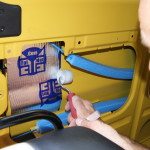
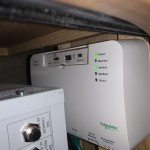 Xantrex Comm Box Install
If you have a Xantrex inverter, there’s a device you can get to talk with it via a tablet or handheld device. It’s called the Xantrex ComBox. We installed this down by the inverter itself. We also had to install an inexpensive 12 Volt router so that we could talk with it. I’ll be honest, we don’t use the ComBox very much day-to-day. But if there’s ever a problem or question with Lance’s electrical system, the ComBox lets us access extremely valuable log information so we can figure things out.
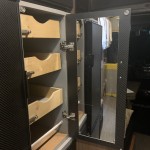
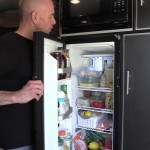 New Compressor Refrigerator and New Cabinetry
If you were to ask me what was the most difficult mod I’ve ever done to Lance, swapping out the absorption fridge for a (dual) compressor driven model is hands down the winner. I don’t even have to think about it – it was that difficult. It was so difficult in fact, that it took me 5 separate videos to chronicle the project! Gas plumbing, electrical, structural, insulation, cabinetry… it’s all here! The Travato comes with a compressor fridge these days, but ours is bigger and our cabinets are larger.
 Better Drawers for Pantry
When I rebuilt the pantry cabinet during the fridge replacement… it grew! This meant I couldn’t use the old drawers, and so I had to rebuild them. The new drawers are both wider and longer than the old ones, with integral fronts instead of applied fronts like the old ones had. I didn’t write about this specifically, but handled it during the Fridge remodel series.
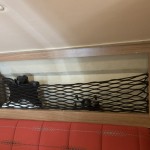
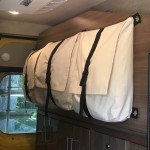 New Laundry Bags Under Bed
We pretty quickly hit our limits with the mesh bag under the bed for laundry storage. It drooped! Since I had learned to sew, I made some proper, gusseted bags for laundry storage under the bed. You can read about the whole process, including the attachments (which was surprisingly difficult) in this post. This was one of those mods that turned out way better than I thought it might.
 Lined Shelves and Drawers with Cork (quiets rattles)
This is a project anyone can do because it’s basically like shelf-paper that we’ve all been using for generations. I hate rattles – and I finally decided to try to quiet things down inside the cabinets by lining drawers and doors with cork. Cork shelf paper is readily available, cuts with scissors, and has an adhesive backing. Added bonus: In addition to being quieter, cork also keeps things from sliding around so much!
 Adapted Rear door Handle to Open With Strap
This was a safety mod that I didn’t write about because it’s unique to Lance and his high bed. It’s something Stef requested though, so it got done. With Lance’s bed up so high, the handle to open the door in an emergency is a couple feet below the bed – meaning basically there was no way to open the rear doors in an emergency if you were in bed. To get around this, I modified the back door and connected the door handle to a nylon strap that we can reach from the bed. Also had to install an eye bolt so the strap could “turn the corner” so to speak.
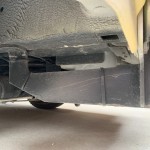
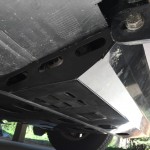 Installed a Skid Plate
With Lance’s second alternator hanging pretty low, I was concerned. I wanted t get it covered and protected from road debris, curbs, and what have you. I worked with Gordon White through several versions to develop a heavy duty skid plate that protects not just the second alternator, but the entire underside of the engine. We went from the first version all the way through the final one, which is still on Lance today.
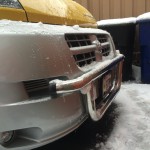
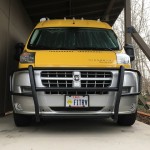 Bull Bar Version 2
When Gordon and I were developing the skid plate, we wanted it to mount securely to frame rails. We also wanted to make sure it wouldn’t interfere with other accessories folks might install. To gain some insight into this, we installed a second, and more widely used bull bar or brush guard on Lance. This one looks more… badass.
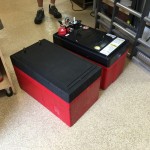
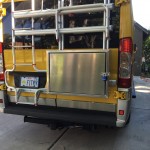 Storage Box on Rear
Camper vans in general, and the Travato in particular, aren’t known for their outside storage capabilities. I wanted to change that, so I hired a local metal fabricator to build a custom exterior storage box for the Travato. I mounted the box below the bike rack. We’re several years on now, and this box has given us plenty of use with no troubles whatsoever.
 Replaced Air Conditioner (the first time?)
The original air conditioner on Lance was a Coleman Mach 8 – so named after the sound it made. A loud air conditioner is particularly problematic for us because our bed is so near the ceiling. We decided we wanted something quieter and colder, and so we installed a Dometic Penguin II air conditioner in this rather humorous video. Stef still hasn’t let me live down the rope incident…
 Back Wall Storage – Take 2
I cannot take credit for being the first to realize that there was storage potential in the rear wall of the Travato G floor plan. Others blazed this trail, and then I quickly added some storage in this video. The storage I added wasn’t super useful, and I suppose that doomed it to being replaced one day. (Yes, there is a third attempt at back wall storage coming up.) As a side note, Winnebago now includes some back wall storage in new Travato G builds.
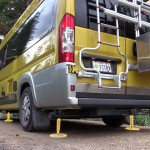 Installed E&P Leveling Jacks
OH MY GOODNESS! Of all the mods on Lance, I think this one may be my favorite. I have a thing for being level. And driving up onto blocks never gets it quite right. So we took a trip up to Advanced RV in Willoughby, Ohio to have the team there install these E&P leveling jacks on Lance. Now, we’re automatically level, and the van doesn’t rock. Which ROCKS! I can’t imagine owning an RV without a leveling system anymore. I’m spoiled!
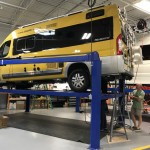 Installed VB Air Suspension
While we were at Advanced RV, why not go for The Full Monty? We also had the team there install VB Air Suspension on our ProMaster RV. Another total success. In addition to being the quietest, Lance is also the smoothest driving ProMaster RV I’ve ever been in. He’s the smoothest vehicle we own! You can learn all about the install here. And later, we were able to gather some data on the performance of the air suspension in this video. Another thing I’ll probably do to any RV going forward.
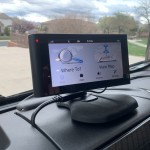 Proper wiring for the Garmin Nav
When we first got Lance, it took us less than two weeks to determine we hated the factory TomTom navigation system with a blinding fury. We pretty immediately replaced it with a Garmin Nuvicam system. But the Garmin had a specific cord that you had to use to get traffic updates. And that cord draped all over the dash. If you know me, you know that upset me. It bugged me for a couple years before I went into a car stereo shop and had them disassemble the dash and wire up a proper power source inside the dash. This is how it looks today. No drape-y cord.
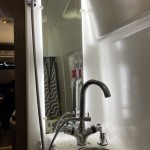
 New Thermostatic Bathroom Faucet
You’ve already seen how I modified the bathroom fixture to eliminate the cold water blast while showering. This mod was taking it to a whole other level! Plus, this faucet is quite a bit taller and you can actually get your hands under the sink now. I installed a faucet from Duda Diesel with a thermostatic mixing valve. Meaning… the faucet won’t let water pass that isn’t at your set temperature. It will adjust hot and cold to keep the temperature steady. Awesome! I can’t take credit for finding this faucet, but I sure do like having this installed. Plus – I was able to use the extra hole in the countertop for a soap dispenser.
 Activate Backup Camera with a Switch
The ProMaster has always had a backup camera. But it was never really convenient to look at it while you were driving. In fact, in Lance’s model year… you couldn’t see the backup camera while underway unless you opened the rear doors. (!) When we started towing a small trailer, I decided I wanted to see what was happening back there, so I figured out how to activate the backup camera with a switch. The programming in the dash has changed since then, so this solution may not work for everyone – but it sure works for us.
 Replaced the “Pictures of Wood” with Yellow
If you’ve ever removed anything from your “wood” RV’s walls, you’ve probably realized that it’s really just a “picture of wood” on a sticker. (Which, ironically, is stuck to wood… go figure.) Eventually, one of two things happened in Lance. Either a) I ruined one of the walls in the course of a mod and had to do something different; or b) Stef got tired of the pictures of wood and wanted to redecorate. We’re not saying, but either way, we sanded down the pictures of wood, and primed and painted them Lance Yellow!
 New BMS and Battery Upgrades
The one disadvantage to using prototypes and emerging technology is that it continues to advance. That’s continued to happen to lithium batteries since we installed our lithium system. After a while, we heard from the folks at Lithionics that there had been advances in their BMS, and that they also had the ability now to add more battery capacity in the same case space. This was too good to pass up, so we sent our battery back to Lithionics for a BMS and capacity upgrade. As a bonus, it came with their new, cool battery monitor display (shown here). I didn’t write anything up about this, but in the end, Lance now has a 7000 Watt-hour lithium battery.
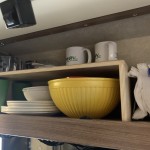 Installed Shelves in Galley
Here’s another project I didn’t really write anything about. After a while, we realized we could make a lot better use of the storage in Lance’s Galley if I just added a couple shelves. So I did! I added one shelf below the sink, and another shelf (shown here) in the overhead cabinet. Just like the drawers across the way, these shelves are lined with cork to keep things from sliding, and to cut down on rattles.
 Rolef Screen for Side Door
This is another one of those mods we wonder how we ever lived without. Nowadays, lots of Travato owners are installing these screens. But back in the day, I had to track down the owners of this screen company (whose screens I had seen on Pleasure-Way vans) and convince them to build a screen for the Travato. Lance received their prototype, and the rest is Travato history. This really is the best screen door ever in a van… once you’ve tried it, you’ll agree.
 Shortened Dinette Wall and Seat Cushion
This is a mod I never wrote anything up about, but probably should have because it makes a huge difference in the feeling of the Travato G floor plan. As it comes from Winnebago, the backrest and seat cushions on the Travato G are pretty darn tall. That makes the cushions able to be converted into a bed – which is nice for some. But we NEVER did that, so it was just weirdly tall cushions to us. I took our dinette seat cushions to an upholsterer to have them reshaped. While he was doing that, I cut down the wall behind the dinette to open up the space. The end result is a galley and dinette area that feels a LOT more open. If enough of you are interested in this, I’ll write it up and share some pictures (if I can find them).
 Reinforced Hitch for Towing
When we got our trailer, George, I knew we’d be towing a good bit. I also knew that there were issues with the Curt hitch on the Travato and the way that it was mounted. The problems are entirely due to torsional loads on the hitch from things like extended bike racks and StowAway boxes… but I wasn’t taking any chances. I took Lance into a local hitch shop and had them weld a couple of additional braces on to the hitch. You could pound on this thing with a sledge hammer now and it would be just fine.
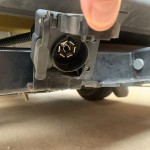 Conversion to 7 Pin Wiring for Trailer
The standard Travato comes with a 4-pin wiring harness to attach a trailer. That worked fine except for two issues. First – our trailer had a 7-pin connector! I didn’t want to be wiring up an adapter every single time I used the RV. The other problem was harder to fix. Our trailer has LED lights. Due to a weirdness with the wiring adapter, all of our trailer lights would glow faintly all the time… even when the vehicle was turned off. (I know, right?) I called the people at Curt who said it was a known issue with their adapter and LED lights. They recommended this trailer light converter to fix the problem. I installed it in place of the factory unit, and then ran the additional wiring to complete the 7 pin conversion. End result: properly working (and NOT working) 7-pin lights on the trailer.
 Installed Smart Plug
What’s a Smart Plug? It’s an improved way to connect your RV to shore power. I tested it out and it seemed to be a bit better, so I installed one in this video. As an added bonus… nobody wants to steal my shore power cord because the plug is different from everyone else’s!
 Stef’s Sticker Wall
This is entirely a Stef project! She did it when I was out of the country cycling, because she knew I’d never let her do an RV mod “unsupervised”. I have to say, it came out pretty nice, and it’s a great place for us to remember our voyages.
 Installed Water Bottle Holders Over Stove
Since Stef and I are cyclists, we’re always bringing water bottles along on our RV trips. Not the disposable kind… the bike kind. Well we never really had a good place to store them until I made this. Remember about 130 projects ago where I said I saved a mesh net to use on other projects? This was one of those projects! The water bottle holders are just pieces of that mesh netting stapled to the cabinet above, after I removed the glass splash guard. They were really easy to do. I would NOT have done this project if I hadn’t replaced the propane stove with an induction one. Probably should have written this one up for fellow cyclists. Next time…
 Installed Remis Cab Shades for ProMaster
When Remis FINALLY came out with their cab shades for the ProMaster, I had to have them! I picked some up from Winnebago, and installed them there on the rally grounds in this video. It was super easy to do, requiring only a screwdriver. Funny thing though… after rolling with them for a year and a half, we decided we didn’t like them anymore and so we removed them.
 Venting for Lithium Battery
Everyone worries about their lithium battery getting too cold. We have Lance’s inside, so we don’t really think about that much. We also never thought about it getting too hot, for the same reason… it’s inside. But apparently, that was a mistake. After we experienced a thermal shutdown event on our battery, I decided the sealed-up battery cabinet needed some venting. You can watch me install it in this video. The good news is it seems to have worked, and the battery has never gotten anywhere near that hot again. (About 130 F if I recall.)
 Installed Maxx Shade Plus Vent Cover with Light
For years, we’ve used a snap-on vent cover from our friends at Advanced RV. But using that means we always have to carry something extra with us when it’s not installed. So when the folks at AirXcel came out with the Maxx Shade, I got one. You can watch the install in this video. I got the one with the extra LED lights in it because I’m partial to a ghoulish glow on my forehead. This one doesn’t have quite the insulating performance of its predecessor by itself, but it’s very easy to add insulation above it to make it better. No complaints on this one over a year in.
 Installed Dual Battery Solar Charge Controller
Solar power on a rig with a large lithium battery like Lance is nice, but it’s not critical. But eventually I realized that something that IS critical is keeping the chassis (vehicle) battery charged up while the RV is in storage. On a trip to Oregon, we visited with the folks at Zamp Solar who showed us how to install a Dual-Battery solar charge controller. See the pros install it in this video. So now Lance’s solar array keeps not just the house battery, but also the vehicle battery charged up… and I don’t have to do a thing. My kind of charger!
 Installed UltraGauge Blue
OK. The actual install of this thing took only minutes, but getting it working and reporting data on Lance made it a project. Without getting too far into it, the temperature gauge in the ProMaster does NOT show you the temperature. That can lead to bad things… some of which happened to Lance. Anyways, if you want to know what the temperature in your engine really is, then you need some kind of external monitor. This one is low-key, and plugs into the OBDII port on your vehicle. Watch the video to learn more!
 Installed Another New Air Conditioner
Yeah, so I think this was actually like the third or fourth air conditioner we’ve installed on Lance. We removed our Dometic Penguin and installed a Coleman Mach 10 NDQ air conditioner. Why? Because the Q stands for Quiet! And this air conditioner is considerably more quiet than any of the other ones we’ve had. Don’t believe me – watch the video! (And then you too can learn the “arms-length, waist-high” standard for RV AC noise testing!)
 Adjusted and Sealed Rear Doors
If you’ve ever driven your ProMaster-based RV down a dirt road and noticed a whole lot of dust and dirt inside your back doors – this mod is for you. I went about adjusting and sealing up the rear doors in the least intrusive and simplest way possible. The results so far have been nothing short of fantastic – I’ve yet to notice any junk inside the rear doors. It’s worth a watch – check it out!
 Rear Cabinets – Third and Final Try
This would be the third time I’ve attempted to mod storage on the rear wall of the Travato G, and this time, I think I got it right. With these cabinets in place, we actually have storage for items we use back there, freeing up space in the rest of the RV for things like a vacuum! Stef thinks this mod was all about the vacuum, but it wasn’t. I really just wanted to see how far I could push the storage in the back. I think I’ve gone about as far as I can with it, so I won’t be doing it a fourth time. Maybe.
 Backlight for Bathroom Mirror
Sure, this looks like a makeup mirror, and Stef loves it. But the real driving force behind this mod was that I wanted to be able to see to shave!! This mod turned out much cooler and trendy looking than I could have imagined, and we’re both thrilled with it.
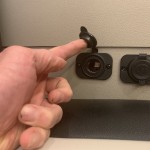
 Added Bathroom Pump Switch
If you’ve ever had a “Honey, can you turn on the water pump” moment while you’re stuck in the bathroom – you’ll appreciate this mod. While I had the back wall and the bathroom all torn up, I decided to add a lighted switch to the bathroom wall so you can turn on the pump without walking to the control panel. Travatos should come this way from the factory if you ask me.
 Removed Remis Cab Shades
Yeah, I installed these things twenty mods ago and thought they were awesome. After using them for a year and a half, we thought they were less awesome, and I’ve removed them. Why did we think they were less awesome? Well, they take up quite a bit of your windshield real estate, which doesn’t affect driving, but still… Also, after a while, they tend to rattle while you drive. And finally, they leaked a good bit of light – you couldn’t see in, mind you. They just leaked light. So we’ve come full circle and are now using Vanmade Shades all around the RV.
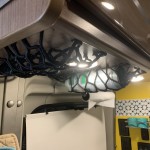
 Insulated the Pizza Oven
The “Pizza Oven” is a known hot spot inside the Travato. In the summer, you can actually damage things by storing them up there if you’re not careful. So…. after dealing with this for almost 5 years, I finally got around to doing something about it. First, I removed the headliner in this video (which was a beast). Then, I insulated and reinstalled the headliner in a follow-up video. The whole thing took two weeks of weekends, but I’m glad I finally got it done.
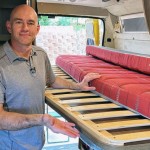 Added a Slat Bed
A slat bed does two things in an RV setting. First, it provides a layer of spring-like support underneath your RV mattress (since it’s probably not resting on a box spring). The other thing it does is provide for some airflow underneath the mattress so it won’t get… funky. We actually already had the Froli Sleep System in Lance which did those two things. But the Froli system did something else: it snagged the sheets constantly. That eventually did it in. I ripped it out and replaced it with a slat bed (slats courtesy of Ikea) in this video.
OK. Wow. That’s 85 mods now and still counting! I think that list kind of says something. Like, “Get a life, James!” Or maybe it tells the story that I’m not happy unless I’m tinkering with something? Maybe it says something about what it takes to make a place – any place – your own? Maybe it says I’ve just got too much time on my hands? Whatever it says, it sure is interesting to look back on. What a long way Lance and I have come together!
I’ve still got a couple mods I’m thinking about, so this list may grow yet. Hopefully you found the list fun, and maybe got a little inspiration for some mods of your own.
At least, I hope you liked it. Because it took me like two weeks to put together.
Cheers!


What tires do you use on Lance?
We have Michelin Defender LTX for summer and Bridgestone Blizzak for winter.
The Defenders have been replaced by Agilis for Michelin.
Concerning your Reinforced Hitch Mod.
Can you send a few pictures of your Mod.? or a drawing?
Did you disconnect your batteries before you welded? I have seen a warning about doing so. Could damage chassis or lithium’s.?!
I have a StowAway cargo box & it bounces alot…
Thanks
Nothng much to show or share, really.
I just took Lance to a custom hitch shop and asked them to reinforce the hitch. They seemed to know what to do.
In the end, it is just a couple of supports welded onto the hitch that attach further back the frame rails. It keeps the hitch from rotating by securing it at a second point.
If a hitch shop didn’t immediately and intuitively know what needed to be done, I’d probably go someplace else.
James, I am currently desperate for a mod to do to McFly! You have taught me so much about the Travato along your mod-history. I am thankful for your beautiful brain and your willingness to share what comes out of it! 😉
I’m sure you’ll figure out something to mod, amiga.
Regarding the thermostatically controlled faucet you installed in the bathroom. Does that eliminate the need for the hot water check valve you’d previously installed?
Really enjoy all the information and videos you’ve posted over the years. We’re picking up our new Travato 59G next week and I’ll be installing the thermostatically controlled faucet and wanted to know if I’d need the hot water check valve too.
I left our check valves in place since they were already there.
I did remove the shutoff valve. The faucet doesn’t leak, and adjusting the flow does not change the temperature, so there was no use for it. During showers, we just use the faucet’s flow knob to shut off the water.
I’ve never thought about removing the check valves.
In theory, the thermostatic mixing valve would adjust to provide water at the correct temperature. But looking at schematics, I can see there could be the potential for backflow when the faucet is “off”.
If there were backflow, then the thermostatic valve might not be able to adjust the temperature quickly enough to provide a constant temp.
Were I re-doing this project, I would add them – just to be safe. They’re not super expensive, and the extra work required is minimal.
James and Stef,
Thank you very much for the mods and the encyclopedia. Much useful info here for future mods to incorporate into our 2016 59G. 8,000 miles and approx. 40 nights since purchase during July, 2019. Our travels and those of many others are now paused as our country works through the Covid-19 Pandemic.
We have made numerous mods to our T with, I believe, essentially no overlap with regard to the mods that you have made. What is best manner in which to convey our mods (and for others to convey their mods) to you so that you can consider for Lance?
Safe travels when you resume.
Rick F.
Glad you liked the list!
Since I’ve already created this (rather long) list, I think it would be best to keep the mod info in one place. So, if you or anyone else would like to suggest a mod, feel free to do so in the comments here.
That way, even if I don’t implement a mod, anyone else reading the post could potentially find it and use it themselves. (Whereas, if it was sitting in my email, nobody else would ever see it.)
If I complete another mod, I’ll add it to the list above.
If it gets out of hand, then I may have to think of something else, but let’s start with that.
James,
Thank you. I just completed another mod yesterday evening (solenoid and metal enclosure enhancement) and will start posting mods in the comments.
Rick
Thanks for putting this list together, been following your trail of mods for a long time but here I found several that you had not previously posted!
James, you are the Massssssster, to paraphrase the words of the Toy Story Alien.
Now I’m absolutely perplexed by why Travatos don’t come with an LED overhead bath light as standard.
It is interesting to see where the modding odyssey takes one. You had a blanker slate than most of the rest of us. We’re glad we didn’t have to do some of the things you did.
Like you, we’ve cooled on the Remi Blinds. The more we use them the more we think they’re an overengineered answer to the wrong question. They’re not great blinds and they act as chimneys that efficiently vent sun-heated air between the windshield and blind straight into the coach.
It’s great to see all the mods that became standard over the past 6 years on the Travato. Now it’s time for WGO to do a serious refresh/rethink that integrates the ideas owners have come up, plus some, into a 21st century design. The Boldt and now the Solis are showing the way forward right now, with milled ply interior partitions and far less “rolling house” acoutrement, streamlined digital age entertainment packages, and maximize space utilization and storage.
With powered screwdriver in hand, I wish you Happy Travels (and Modding)
Thanks, Shaun!
It’s late in the game with Lance and I’m running out of projects…